> ## Documentation Index
> Fetch the complete documentation index at: https://help.mockspark.com/llms.txt
> Use this file to discover all available pages before exploring further.
# Team Management
> Easily customize role permissions to keep your team organized and working smoothly
## Introducing Team Management
Our Team Management feature is designed to help you organize your teams more efficiently and collaborate with ease. With this tool, you can define custom roles, assign the right permissions, and add team members with specific responsibilities, creating a permission structure that fits your organization’s needs.
This feature allows you to:
* Clearly define roles and responsibilities to boost collaboration.
* Control access levels to protect sensitive information.
* Monitor and adjust your team structure as your business grows.
In the following steps, we’ll walk you through how to create roles, add team members, and make the most of Team Management to streamline your daily operations.
## Create a New Role
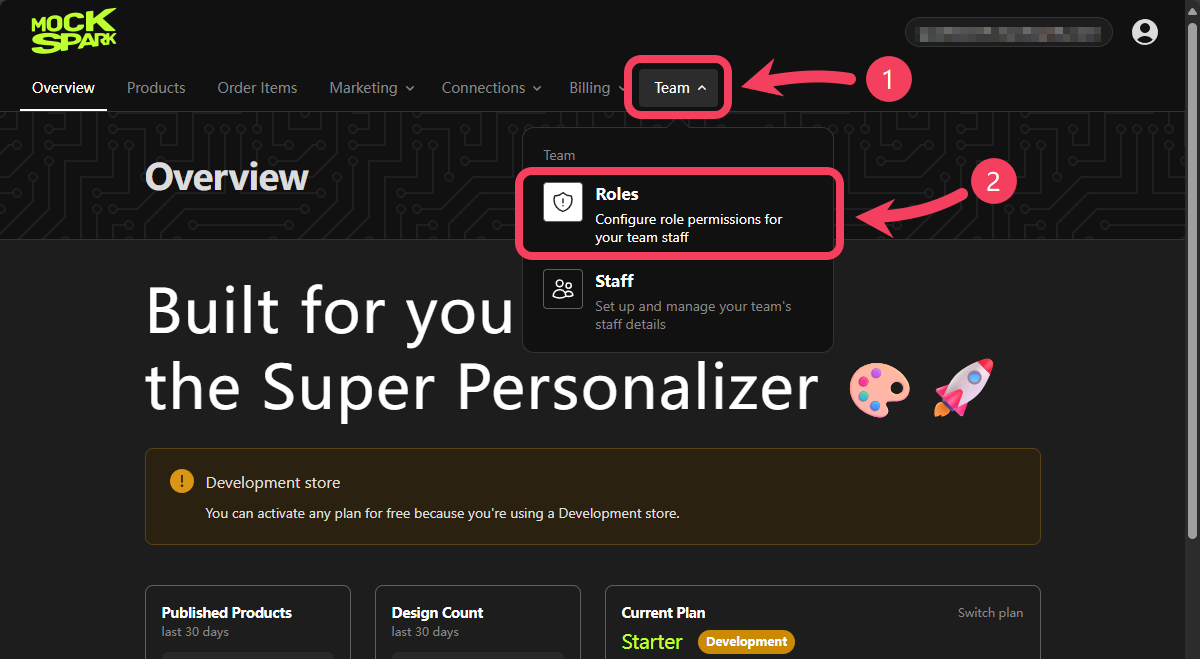
1. Select **Team** section from the top navigation bar.
2. In the dropdown menu, click on **Roles**.
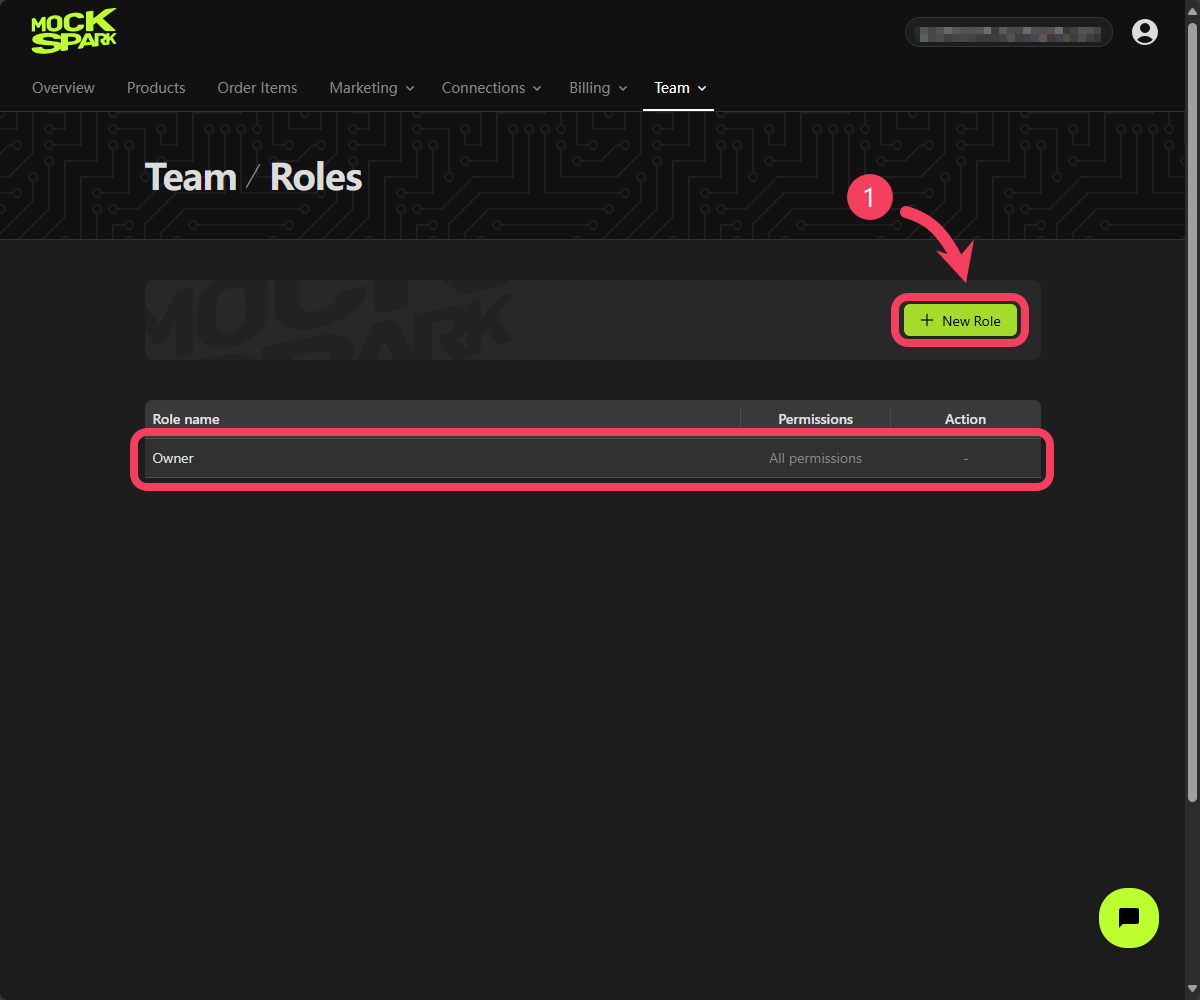
 The **Store owner** refers to the Shopify admin account for a given store. Our system automatically creates a role called `Owner` for this account. This role has full permissions by default and cannot be edited or deleted.
Click **New Role** button to create a new role.
The **Store owner** refers to the Shopify admin account for a given store. Our system automatically creates a role called `Owner` for this account. This role has full permissions by default and cannot be edited or deleted.
Click **New Role** button to create a new role.
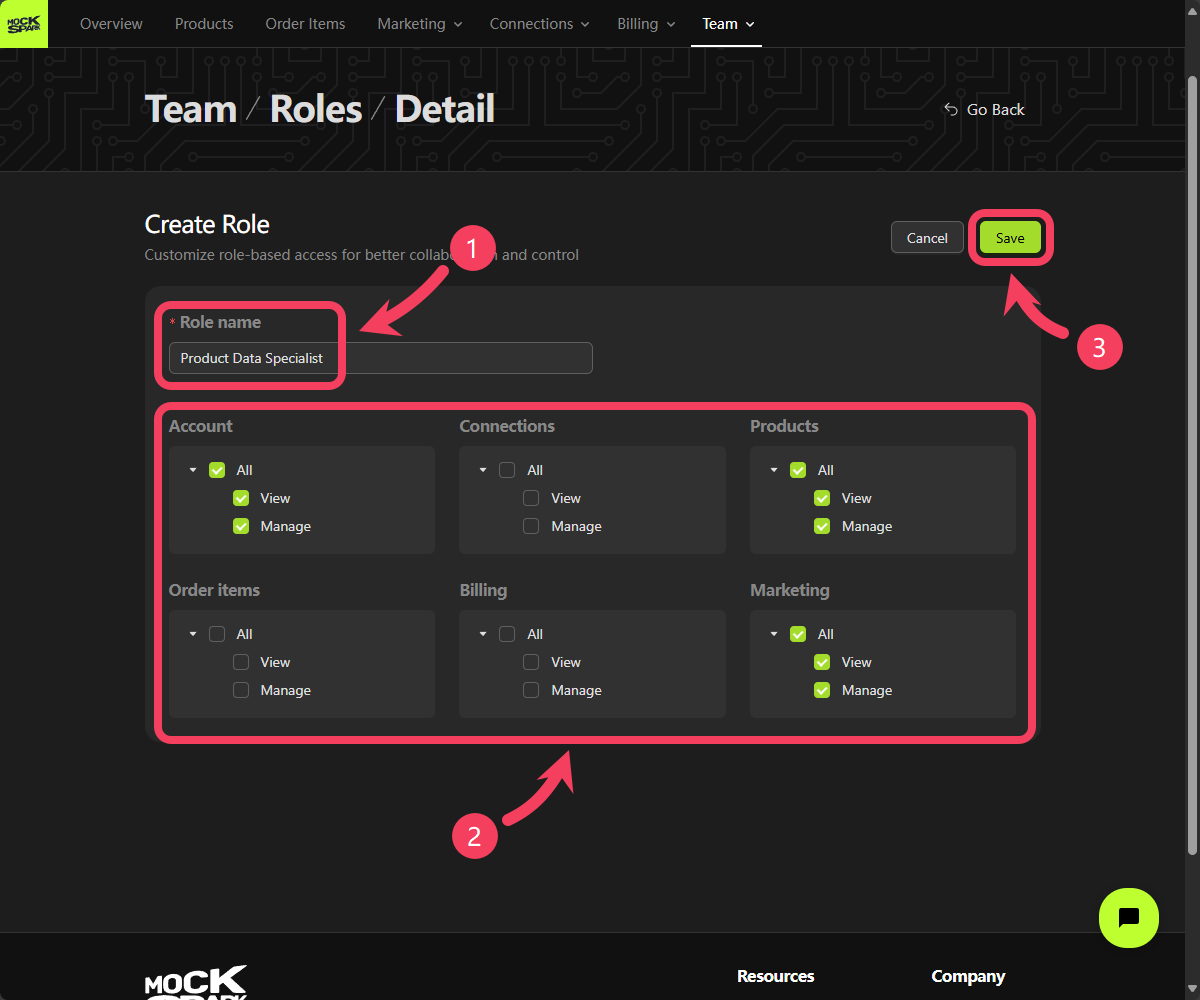
 1. Enter a name for the new role in the **Role name** field.
2. Select the **Permissions** you want to assign by checking boxes within the six permission sets.
Each permission set includes two access levels: `View` and `Manage`. The `View` permission allows users to see the data, while the `Manage` permission grants the ability to edit it.
* The **Account** permission set includes the most essential permissions for any role. In most cases, this should be selected for all roles; without it, users may not be able to perform basic account-related actions.
* The **Connections** permission set determines whether a user can view and manage features within the `Connections Section`.
* The **Products** permission set controls whether a user can access and manage features within the `Products Section`, such as creating new products and publishing them to your store.
* The **Order Items** permission set determines whether a user can view and manage features within the `Order Items Section`, such as reviewing and fulfilling order items.
* The **Billing** permission set controls whether a user can access and manage features within the `Billing Section`, such as viewing usage and purchase data, upgrading the subscription plan.
* The **Marketing** permission set determines whether a user can view and manage features within the `Marketing Section`, such as accessing and editing resource collections like pictures and other media.
3. Click **Save** to create the role.
1. Enter a name for the new role in the **Role name** field.
2. Select the **Permissions** you want to assign by checking boxes within the six permission sets.
Each permission set includes two access levels: `View` and `Manage`. The `View` permission allows users to see the data, while the `Manage` permission grants the ability to edit it.
* The **Account** permission set includes the most essential permissions for any role. In most cases, this should be selected for all roles; without it, users may not be able to perform basic account-related actions.
* The **Connections** permission set determines whether a user can view and manage features within the `Connections Section`.
* The **Products** permission set controls whether a user can access and manage features within the `Products Section`, such as creating new products and publishing them to your store.
* The **Order Items** permission set determines whether a user can view and manage features within the `Order Items Section`, such as reviewing and fulfilling order items.
* The **Billing** permission set controls whether a user can access and manage features within the `Billing Section`, such as viewing usage and purchase data, upgrading the subscription plan.
* The **Marketing** permission set determines whether a user can view and manage features within the `Marketing Section`, such as accessing and editing resource collections like pictures and other media.
3. Click **Save** to create the role.
 ## Invite a Team Members
Once you’ve confirmed that the new role has been successfully created, you can move on to adding a team member.
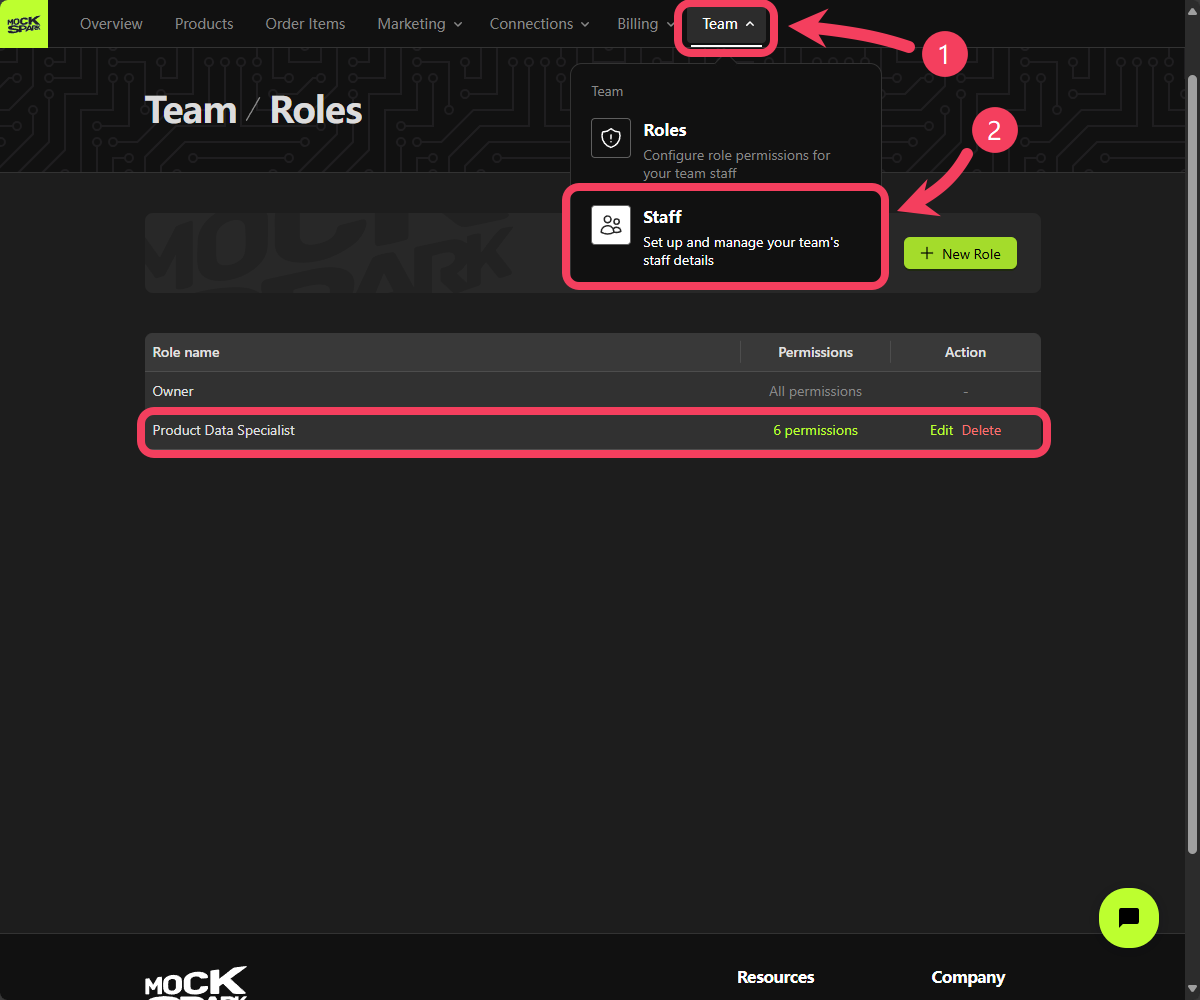
1. Select **Team** section from the top navigation bar.
2. In the dropdown menu, click on **Staff**.
## Invite a Team Members
Once you’ve confirmed that the new role has been successfully created, you can move on to adding a team member.
1. Select **Team** section from the top navigation bar.
2. In the dropdown menu, click on **Staff**.
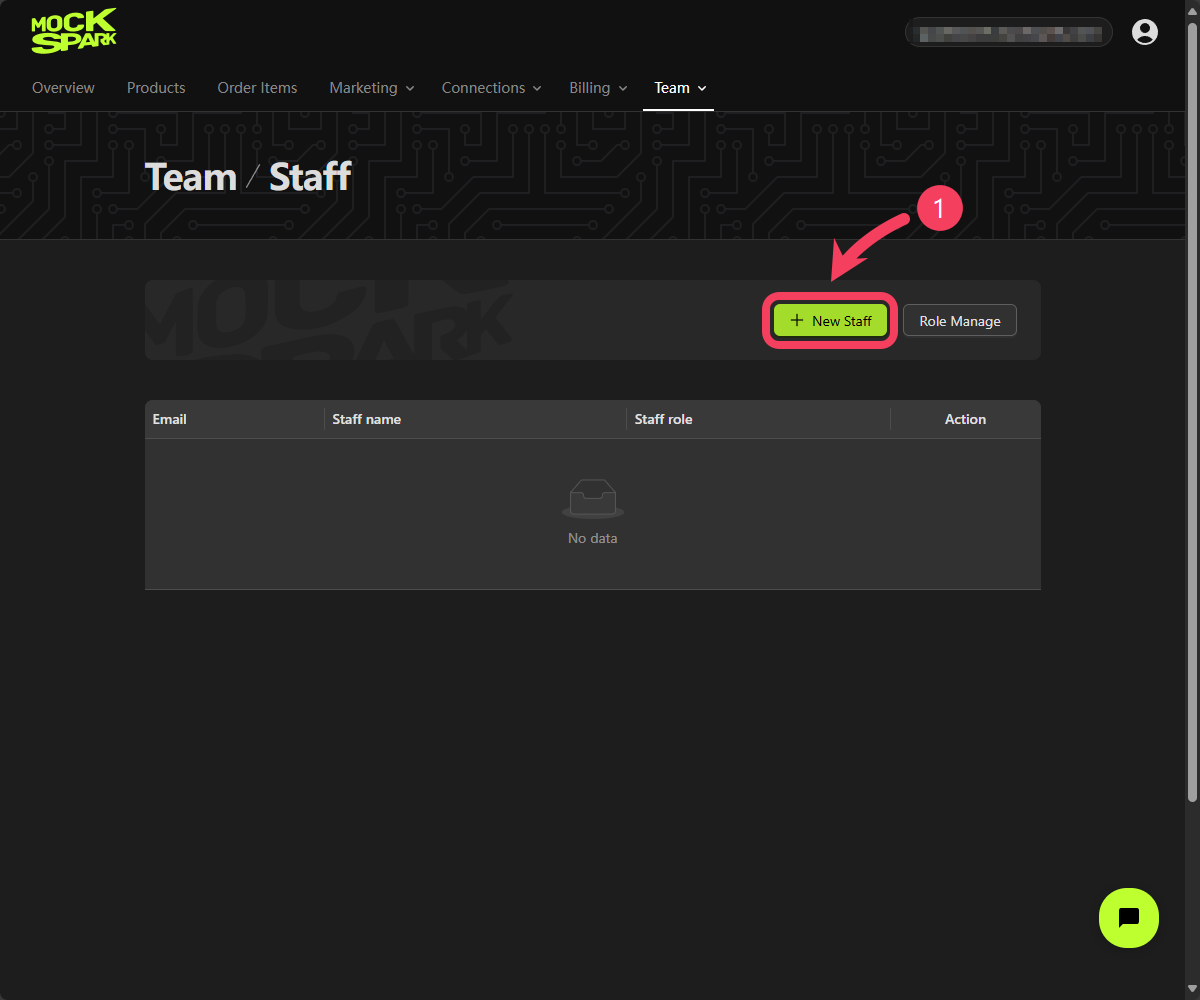
 Click **New Staff** button to create a new team member.
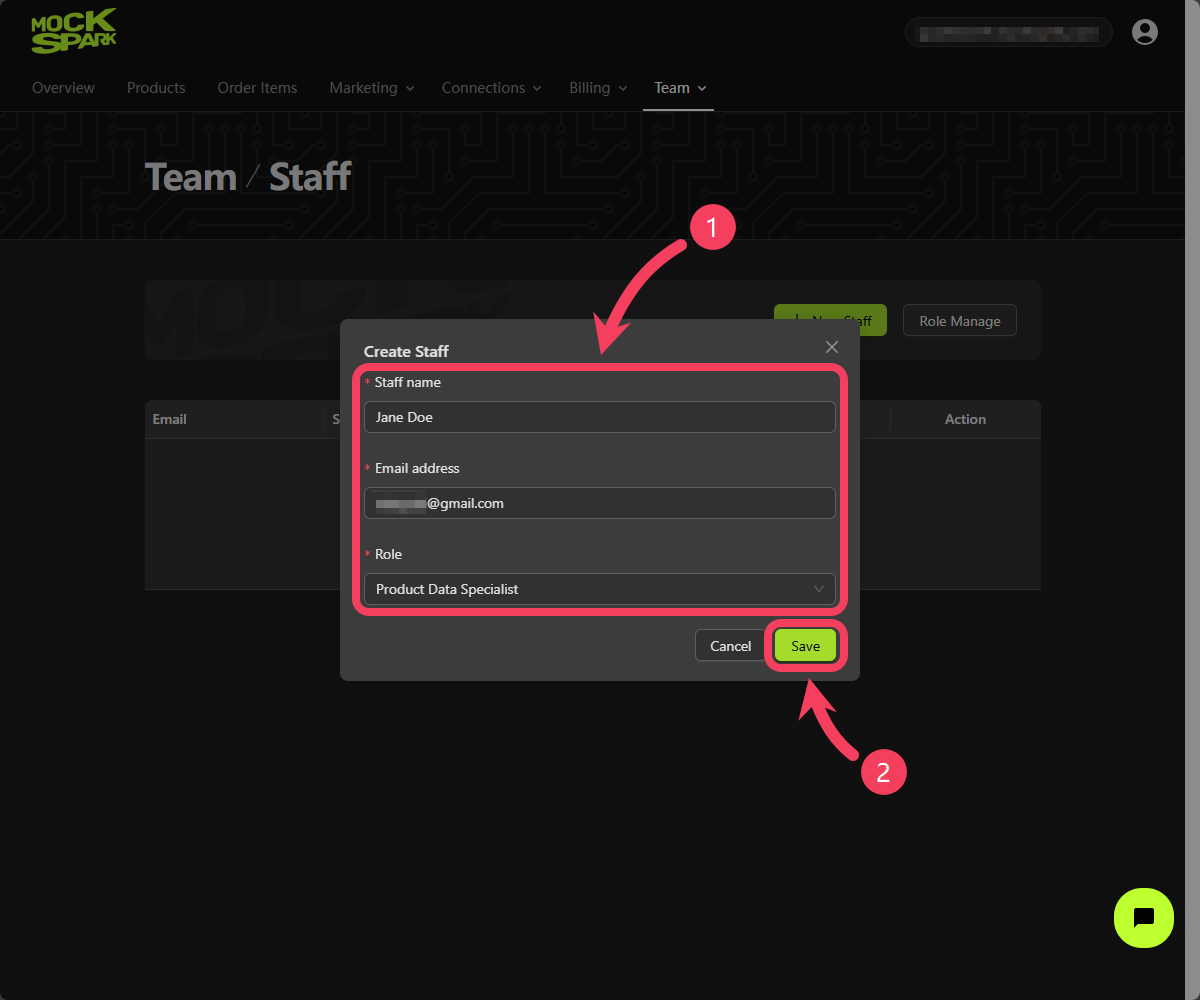
 1. In the dialog box, enter the new member’s `name`, `email address`, and assigned `role`.
2. Click **Save** to add the new team member.
1. In the dialog box, enter the new member’s `name`, `email address`, and assigned `role`.
2. Click **Save** to add the new team member.
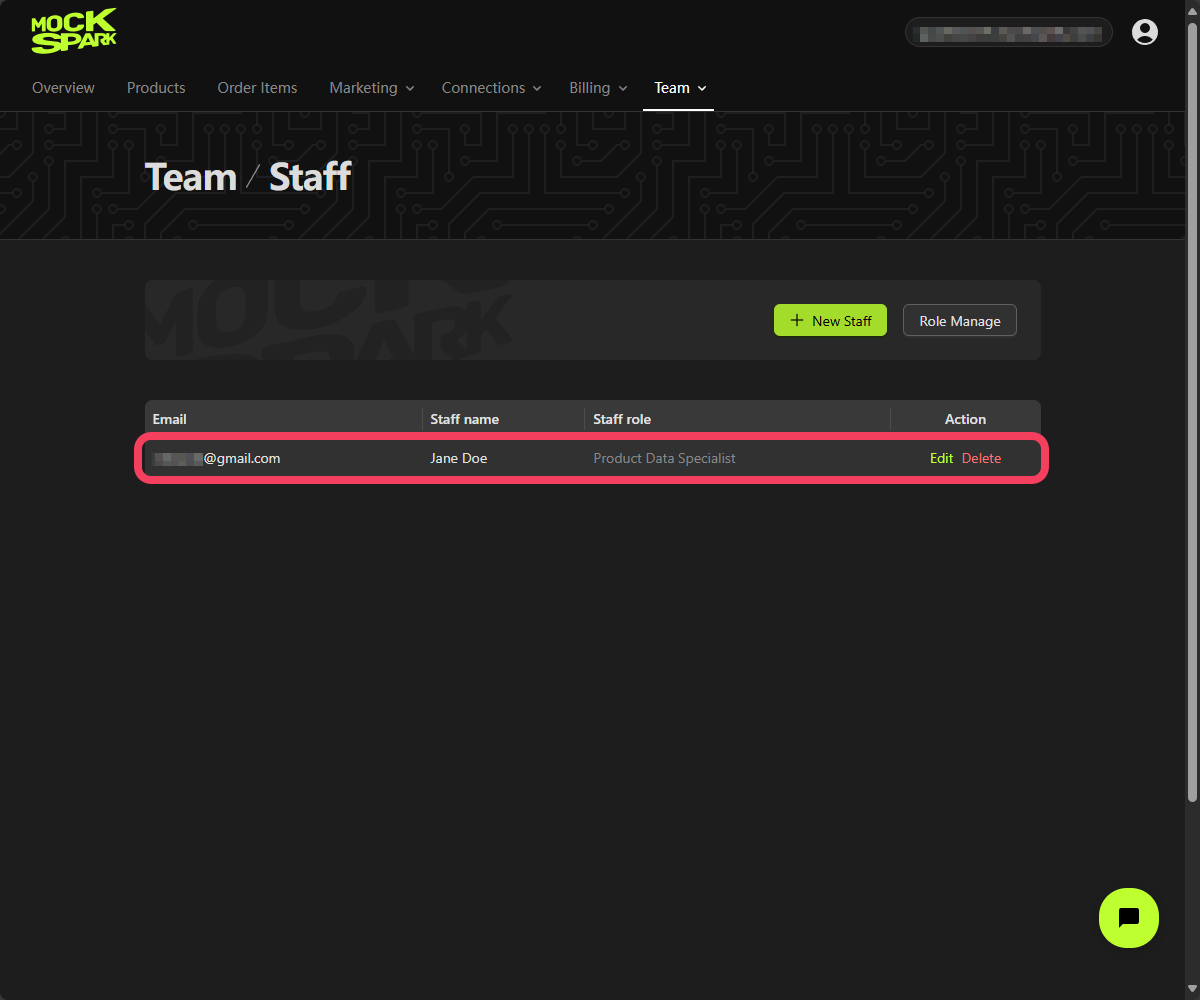
 In the **Staff** table, you’ll see the newly added team member listed. At the same time, the system will automatically send an invitation `email` to that staff.
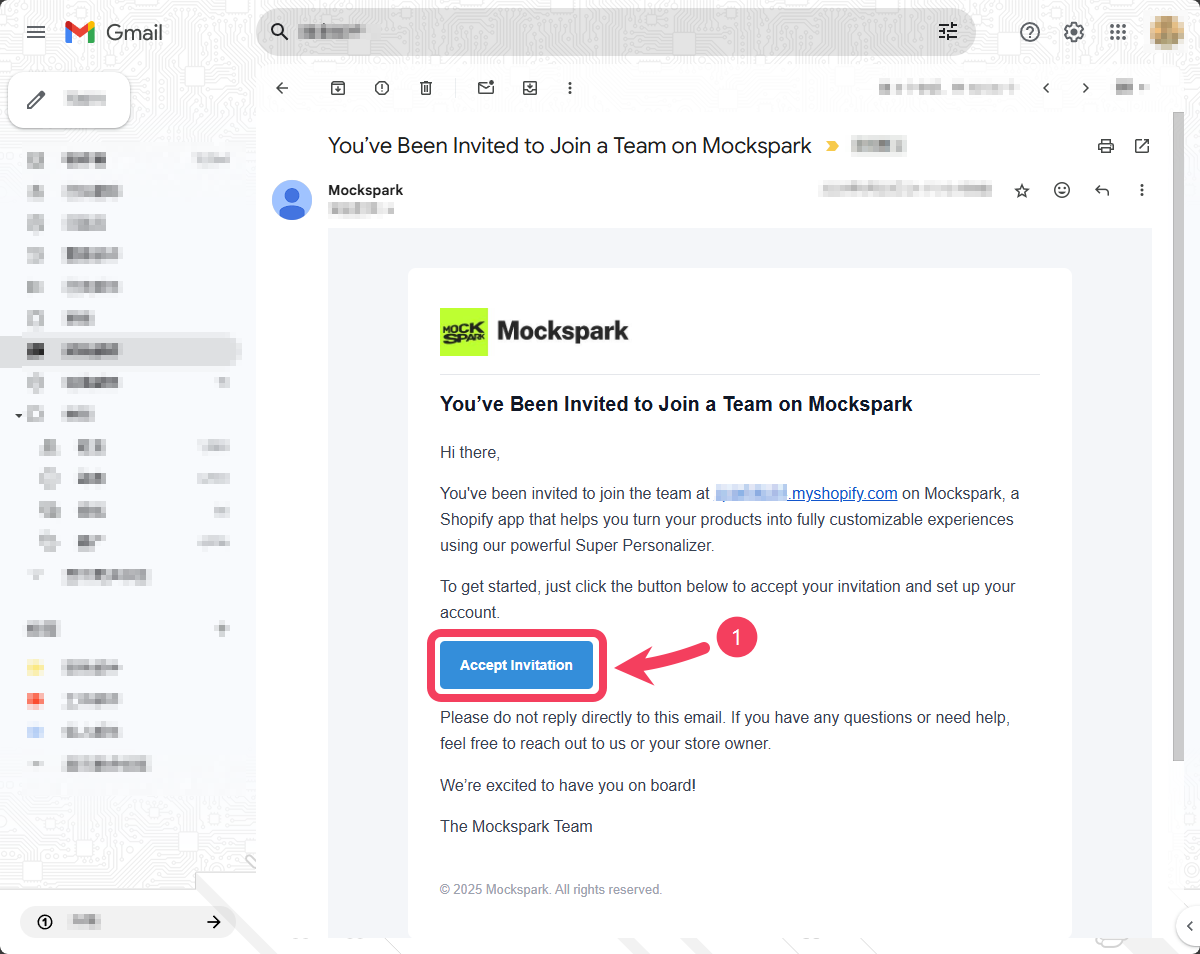
 Once the invited team member clicks **Accept Invitation** in the `email`, they will be redirected to the MockSpark account activation page.
The email may take a few minutes to arrive, so please be patient. If you haven’t received it after 15 minutes, check your spam or junk folder. You can also resend the invitation if needed.
Once the invited team member clicks **Accept Invitation** in the `email`, they will be redirected to the MockSpark account activation page.
The email may take a few minutes to arrive, so please be patient. If you haven’t received it after 15 minutes, check your spam or junk folder. You can also resend the invitation if needed.
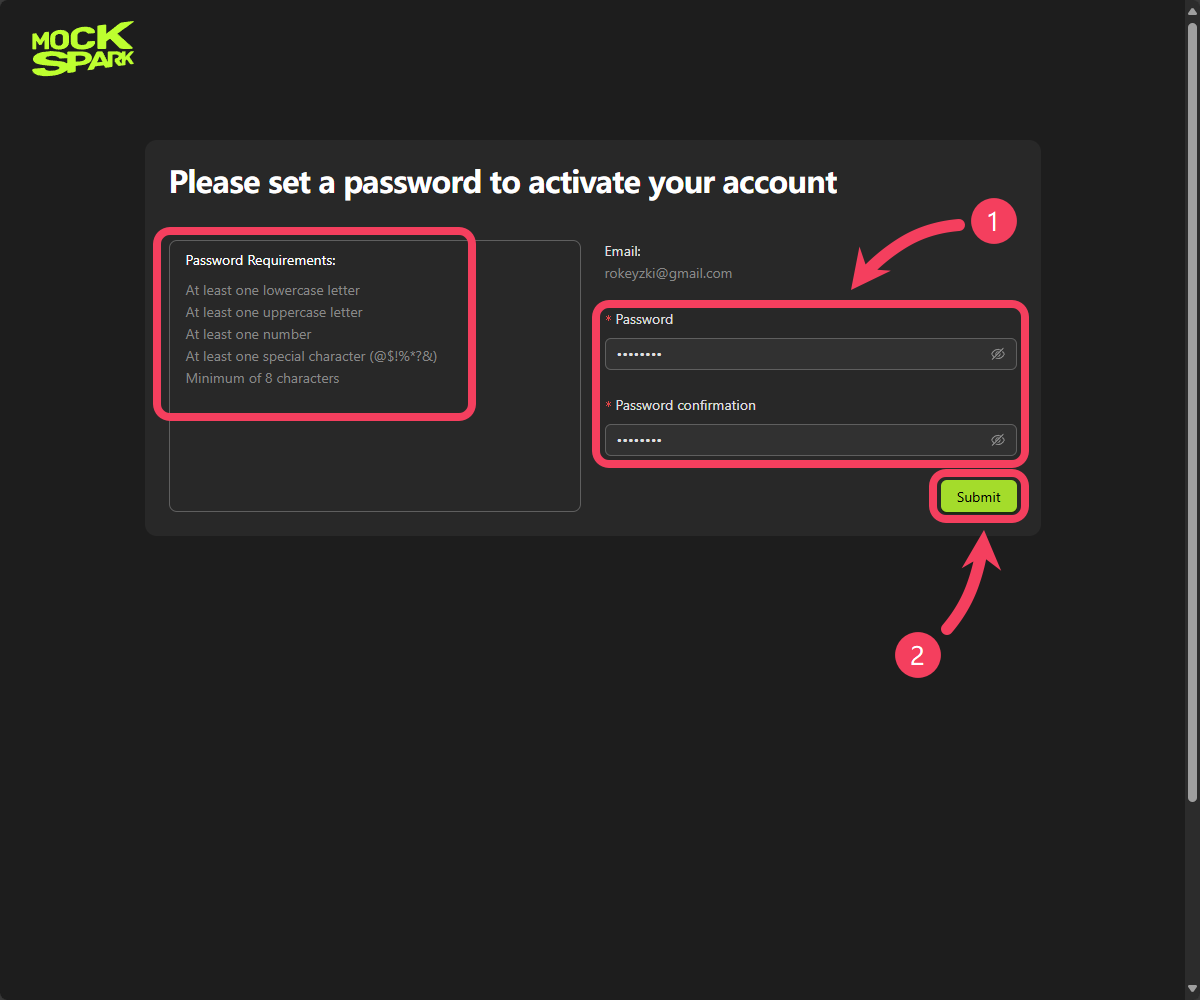
 1. On the account activation page, the invited team member can set their **Account Password**, which will be used for future logins. The password must meet the requirements shown on the left side of the screen.
2. Click **Submit** to complete the account activation process.
1. On the account activation page, the invited team member can set their **Account Password**, which will be used for future logins. The password must meet the requirements shown on the left side of the screen.
2. Click **Submit** to complete the account activation process.
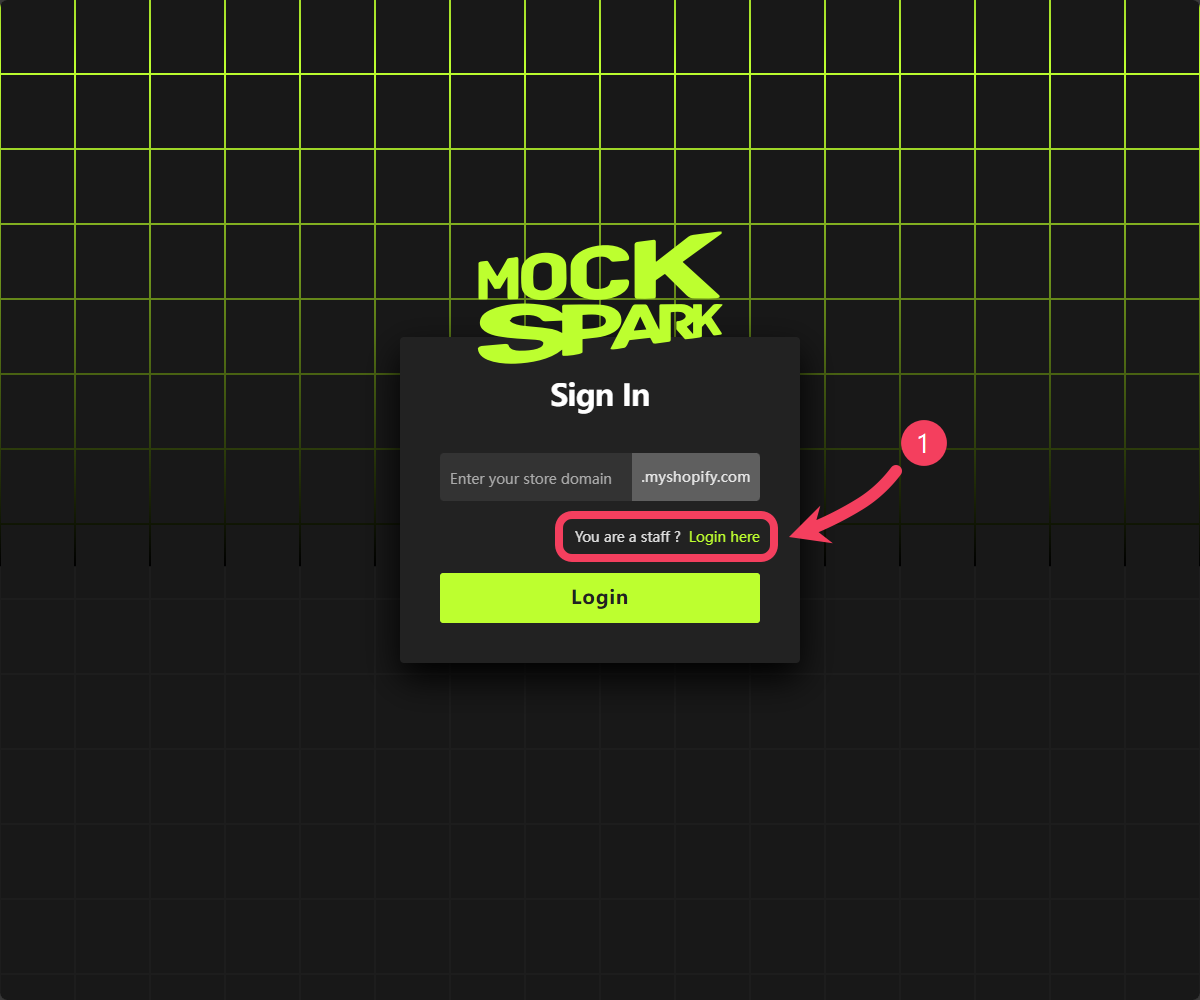
 After the team member successfully activates their account, they will be redirected to the login page. On that page, look for the text that says `"You are a staff? Login here"` and click it to switch to the **Staff Login** view.
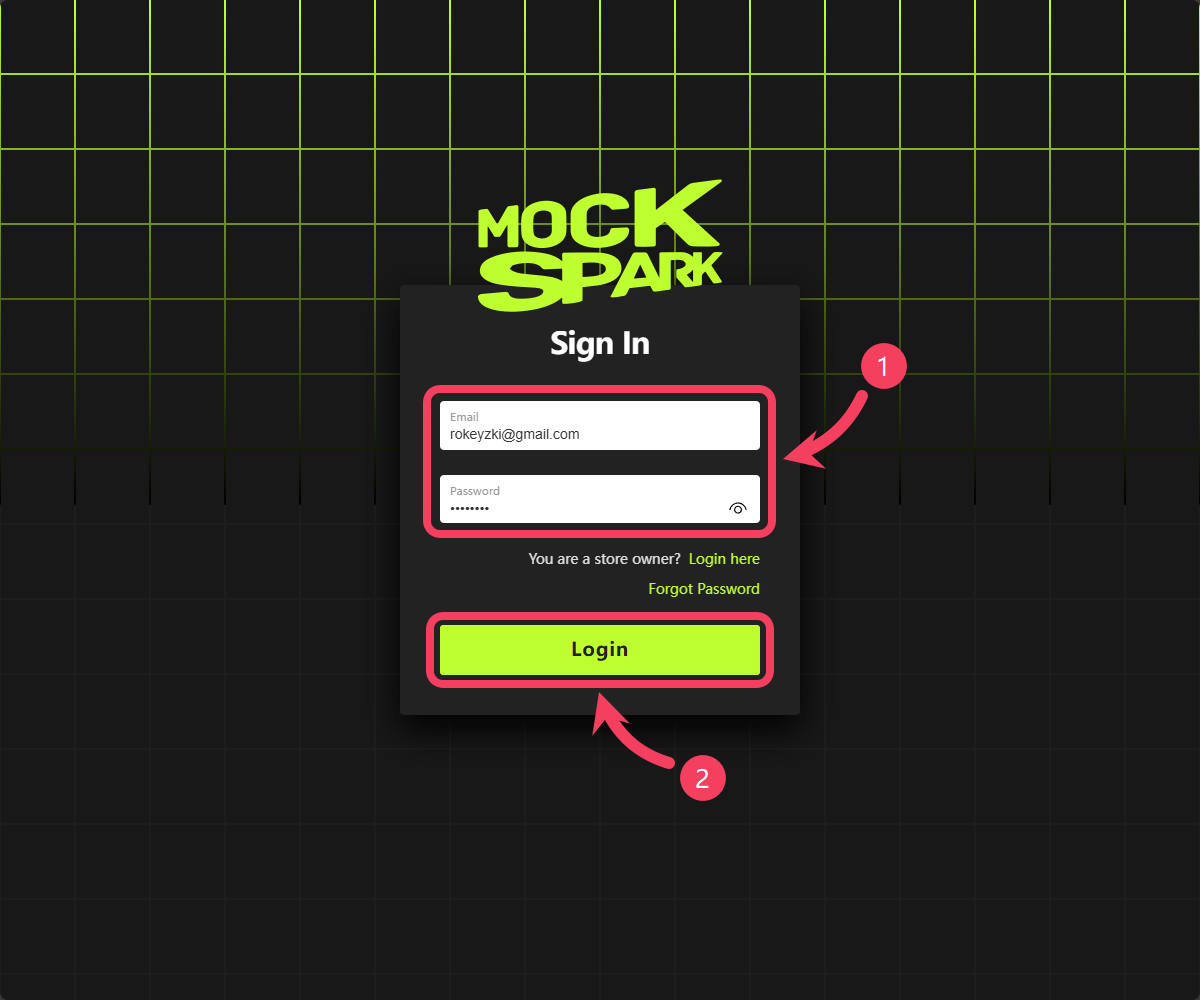
 1. On the **Staff Login** page, team members who have completed account activation need to enter their `email address` and `password`.
2. Click **Login** to access MockSpark.
1. On the **Staff Login** page, team members who have completed account activation need to enter their `email address` and `password`.
2. Click **Login** to access MockSpark.
 ## How Can Staff Reset Their Password?
If a team member wants to change their password, they can follow these steps:
This feature is exclusively for team staff members. Store owners should use Shopify OAuth for login.
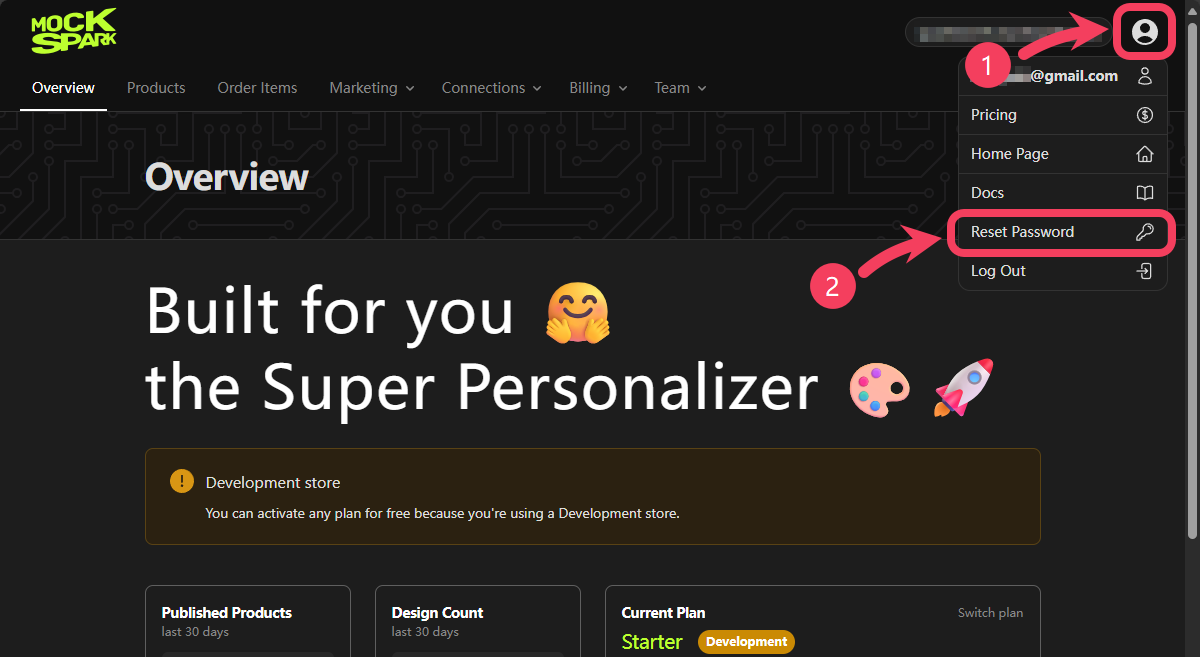
1. After logging in to MockSpark, click the profile icon in the top-right corner of the page.
2. Select **Reset Password** from the dropdown menu.
## How Can Staff Reset Their Password?
If a team member wants to change their password, they can follow these steps:
This feature is exclusively for team staff members. Store owners should use Shopify OAuth for login.
1. After logging in to MockSpark, click the profile icon in the top-right corner of the page.
2. Select **Reset Password** from the dropdown menu.
 1. On the reset password page, team members can set a new password for their account. The password must meet the requirements listed on the left side of the screen.
2. Click **Submit** to confirm and update the password.
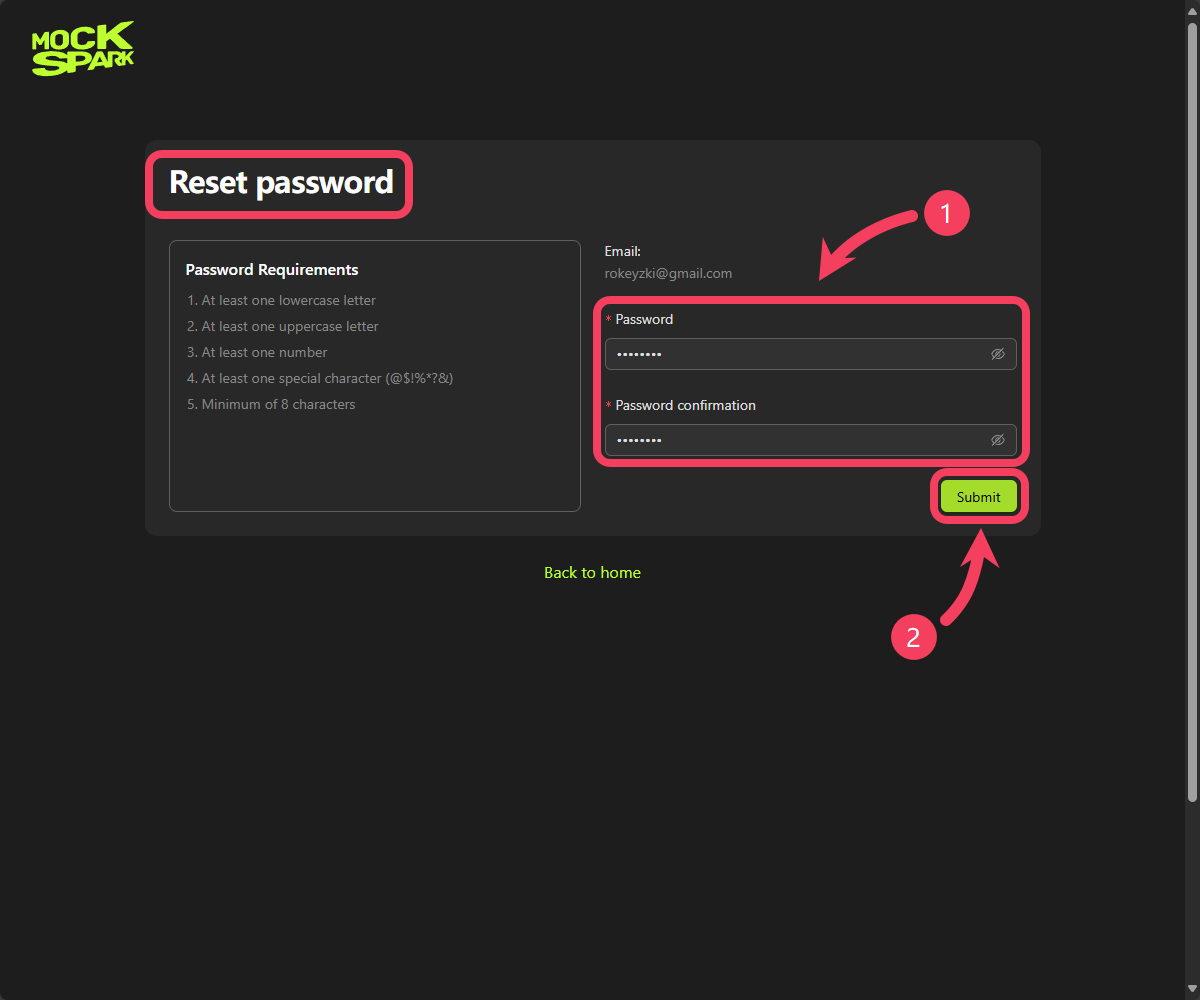
1. On the reset password page, team members can set a new password for their account. The password must meet the requirements listed on the left side of the screen.
2. Click **Submit** to confirm and update the password.
 If a team member forgets their password and is unable to log in, they can reset it by following these steps:
On the login page, switch to the staff login view and click **Forgot Password**.
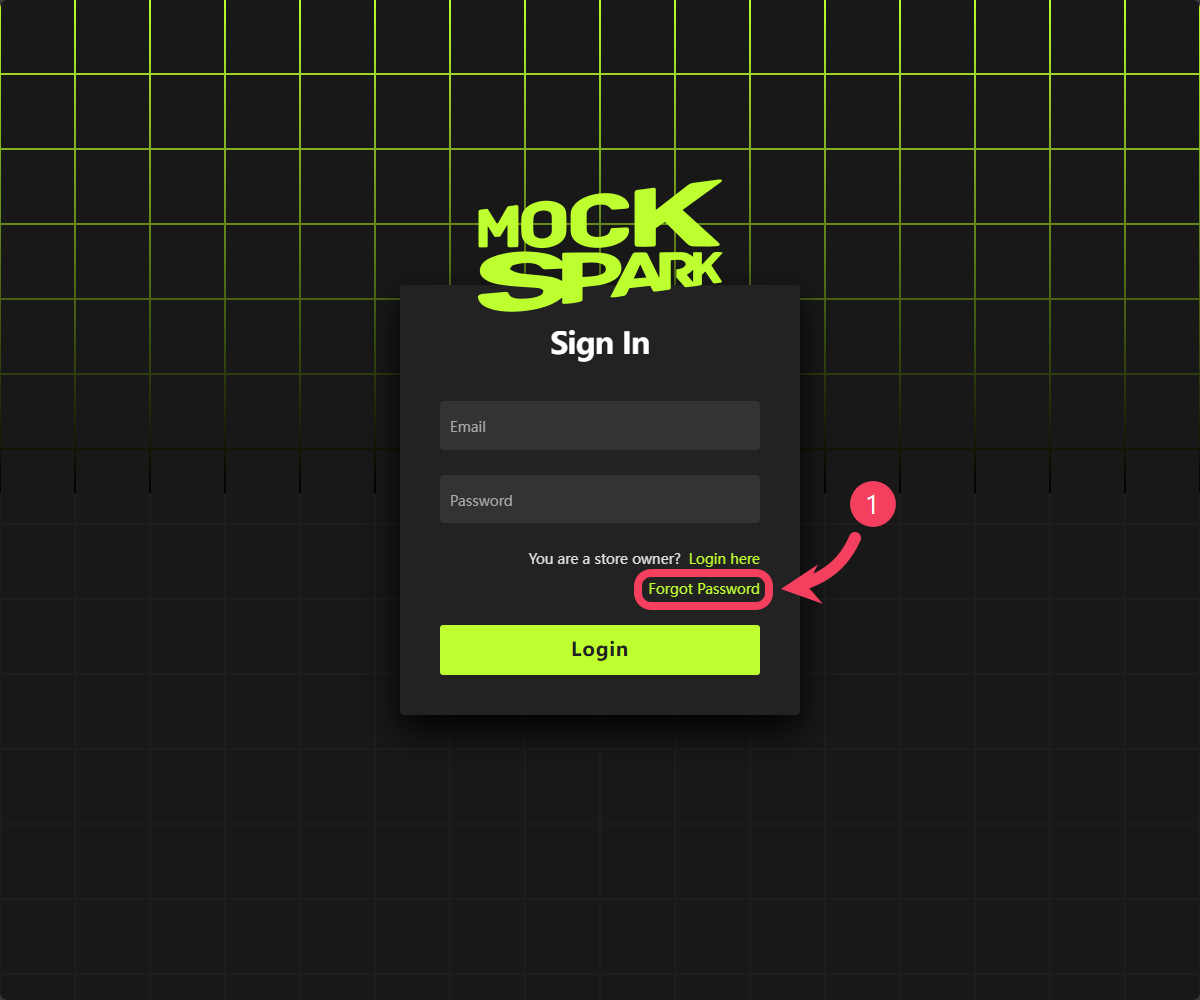
If a team member forgets their password and is unable to log in, they can reset it by following these steps:
On the login page, switch to the staff login view and click **Forgot Password**.
 1. On the reset password page, team members need to enter the `Shopify domain` of their store along with the `email address` associated with their account. A password reset confirmation link will be sent to that `email`.
2. Click **Submit** to send your request.
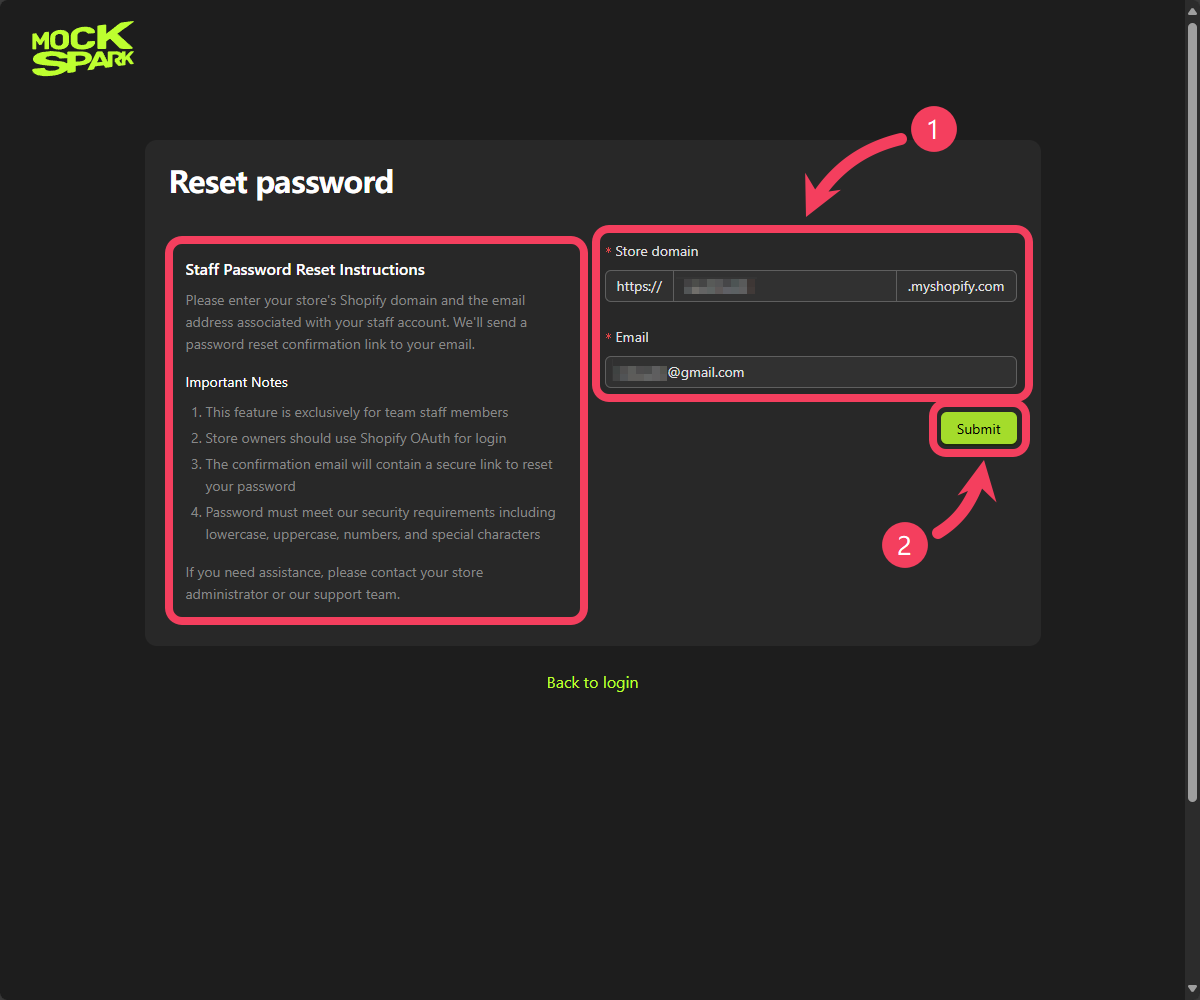
1. On the reset password page, team members need to enter the `Shopify domain` of their store along with the `email address` associated with their account. A password reset confirmation link will be sent to that `email`.
2. Click **Submit** to send your request.
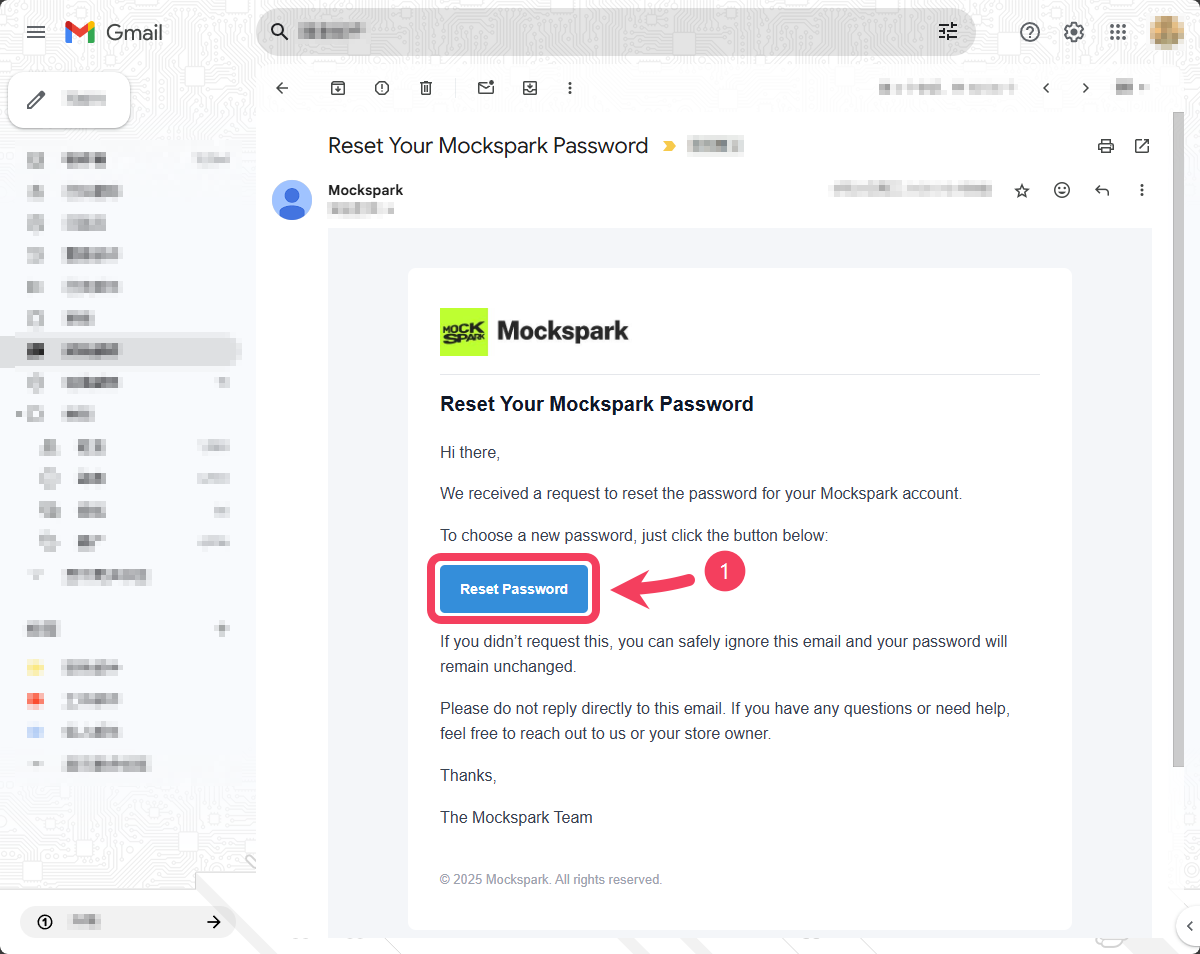
 If everything is correct, the team member will receive an email with a link to reset their password. By clicking the **Reset Password** button in the email, they will be taken to a page where they can complete the password reset process.
The email may take a few minutes to arrive, so please be patient. If you haven’t received it after 15 minutes, check your spam or junk folder. You can also resubmit your request at any time if needed.
If everything is correct, the team member will receive an email with a link to reset their password. By clicking the **Reset Password** button in the email, they will be taken to a page where they can complete the password reset process.
The email may take a few minutes to arrive, so please be patient. If you haven’t received it after 15 minutes, check your spam or junk folder. You can also resubmit your request at any time if needed.