> ## Documentation Index
> Fetch the complete documentation index at: https://help.mockspark.com/llms.txt
> Use this file to discover all available pages before exploring further.
# Products
> A step-by-step guide to creating fully customizable products
## Types of Customizable Products
In MockSpark, there are two main types of products: **Third-Party Fulfilled Products** and **Seller-Fulfilled Products**.
Third-Party Fulfilled Products are items that are fulfilled through external platforms directly integrated with Mockspark. This includes services like Printify, Printful, and other supported fulfillment providers.
Seller-Fulfilled Products include items that the seller handles independently. This means the seller is responsible for providing product information, managing production, and shipping orders. It also includes products fulfilled through third party services that are not currently connected to Mockspark.
Importing a **Third-Party Fulfilled Product** into MockSpark is simple and straightforward. The fulfillment provider supplies all the necessary product information, so all you need to do is create your mockups. Once they’re ready, you can start selling the customizable product in your store right away.
To learn how to import a Third-Party Fulfilled Product, check out our [Quick Start Guide](/docs/get-started/quickstart).
If you want to sell a unique customizable product that you produce yourself, or if you're using a print-on-demand and dropshipping platform that isn't currently supported by our list of third-party fulfillment providers, you can manually create a **Seller-Fulfilled Product**.
# Create a Seller-Fulfilled Product
In this tutorial, we’ll walk you through the step-by-step process of creating a **POLO SHIRT** that comes in six colors (`White`, `Grey`, `Black`, `Red`, `Stone`, and `Navy`) and three sizes (`S`, `M`, and `L`). Using this product as an example, you’ll learn helpful tips and best practices for creating **Seller-Fulfilled Products**.
We’ve prepared image assets for the sample product (**POLO SHIRT**) to help you get started. [**Click here**](https://cdn.mockspark.com/assets/docs/Polo_Shirt_Image_Assets.zip) to download the **zip file** to your desktop and extract its contents.
## Step 1: Edit Basic Details
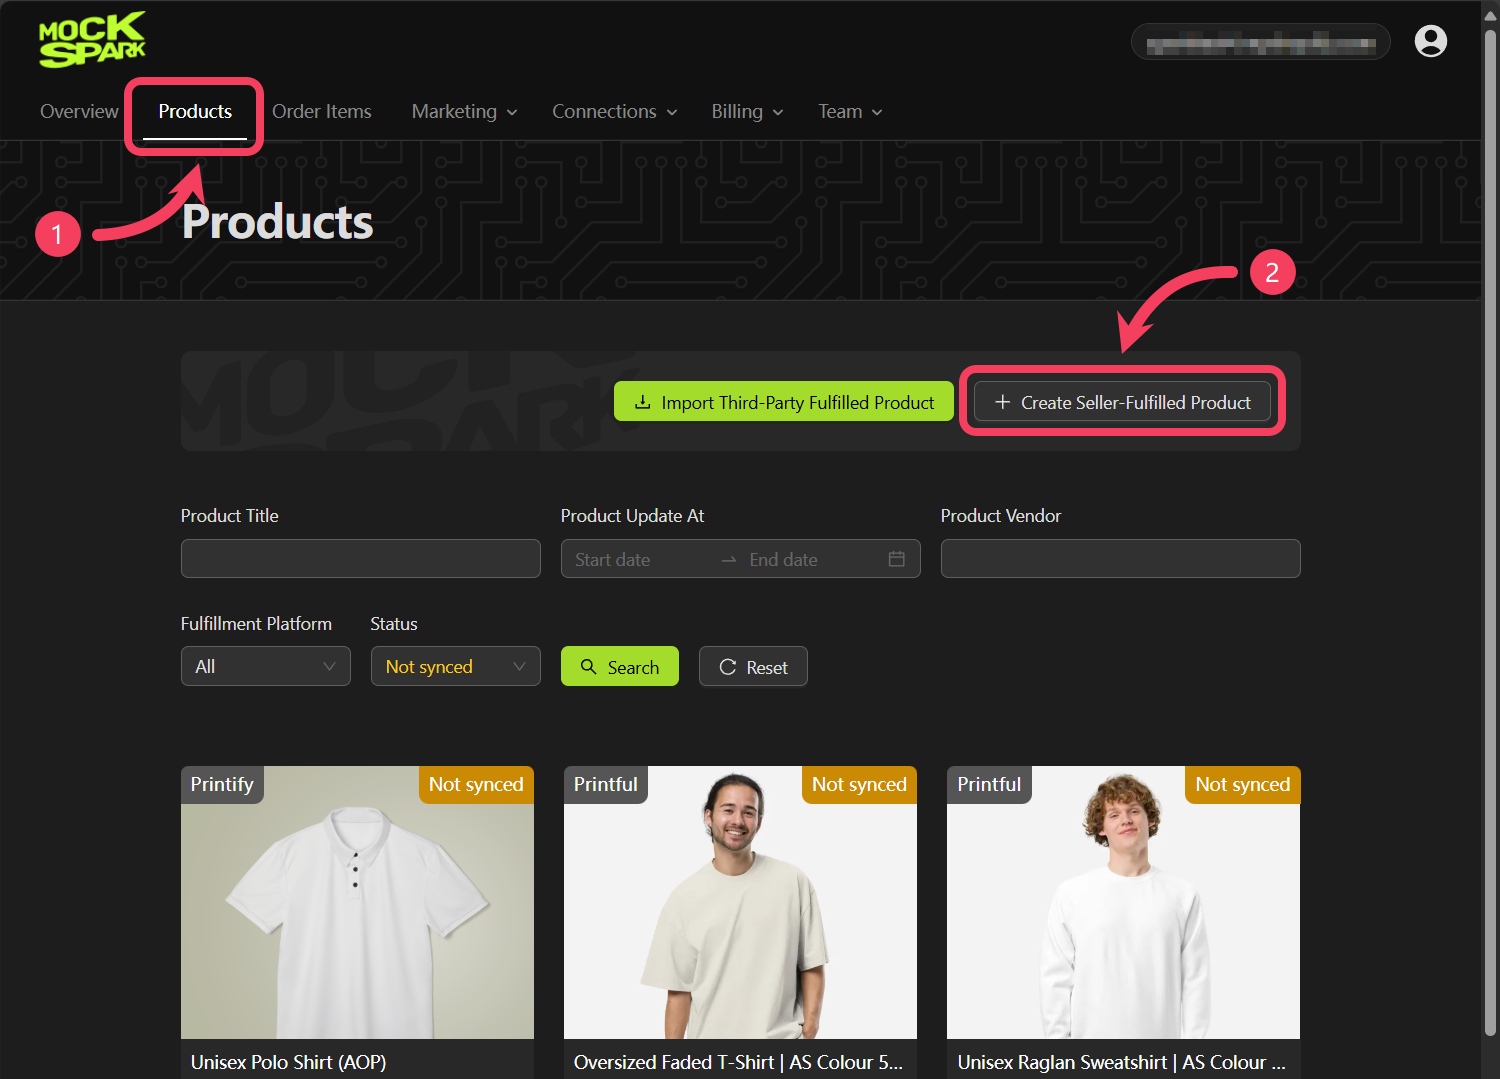
1. Go to the **Products** section from the top navigation bar.
2. Click the **Create Seller-Fulfilled Product** button.
 ### Basic Information
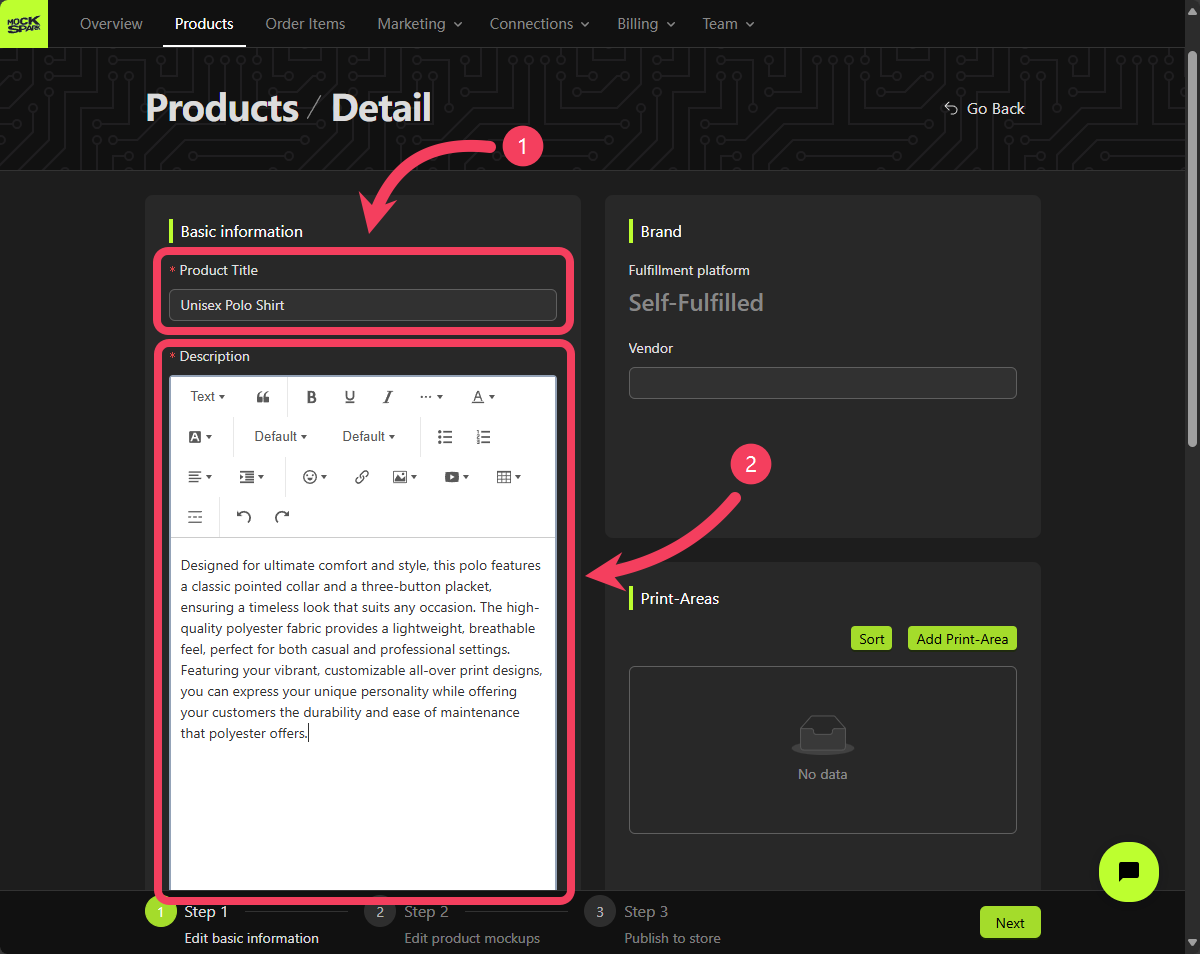
1. Please enter your product title.
2. Please enter a detailed description of your product in the rich text editor.
### Basic Information
1. Please enter your product title.
2. Please enter a detailed description of your product in the rich text editor.
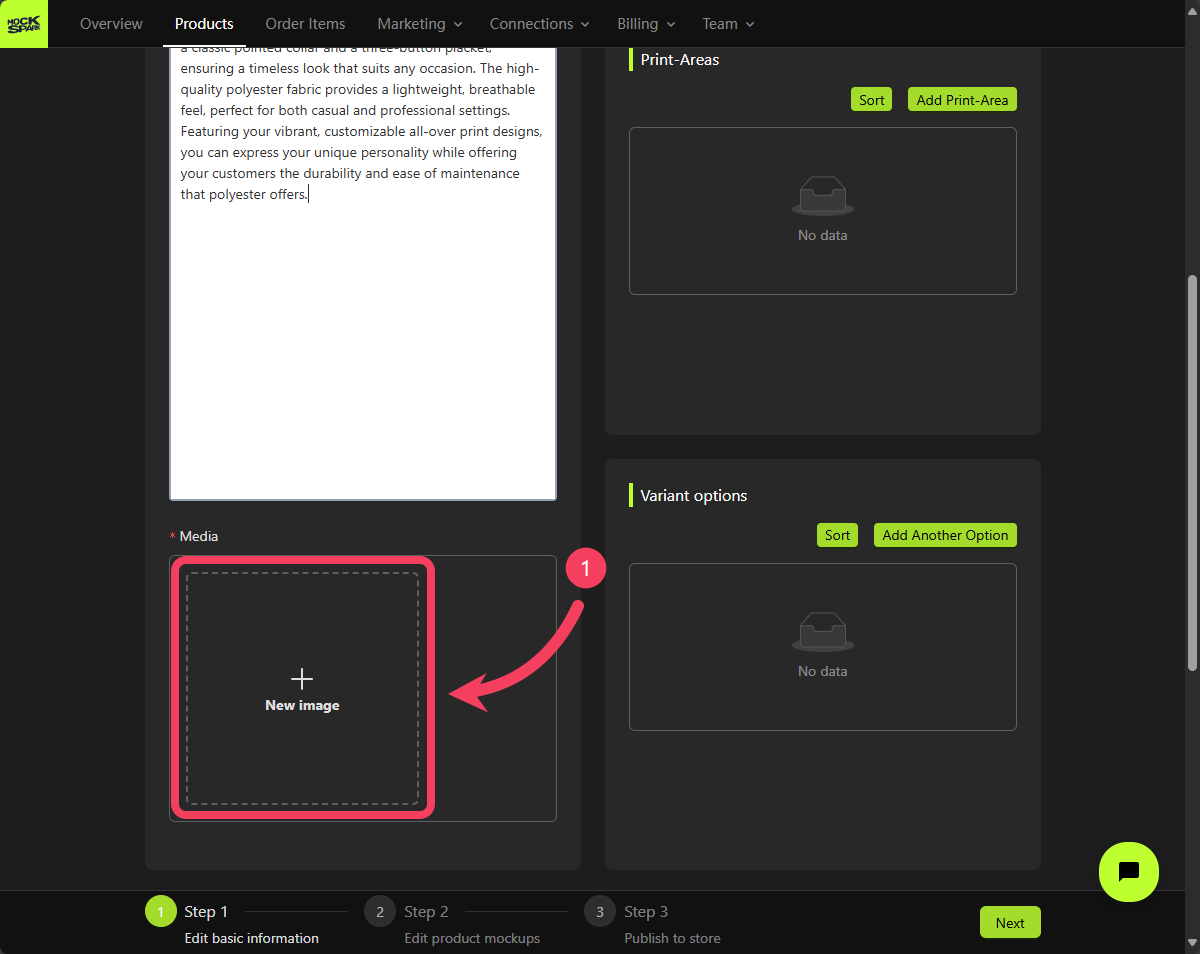
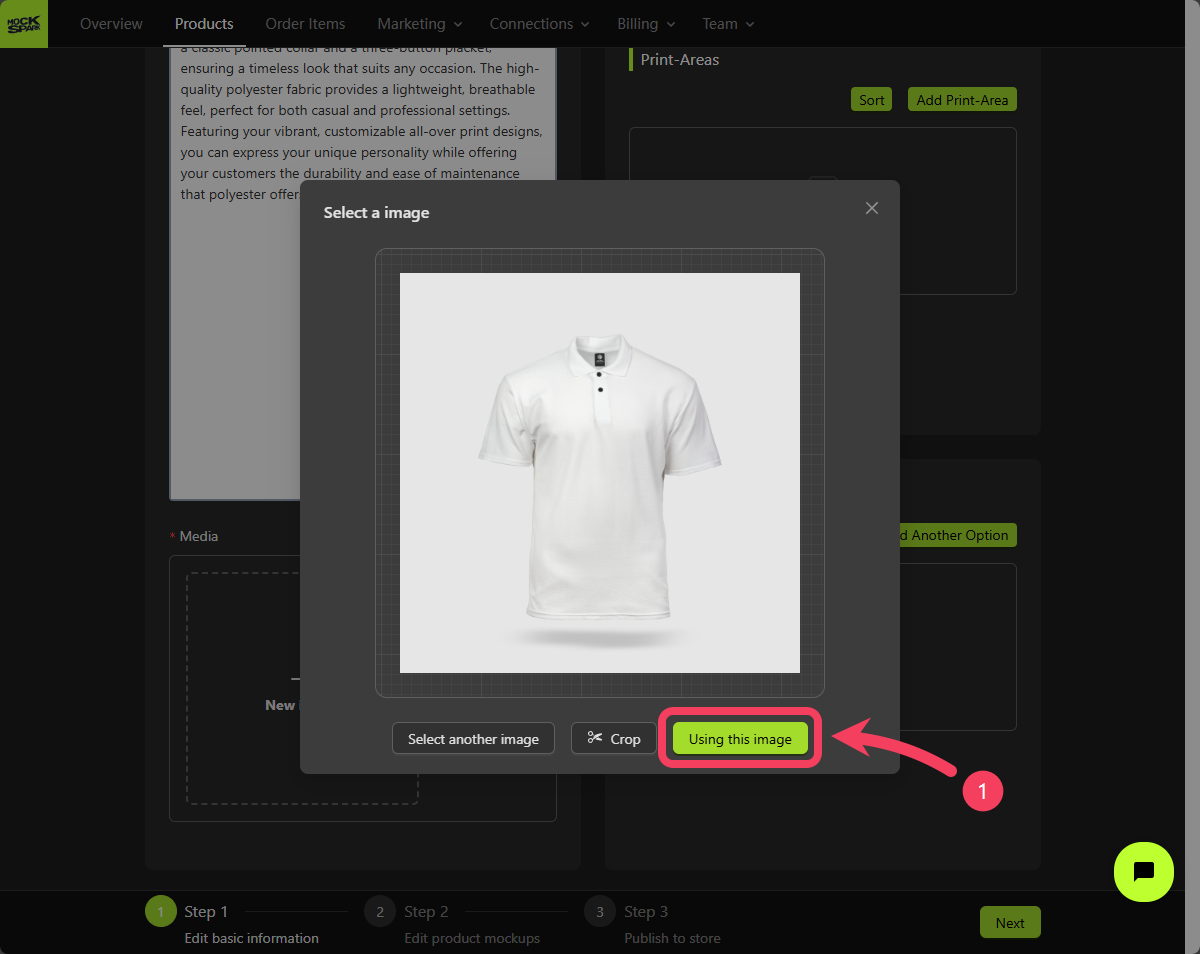
 Click **New Image** to upload a picture for your product.
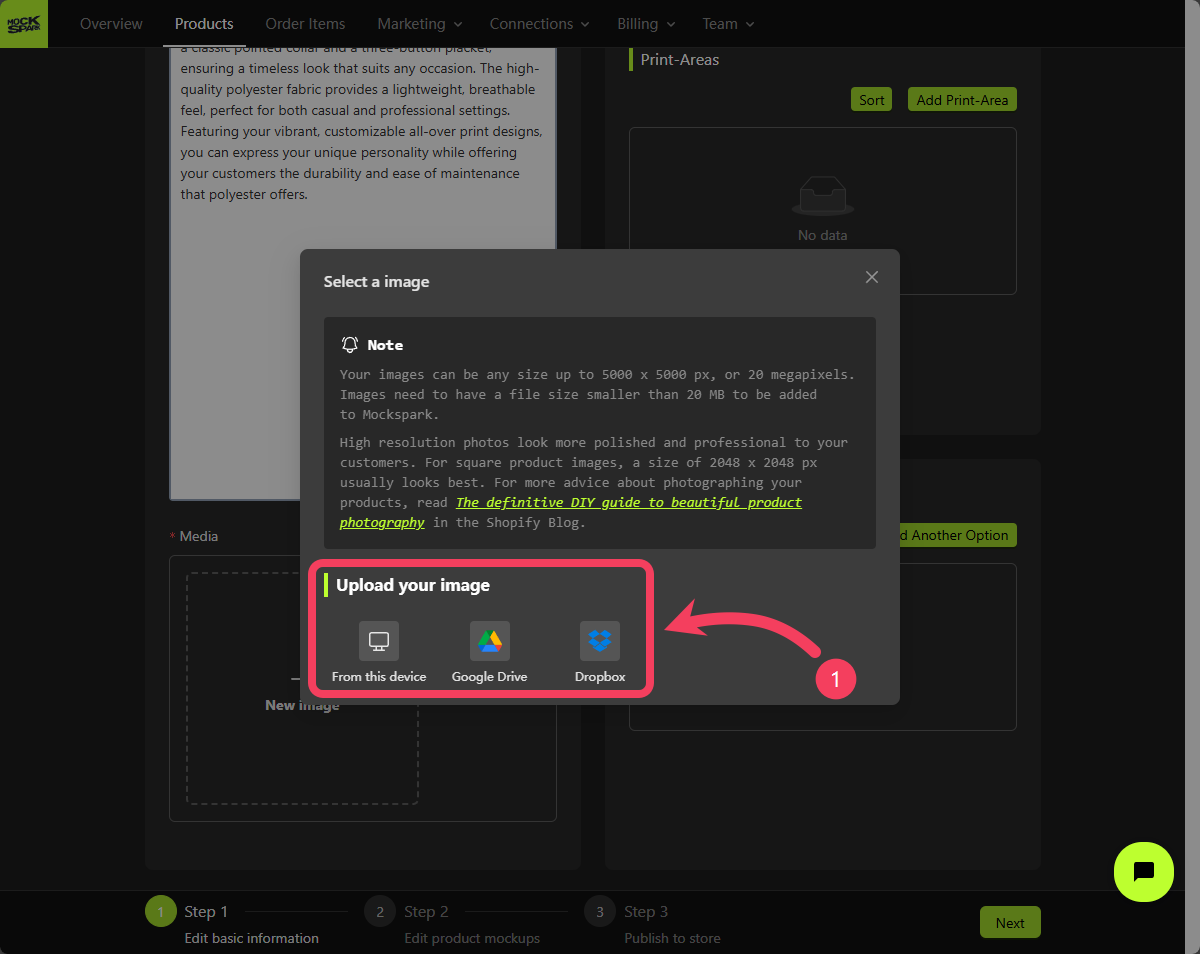
 Choose how you'd like to upload your product image.
 Upload a front view of a `White` polo shirt, then click **Using this image**.
 ### Brand
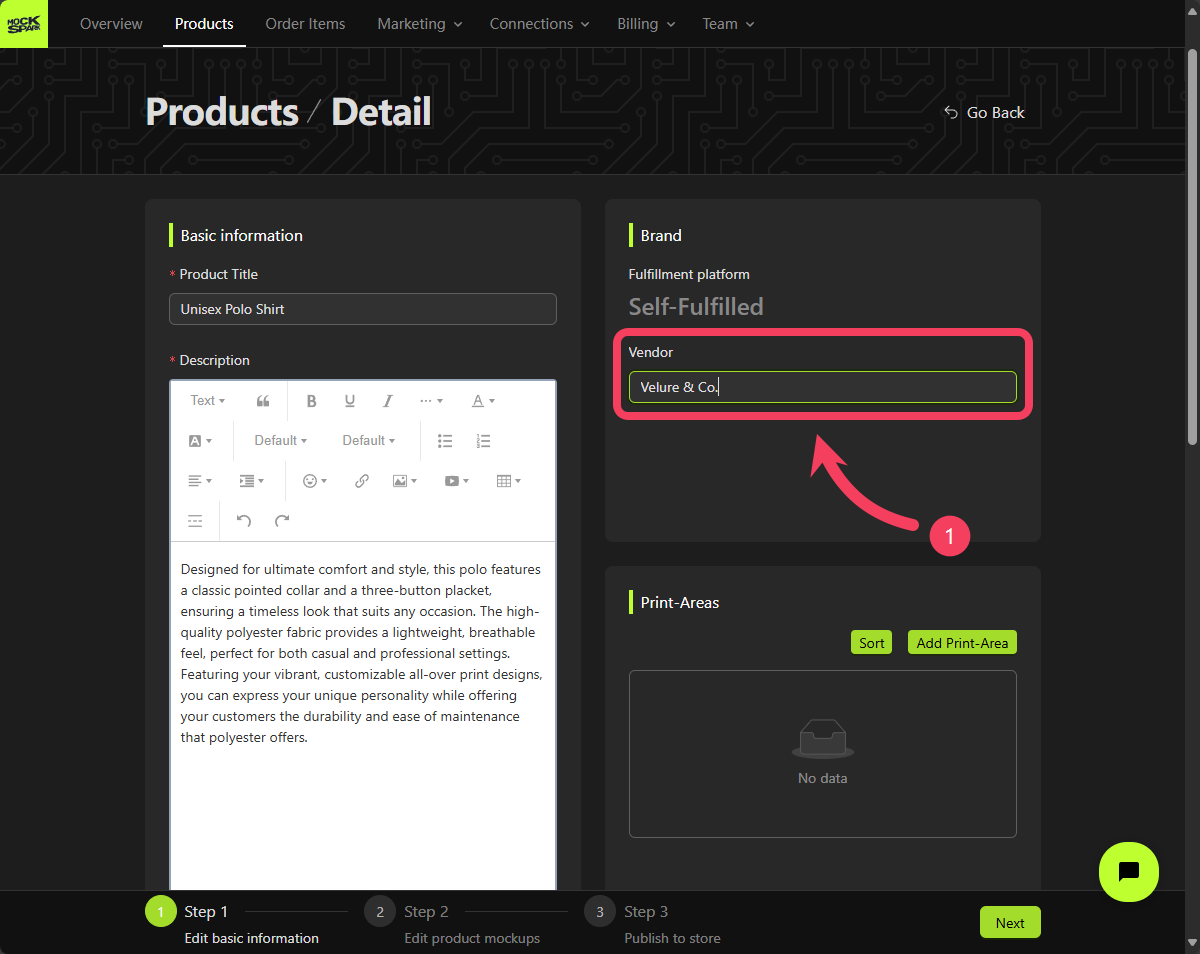
Enter the vendor name for this product.
### Brand
Enter the vendor name for this product.
 ### Print-Areas
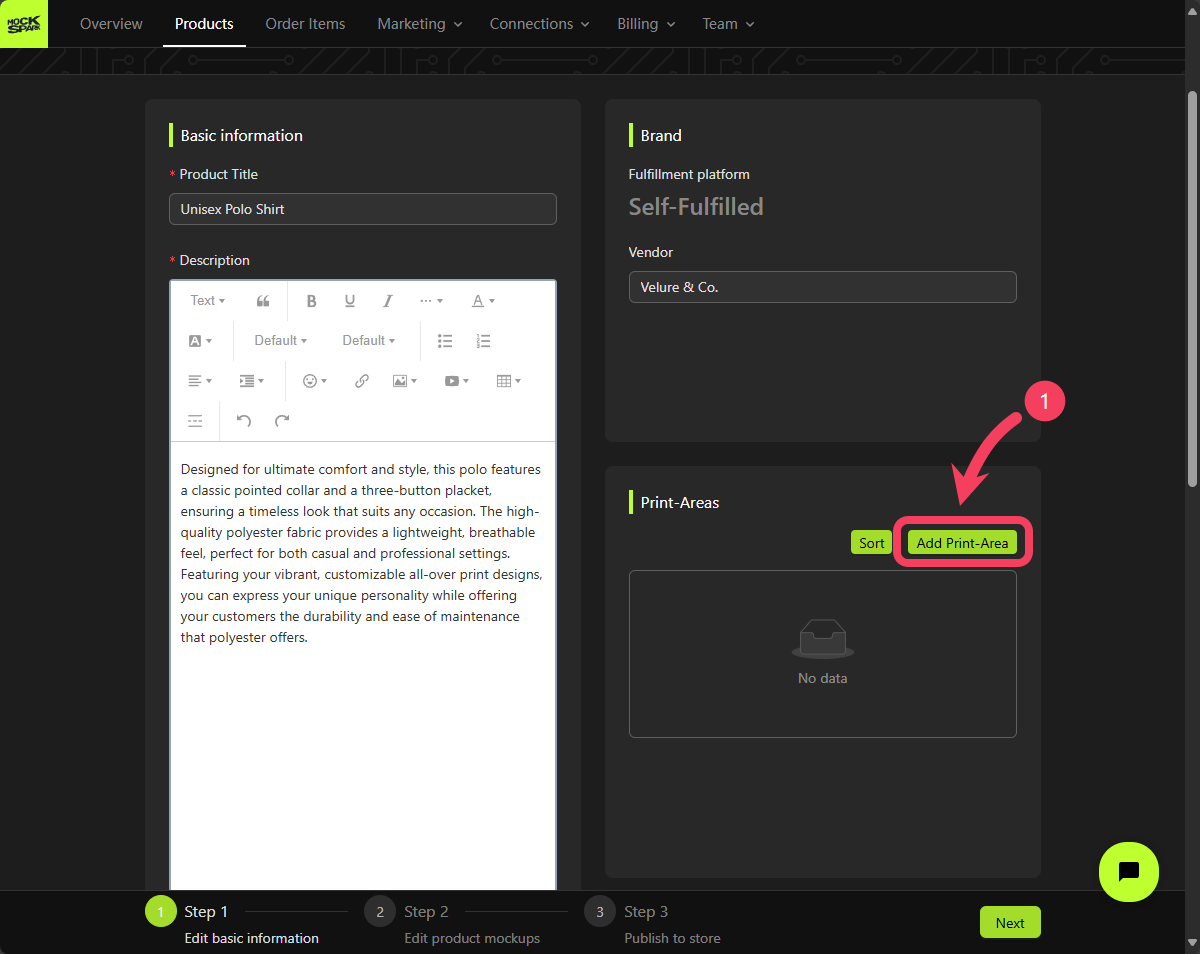
Select **Add Print-Area**.
### Print-Areas
Select **Add Print-Area**.
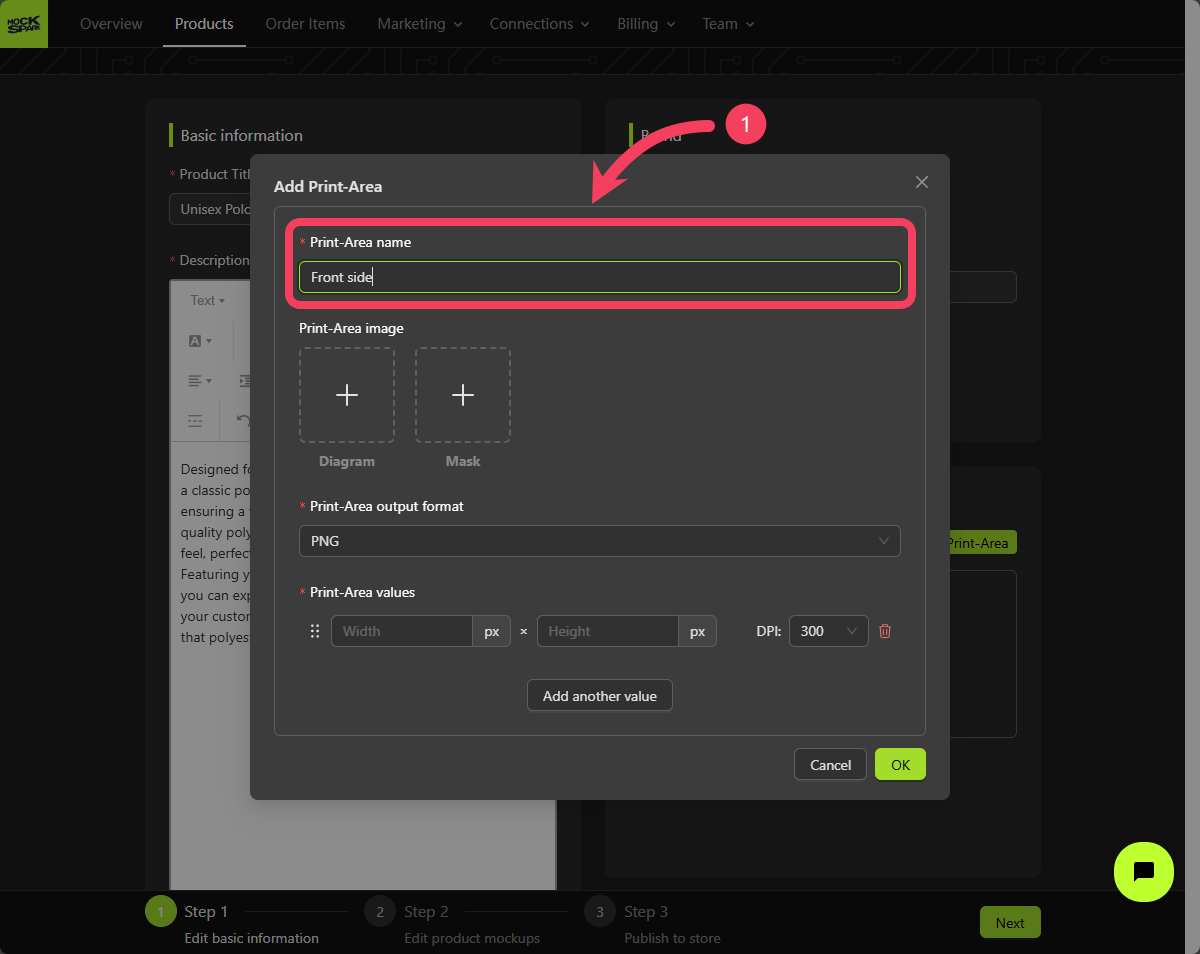
 Name this Print-Area `Front Side`.
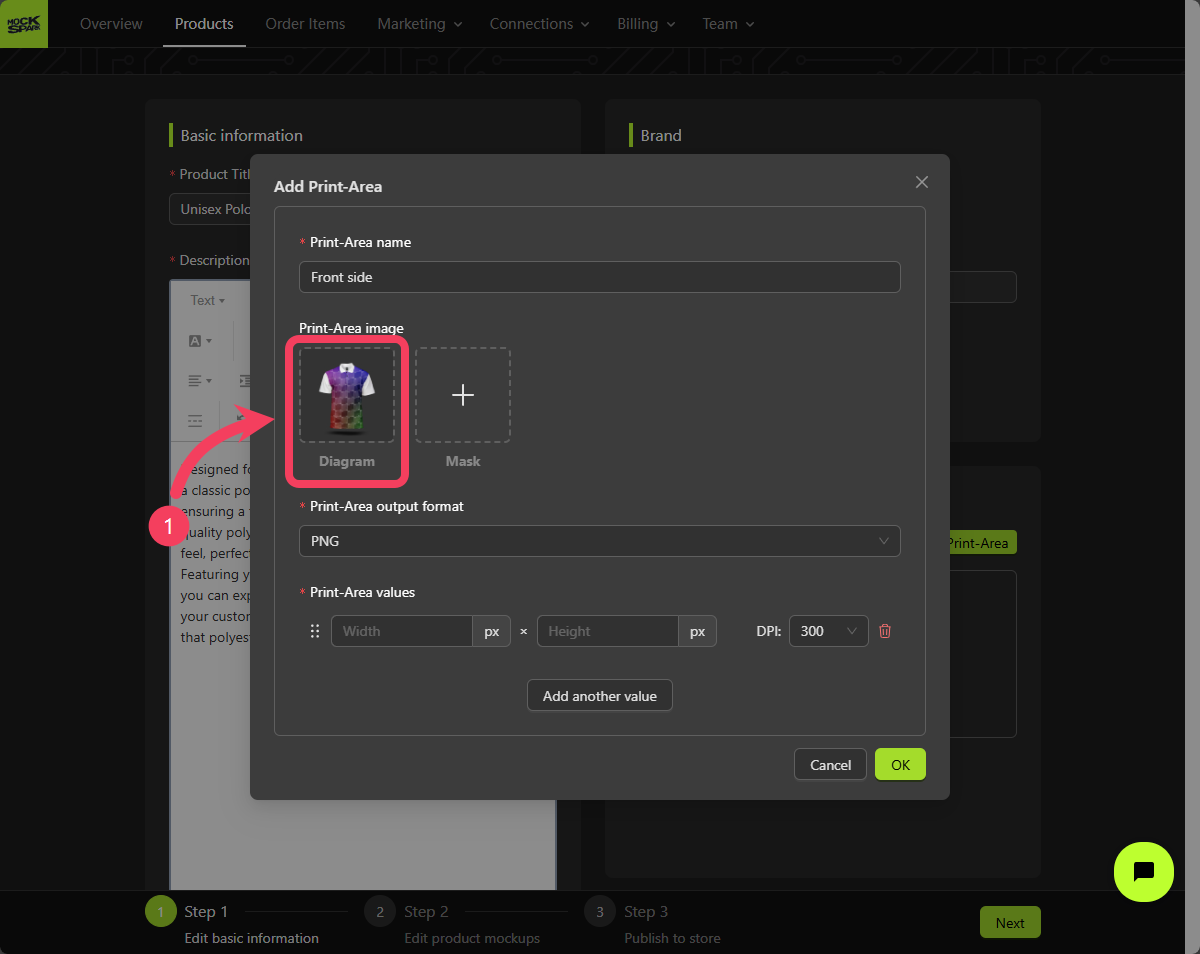
 A **Diagram** is a sample image shown in the Print-Areas panel of the `Product Personalizer`. It's designed to help customers easily identify and differentiate between various Print-Areas on a product.
Uploading a **Diagram** is optional. If you don’t provide one, the system will automatically generate a default image based on the size of each Print-Area.
**Diagrams** image must be in .jpg or .png format, sized at 100 × 100 pixels, and no larger than 1 MB.
Upload an image to use as the **Diagram** for this Print-Area.
A **Diagram** is a sample image shown in the Print-Areas panel of the `Product Personalizer`. It's designed to help customers easily identify and differentiate between various Print-Areas on a product.
Uploading a **Diagram** is optional. If you don’t provide one, the system will automatically generate a default image based on the size of each Print-Area.
**Diagrams** image must be in .jpg or .png format, sized at 100 × 100 pixels, and no larger than 1 MB.
Upload an image to use as the **Diagram** for this Print-Area.
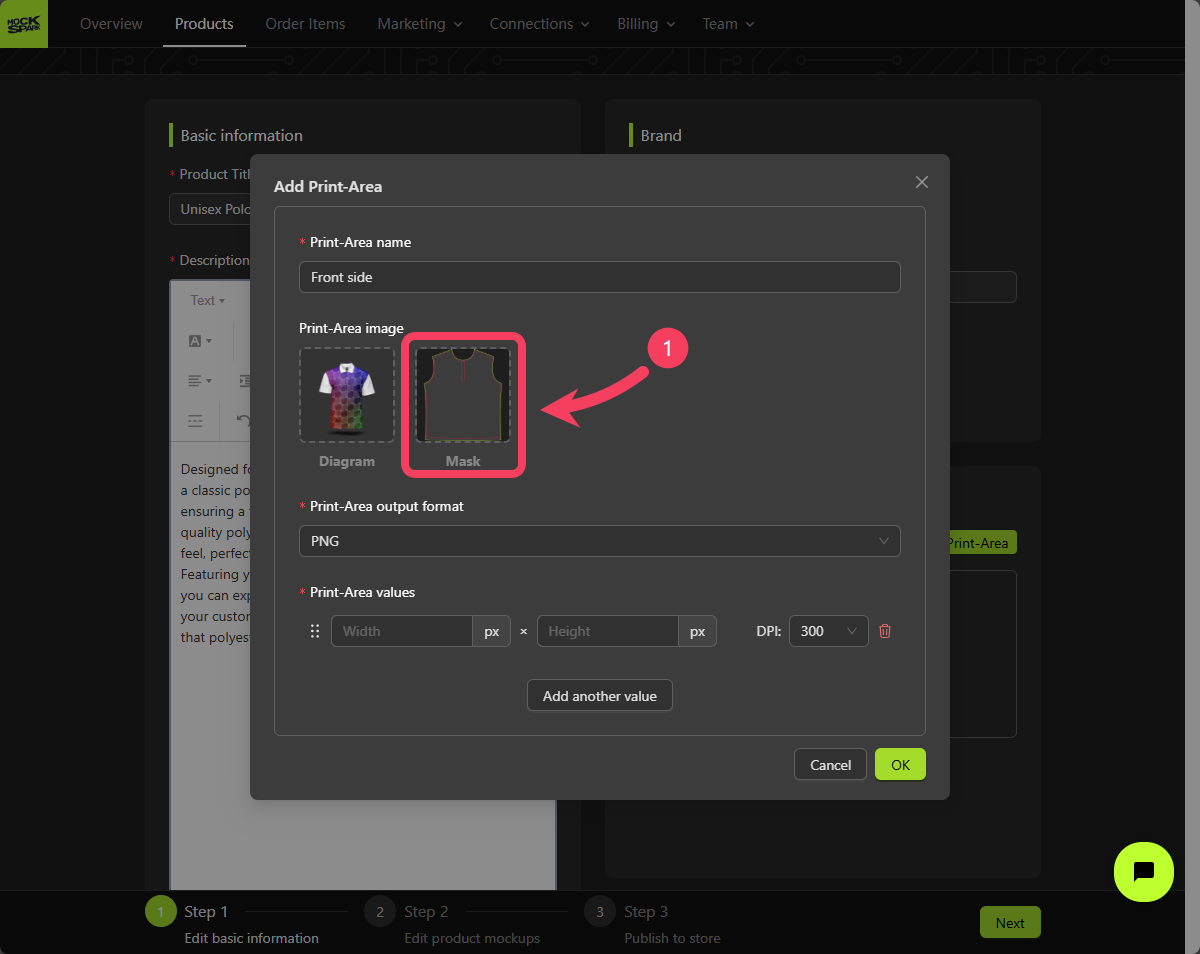
 A **Mask** is an optional overlay image that appears above the Print-Area canvas in the `Product Personalizer`. It serves as a visual guide to help customers better understand the boundaries of the designable area when creating their designs.
While useful, uploading a **Mask** is not required and won’t impact the core design functionality of the `Product Personalizer`.
**Mask** image must be in .png format, sized at 600 × 600 pixels, and no larger than 1 MB.
Upload an image to use as the **Mask** for this Print-Area.
A **Mask** is an optional overlay image that appears above the Print-Area canvas in the `Product Personalizer`. It serves as a visual guide to help customers better understand the boundaries of the designable area when creating their designs.
While useful, uploading a **Mask** is not required and won’t impact the core design functionality of the `Product Personalizer`.
**Mask** image must be in .png format, sized at 600 × 600 pixels, and no larger than 1 MB.
Upload an image to use as the **Mask** for this Print-Area.
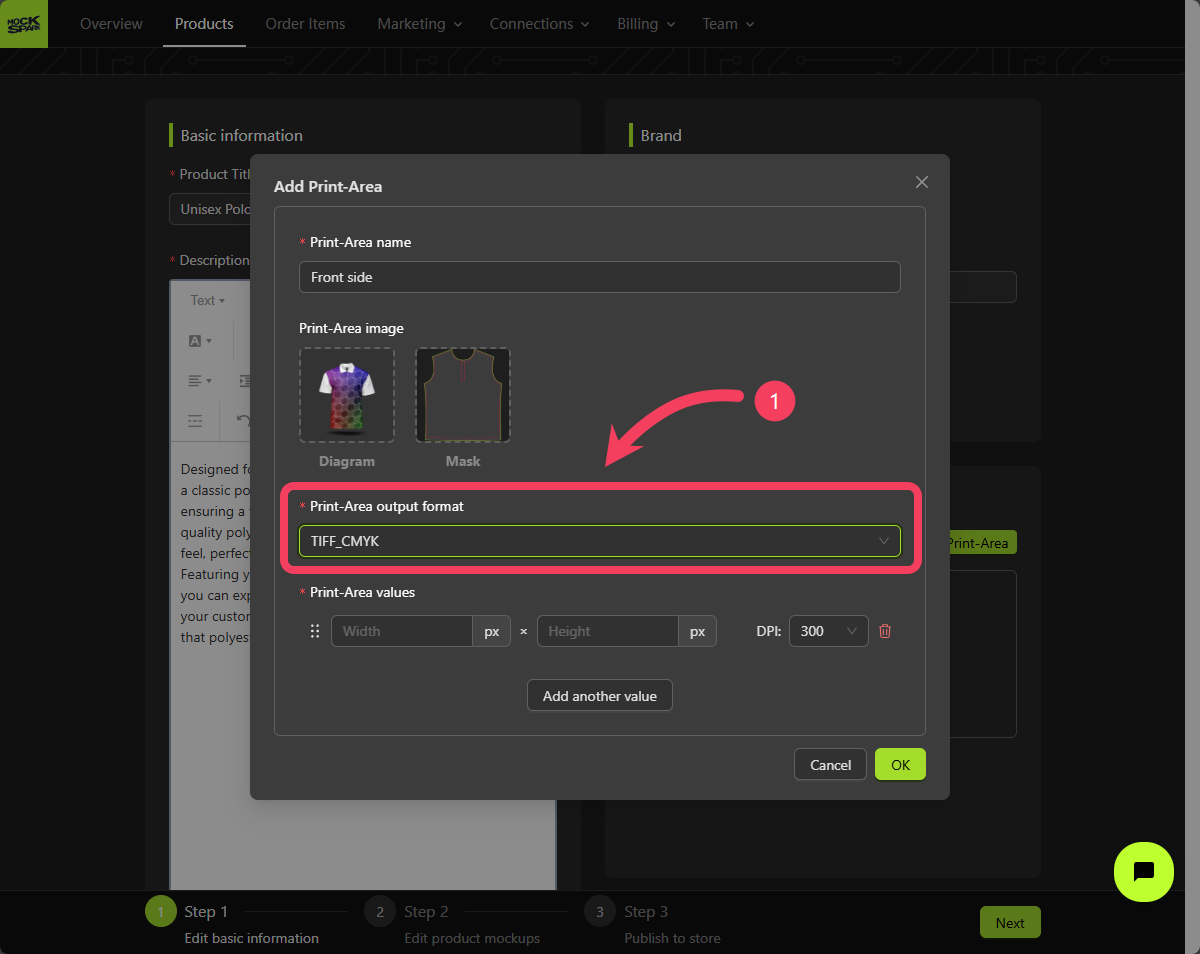
 MockSpark automatically transforms the designs your customers create in the `Product Personalizer` into print-ready image files optimized for factory production. These files are referred to as **Placeholders** within the MockSpark platform.
Setting the **output format** for a Print Area determines the file format of the **Placeholder**.
Currently, MockSpark supports five formats, including:
* `PNG`
* `TIFF`
* `TIFF_CMYK`
* `JPEG`
* `JPEG_CMYK`
In this tutorial, we'll set the Print Area's **output format** to `TIFF_CMYK`.
MockSpark automatically transforms the designs your customers create in the `Product Personalizer` into print-ready image files optimized for factory production. These files are referred to as **Placeholders** within the MockSpark platform.
Setting the **output format** for a Print Area determines the file format of the **Placeholder**.
Currently, MockSpark supports five formats, including:
* `PNG`
* `TIFF`
* `TIFF_CMYK`
* `JPEG`
* `JPEG_CMYK`
In this tutorial, we'll set the Print Area's **output format** to `TIFF_CMYK`.
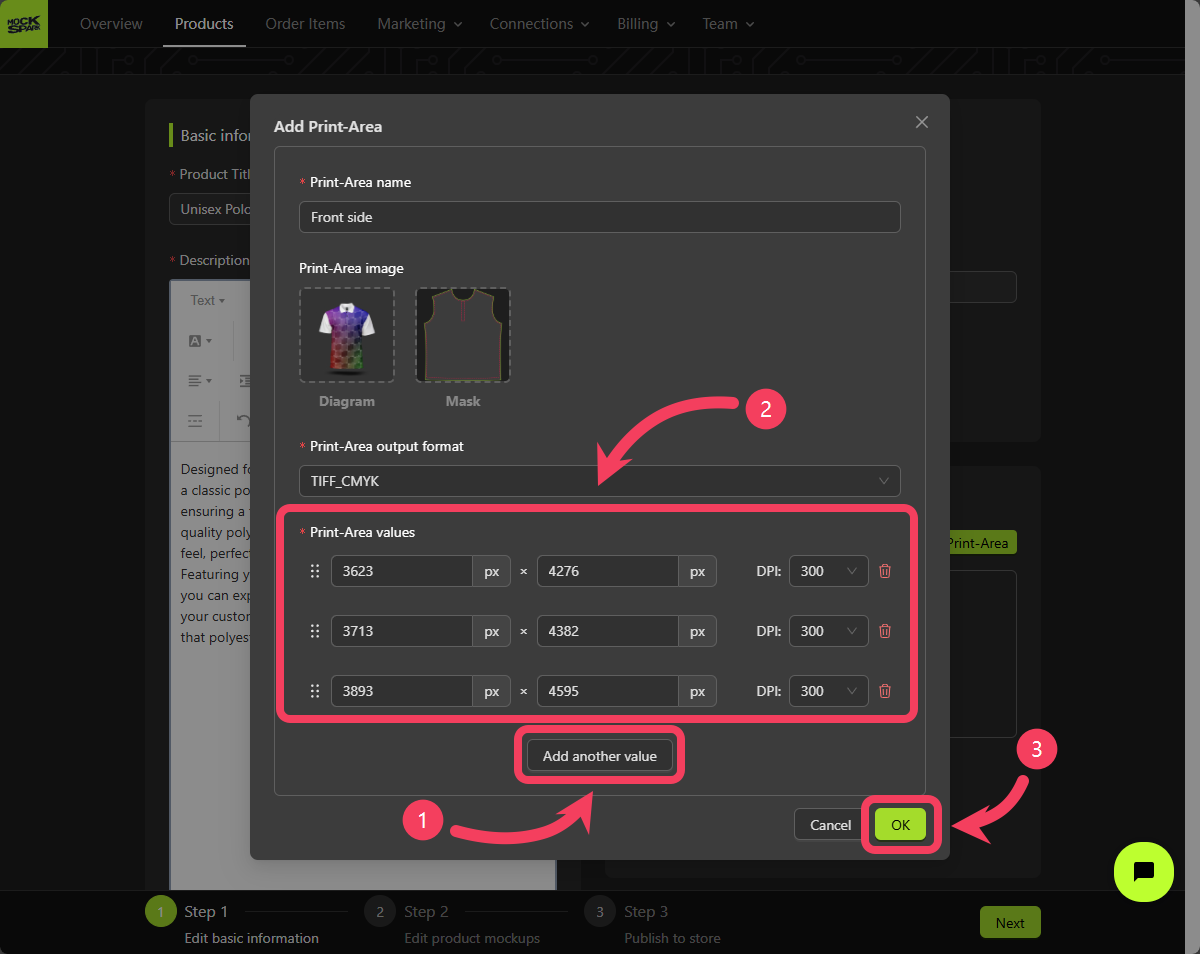
 A single Print-Area can have multiple values assigned to it, typically to represent different print sizes.
For example, if your polo shirt is available in three sizes (`S`, `M`, and `L`), you can provide the appropriate print dimensions for each one based on their actual measurements, like this:
| Width (px) | Height (px) | DPI |
| ---------- | ----------- | --- |
| 3623 | 4276 | 300 |
| 3713 | 4382 | 300 |
| 3893 | 4595 | 300 |
**What is DPI**
In the printing industry, **DPI** (Dots Per Inch) refers to the number of ink dots a printer can produce within one inch.
We offer three DPI settings: `150`, `300`, and `600`. The default is set to 300 DPI. The DPI you choose should depend on the specifications of your production printer. If you're unsure which DPI to select, we recommend going with the default `300` DPI, as it is the most commonly used option and generally works well for most printing needs.
**How to Determine Print Size Using DPI**
To calculate the print size in pixels based on DPI, let’s use an example.
Say Product A has a printable area of `12` inches by `14` inches, and your printer is set to `300` DPI. The pixel size would be:
* `Width`: 12 × 300 = 3600 px
* `Height`: 14 × 300 = 4200 px
Inches × DPI = Pixels
If you're using the metric system, you can convert units using the following:
1 inch = 2.54 cm
1. Click **Add another value** to create 3 value rows.
2. For each value row, enter the appropriate settings for `Width`, `Height`, and `DPI`.
3. Click **OK** to complete the creation of this Print-Area.
A single Print-Area can have multiple values assigned to it, typically to represent different print sizes.
For example, if your polo shirt is available in three sizes (`S`, `M`, and `L`), you can provide the appropriate print dimensions for each one based on their actual measurements, like this:
| Width (px) | Height (px) | DPI |
| ---------- | ----------- | --- |
| 3623 | 4276 | 300 |
| 3713 | 4382 | 300 |
| 3893 | 4595 | 300 |
**What is DPI**
In the printing industry, **DPI** (Dots Per Inch) refers to the number of ink dots a printer can produce within one inch.
We offer three DPI settings: `150`, `300`, and `600`. The default is set to 300 DPI. The DPI you choose should depend on the specifications of your production printer. If you're unsure which DPI to select, we recommend going with the default `300` DPI, as it is the most commonly used option and generally works well for most printing needs.
**How to Determine Print Size Using DPI**
To calculate the print size in pixels based on DPI, let’s use an example.
Say Product A has a printable area of `12` inches by `14` inches, and your printer is set to `300` DPI. The pixel size would be:
* `Width`: 12 × 300 = 3600 px
* `Height`: 14 × 300 = 4200 px
Inches × DPI = Pixels
If you're using the metric system, you can convert units using the following:
1 inch = 2.54 cm
1. Click **Add another value** to create 3 value rows.
2. For each value row, enter the appropriate settings for `Width`, `Height`, and `DPI`.
3. Click **OK** to complete the creation of this Print-Area.
 We've just created our first Print-Area, named `Front side`. Next, we'll set up another Print-Area for the back of the product.
Select **Add Print Area**.
We've just created our first Print-Area, named `Front side`. Next, we'll set up another Print-Area for the back of the product.
Select **Add Print Area**.
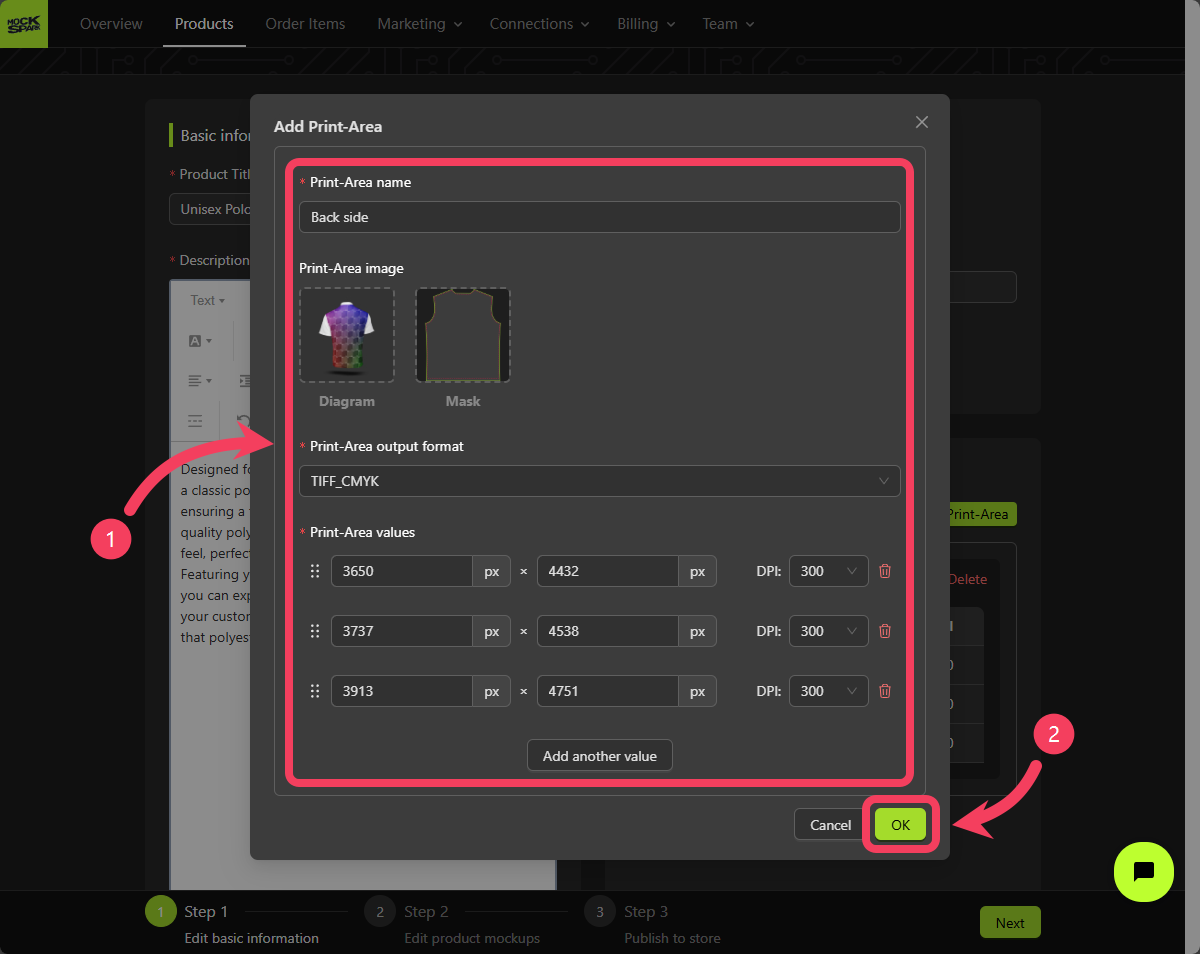
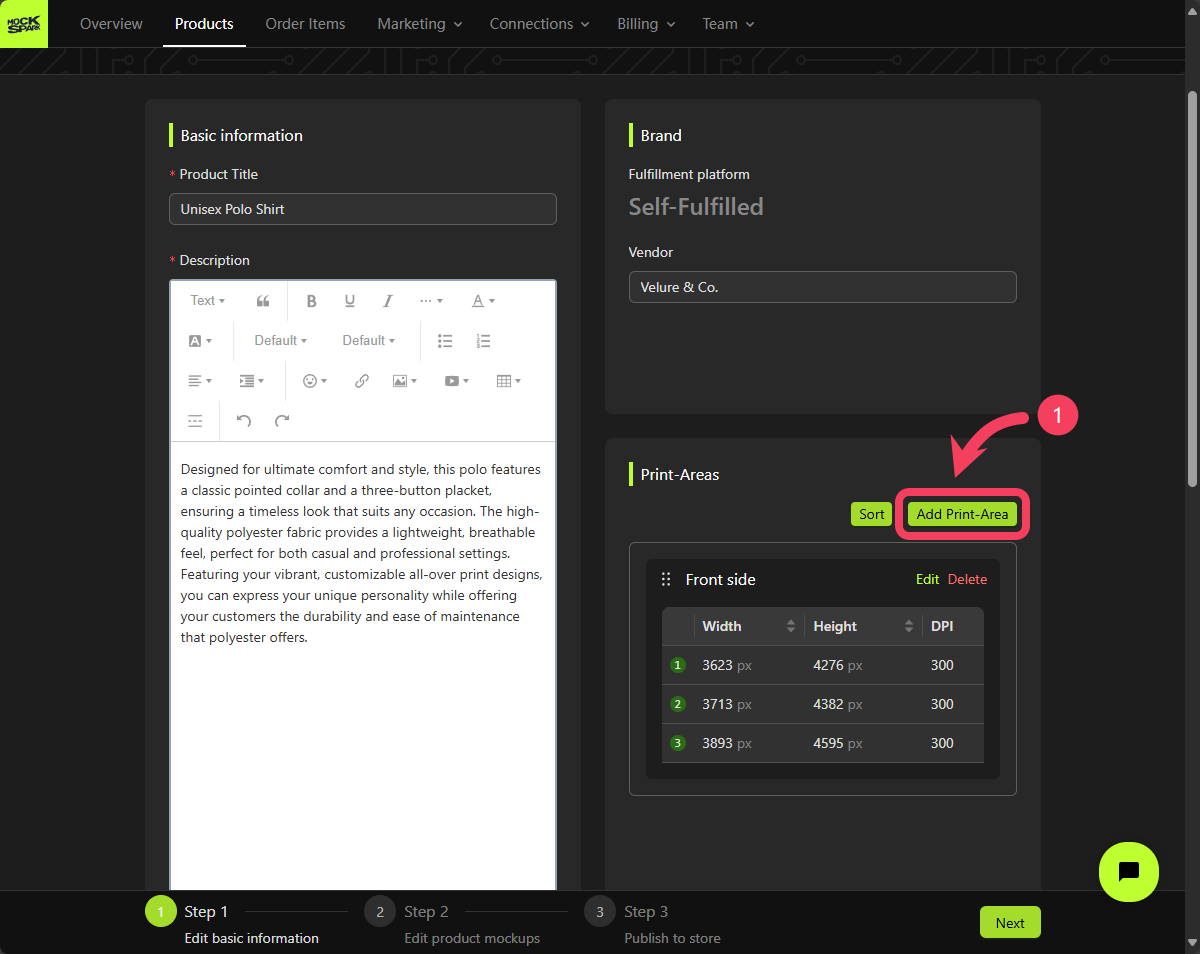 Following the same steps as the previous Print-Area, let's create a new one for the back of the polo shirt and name it `Back Side`.
Select the appropriate images to use as the **Diagram** and **Mask** for this Print-Area.
Enter the values for this Print-Area based on the list below.
| Width (px) | Height (px) | DPI |
| ---------- | ----------- | --- |
| 3650 | 4432 | 300 |
| 3737 | 4538 | 300 |
| 3913 | 4751 | 300 |
1. Create a Print-Area named `Back side`.
2. Click **OK** to complete the creation of this Print-Area.
Following the same steps as the previous Print-Area, let's create a new one for the back of the polo shirt and name it `Back Side`.
Select the appropriate images to use as the **Diagram** and **Mask** for this Print-Area.
Enter the values for this Print-Area based on the list below.
| Width (px) | Height (px) | DPI |
| ---------- | ----------- | --- |
| 3650 | 4432 | 300 |
| 3737 | 4538 | 300 |
| 3913 | 4751 | 300 |
1. Create a Print-Area named `Back side`.
2. Click **OK** to complete the creation of this Print-Area.
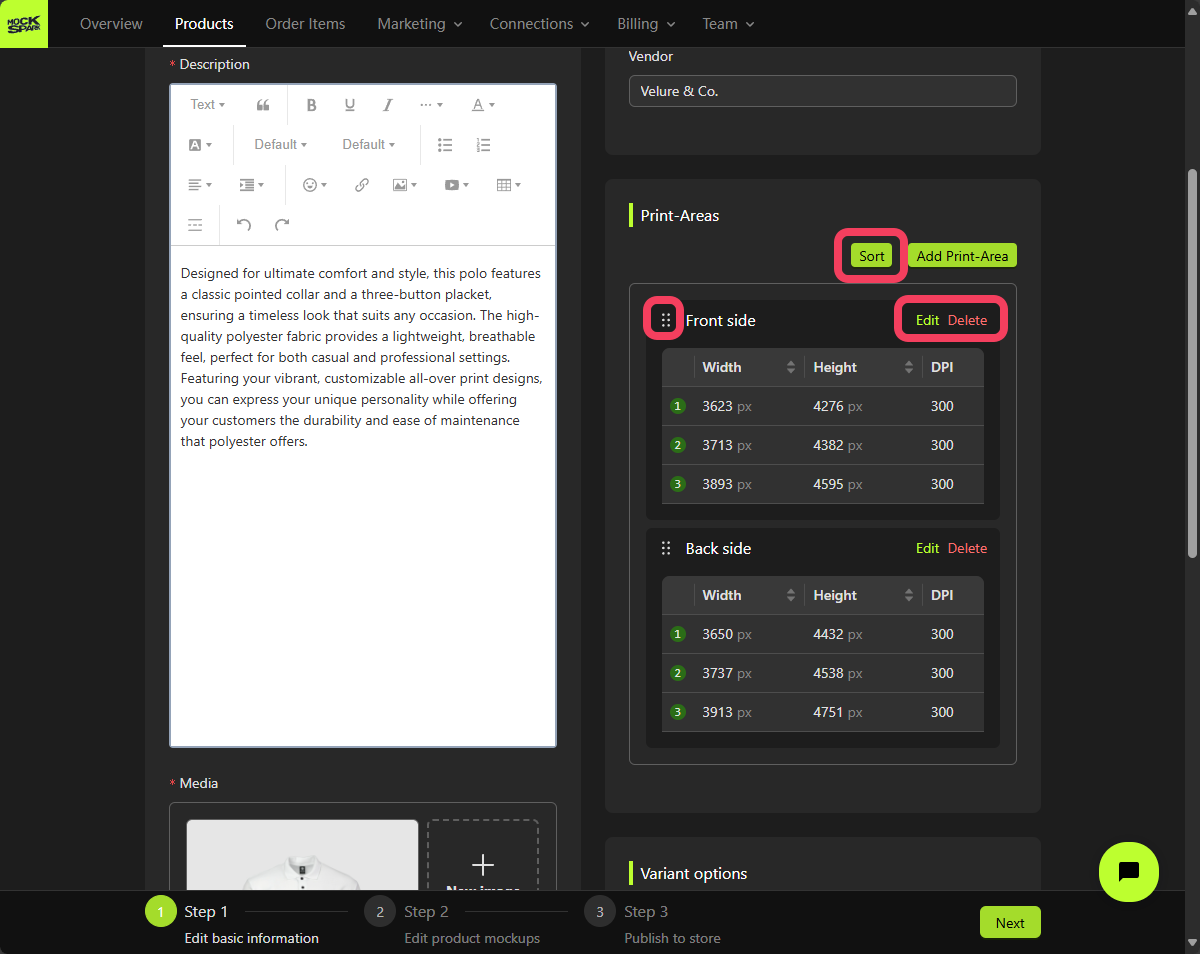
 Once you've created these Print-Areas, you can still edit, delete, or reorder them as needed.
 ### Variant Options
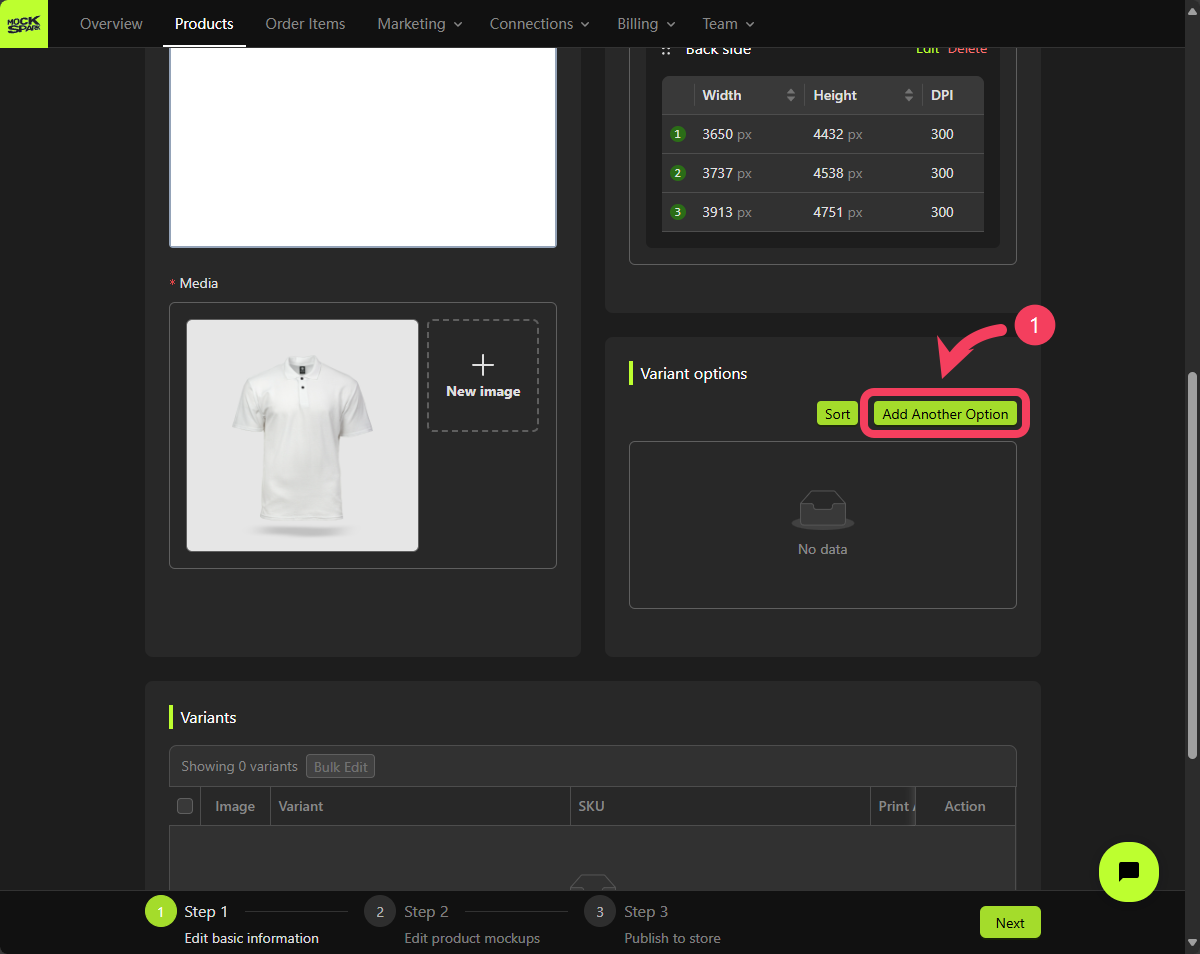
Now that we've finished setting up the Print-Areas for this product, let's move on to creating its **Variant options**.
Each product can have up to three variant options. Combinations of these options define all the possible variations of the product.
In this tutorial, we will create two options for variants: one for `Color` and one for `Size`.
Click **Add Another Option**
### Variant Options
Now that we've finished setting up the Print-Areas for this product, let's move on to creating its **Variant options**.
Each product can have up to three variant options. Combinations of these options define all the possible variations of the product.
In this tutorial, we will create two options for variants: one for `Color` and one for `Size`.
Click **Add Another Option**
 Name this variant option `Color`.
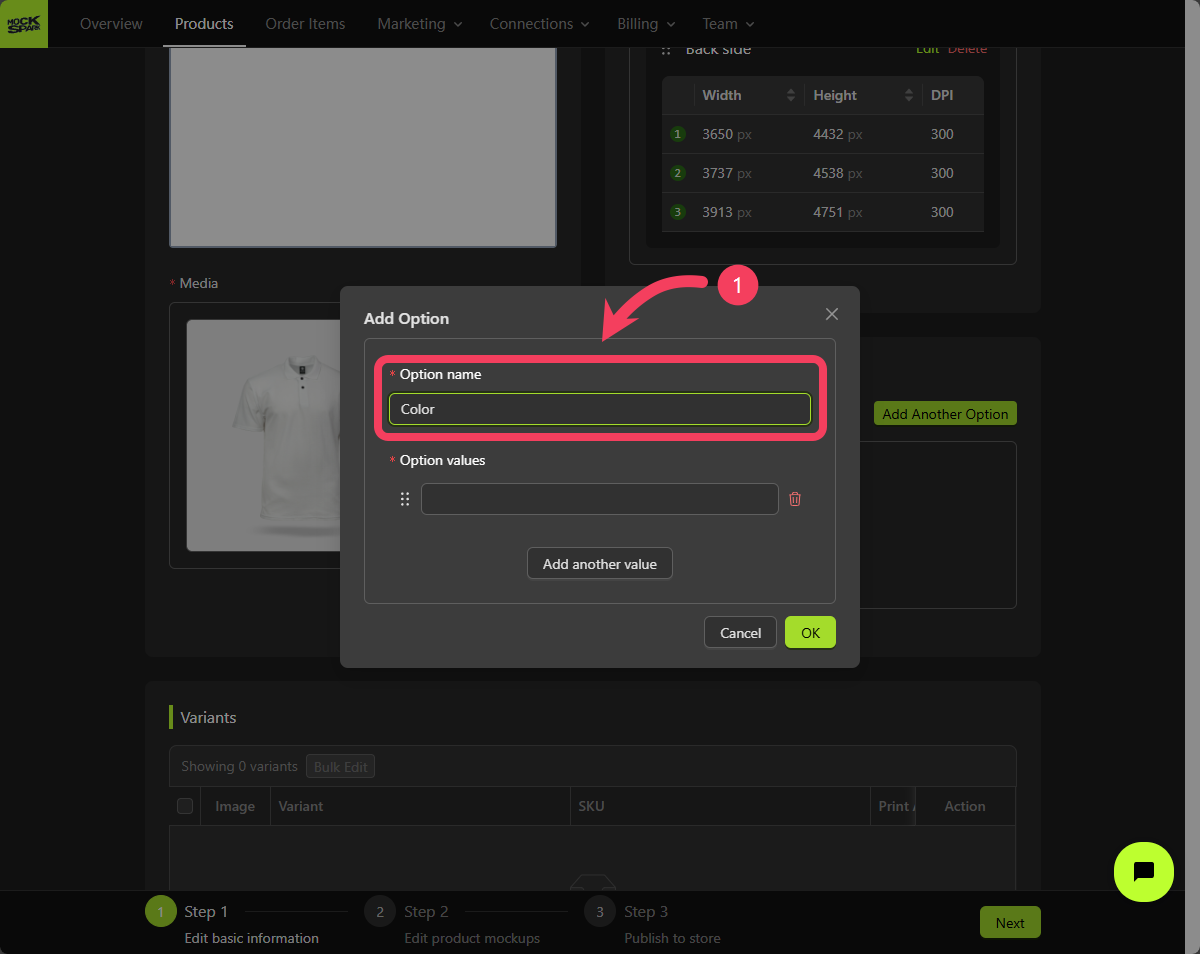 1. Click **Add another value** to create 6 value rows.
2. Enter a different color for each value row: `White`, `Grey`, `Black`, `Red`, `Stone`, and `Navy`.
3. Click **OK** to complete the creation of this variant option.
1. Click **Add another value** to create 6 value rows.
2. Enter a different color for each value row: `White`, `Grey`, `Black`, `Red`, `Stone`, and `Navy`.
3. Click **OK** to complete the creation of this variant option.
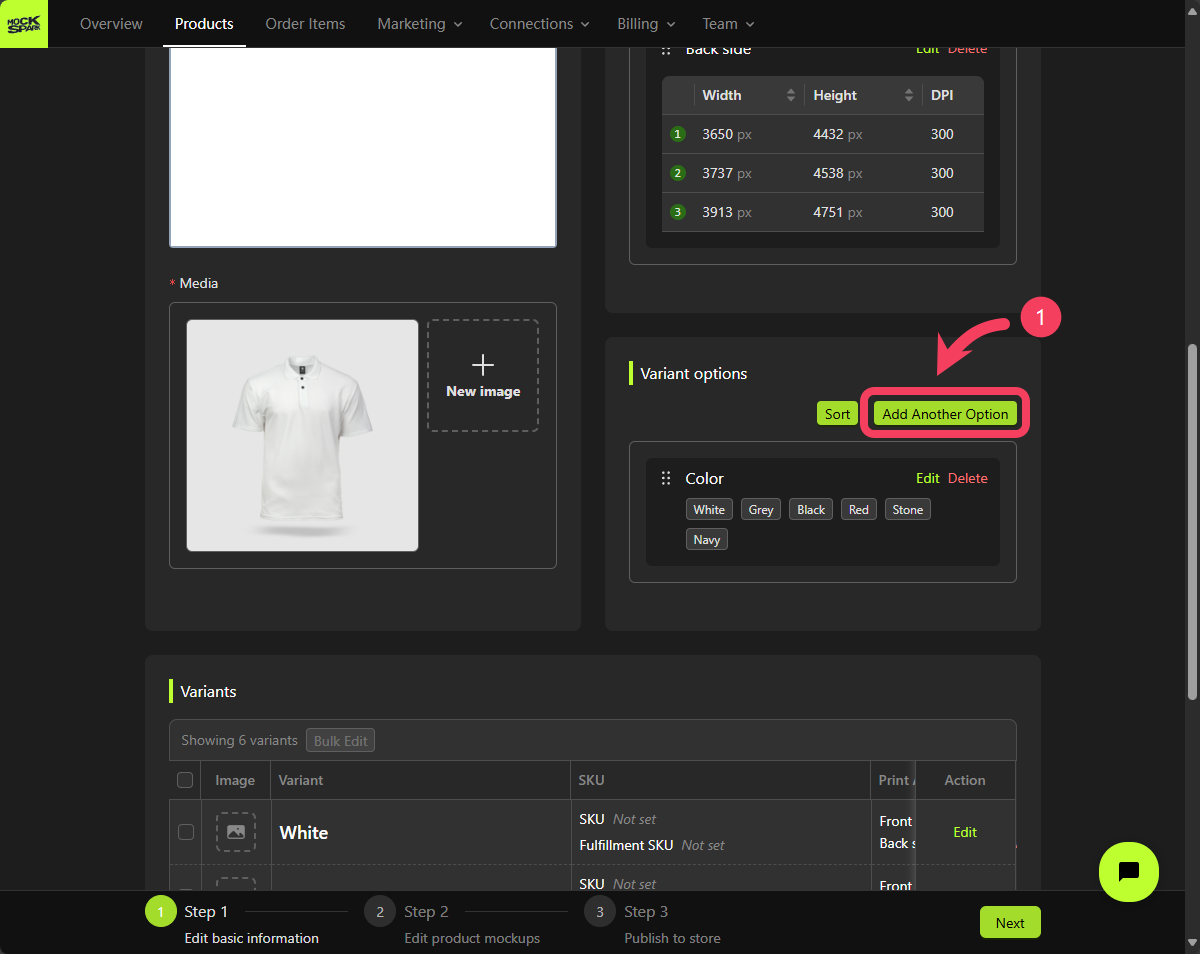
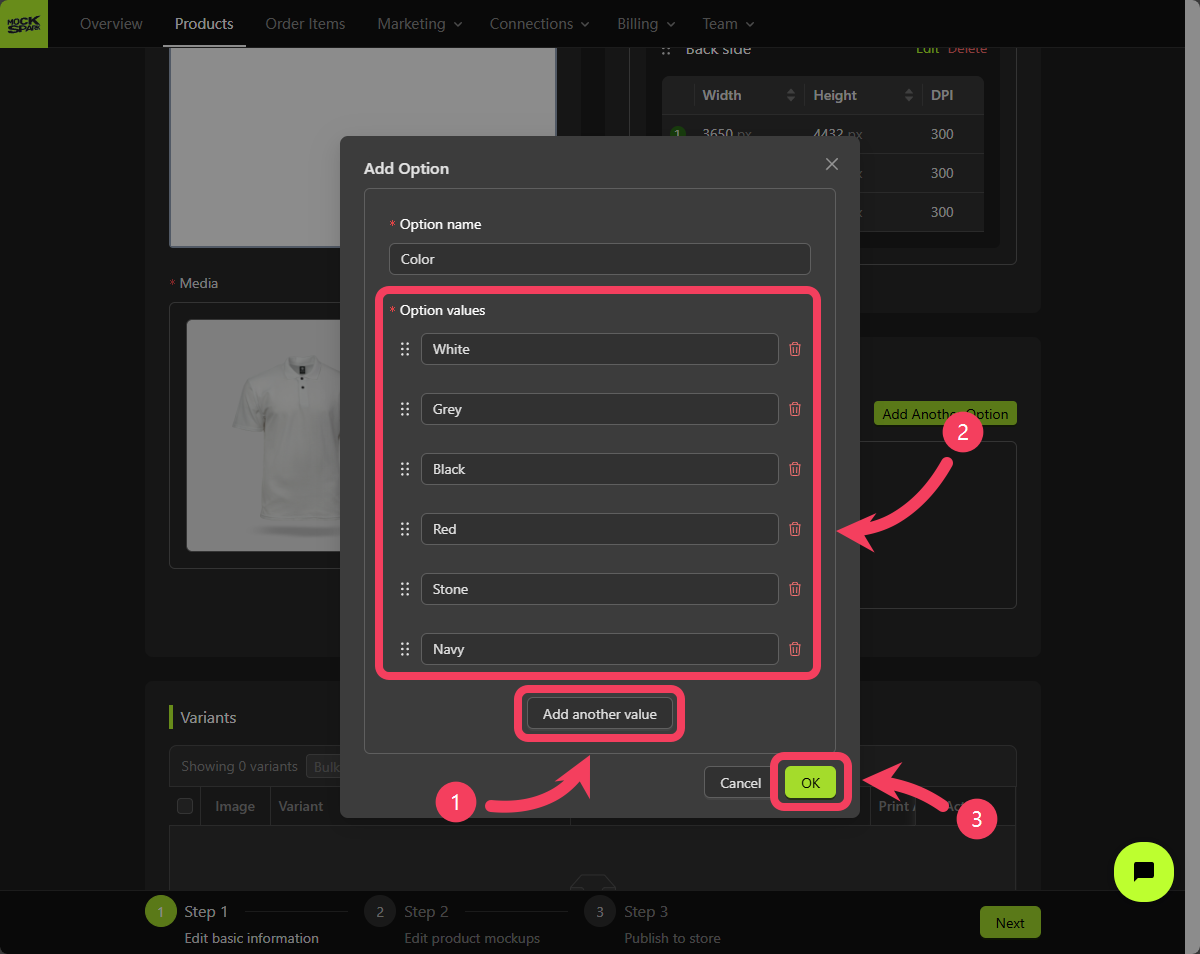 After setting up the `Color` variant option, let’s move on to creating the `Size` variant option.
Click **Add Another Option**
After setting up the `Color` variant option, let’s move on to creating the `Size` variant option.
Click **Add Another Option**
 1. Create a variant option named `Size`, and add 3 value rows to it: `S`, `M`, and `L`.
2. Click **OK** to complete the creation of this variant option.
1. Create a variant option named `Size`, and add 3 value rows to it: `S`, `M`, and `L`.
2. Click **OK** to complete the creation of this variant option.
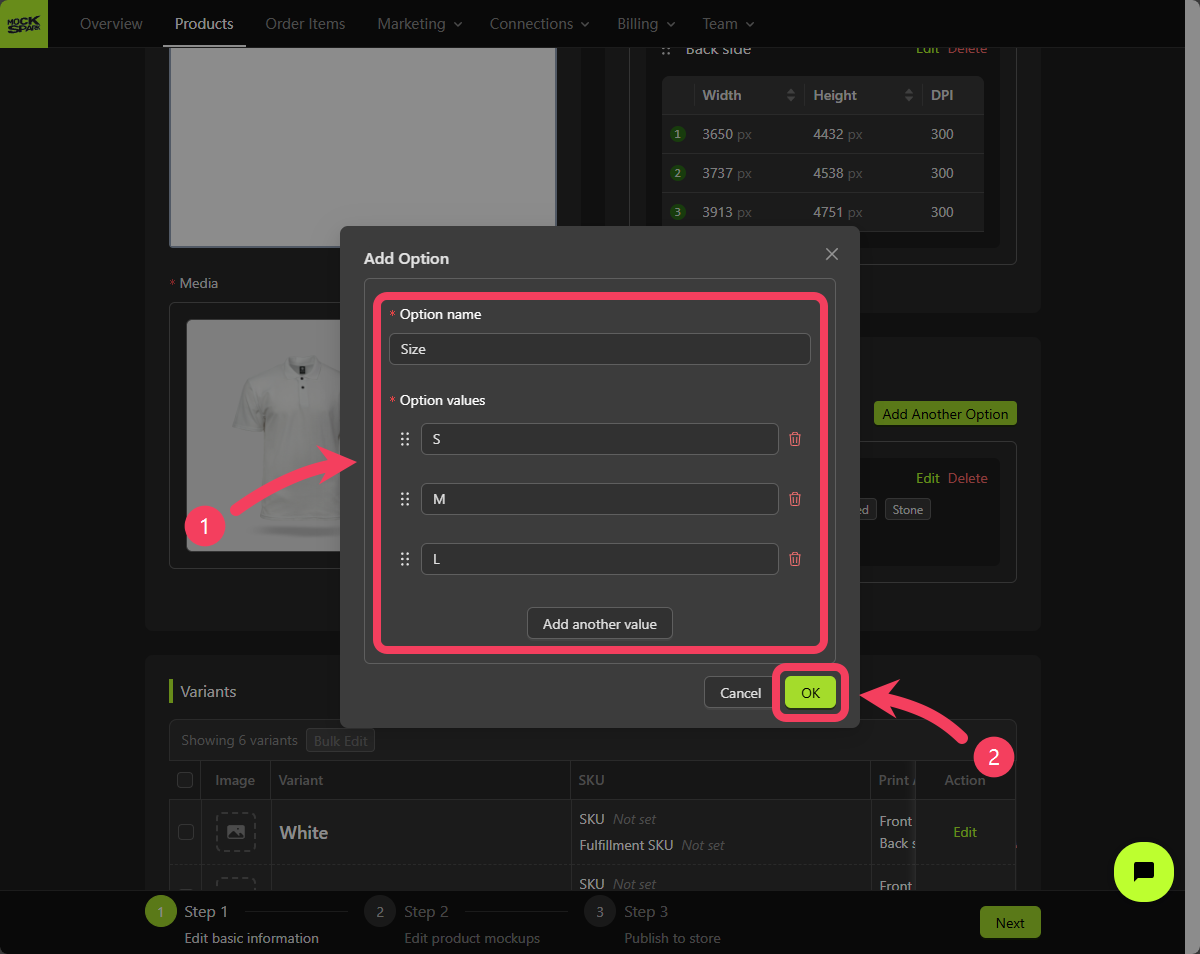 Once you've created these variant option, you can still edit, delete, or reorder them as needed.
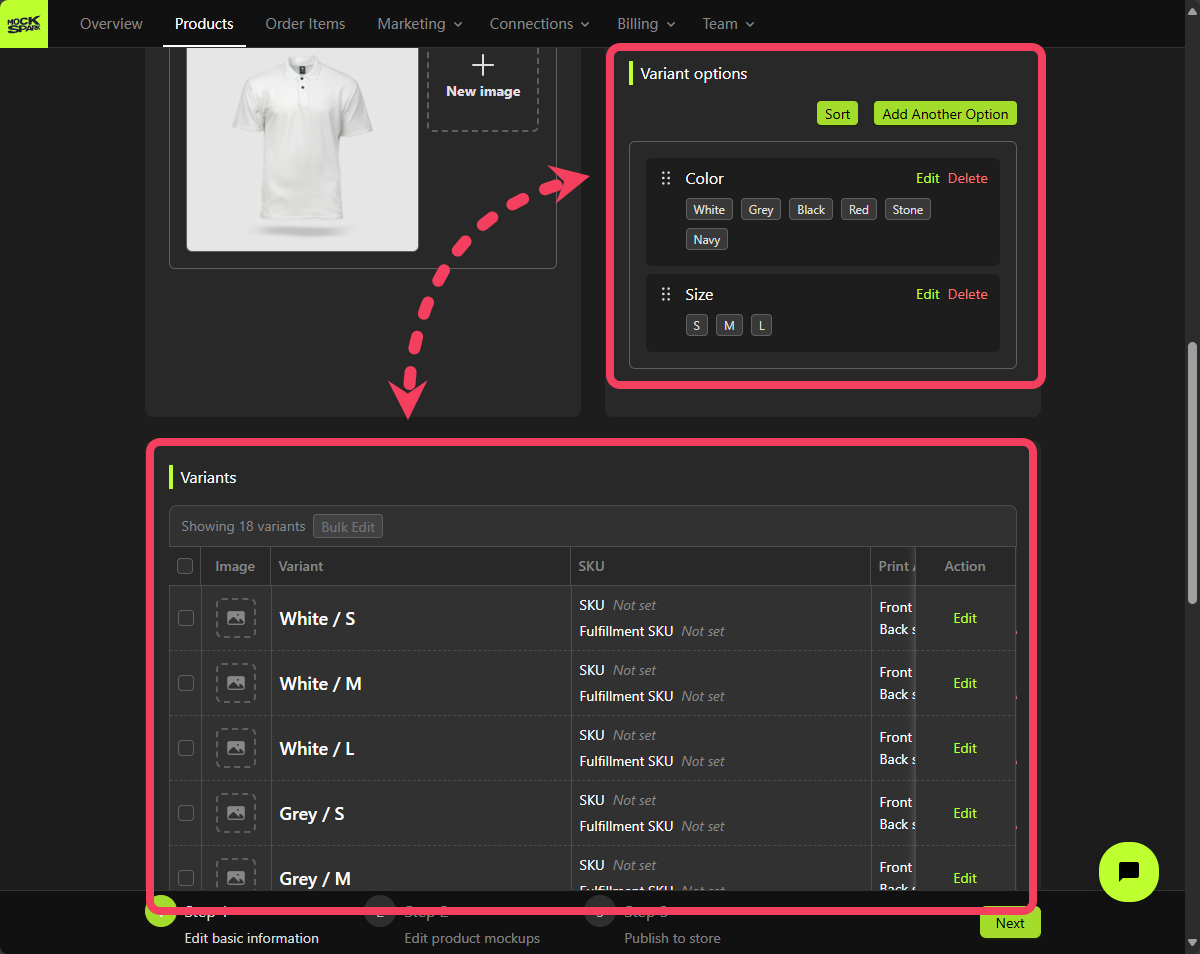
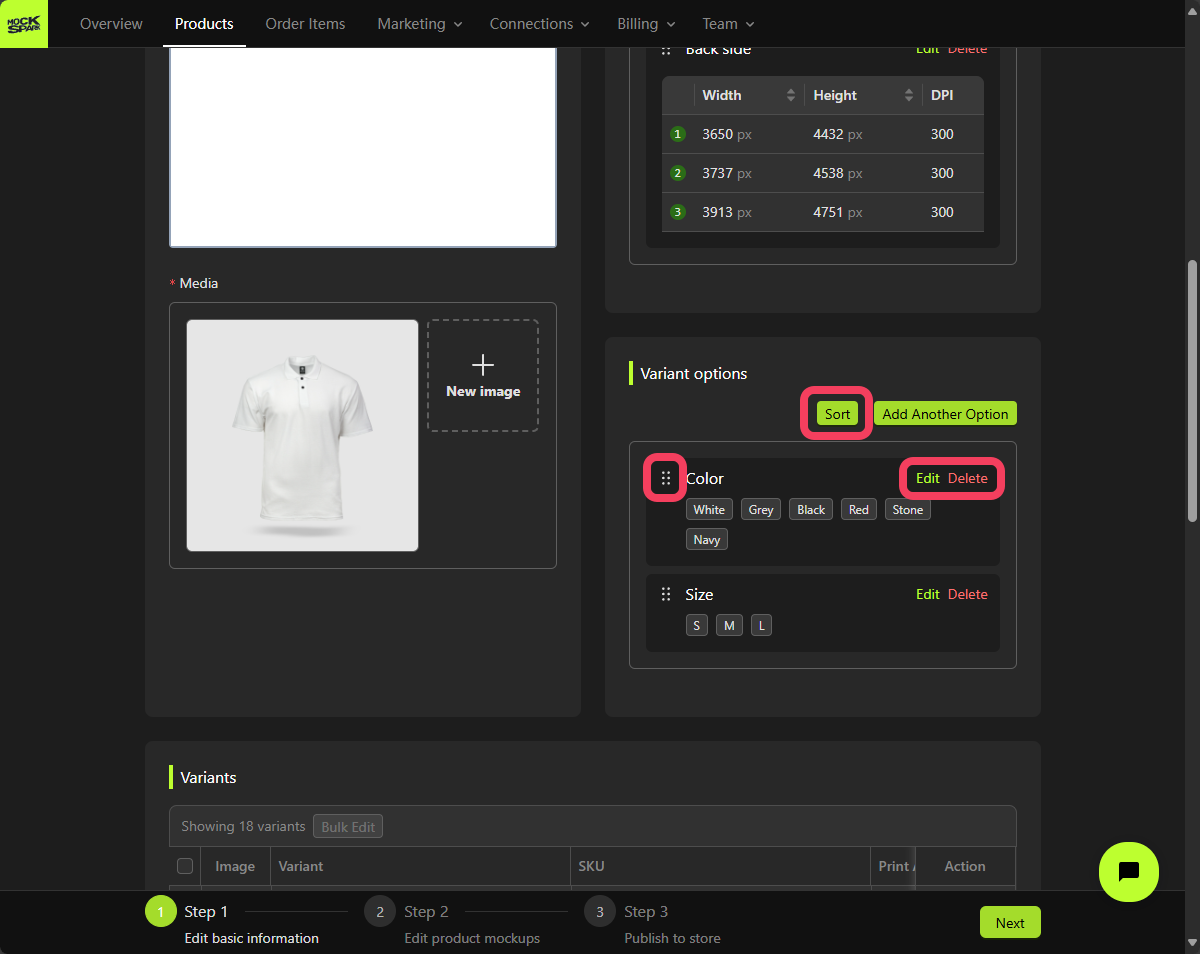 ### Variants
Once you've created the two variant options, such as `Color` and `Size`, the system will automatically generate a variant table that combines these options for your product.
In the **Variants** table, you can view all the different versions of your product.
### Variants
Once you've created the two variant options, such as `Color` and `Size`, the system will automatically generate a variant table that combines these options for your product.
In the **Variants** table, you can view all the different versions of your product.
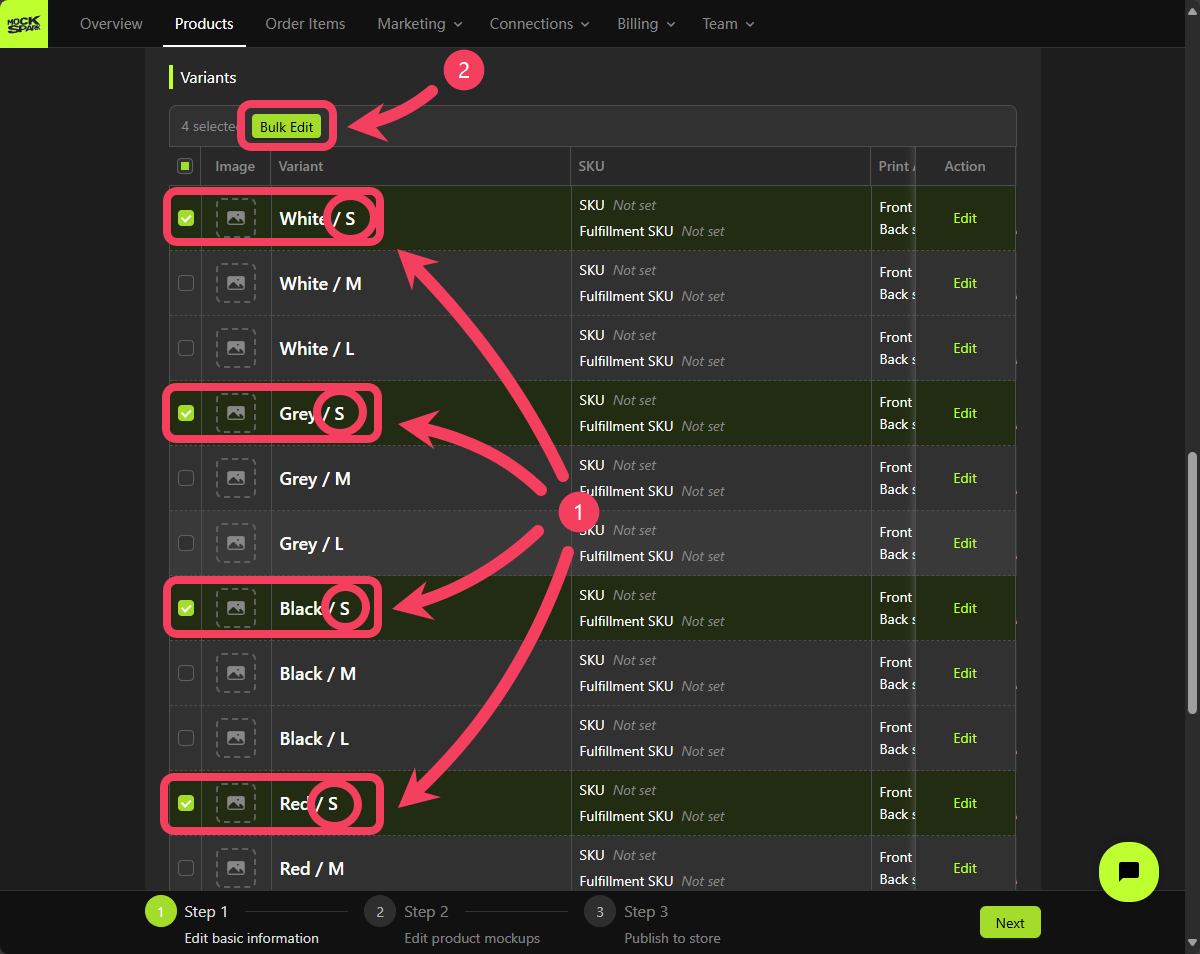
 1. In the **Variants** table, we’ve selected all product variants in size `S`.
2. Click on **Bulk Edit**.
1. In the **Variants** table, we’ve selected all product variants in size `S`.
2. Click on **Bulk Edit**.
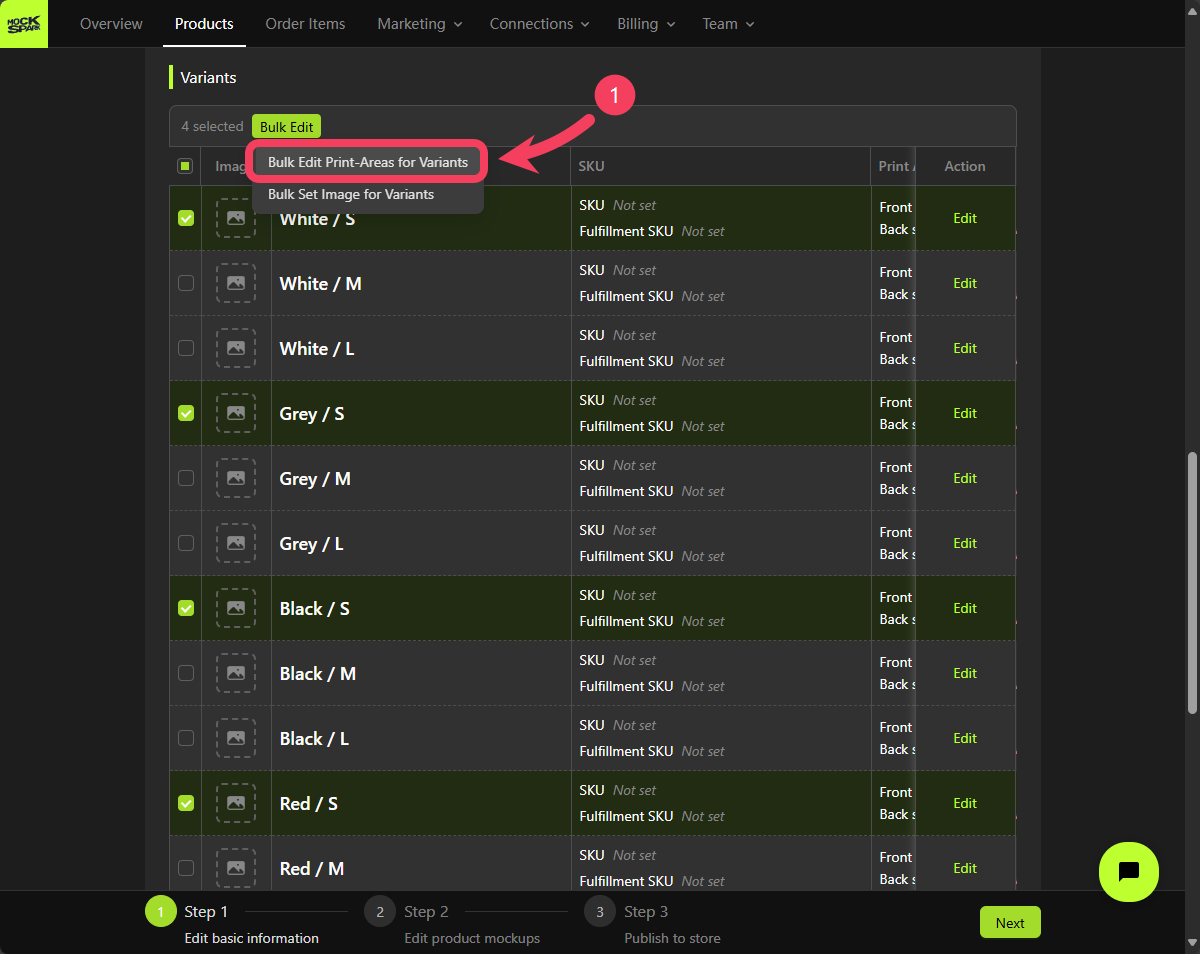
 Select **Bulk Edit Print Areas for Variants**.
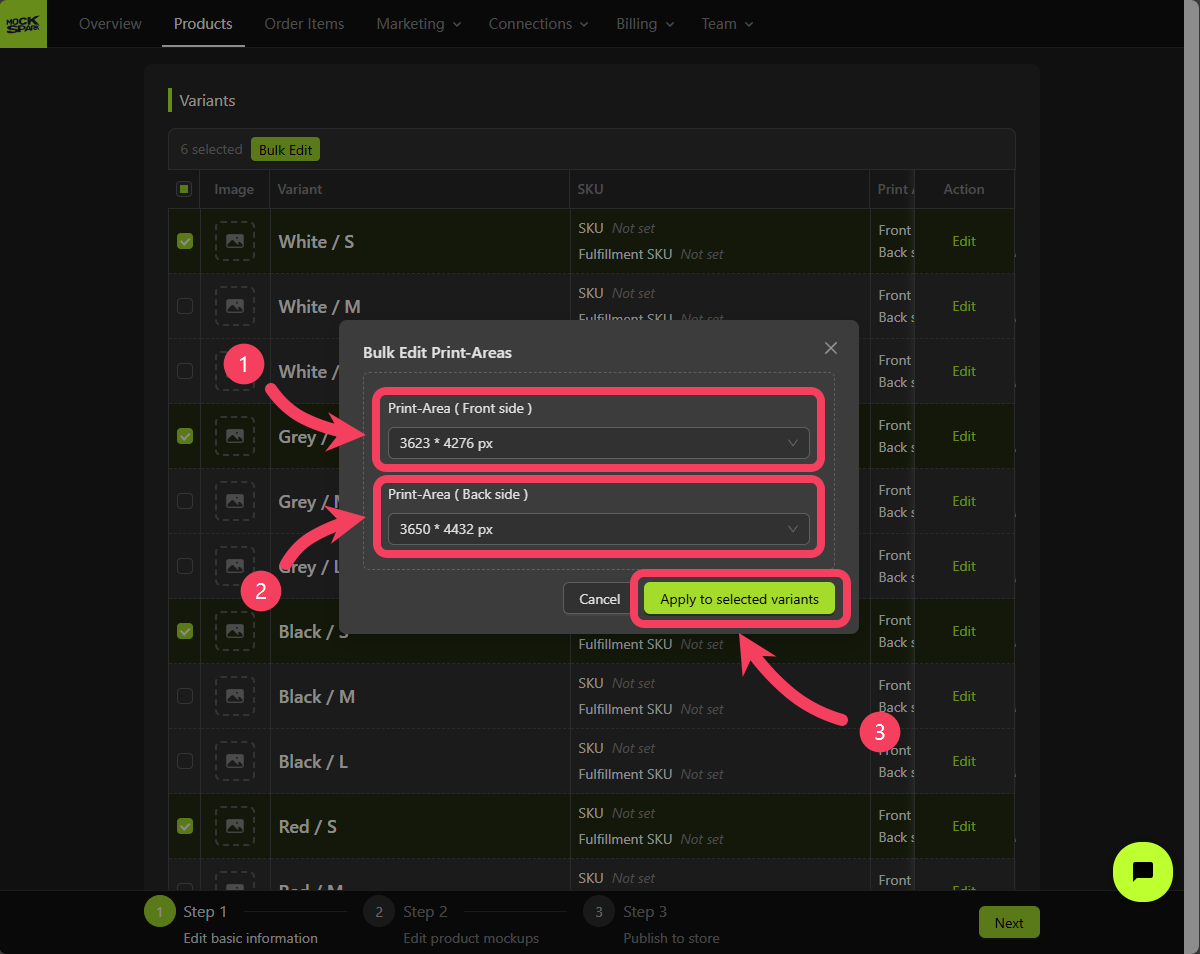
 1. For the **Print Area (Front side)** field, select `3623 × 4276 px`.
2. For the **Print Area (Back side)** field, select `3650 × 4432 px`.
3. Click **Apply to Selected Variants**.
1. For the **Print Area (Front side)** field, select `3623 × 4276 px`.
2. For the **Print Area (Back side)** field, select `3650 × 4432 px`.
3. Click **Apply to Selected Variants**.
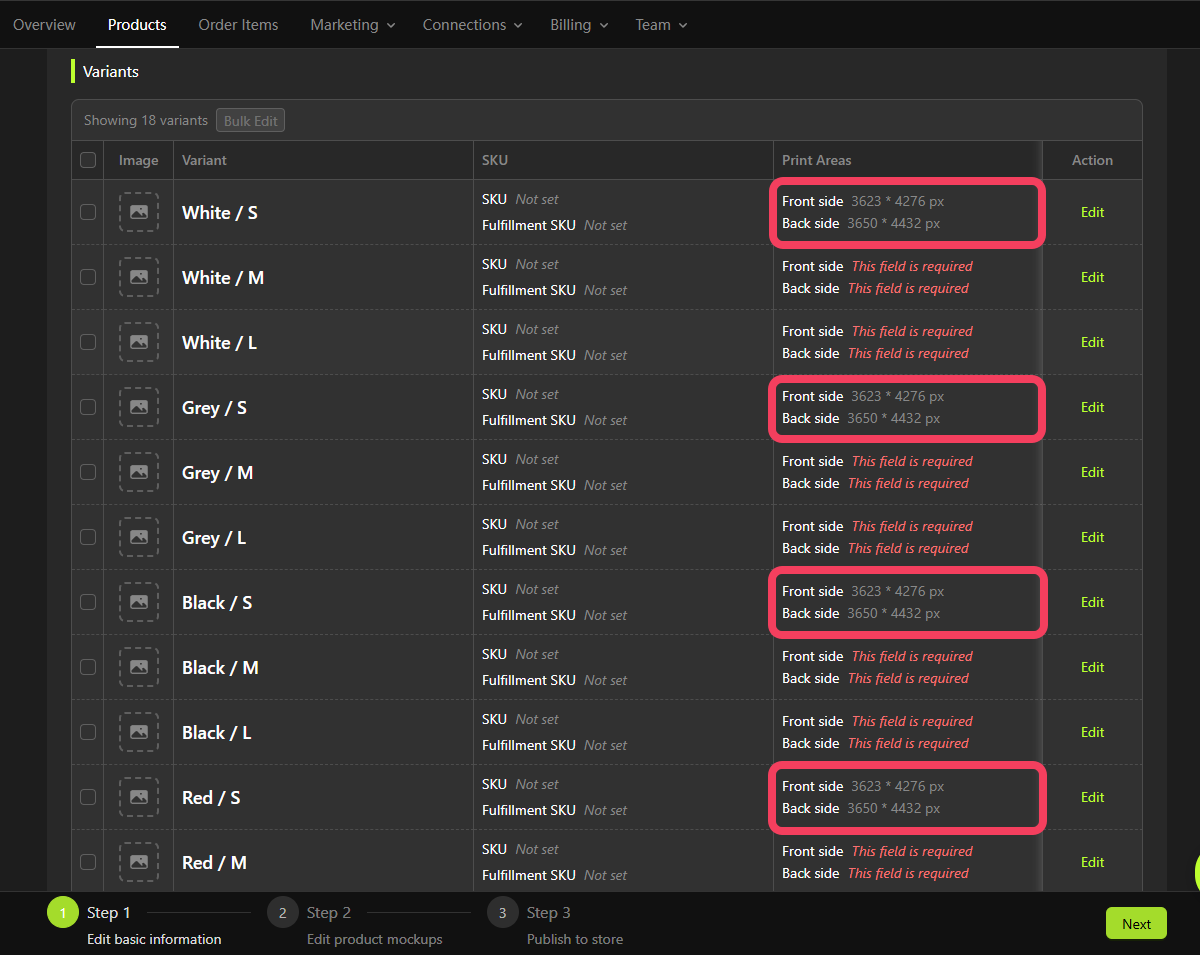
 In the table, you’ll see that the Print Area values for the size `S` variant have been applied in bulk.
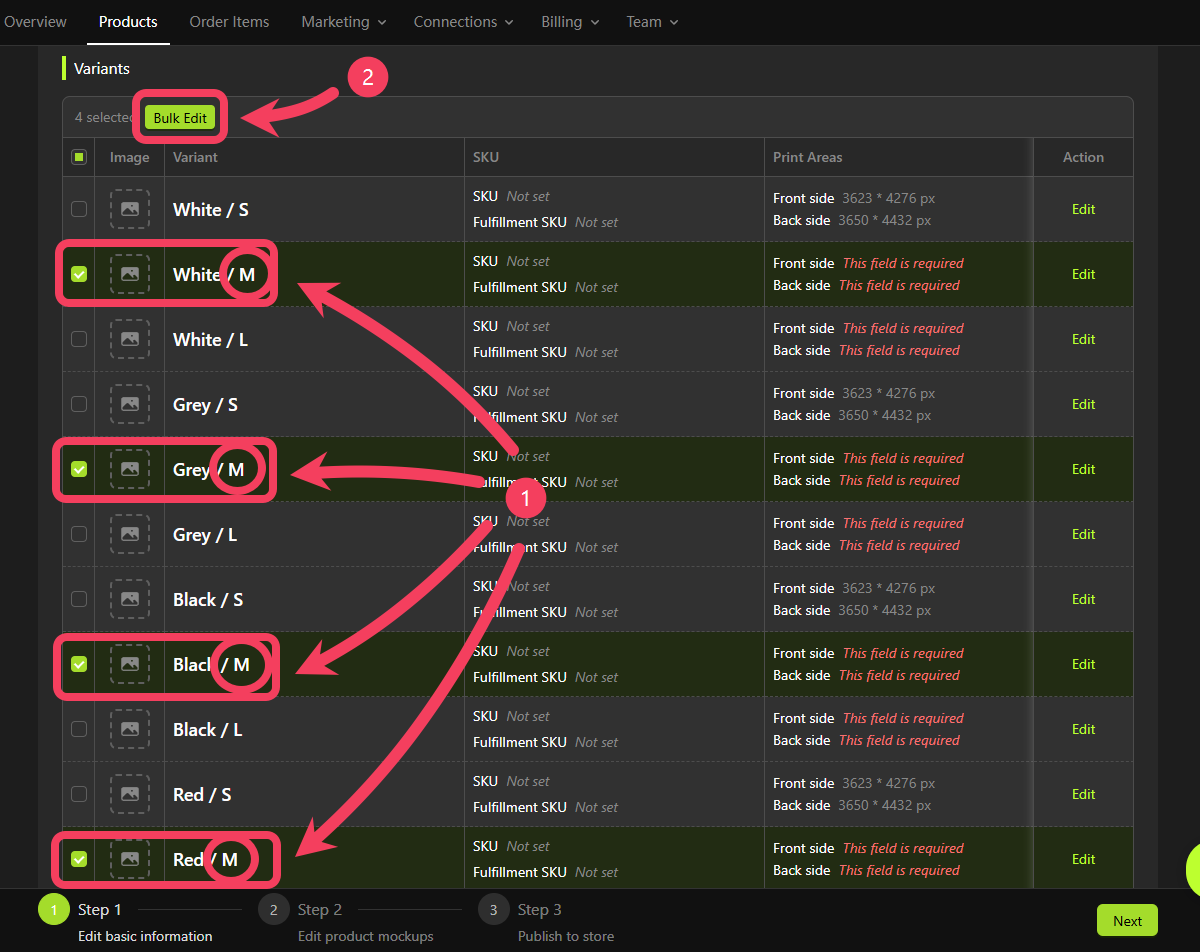
 In the same way:
1. In the **Variants** table, check all the variants that are size `M`.
2. Click **Bulk Edit** and select **Bulk Edit Print Areas for Variants**.
In the same way:
1. In the **Variants** table, check all the variants that are size `M`.
2. Click **Bulk Edit** and select **Bulk Edit Print Areas for Variants**.
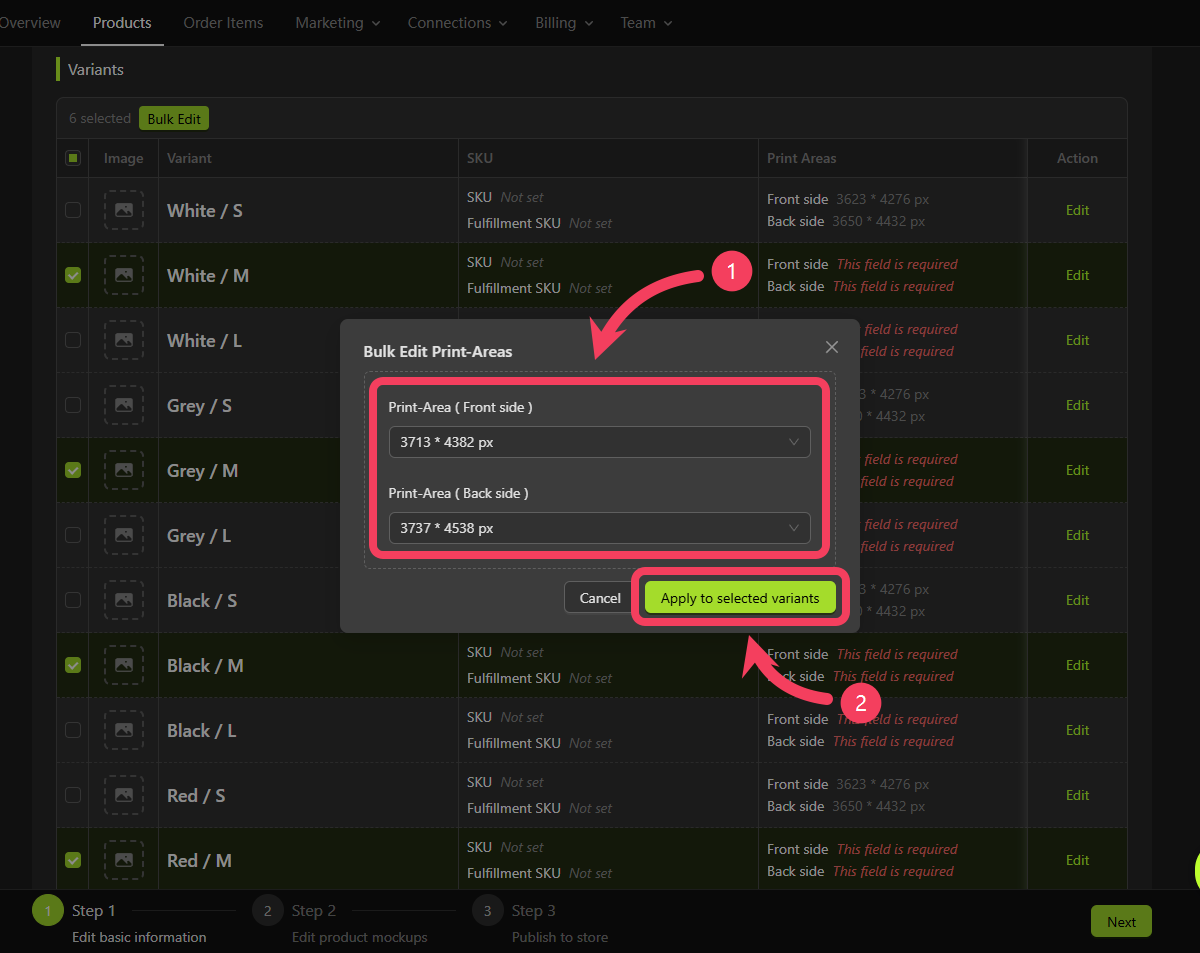
 1. For the **Print Area (Front side)** field, select `3713 * 4382 px`.
2. For the **Print Area (Back side)** field, select `3737 * 4538 px`.
3. Click **Apply to Selected Variants**.
1. For the **Print Area (Front side)** field, select `3713 * 4382 px`.
2. For the **Print Area (Back side)** field, select `3737 * 4538 px`.
3. Click **Apply to Selected Variants**.
 In the same way:
1. In the **Variants** table, check all the variants that are size `L`.
2. Click **Bulk Edit** and select **Bulk Edit Print Areas for Variants**.
In the same way:
1. In the **Variants** table, check all the variants that are size `L`.
2. Click **Bulk Edit** and select **Bulk Edit Print Areas for Variants**.
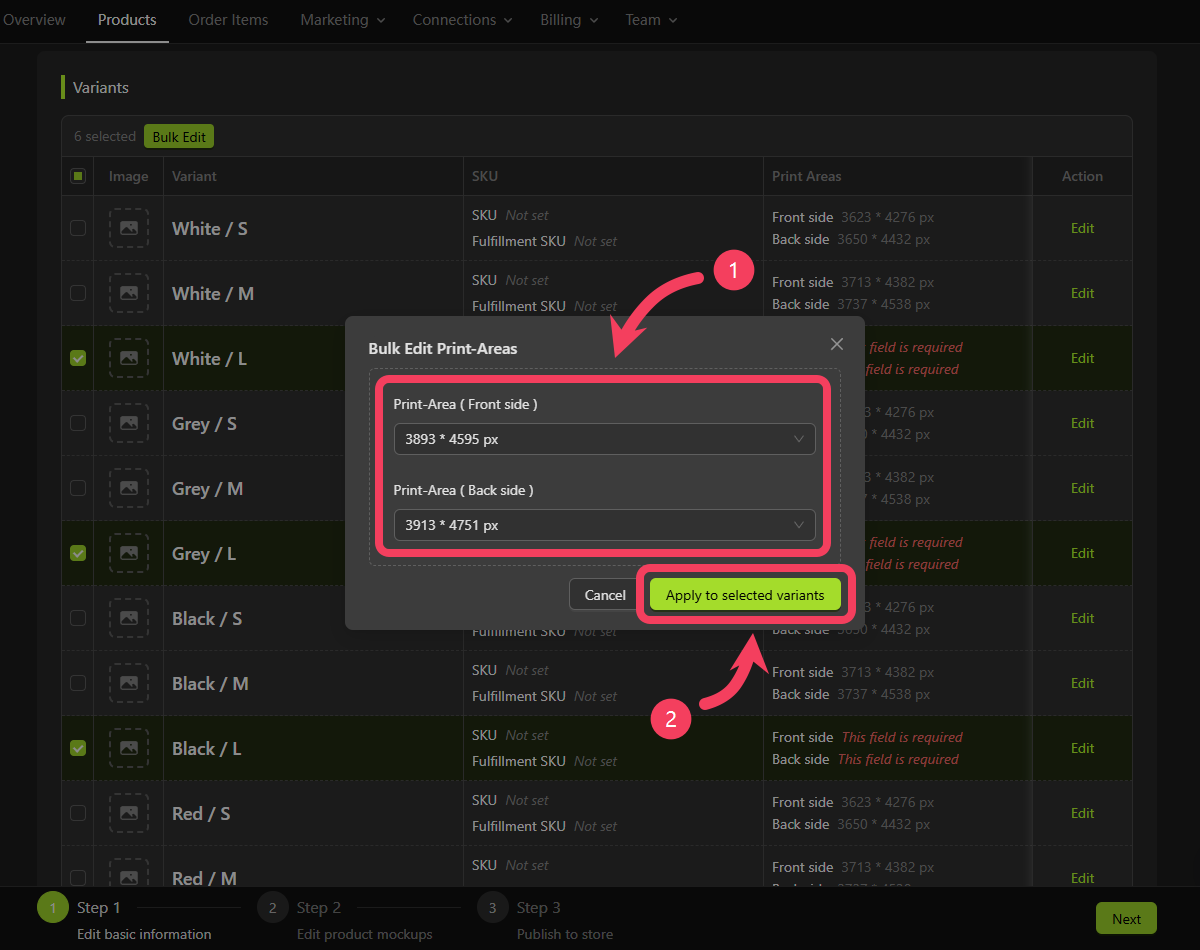
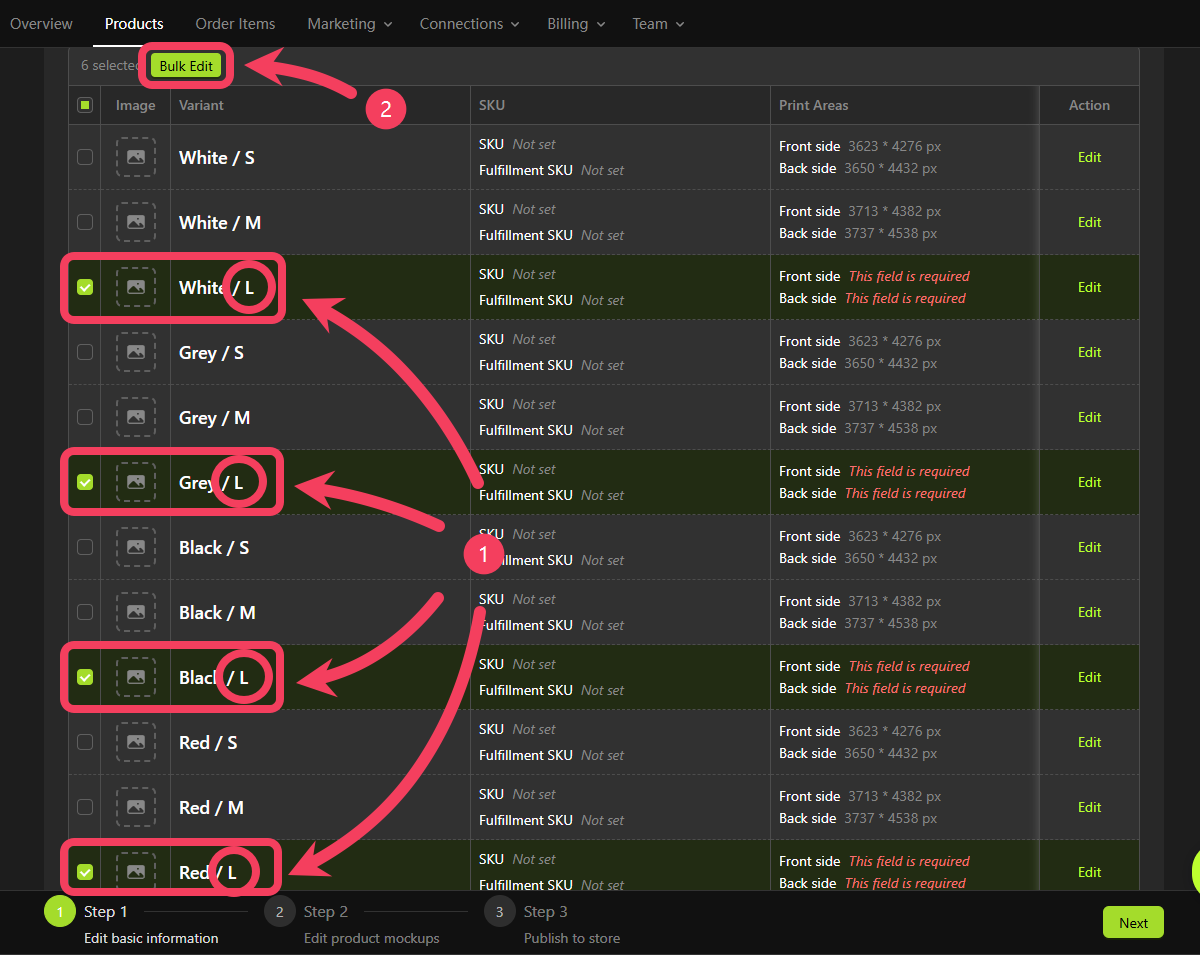 1. For the **Print Area (Front side)** field, select `3893 * 4595 px`.
2. For the **Print Area (Back side)** field, select `3913 * 4751 px`.
3. Click **Apply to Selected Variants**.
1. For the **Print Area (Front side)** field, select `3893 * 4595 px`.
2. For the **Print Area (Back side)** field, select `3913 * 4751 px`.
3. Click **Apply to Selected Variants**.
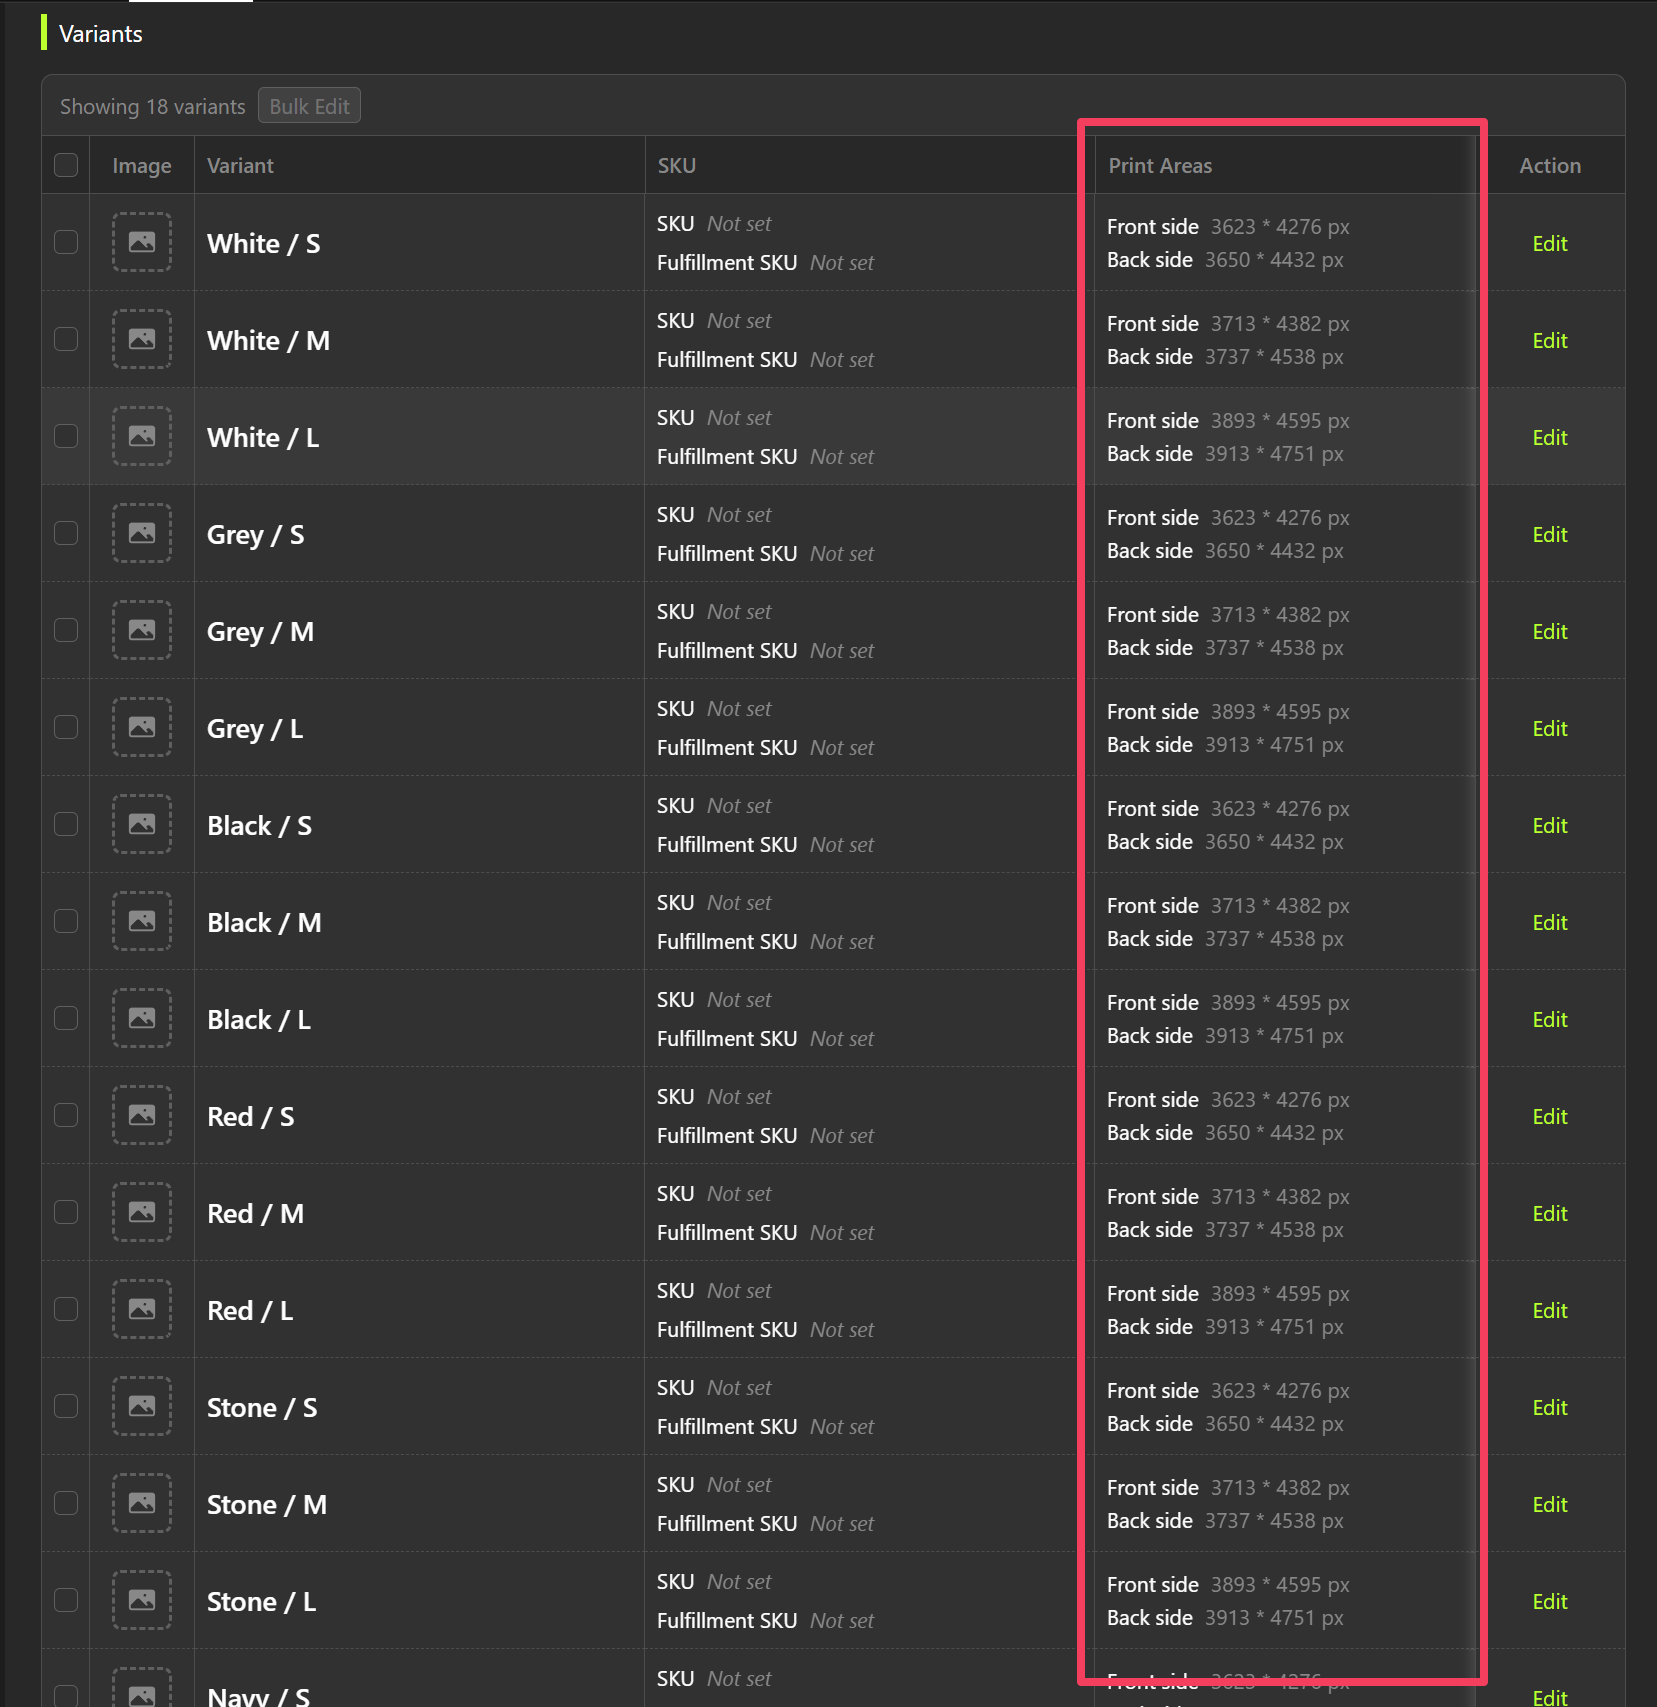
 At this point, all data in the `Print Areas` column of the **Variants** table has been fully set up.
 1. In the **Variants** table, select all variants with the color set to `White`.
2. Click **Bulk Edit**.
1. In the **Variants** table, select all variants with the color set to `White`.
2. Click **Bulk Edit**.
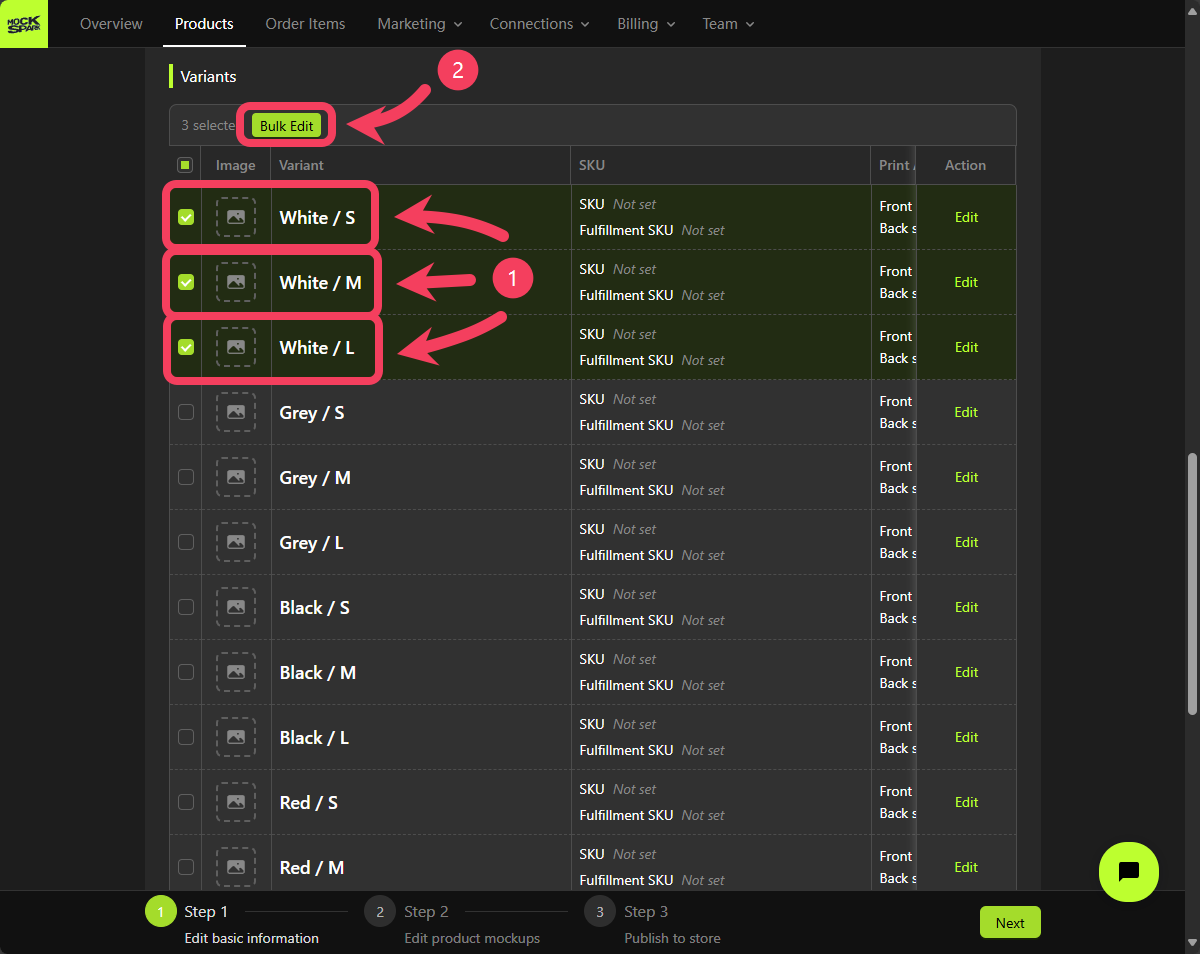 select **Bulk Set Image for Variants**.
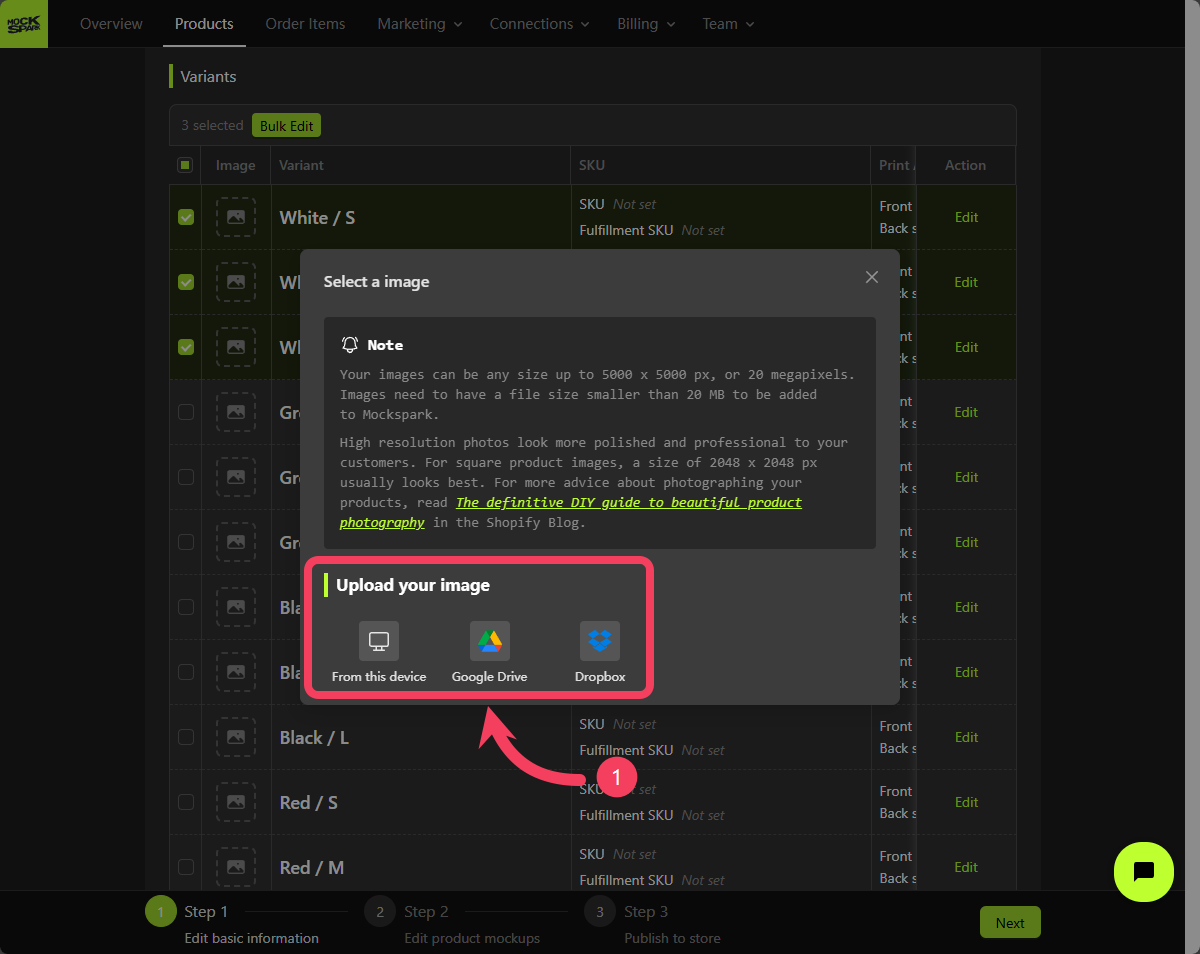
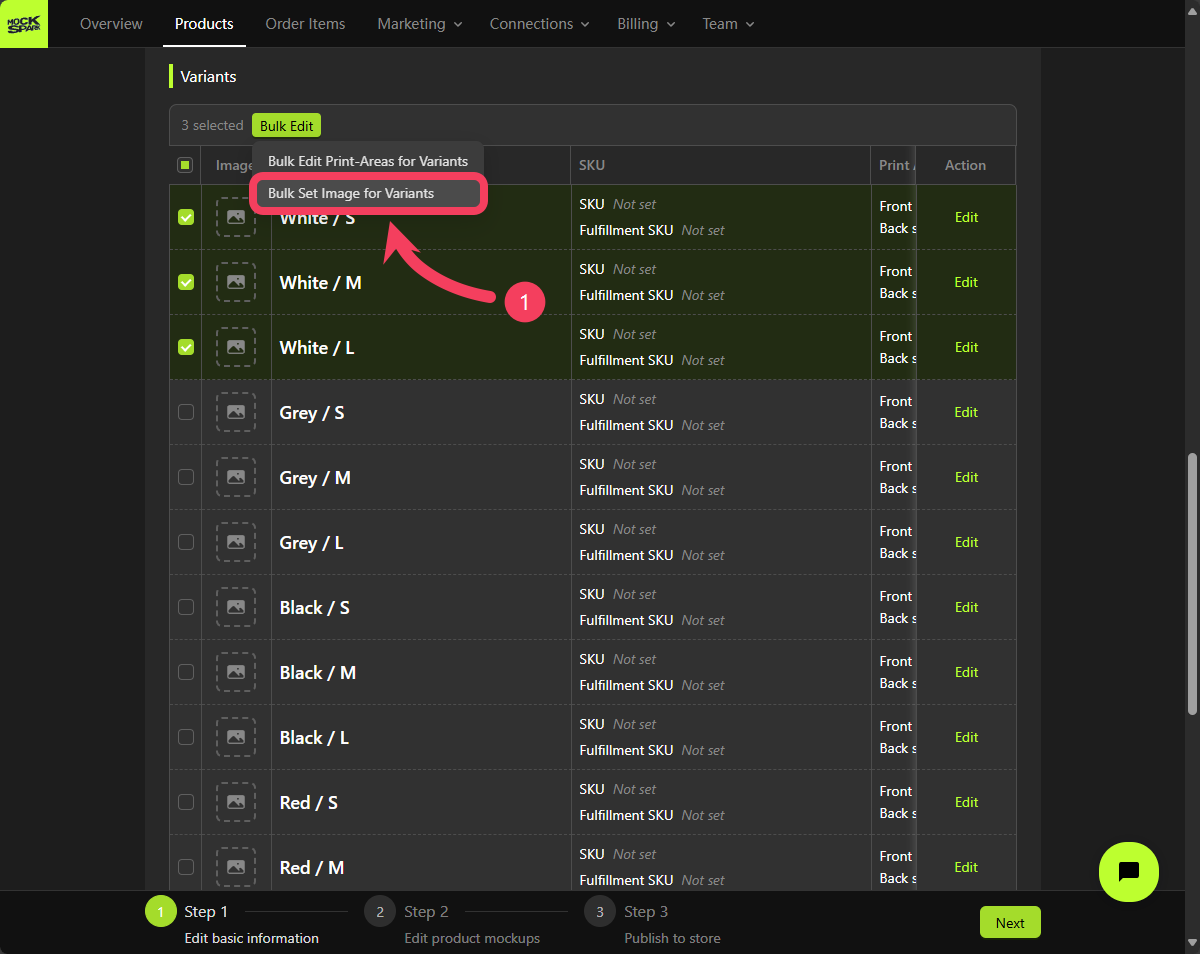 Choose a method to upload images for the `White` variants.
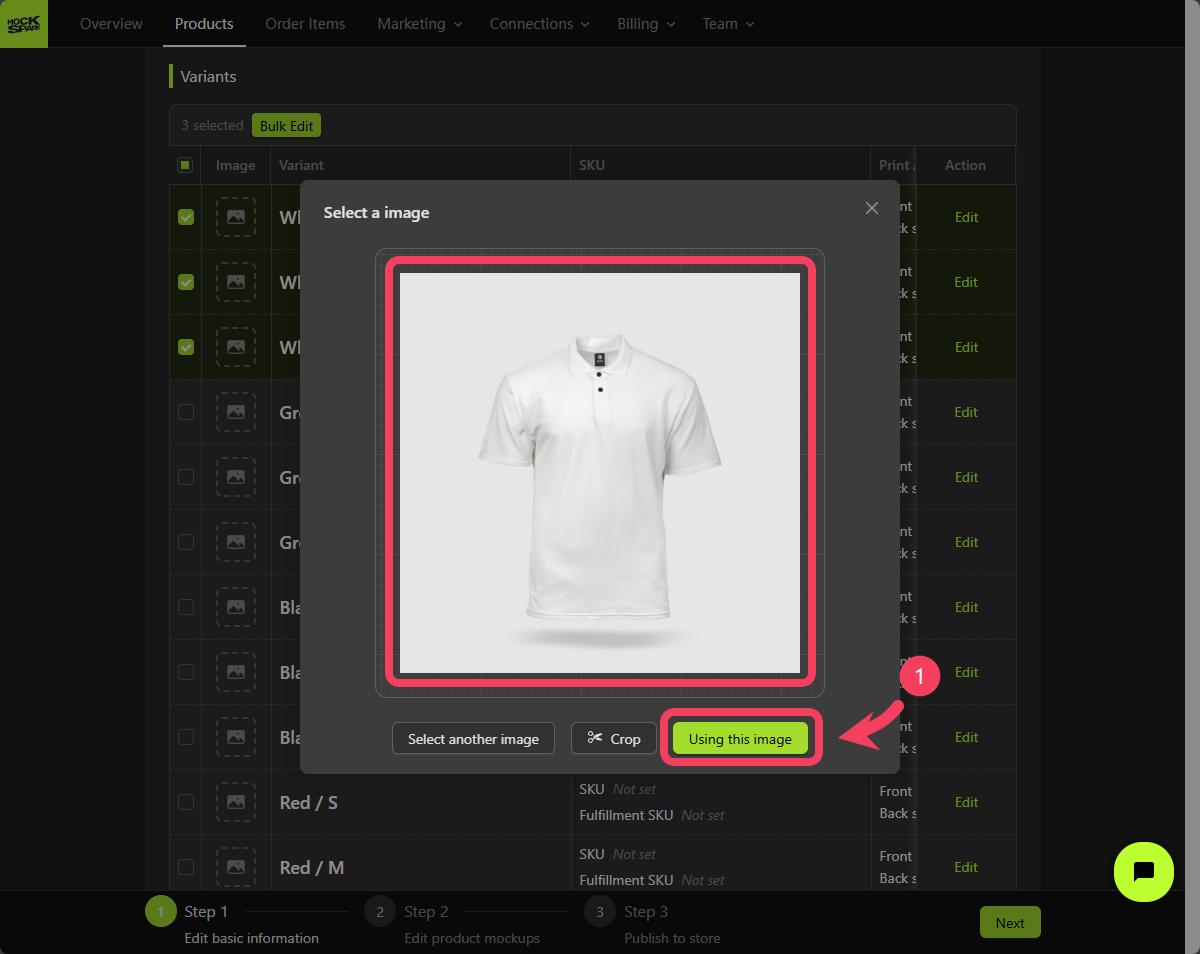
 Since these variants are `White`, we'll use an image that shows the front view of the product in `White`.
Once the upload is complete, click **Using this image**.
Since these variants are `White`, we'll use an image that shows the front view of the product in `White`.
Once the upload is complete, click **Using this image**.
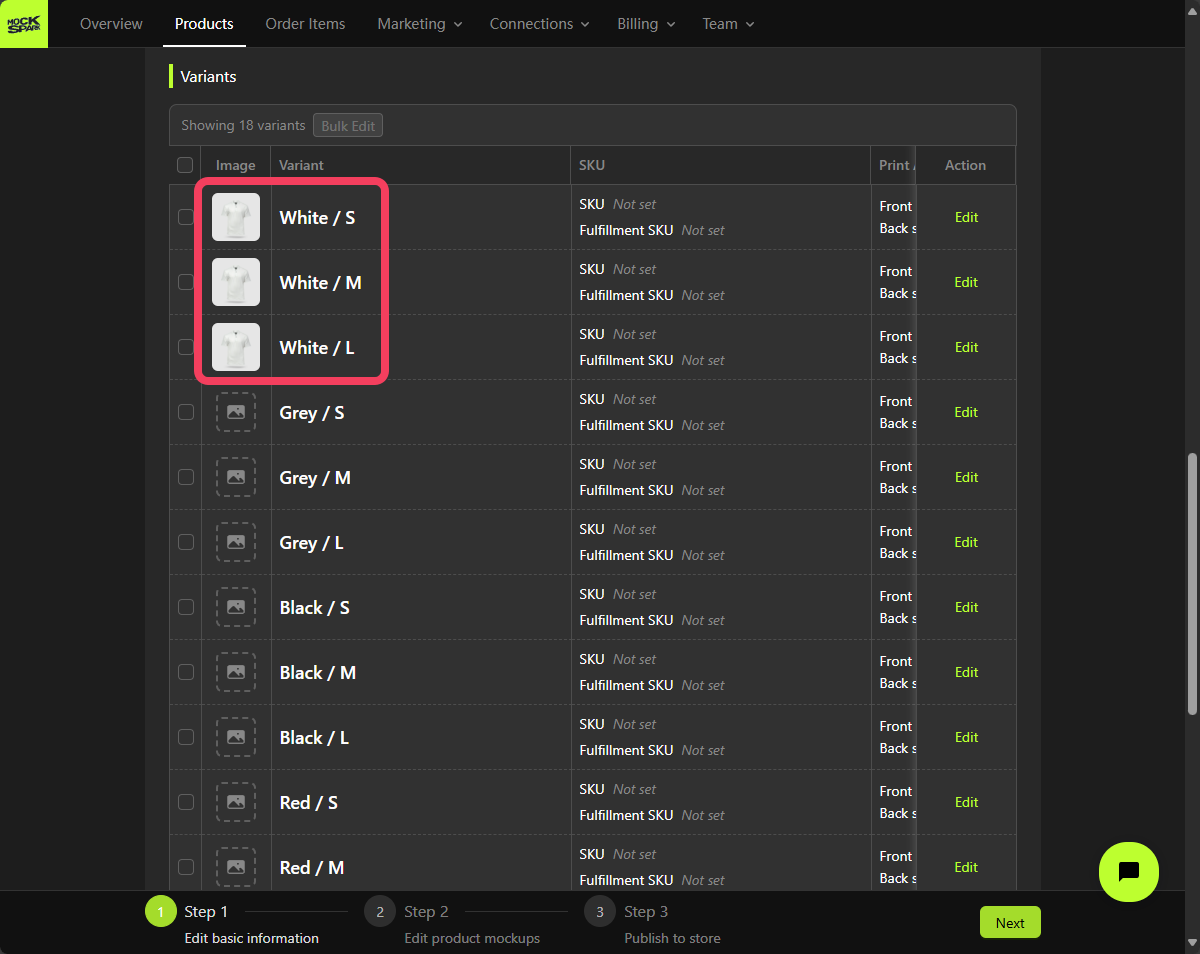
 In the **Variants** table, you can see that the images for all variants with the color `White` have been successfully set.
 Using the same process, upload images for the remaining variants in `Grey`, `Black`, `Red`, `Stone`, and `Navy`.
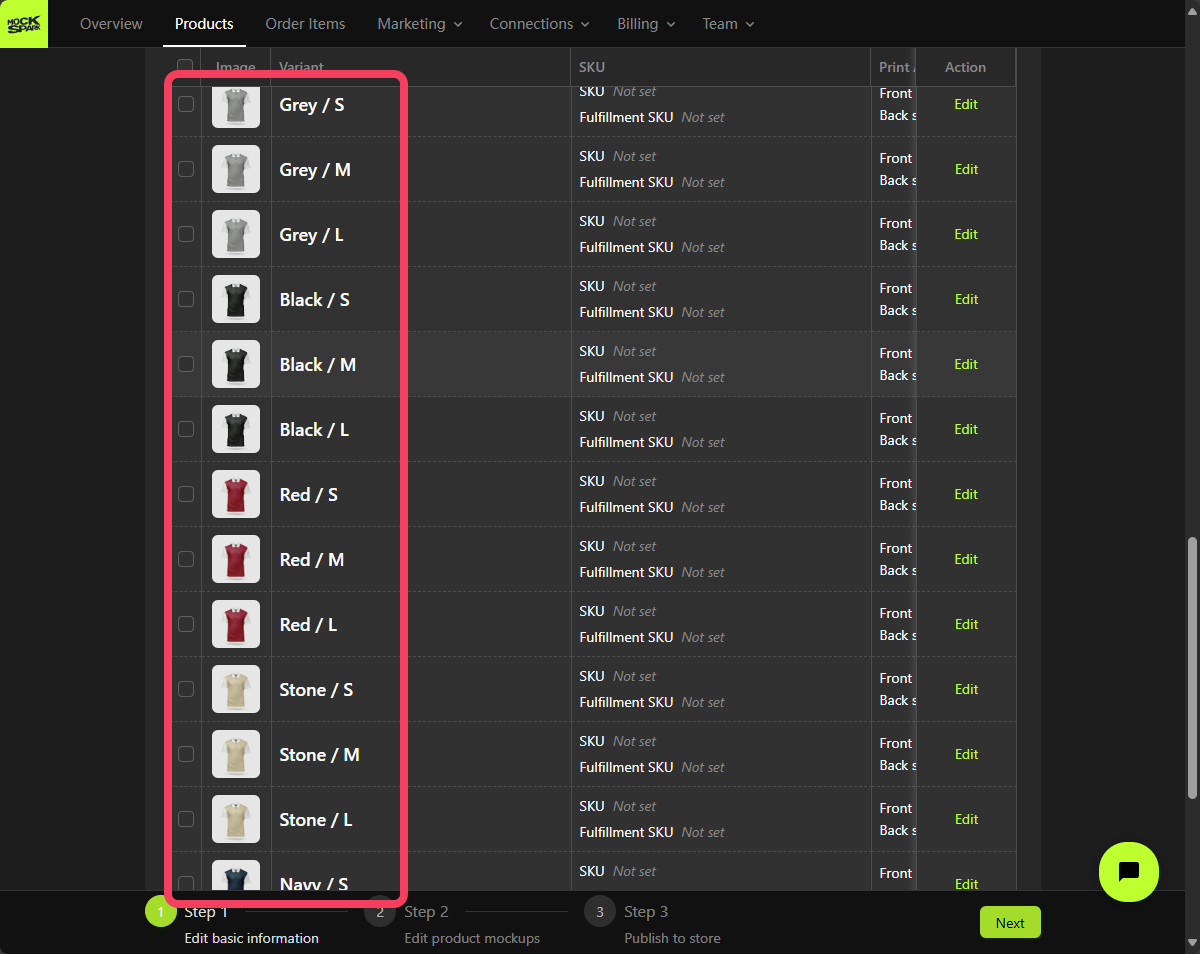 In addition to bulk editing multiple variants, you can also edit individual variants directly within the table.
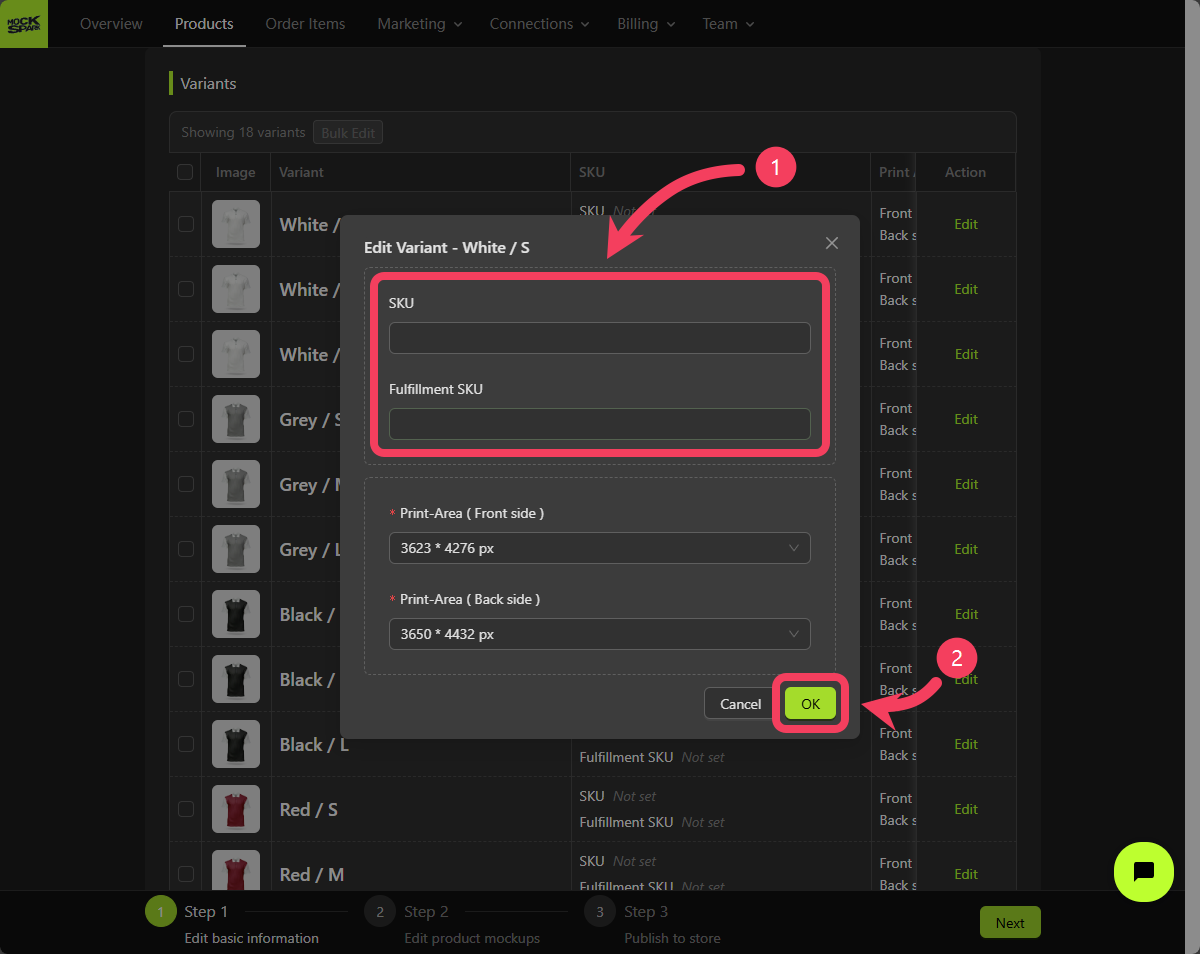
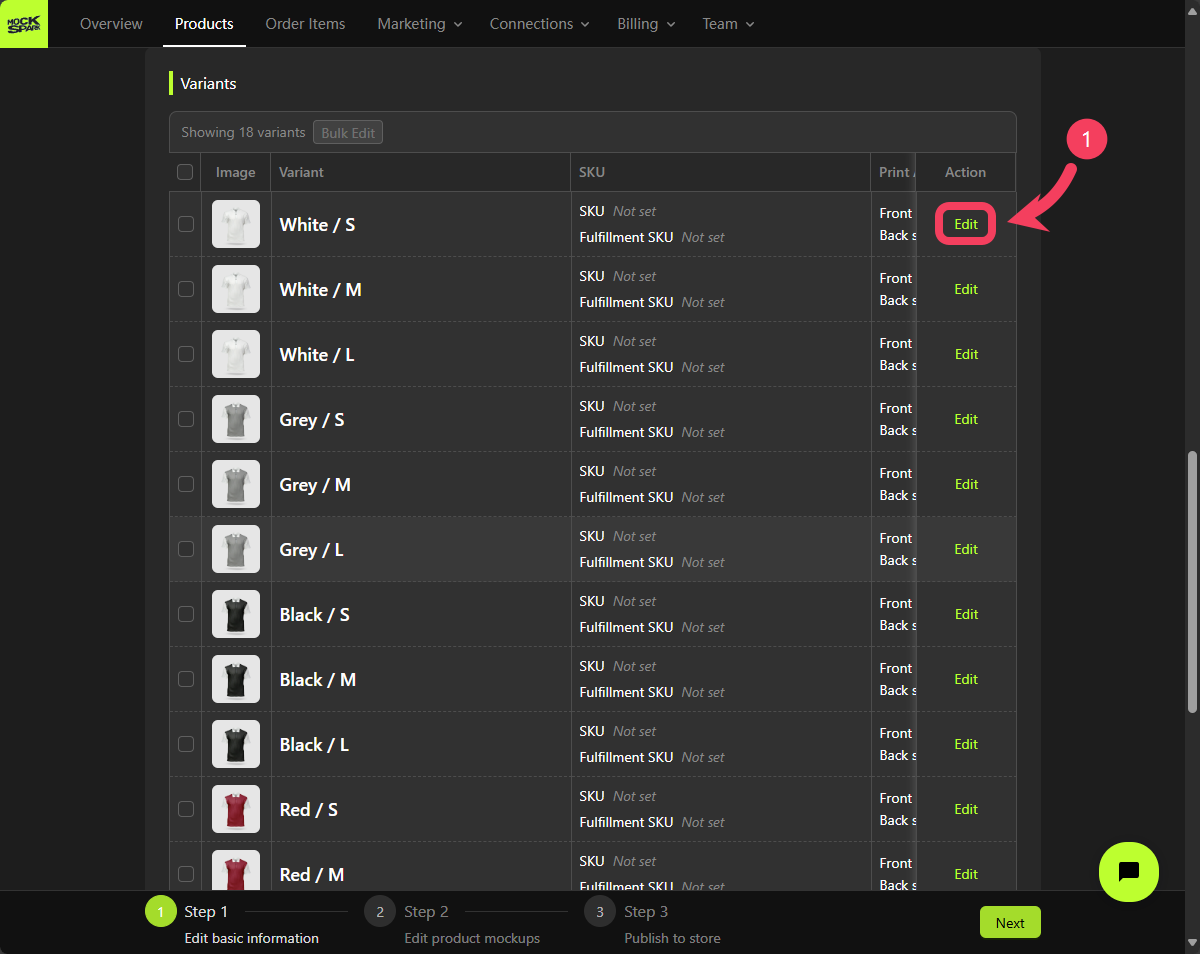 1. For example, you can update information like the `SKU` or `Fulfillment SKU` for a specific variant
2. Click **OK** to save your changes.
1. For example, you can update information like the `SKU` or `Fulfillment SKU` for a specific variant
2. Click **OK** to save your changes.
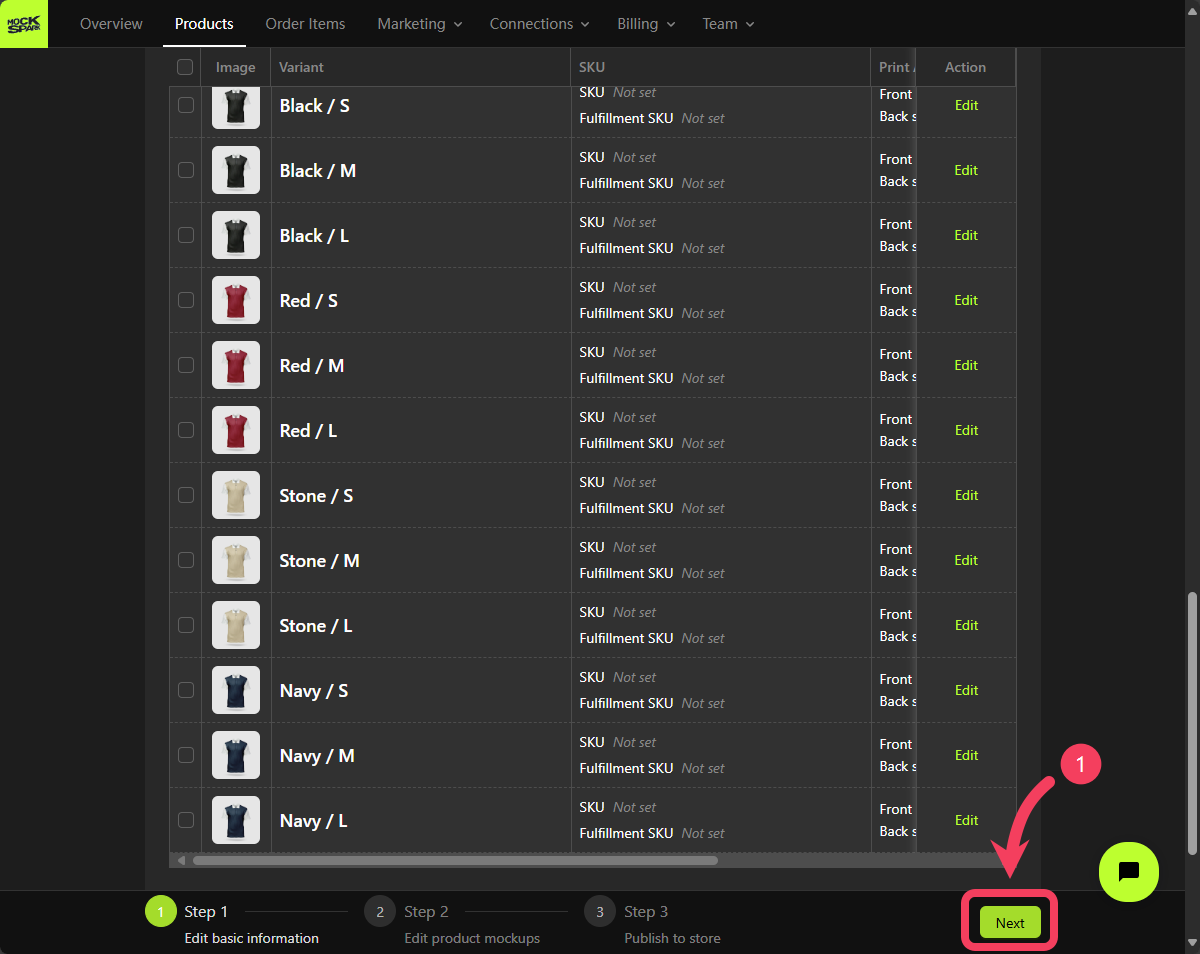
 Click **Next** to save all changes made to the product's basic information in Step 1. If you don't, any edits made on this page will not be saved.
 ## Step 2: Create Mockups
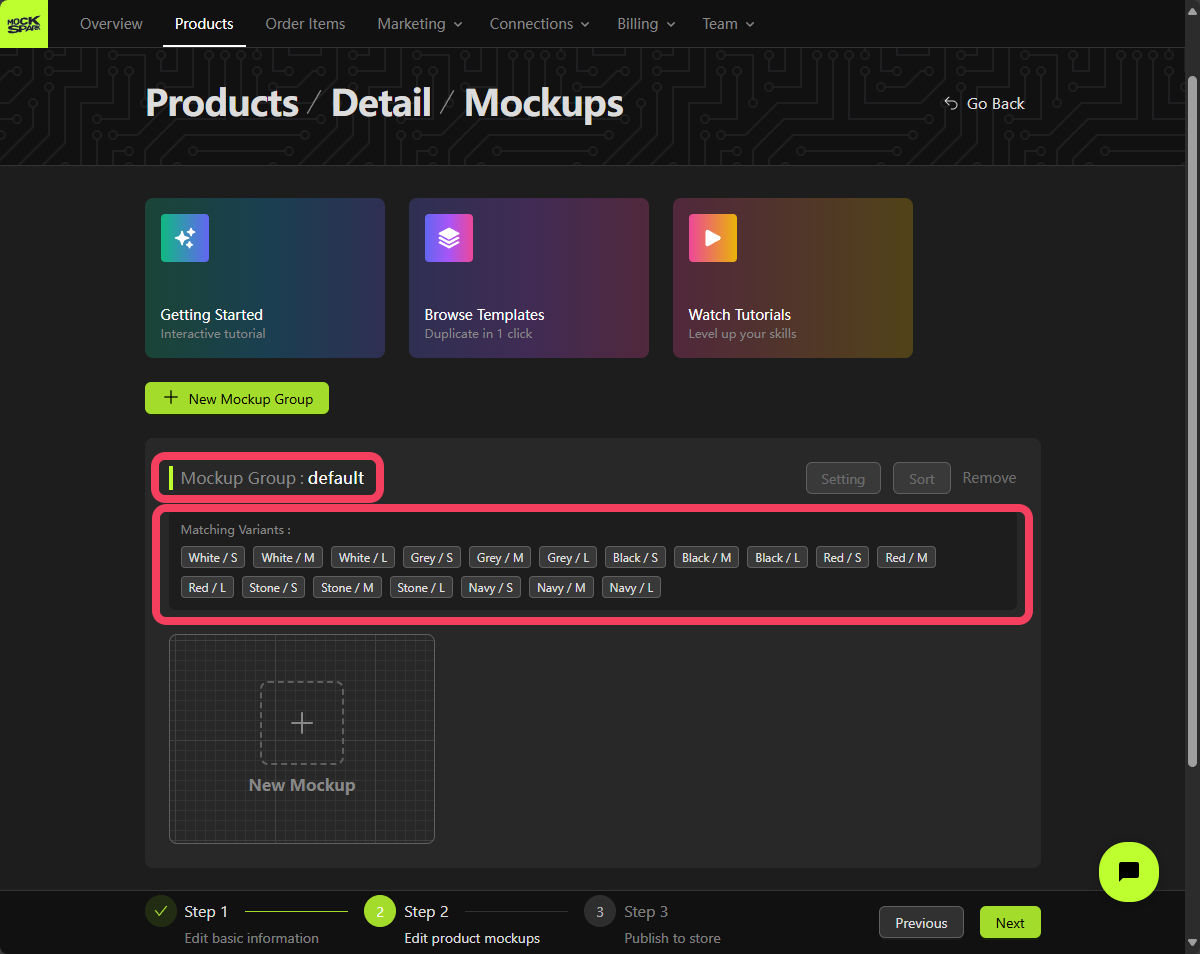
On the Step 2 screen, you’ll see a **Mockup Group** that includes all product variants. This is a system-generated group named `default`.
## Step 2: Create Mockups
On the Step 2 screen, you’ll see a **Mockup Group** that includes all product variants. This is a system-generated group named `default`.
 ### New Mockup: Front Side
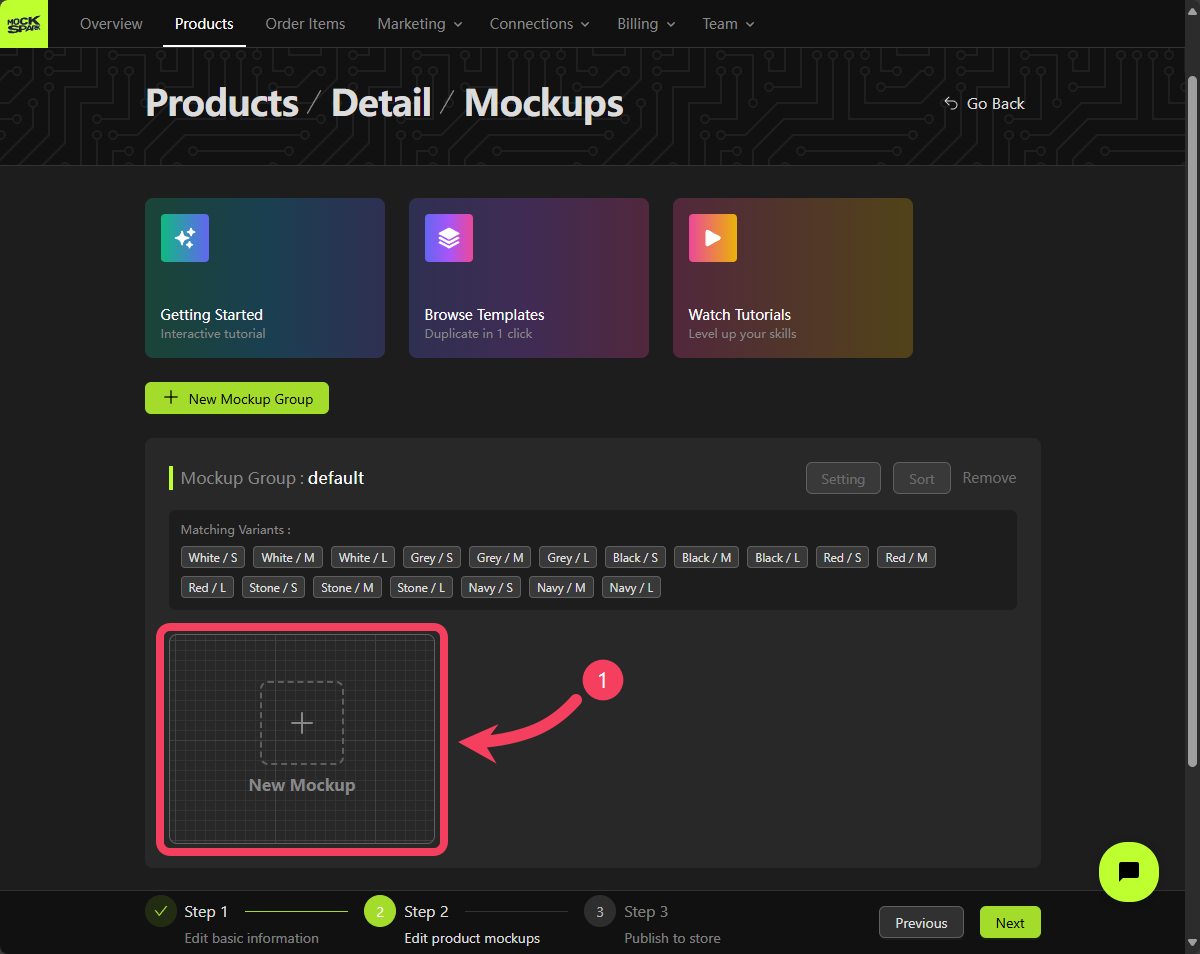
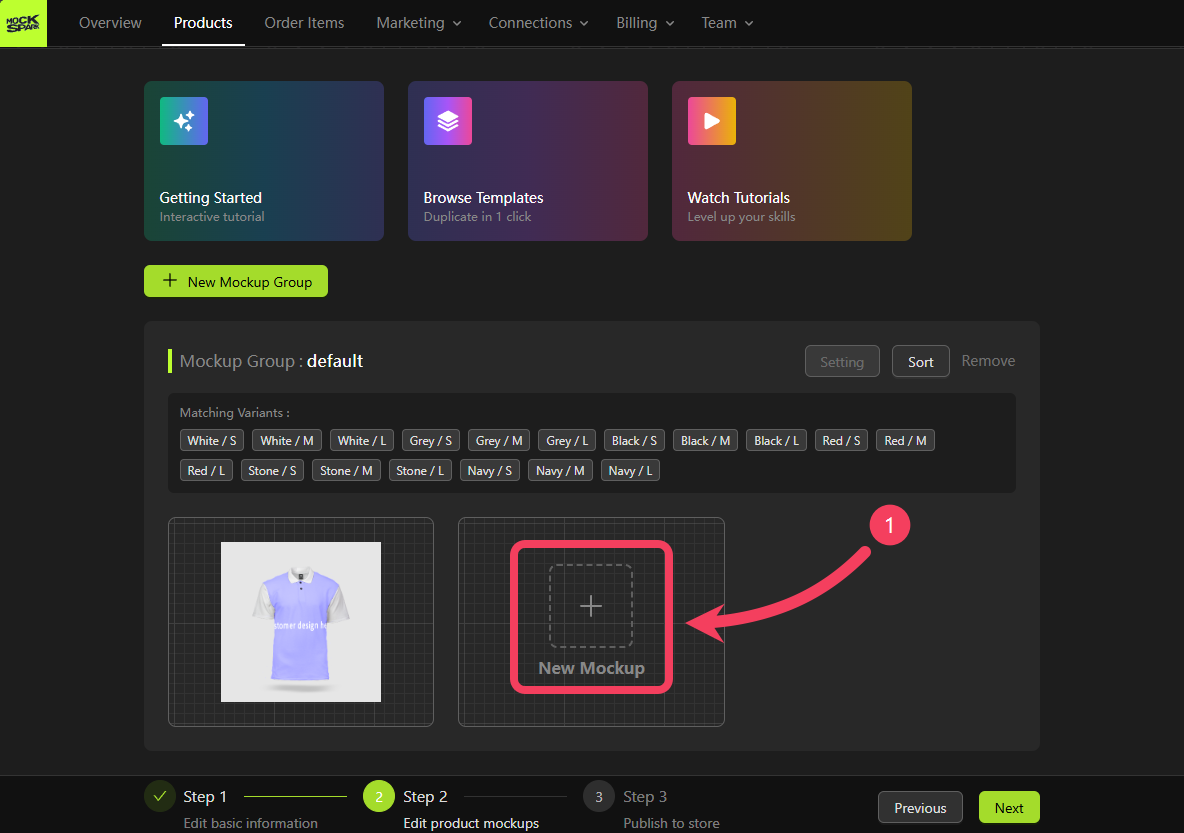
Click **New Mockup** to open the Mockup Creator and build a mockup for your product.
### New Mockup: Front Side
Click **New Mockup** to open the Mockup Creator and build a mockup for your product.
 ### Product Image
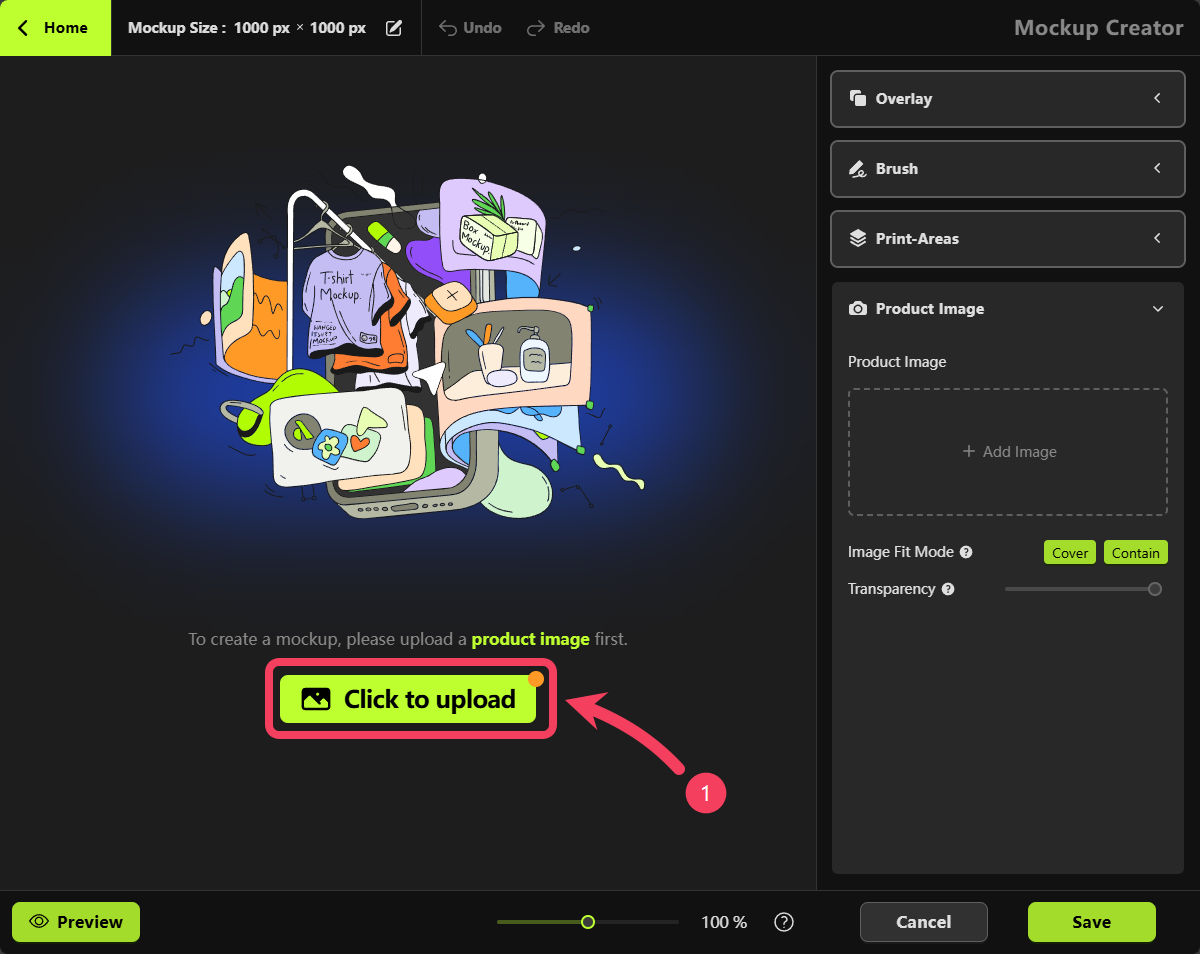
To create a mockup, begin by clicking the button shown in the image below to upload a product photo.
### Product Image
To create a mockup, begin by clicking the button shown in the image below to upload a product photo.
 Select or upload a `front-facing` image of the `White` product to create your first **Mockup**.
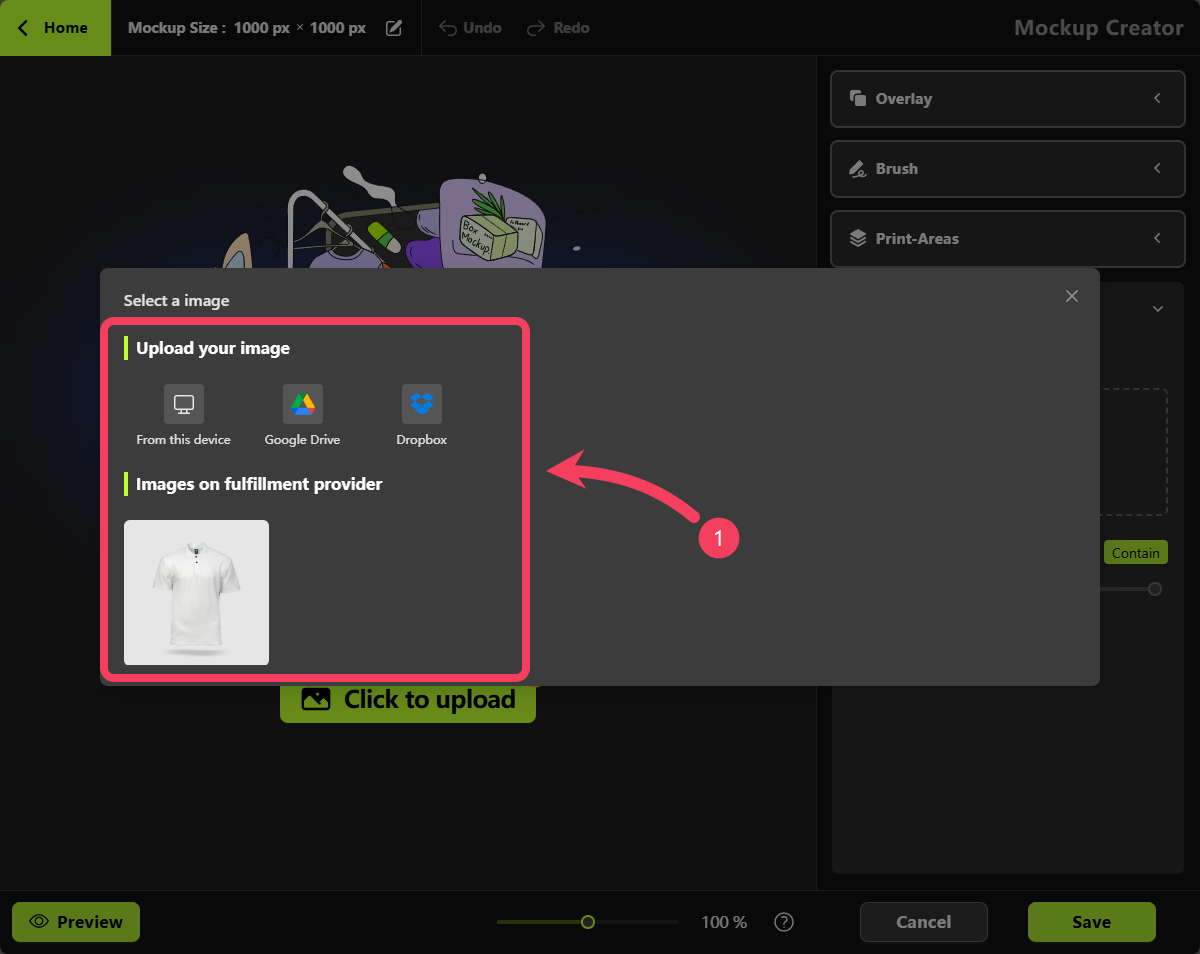 Click the **Using this image** button.
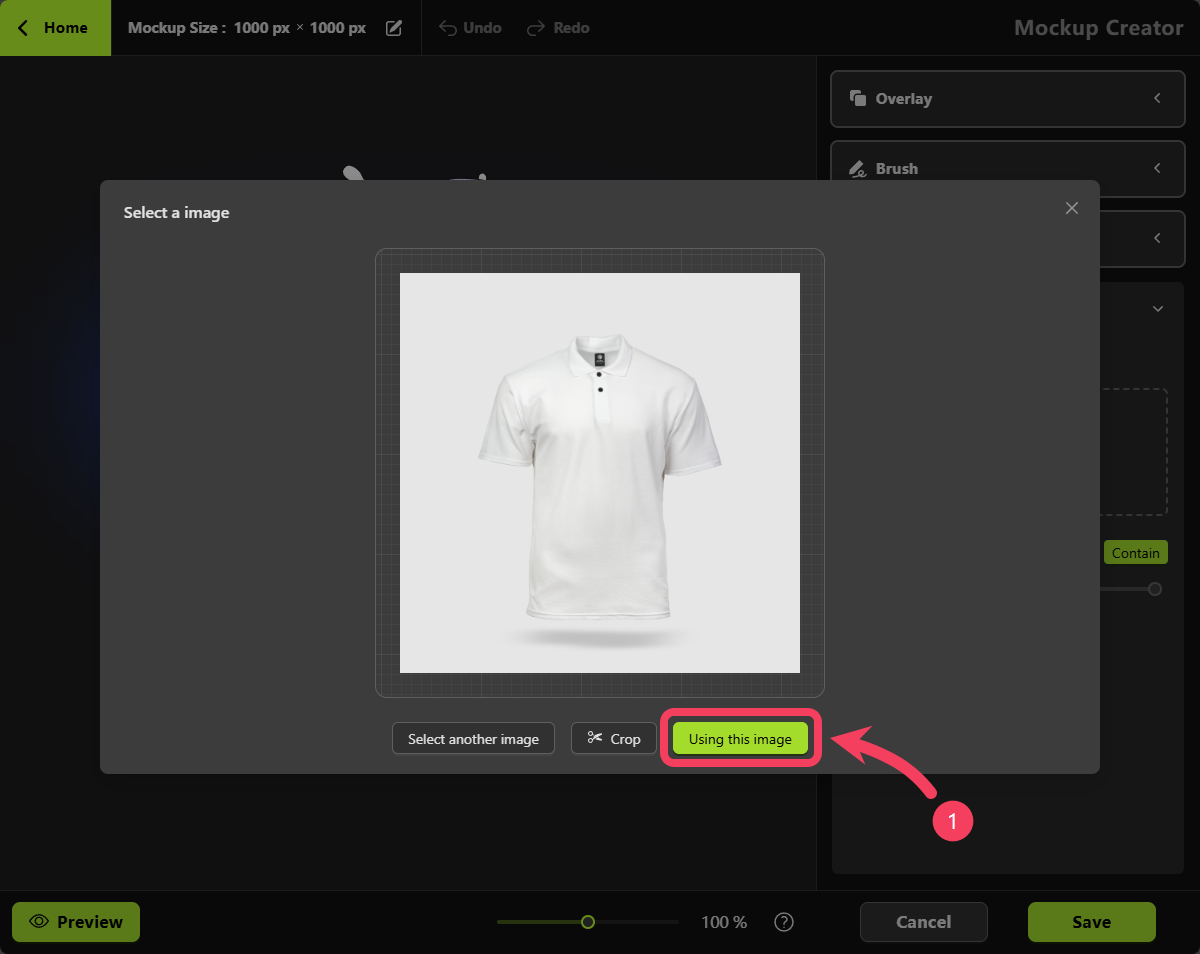 You can zoom in or out of the workspace by using the slider in the bottom bar of the `Mockup Creator` or by scrolling with your mouse wheel.
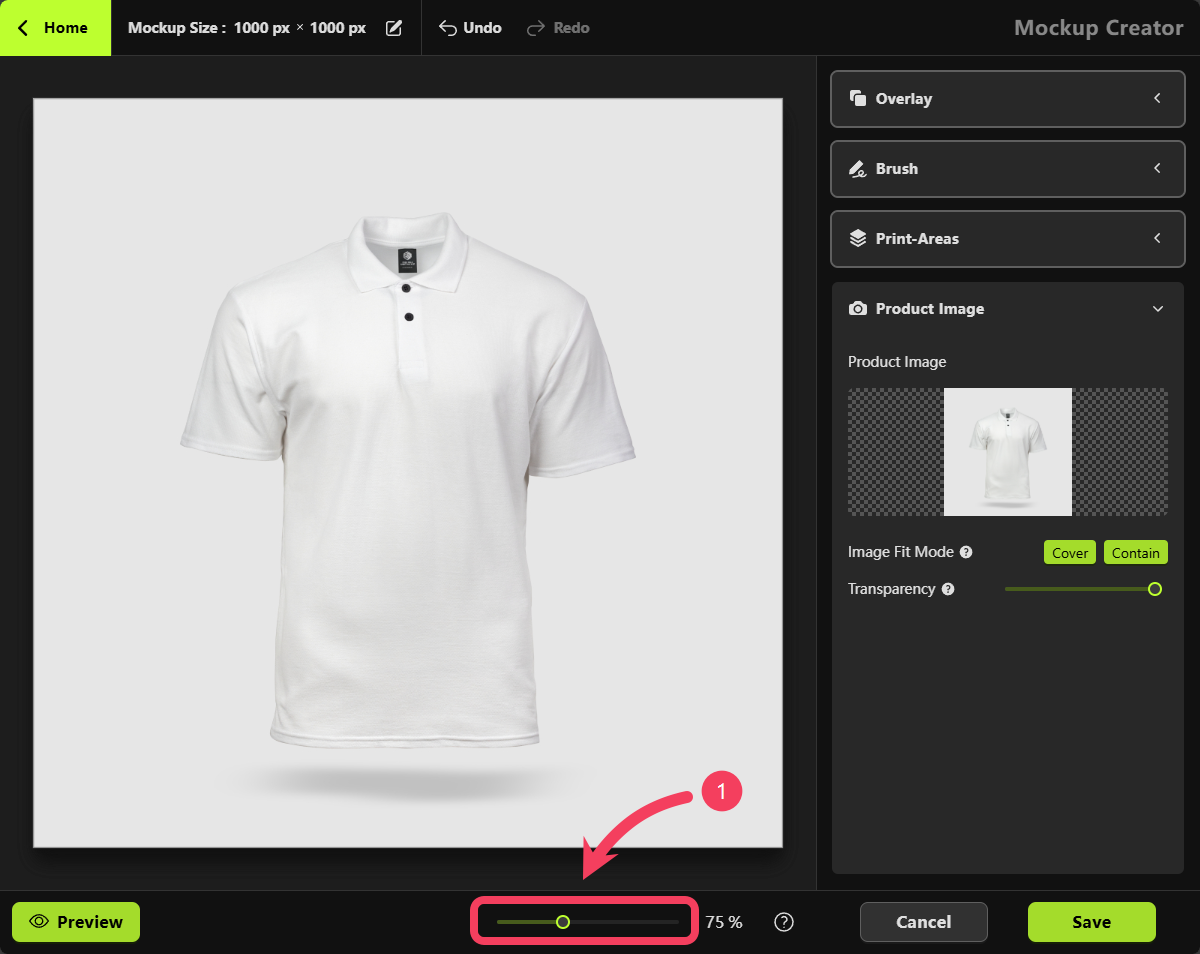 **Mockup Creator** is the tool provided by MockSpark that allows merchants to create product mockups online.
### Print-Areas
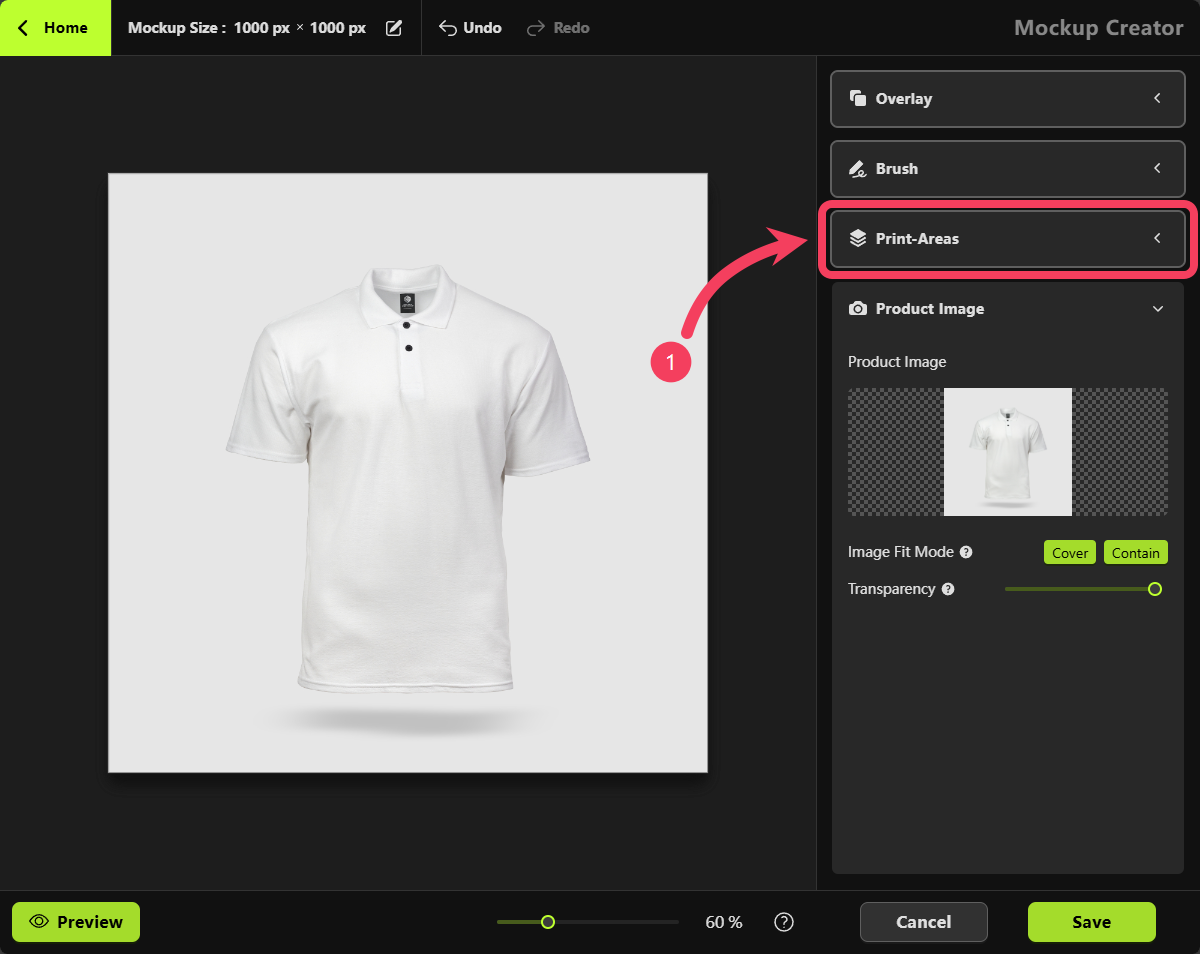
Click on the **Print Areas** section in the right-hand panel.
**Mockup Creator** is the tool provided by MockSpark that allows merchants to create product mockups online.
### Print-Areas
Click on the **Print Areas** section in the right-hand panel.
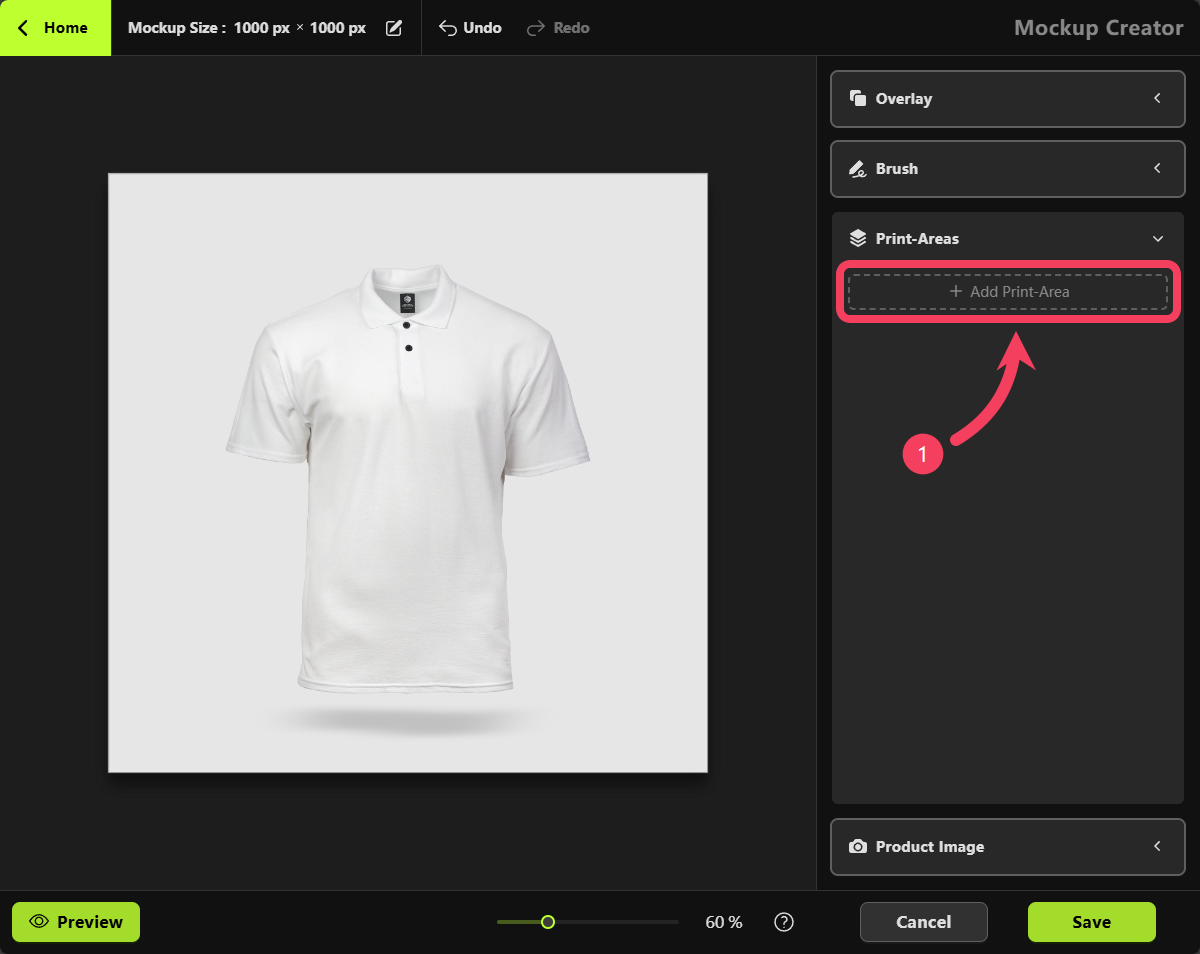
 Click the **Add Print-Area**.
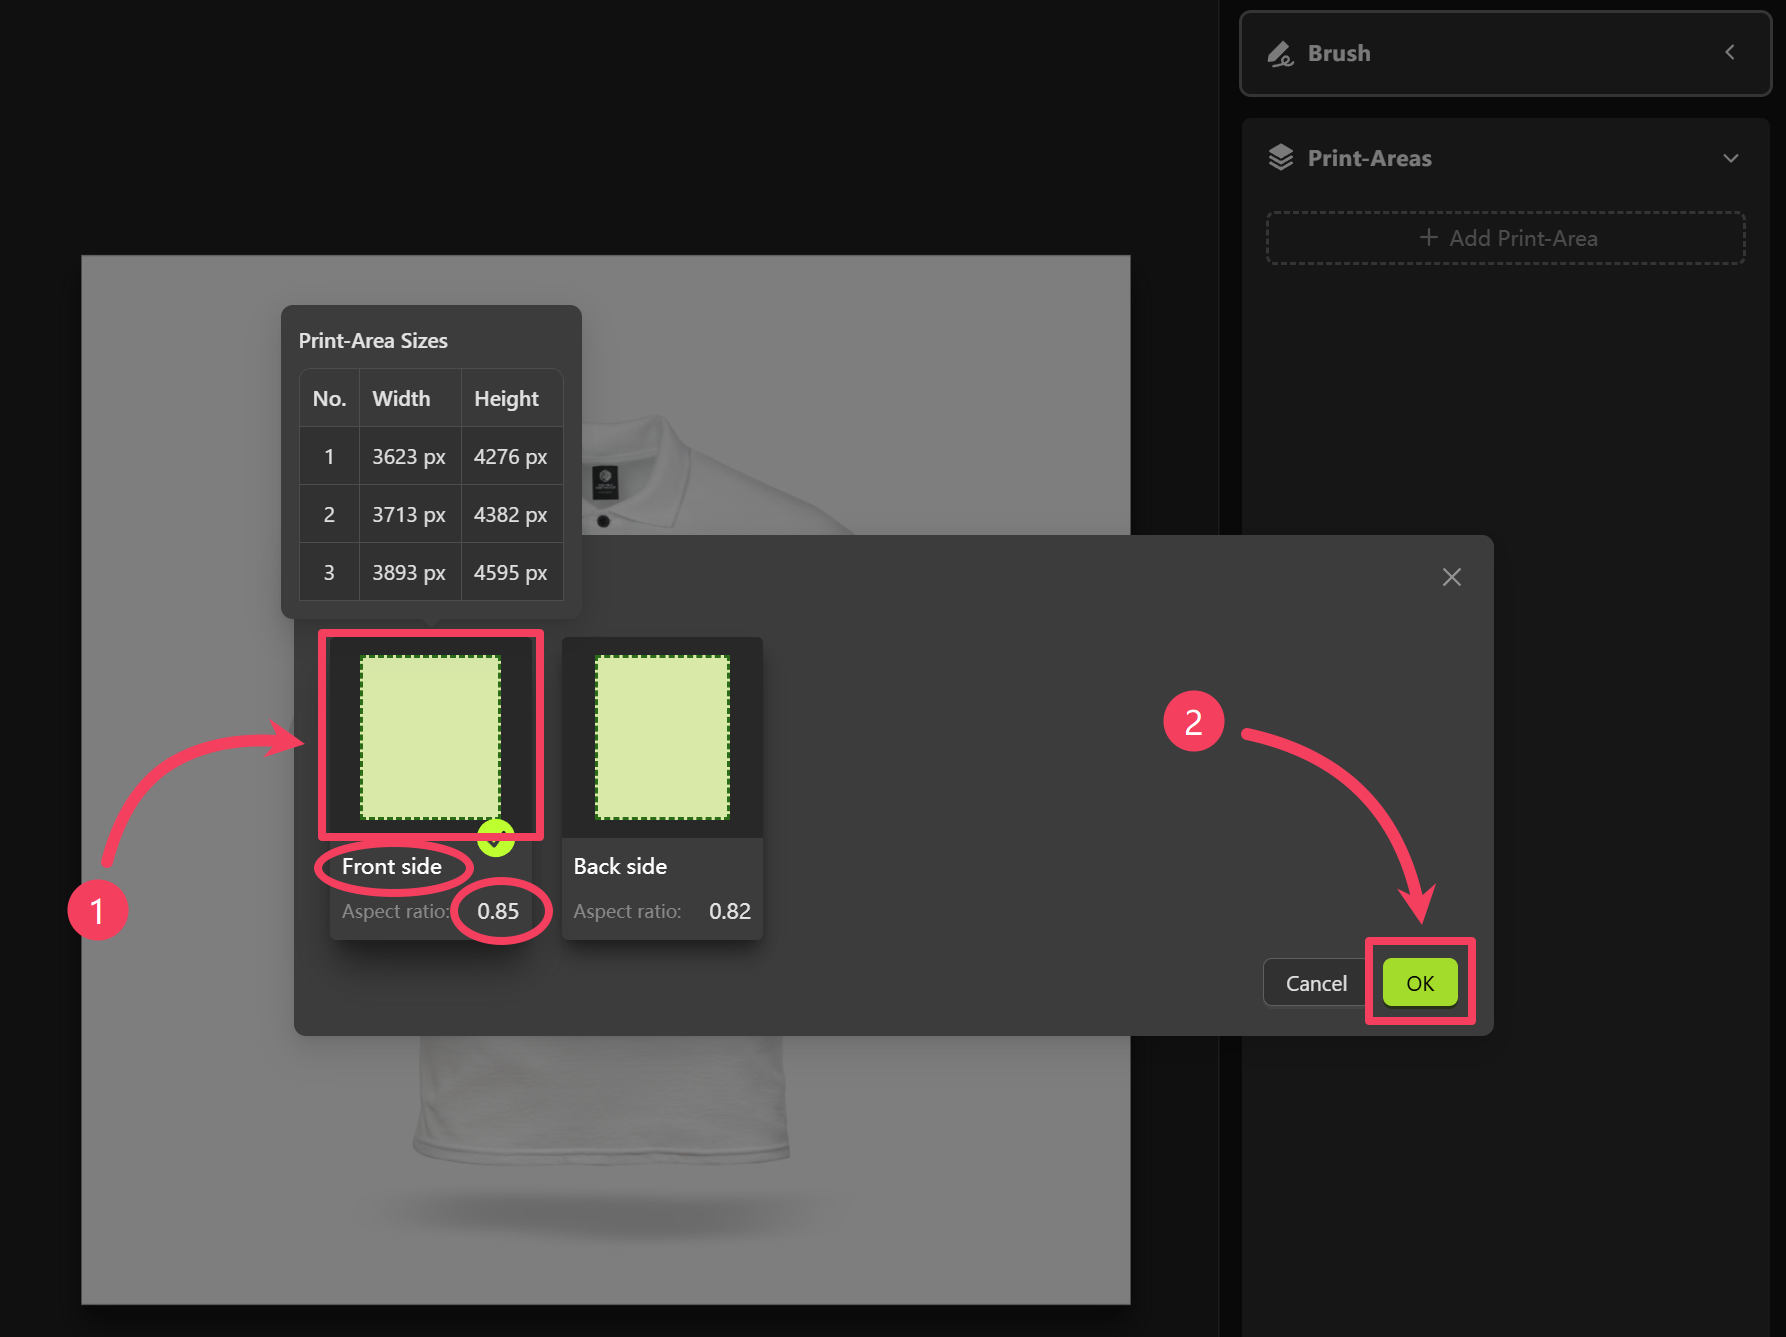
 1. Select the appropriate front-facing Print Area based on its name, and make note of its aspect ratio.
In Step 1, we created two Print-Areas: `Front side` and `Back side`. Here, we'll be using the `Front side`.
2. Click **OK** to add this Print Area to your mockup
1. Select the appropriate front-facing Print Area based on its name, and make note of its aspect ratio.
In Step 1, we created two Print-Areas: `Front side` and `Back side`. Here, we'll be using the `Front side`.
2. Click **OK** to add this Print Area to your mockup
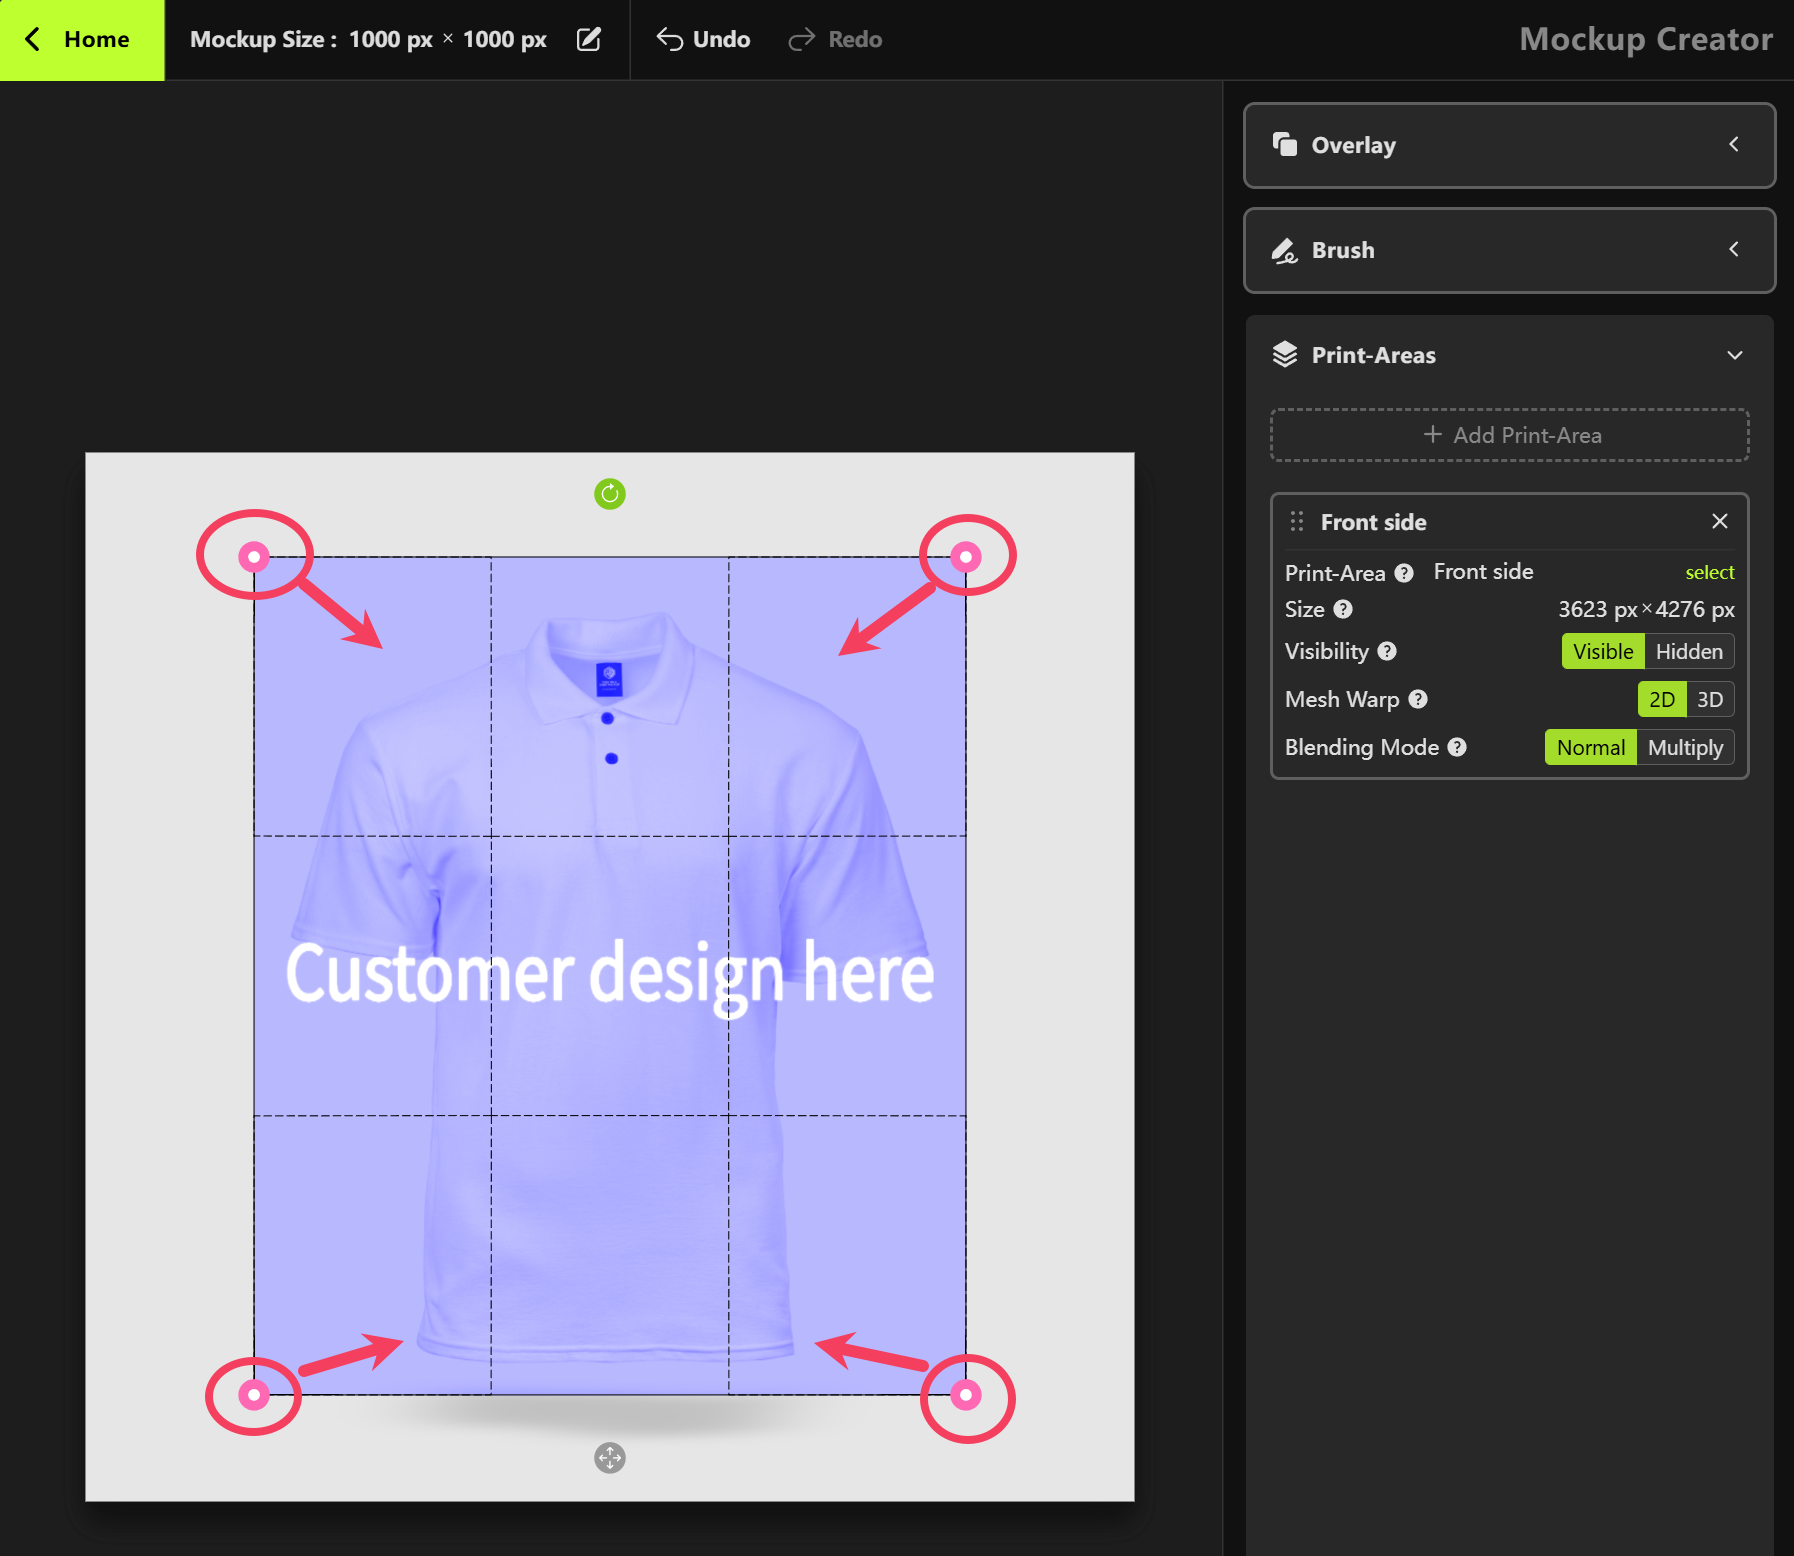
 Drag each of the 4 corners of the Print Area to the appropriate position on the product image.
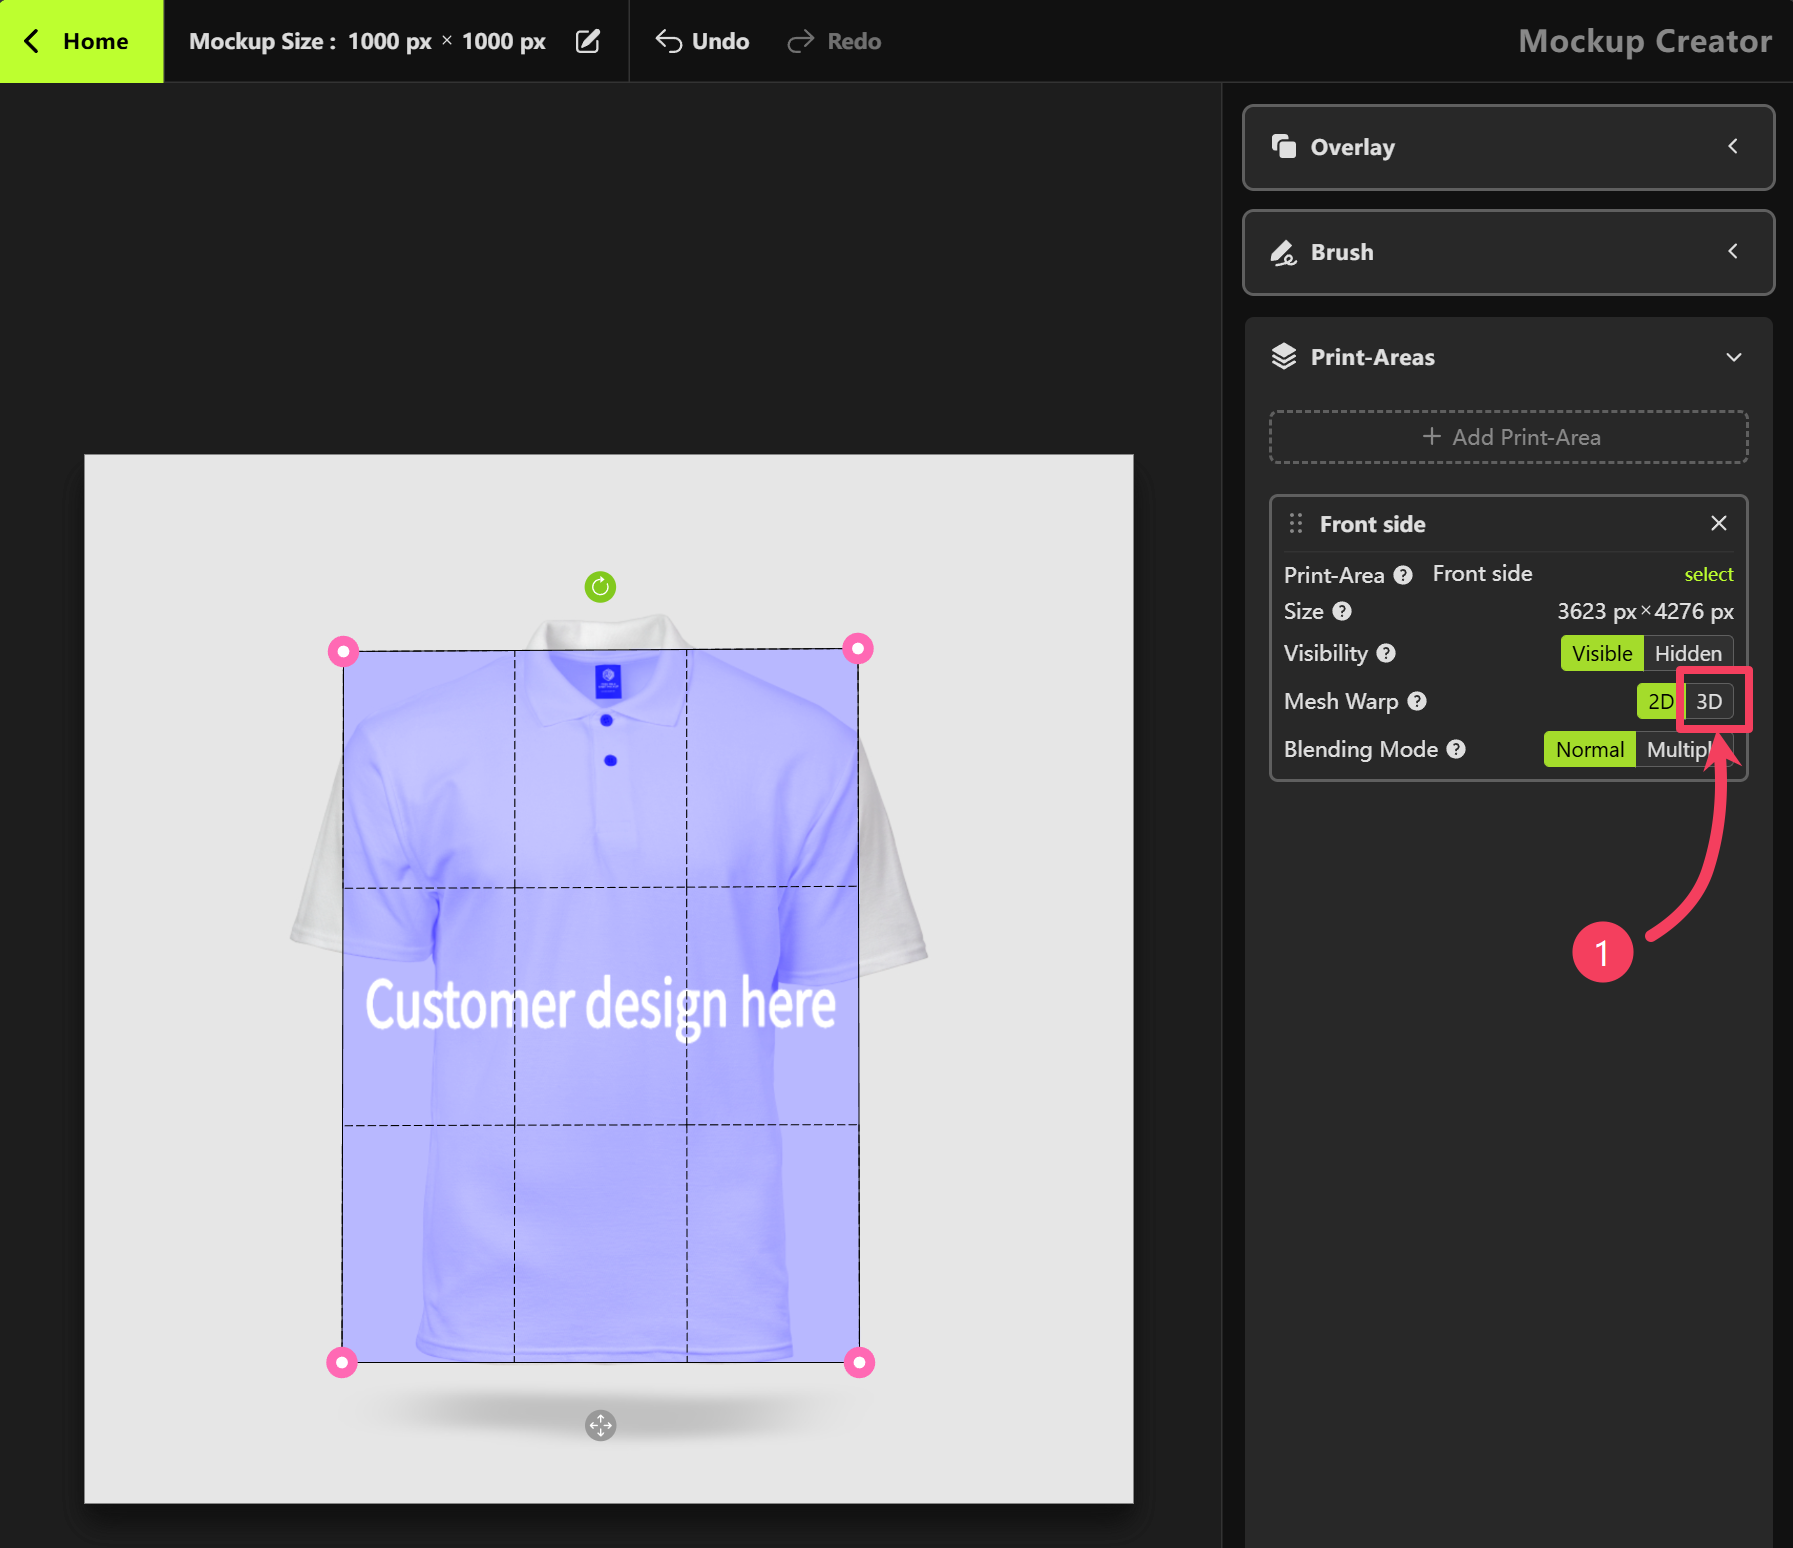
 In the Print Areas section of the right-hand panel, change **Mesh Warp** from **2D** to **3D**.
 In **3D Mesh Warp** mode, the Print Area’s 4 corner points will be replaced with a 4x4 grid, giving you 16 adjustable control points.
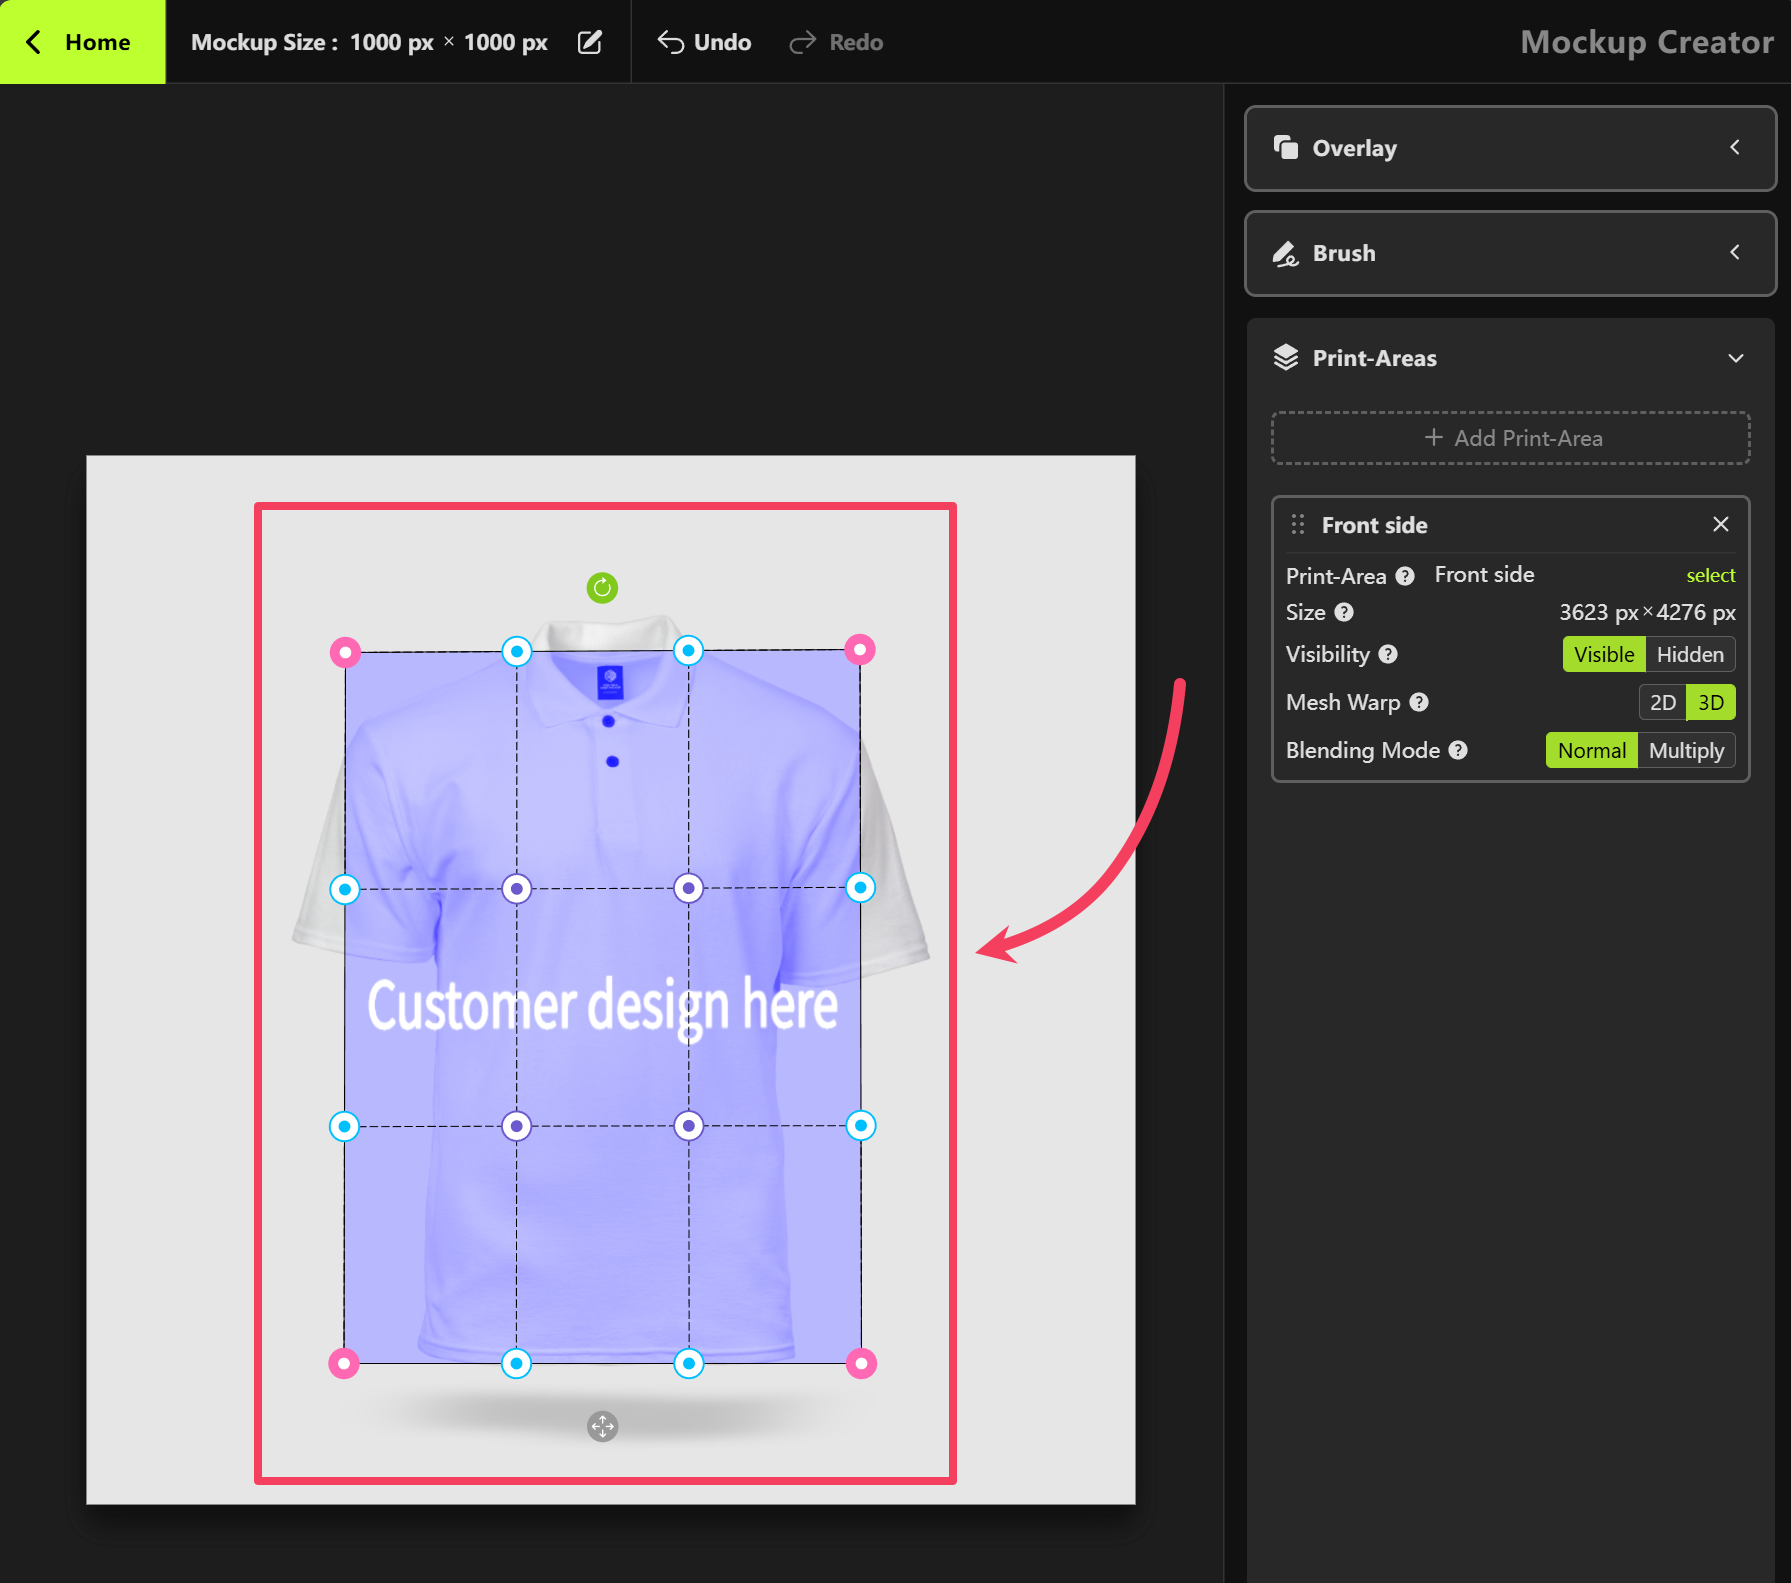 Using the Print Area’s aspect ratio as a guide, adjust the control points to reshape the Print Area. This helps create a more realistic and natural-looking product mockup.
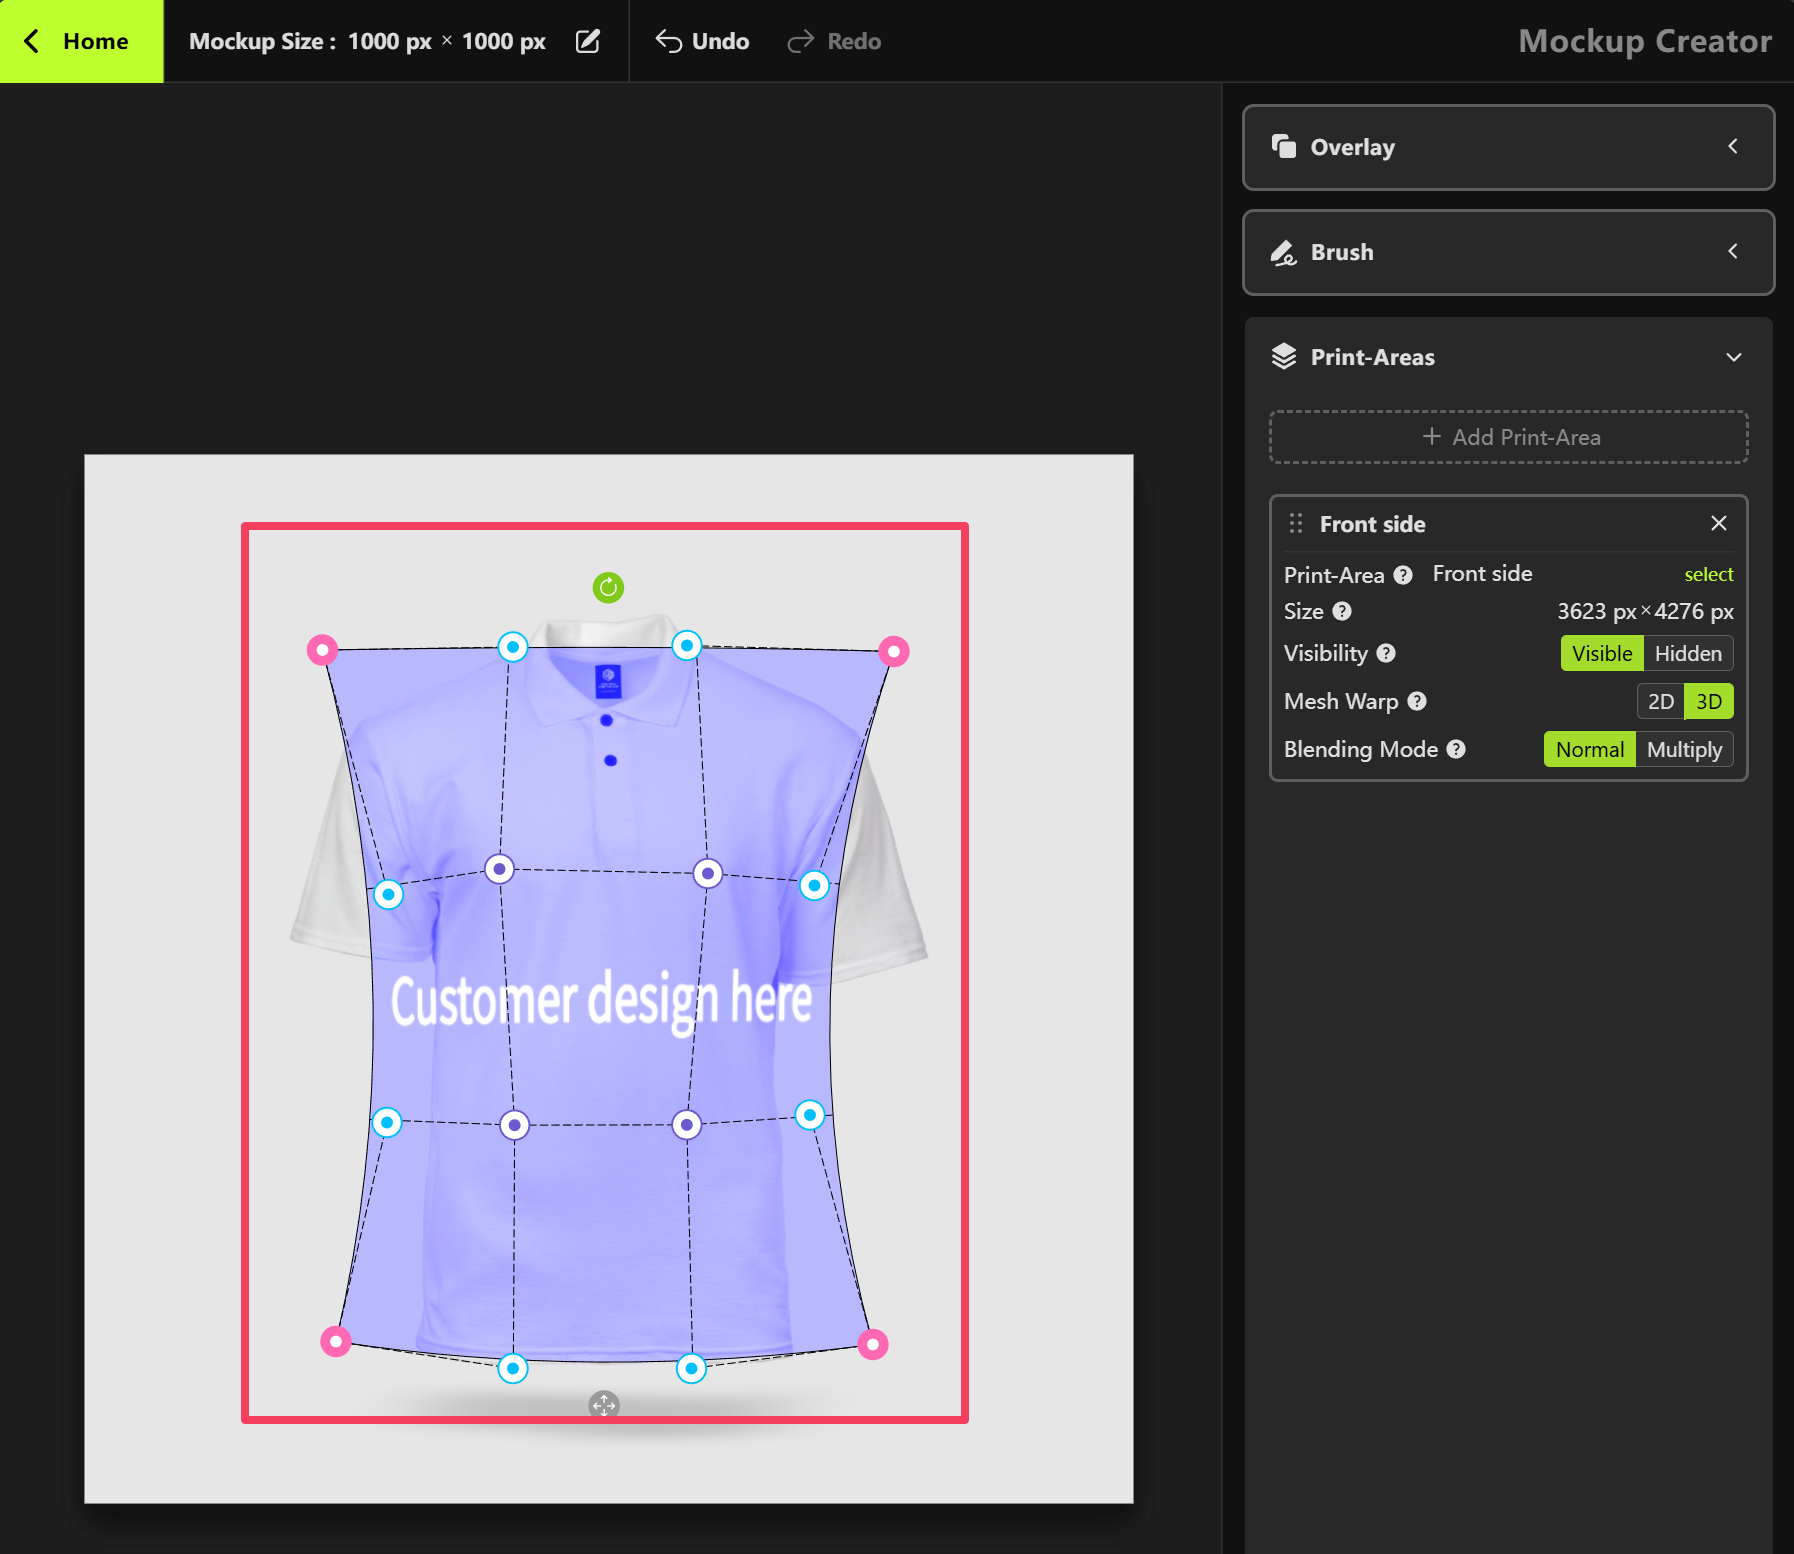 If your product is `White`, we recommend changing the **Blending Mode** from **Normal** to **Multiply** in the Print Areas section on the right-hand panel. This will help enhance the mockup’s visual appearance for a more realistic effect.
For the best results, we recommend setting the Print-Area's `Blending Mode` to `Multiply` only on **light-colored products**.
If your product is `White`, we recommend changing the **Blending Mode** from **Normal** to **Multiply** in the Print Areas section on the right-hand panel. This will help enhance the mockup’s visual appearance for a more realistic effect.
For the best results, we recommend setting the Print-Area's `Blending Mode` to `Multiply` only on **light-colored products**.
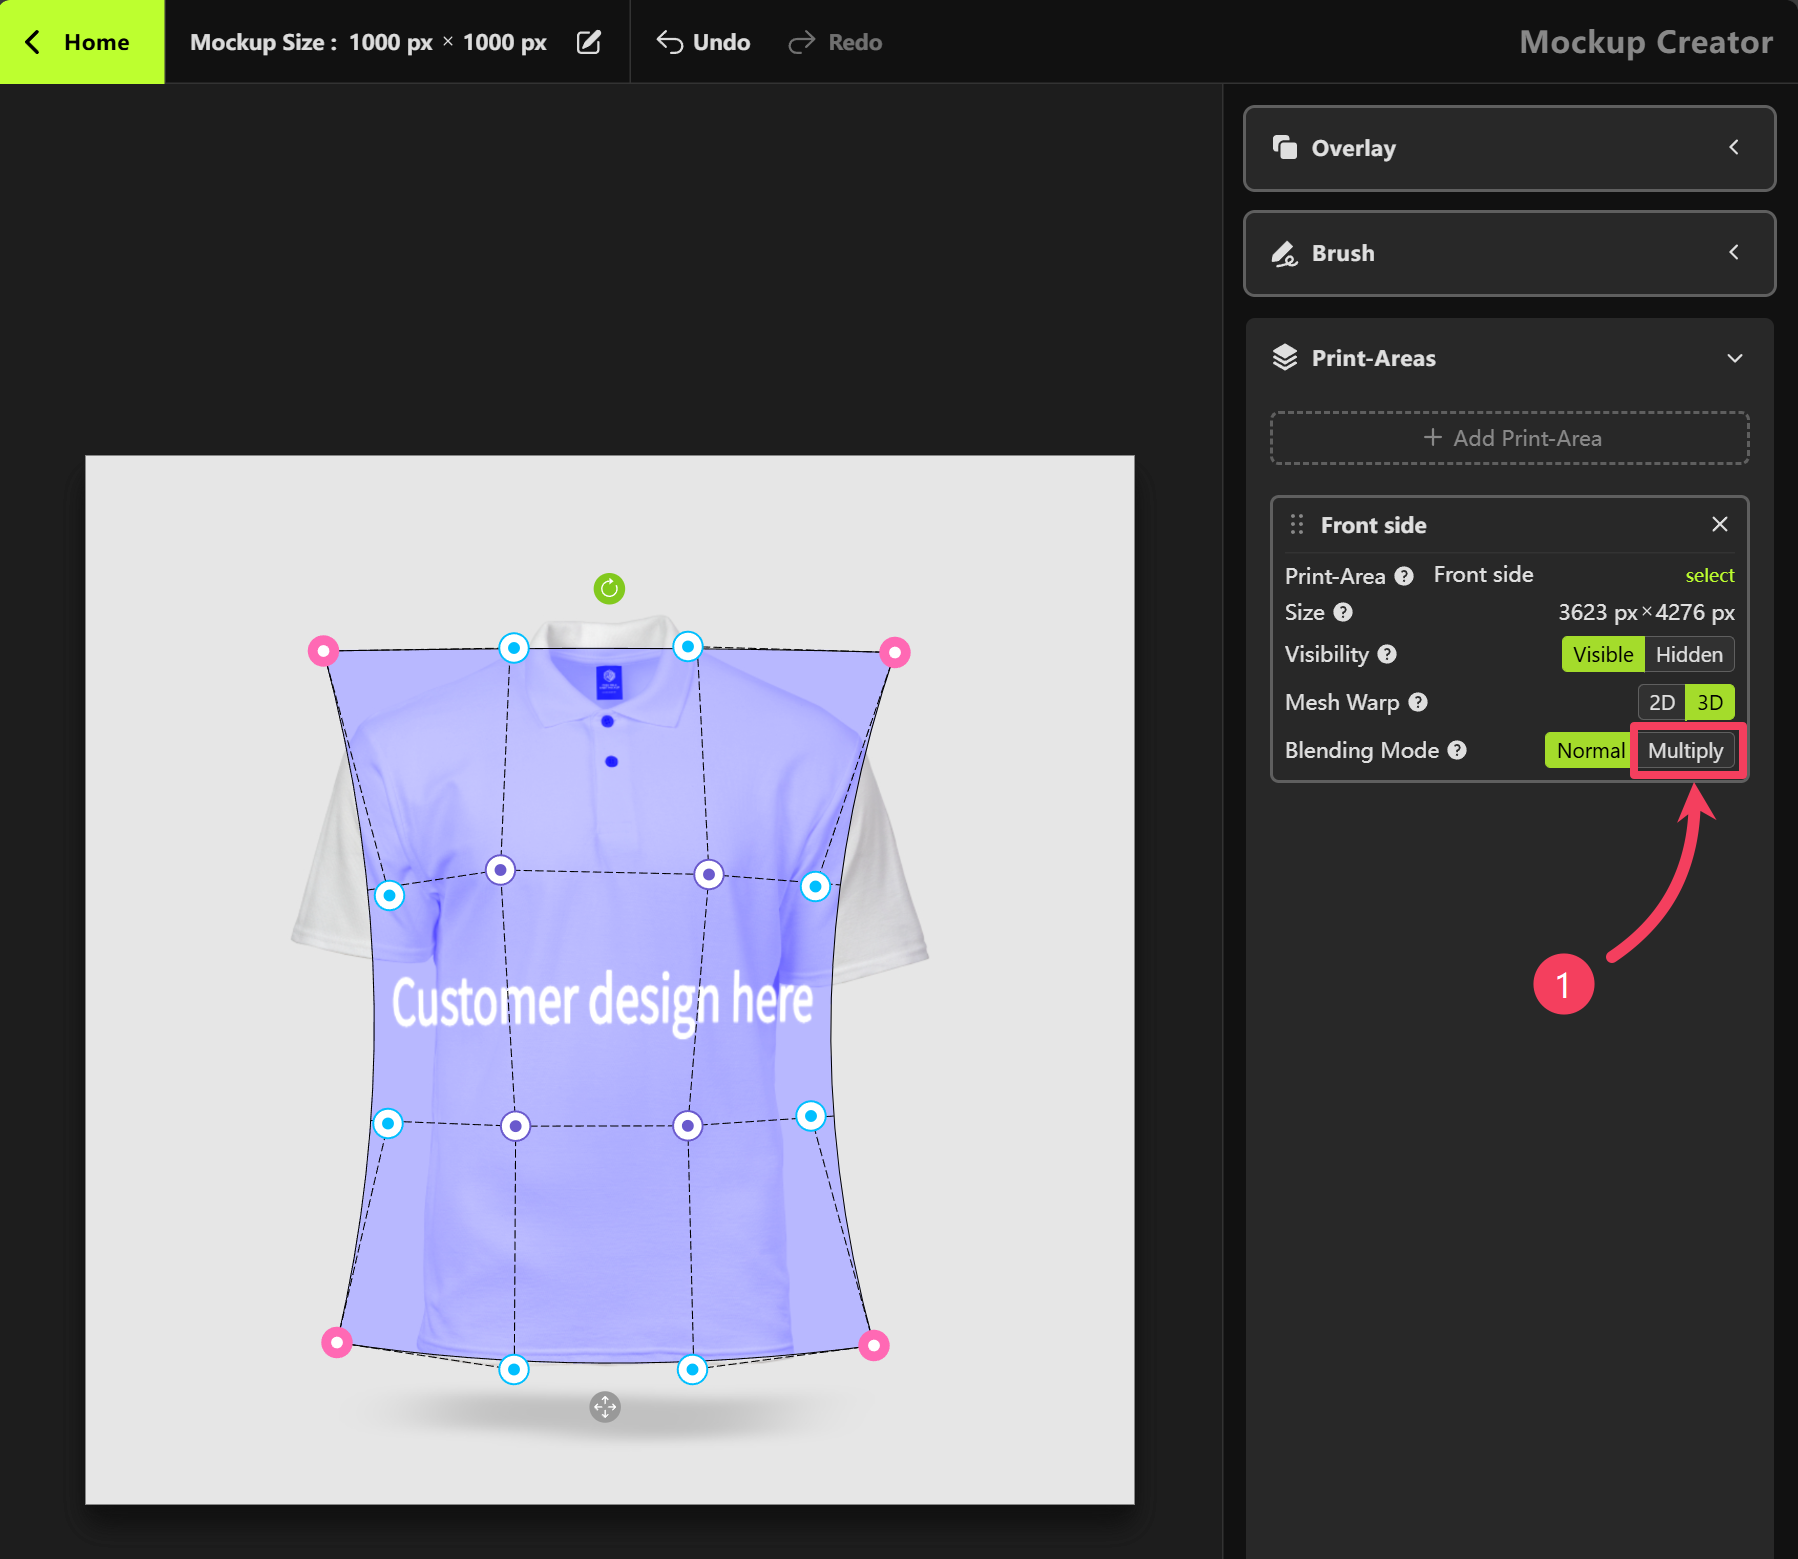 The `Multiply blend mode` creates darker colors by multiplying the base color with the blend color. In this mode, white areas in the blend layer become completely transparent and don’t affect the layers beneath, while black areas remain fully visible. It always darkens the image and never makes it lighter.
### Overlay
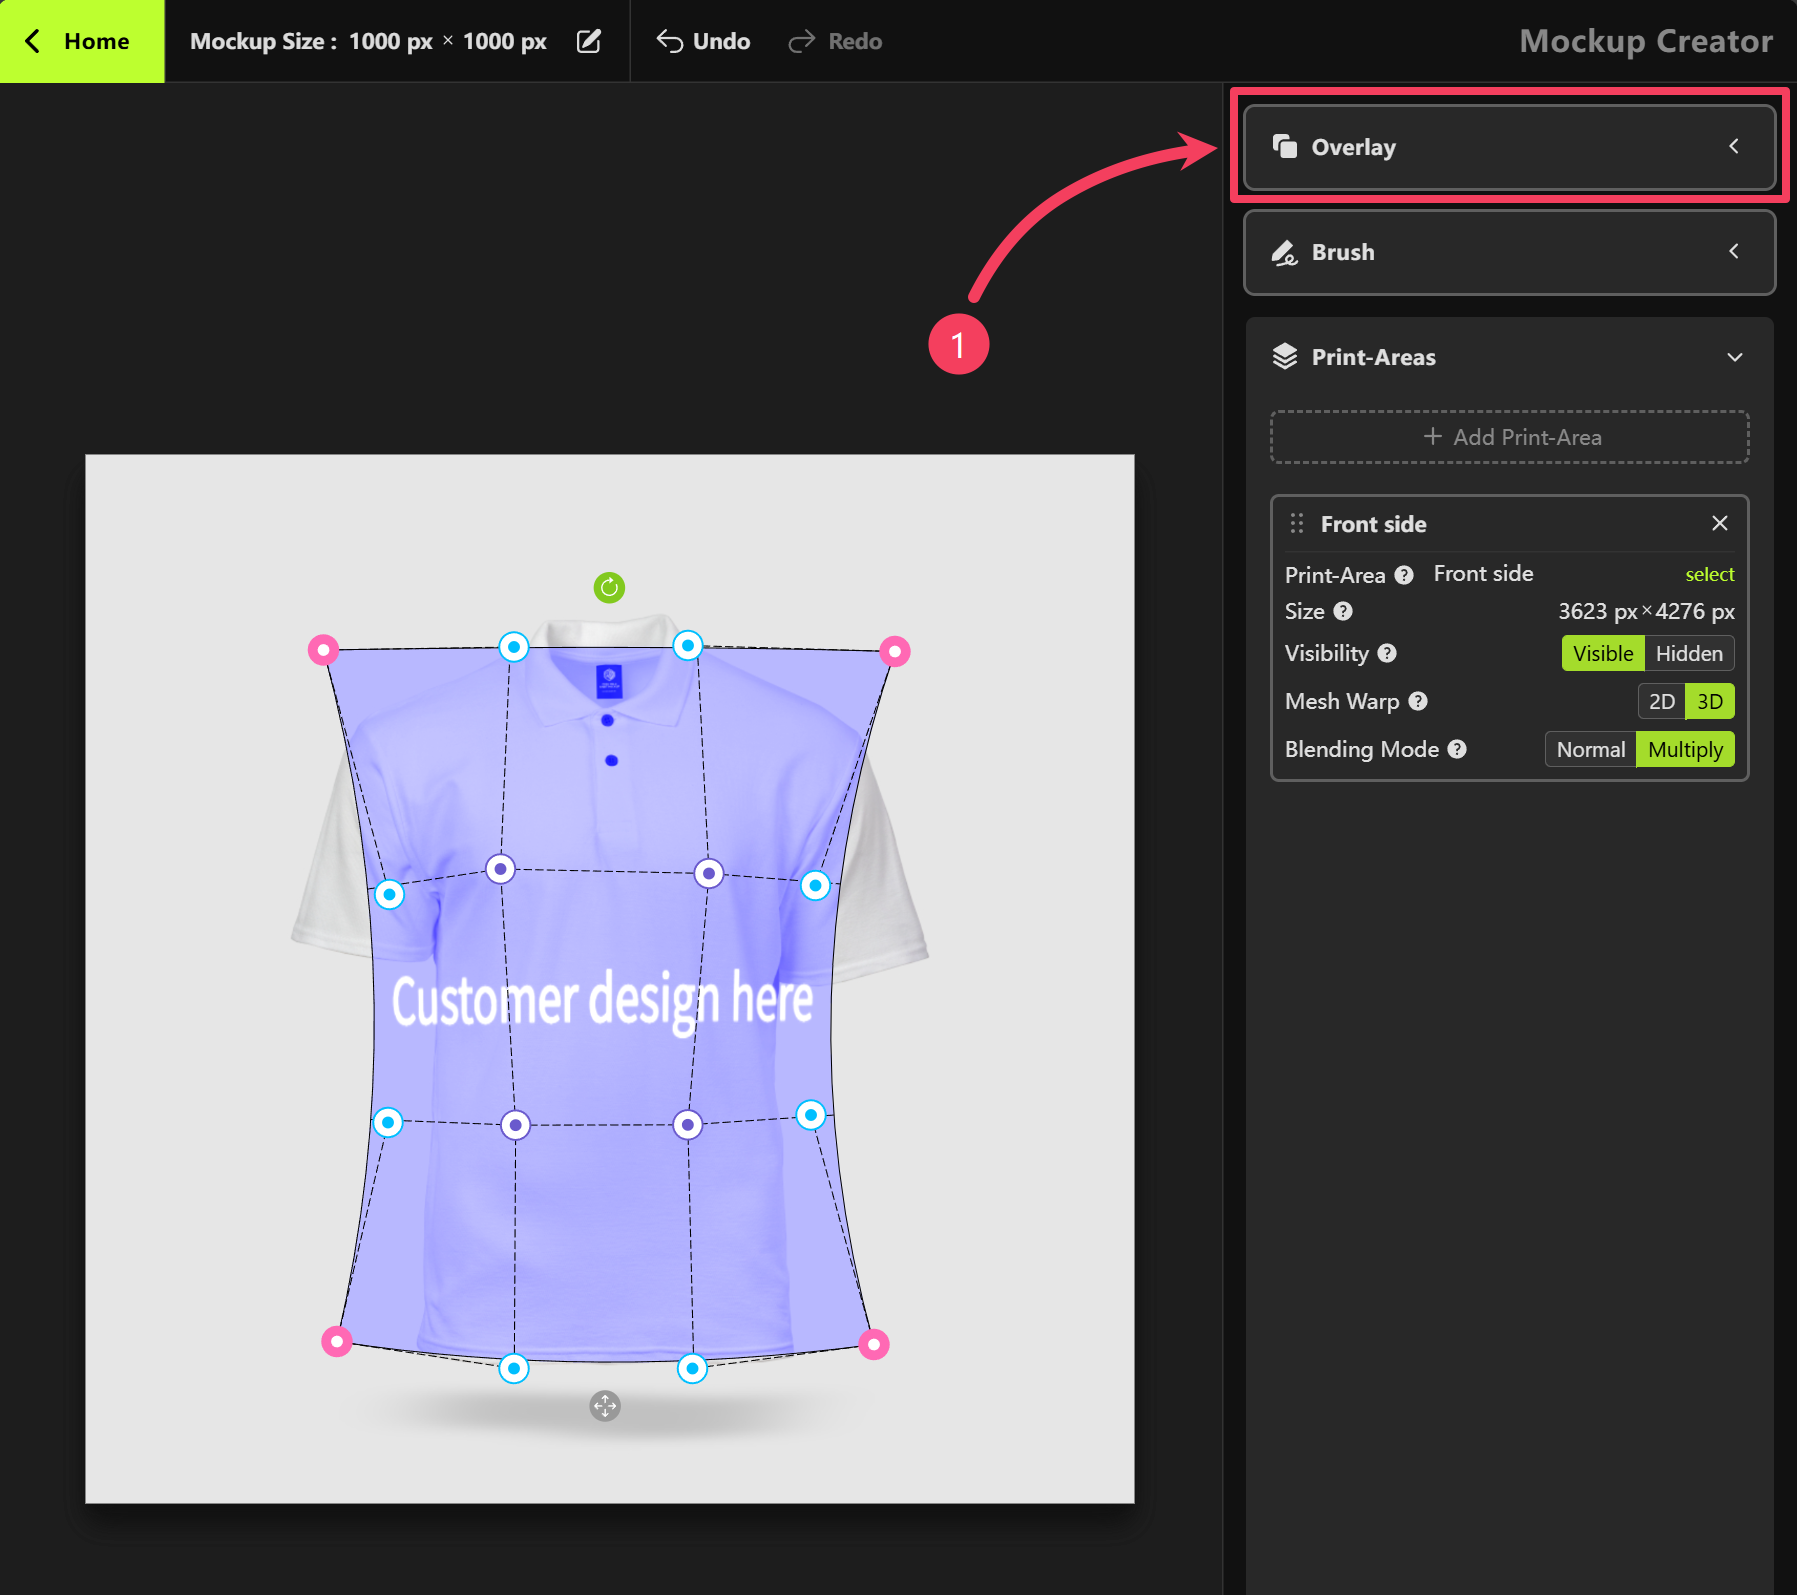
Click on the **Overlay** section in the right-hand panel.
The `Multiply blend mode` creates darker colors by multiplying the base color with the blend color. In this mode, white areas in the blend layer become completely transparent and don’t affect the layers beneath, while black areas remain fully visible. It always darkens the image and never makes it lighter.
### Overlay
Click on the **Overlay** section in the right-hand panel.
 Click **Add Image**
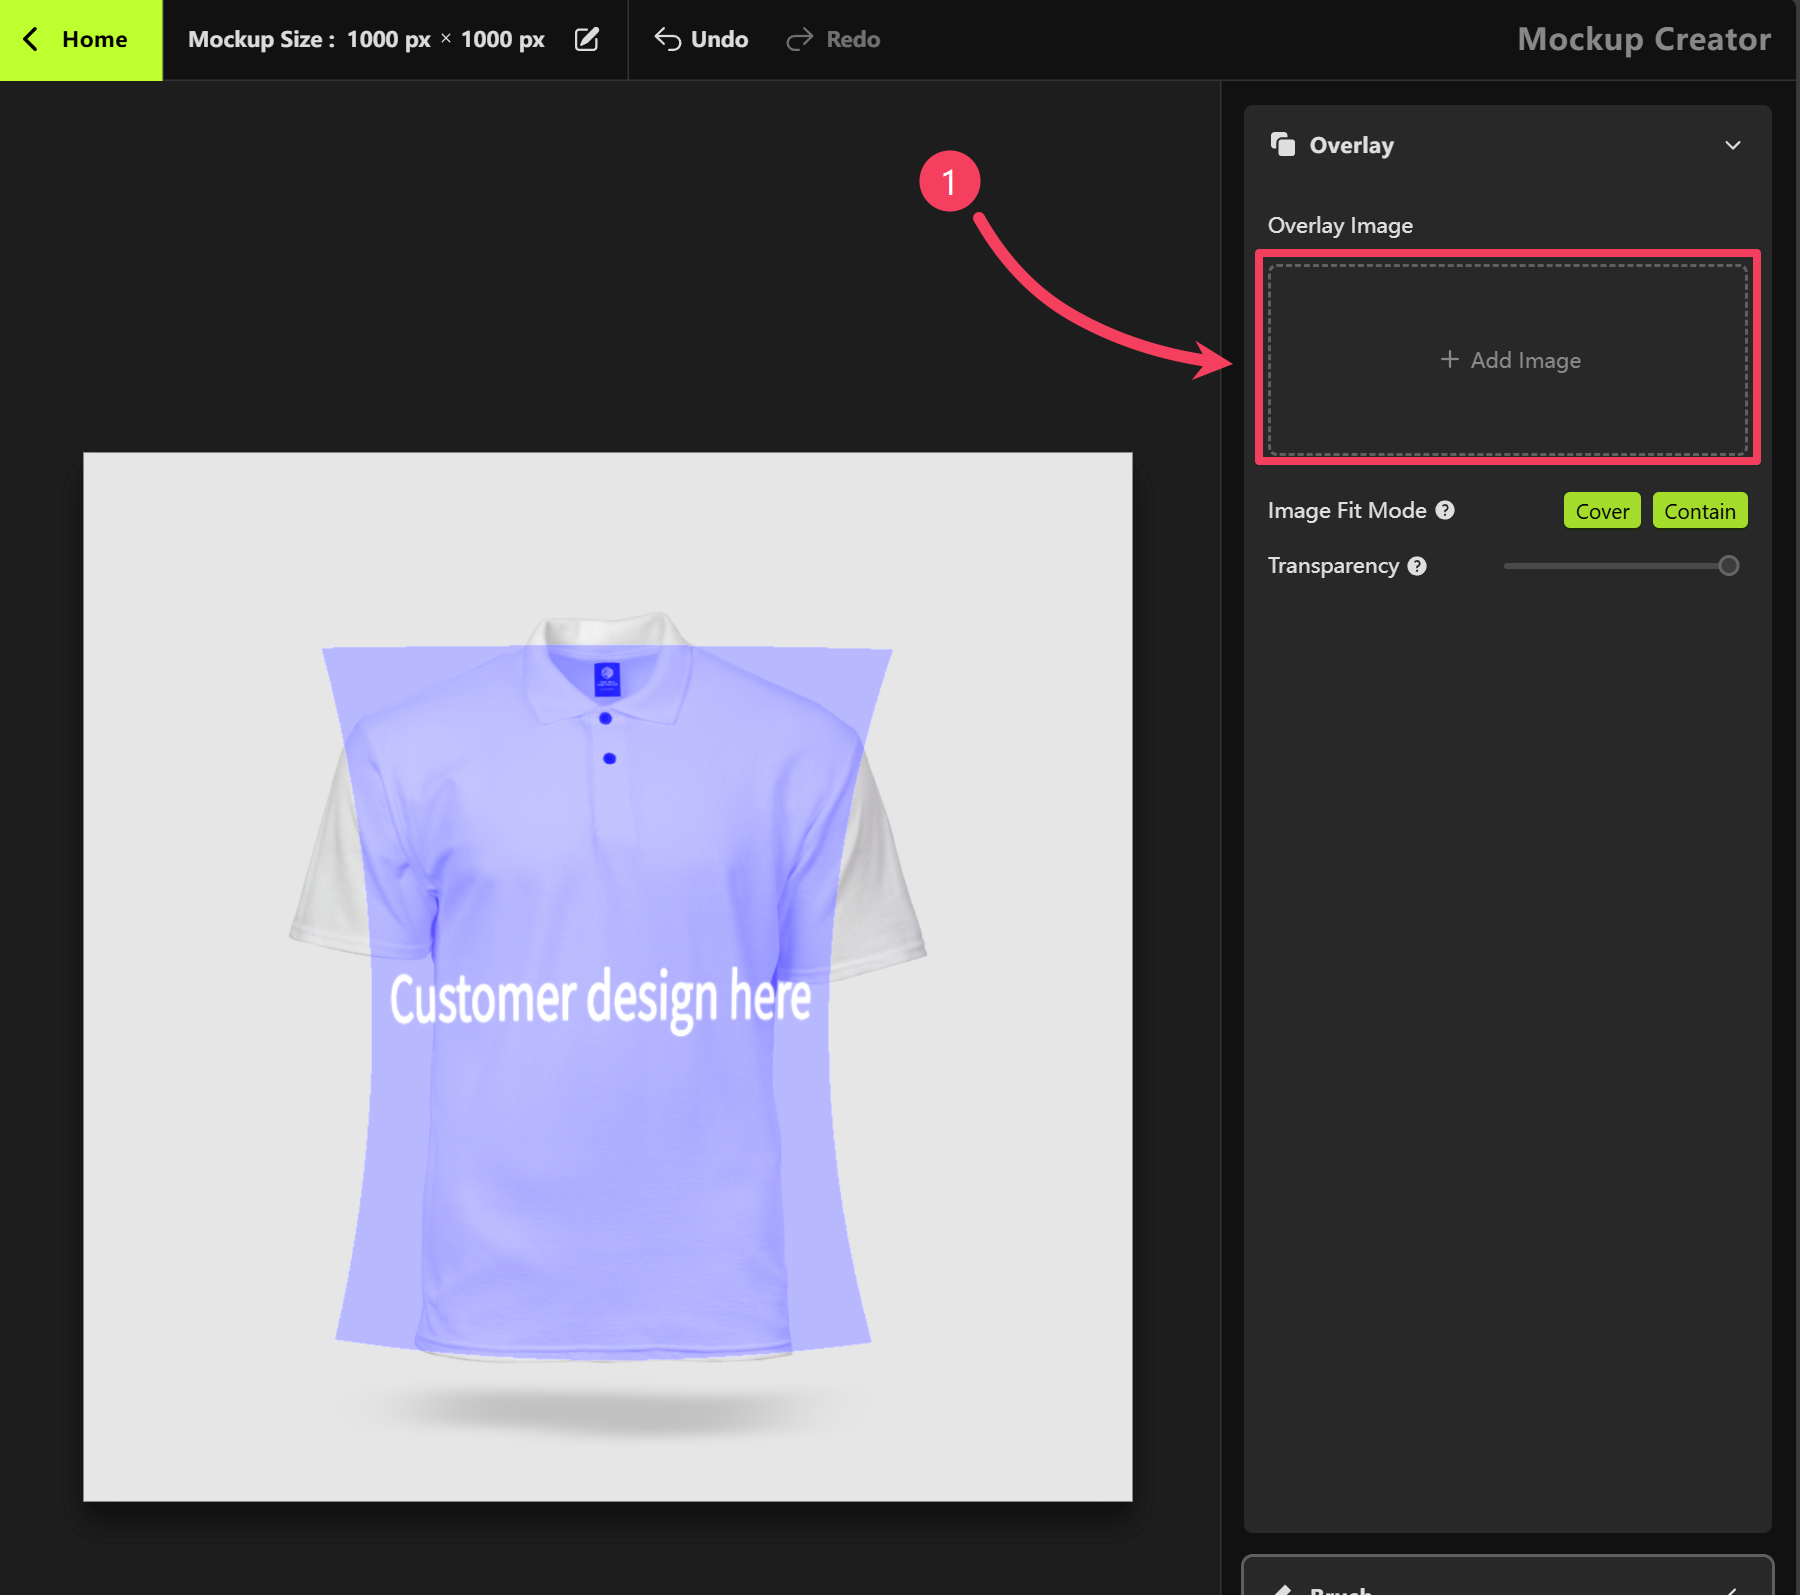 The **Overlay image** in a mockup is an image layered over the product photo. It is typically used in the following scenarios:
1. If your mockup shows a person holding a mug and part of the mug’s Print Area is covered by the hand, you can upload an **Overlay image** to create that realistic overlapping effect.
2. If your mockup features a canvas tote bag with natural shadows or texture details, you can use an **Overlay image** to recreate those lighting or fabric effects as a filter.
Uploading an **Overlay image** is optional and depends entirely on your needs.
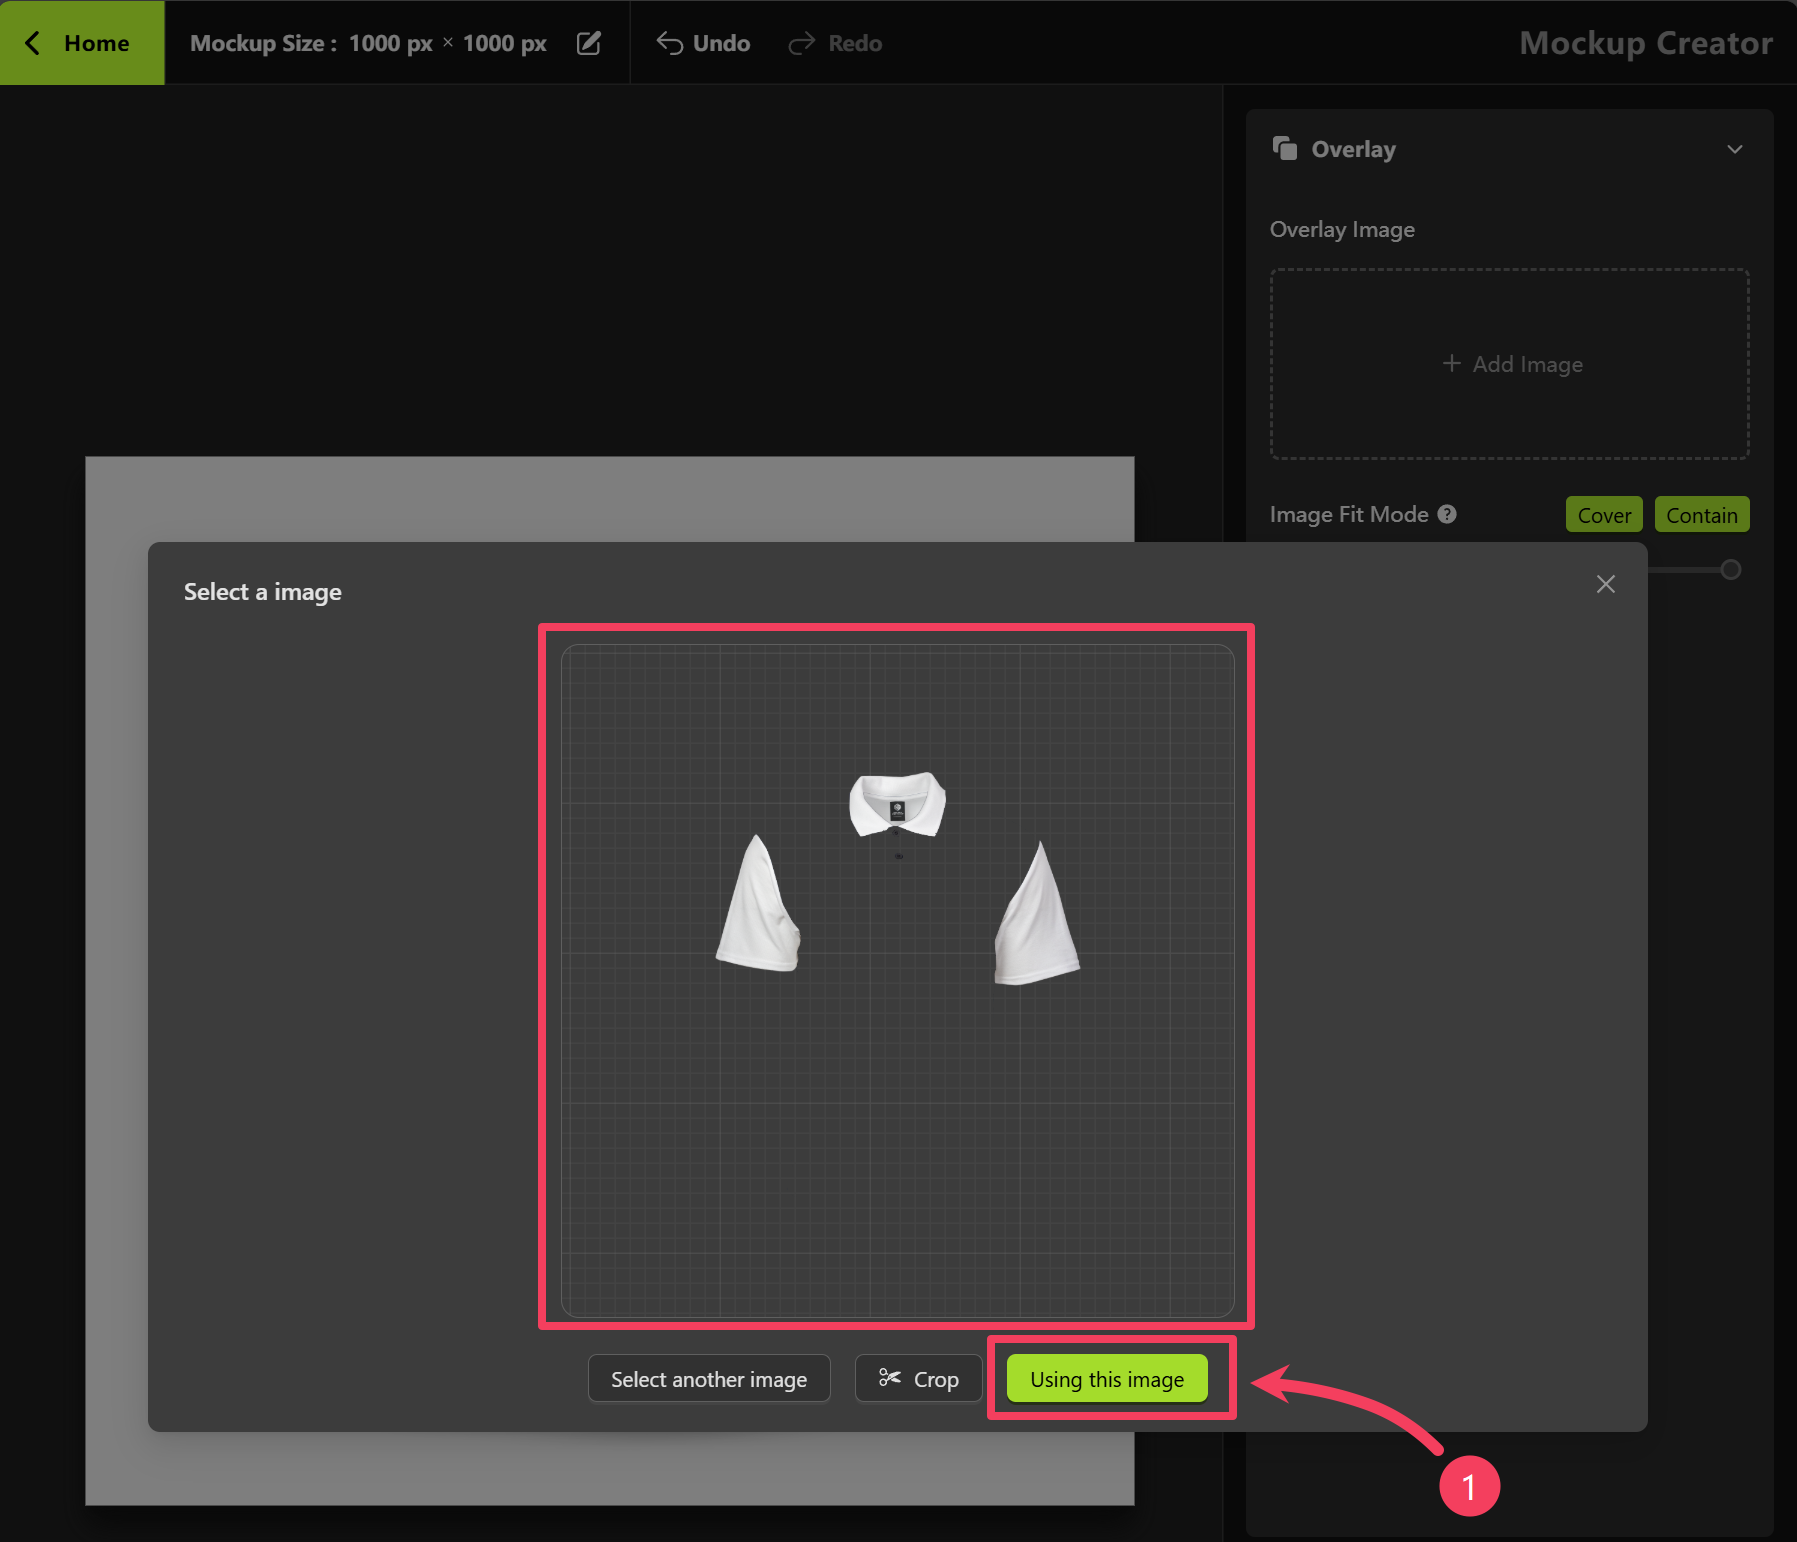
In this tutorial, since we’re creating a mockup for a polo shirt, we’ll upload an **Overlay image** that includes the shirt’s collar and sleeves.
Click **Using this image**.
The **Overlay image** in a mockup is an image layered over the product photo. It is typically used in the following scenarios:
1. If your mockup shows a person holding a mug and part of the mug’s Print Area is covered by the hand, you can upload an **Overlay image** to create that realistic overlapping effect.
2. If your mockup features a canvas tote bag with natural shadows or texture details, you can use an **Overlay image** to recreate those lighting or fabric effects as a filter.
Uploading an **Overlay image** is optional and depends entirely on your needs.
In this tutorial, since we’re creating a mockup for a polo shirt, we’ll upload an **Overlay image** that includes the shirt’s collar and sleeves.
Click **Using this image**.
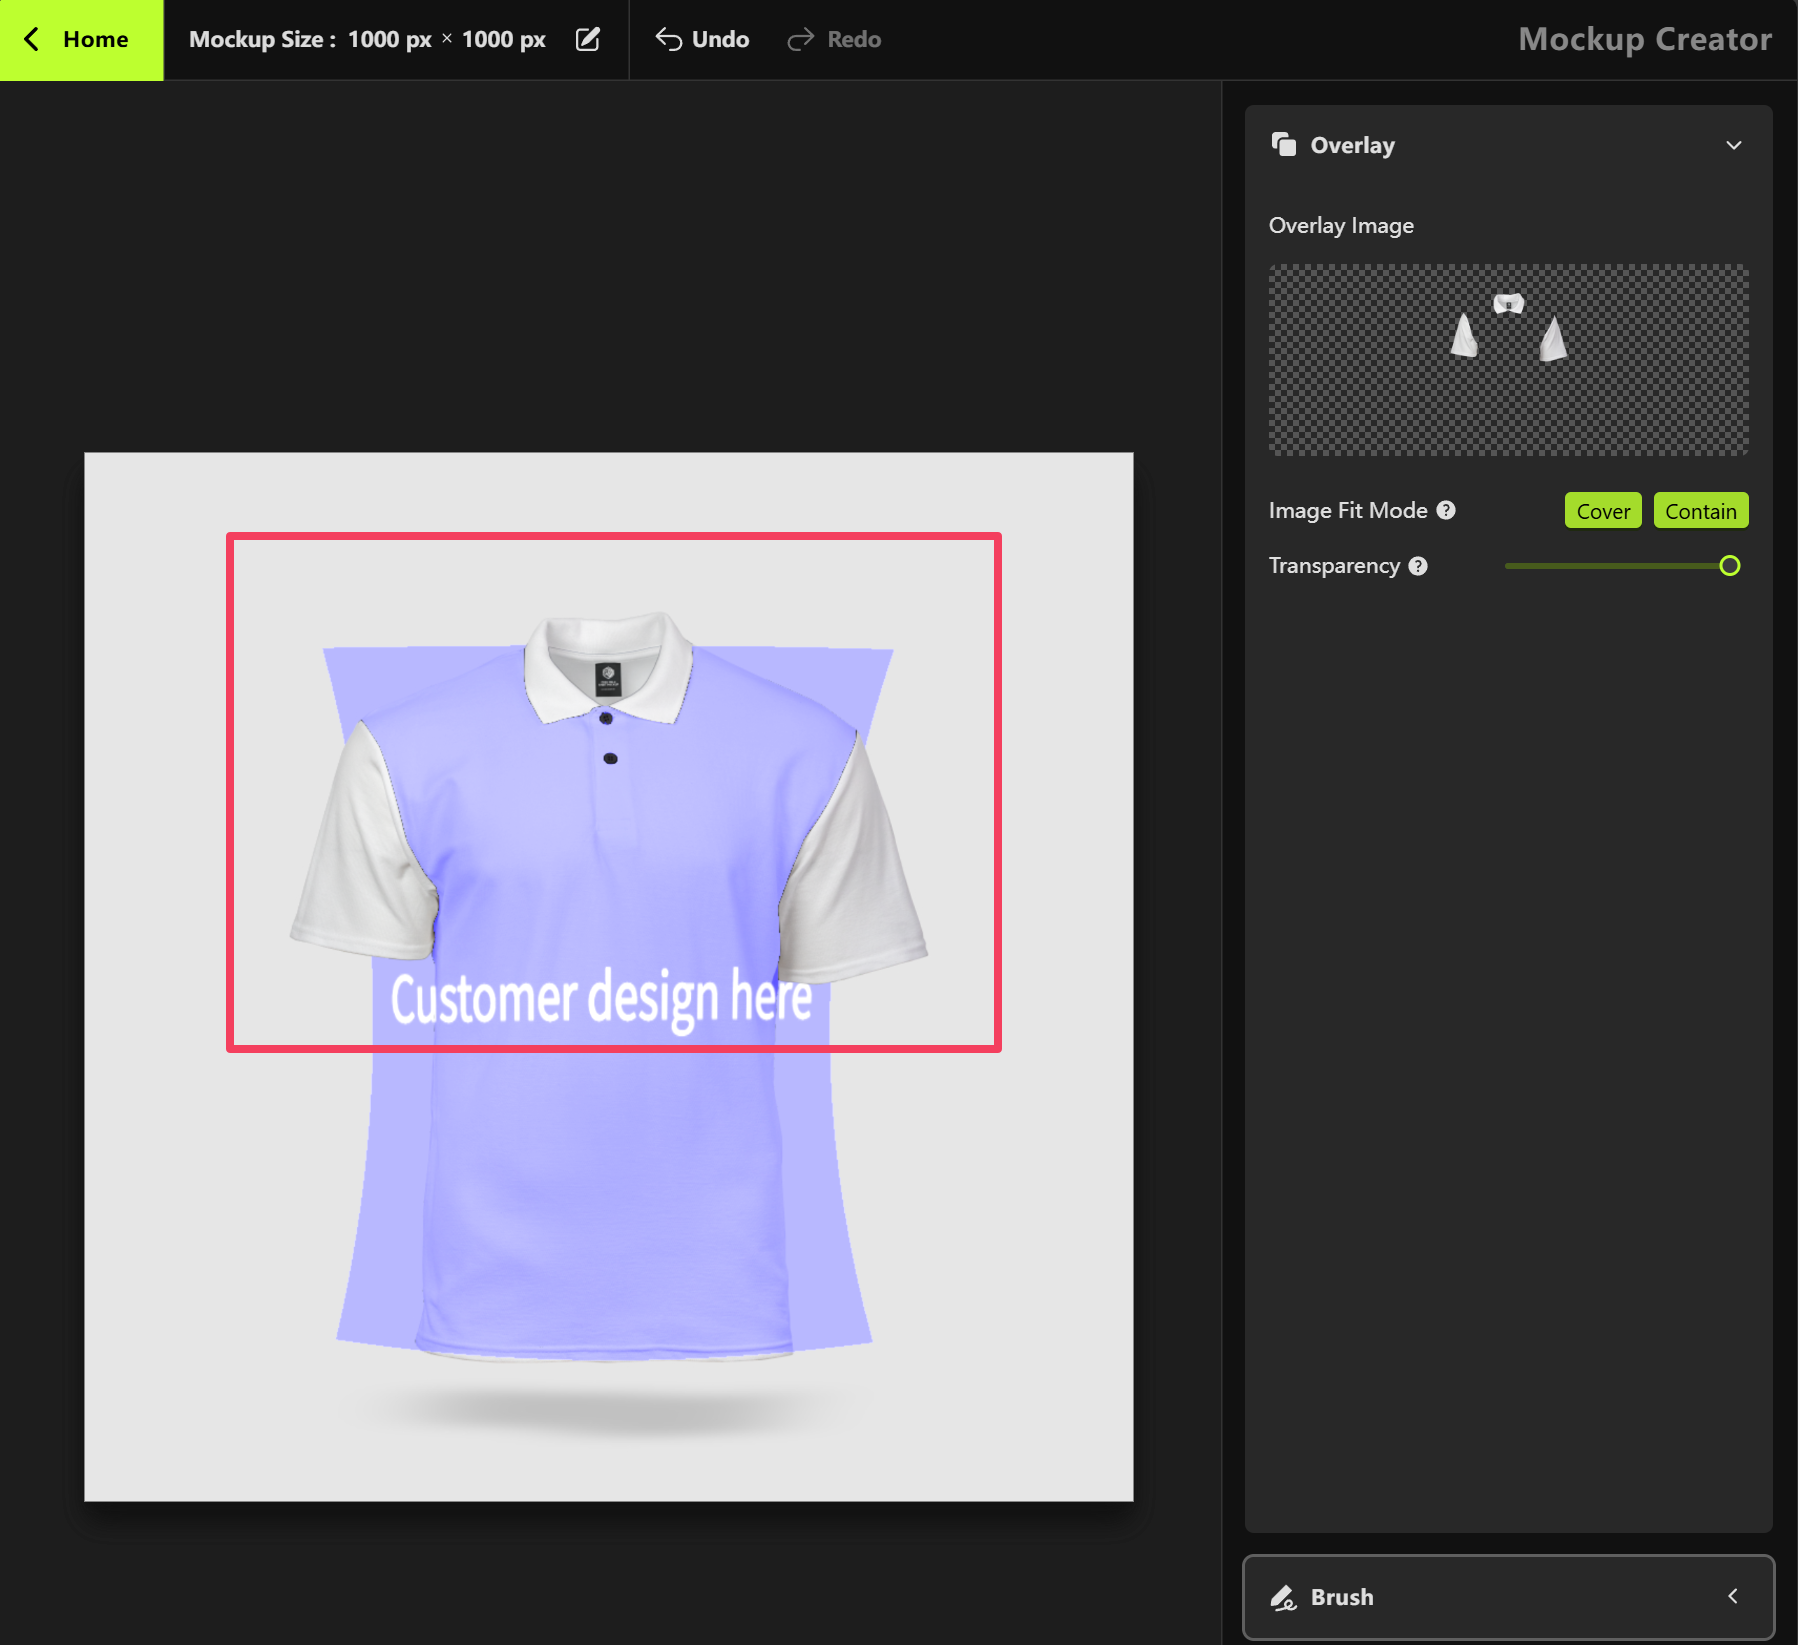
 Once the **Overlay image** has been added, you’ll see it appear above the Print-Areas in the mockup.
 ### Brush
Click on the **Brush** section in the right-hand panel.
### Brush
Click on the **Brush** section in the right-hand panel.
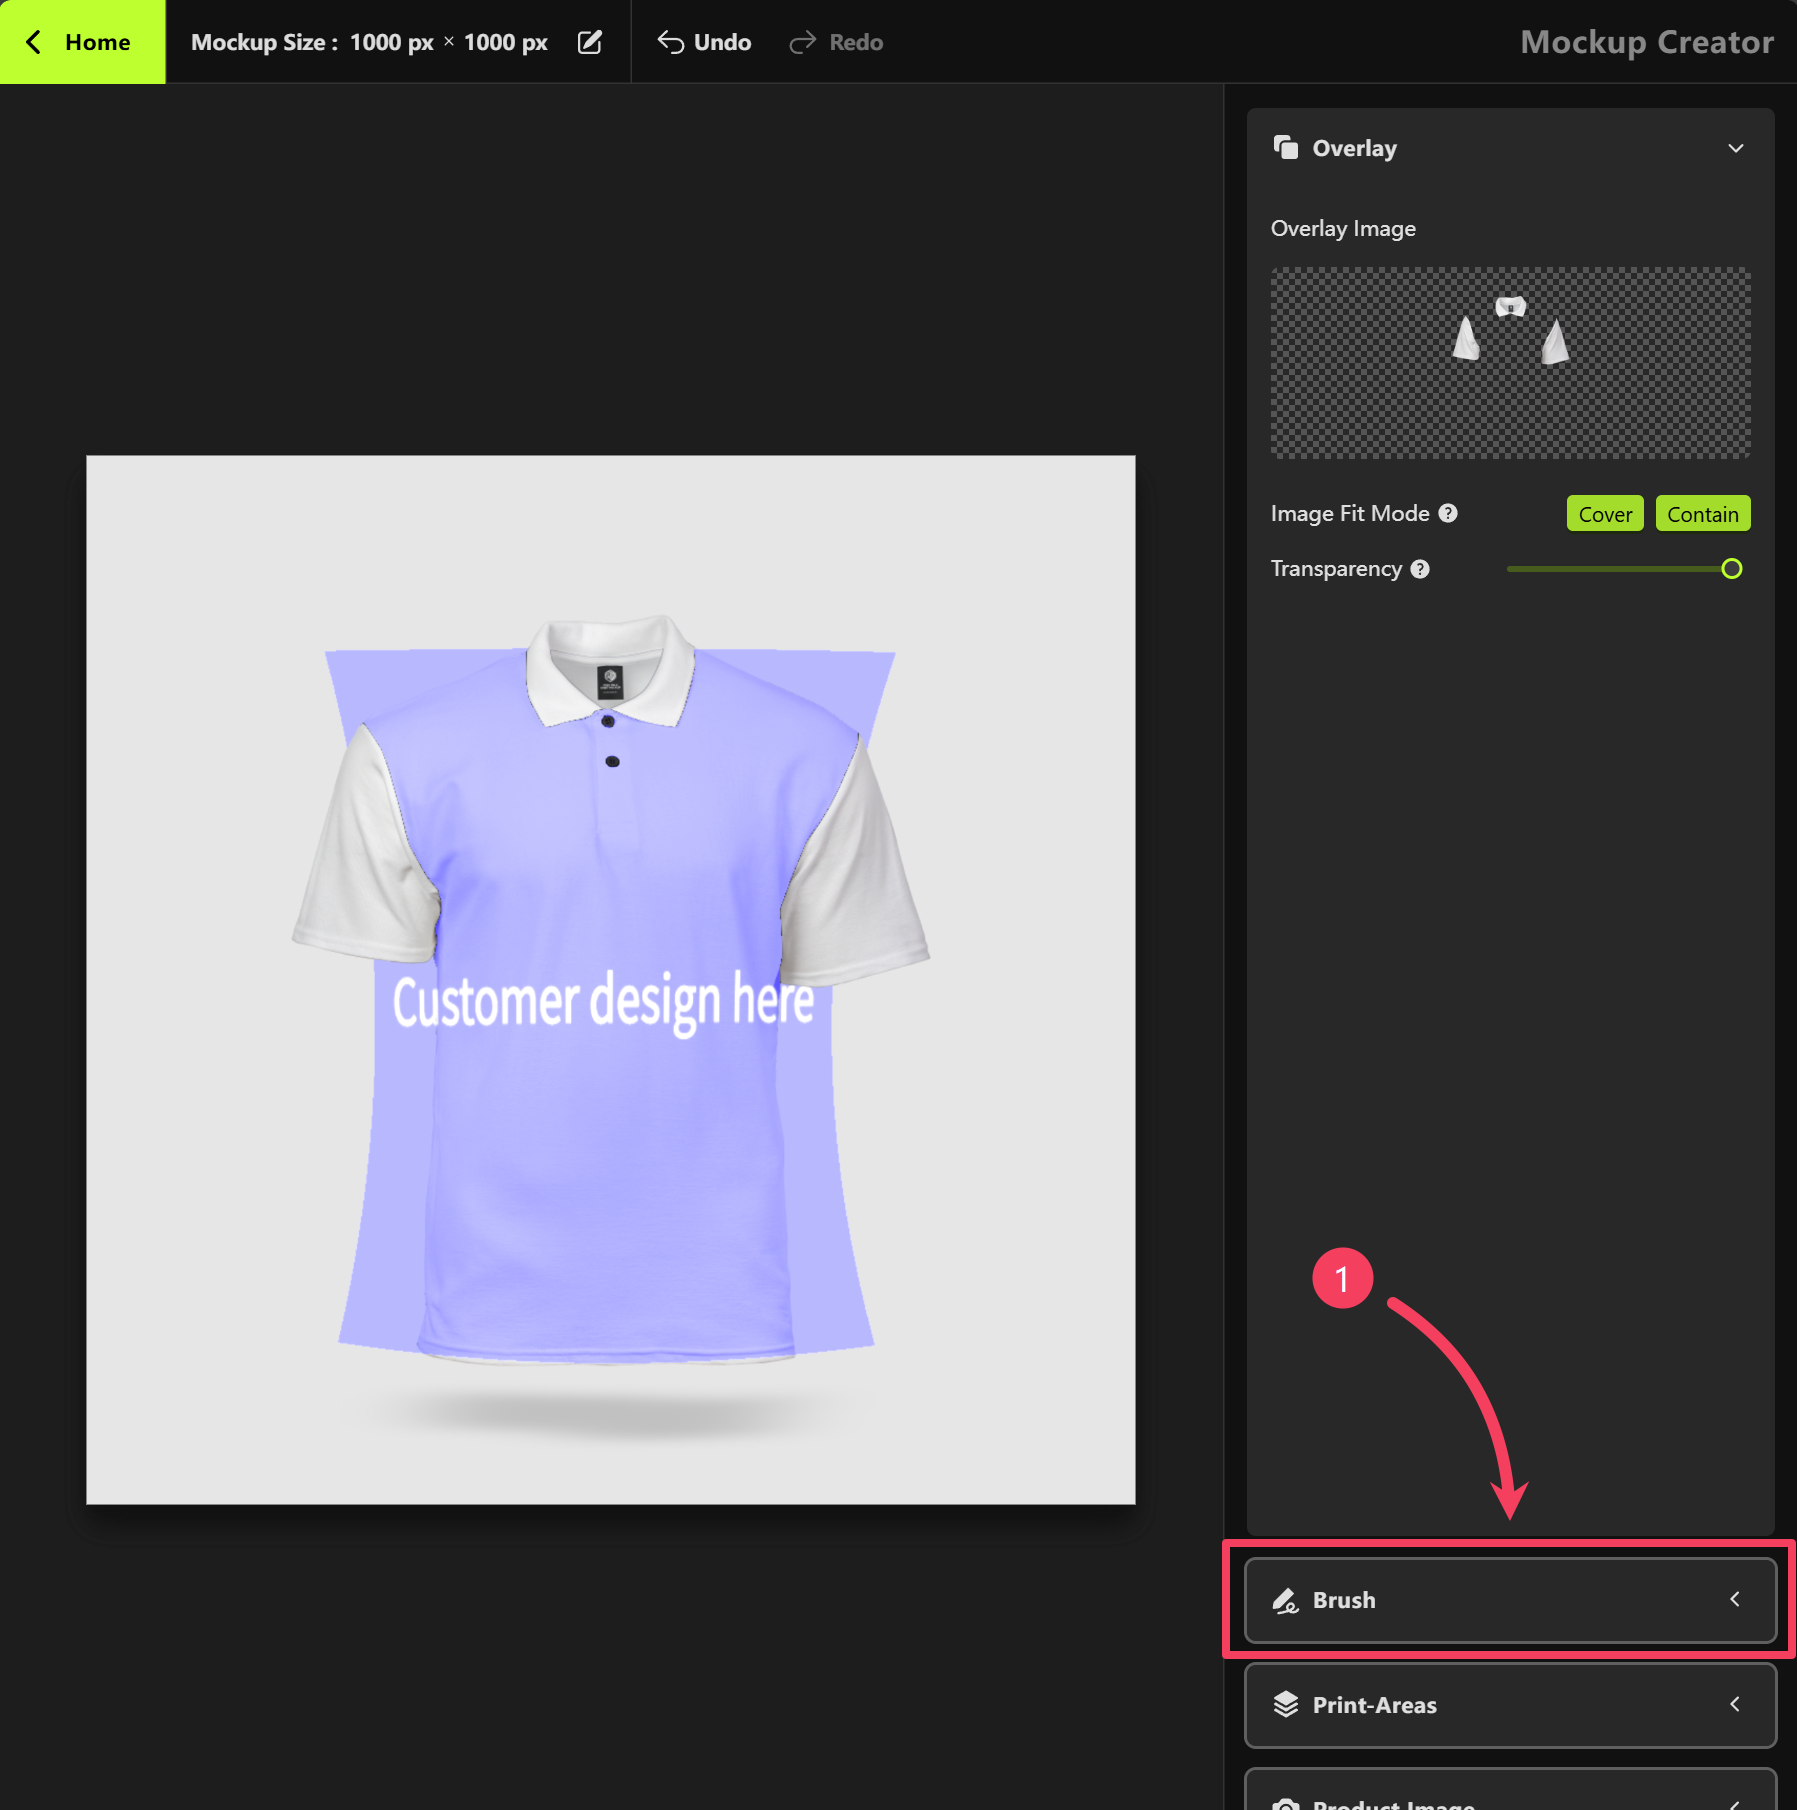 In the **Brush** panel:
1. Set the **Brush Type** to **Erase**
2. Adjust the **Brush Size** as needed
3. Move your mouse over to the canvas on the left and use the brush to erase any parts of the print area that you don’t want shown in the mockup.
The brush tool is limited to the Print-Area.
In the **Brush** panel:
1. Set the **Brush Type** to **Erase**
2. Adjust the **Brush Size** as needed
3. Move your mouse over to the canvas on the left and use the brush to erase any parts of the print area that you don’t want shown in the mockup.
The brush tool is limited to the Print-Area.
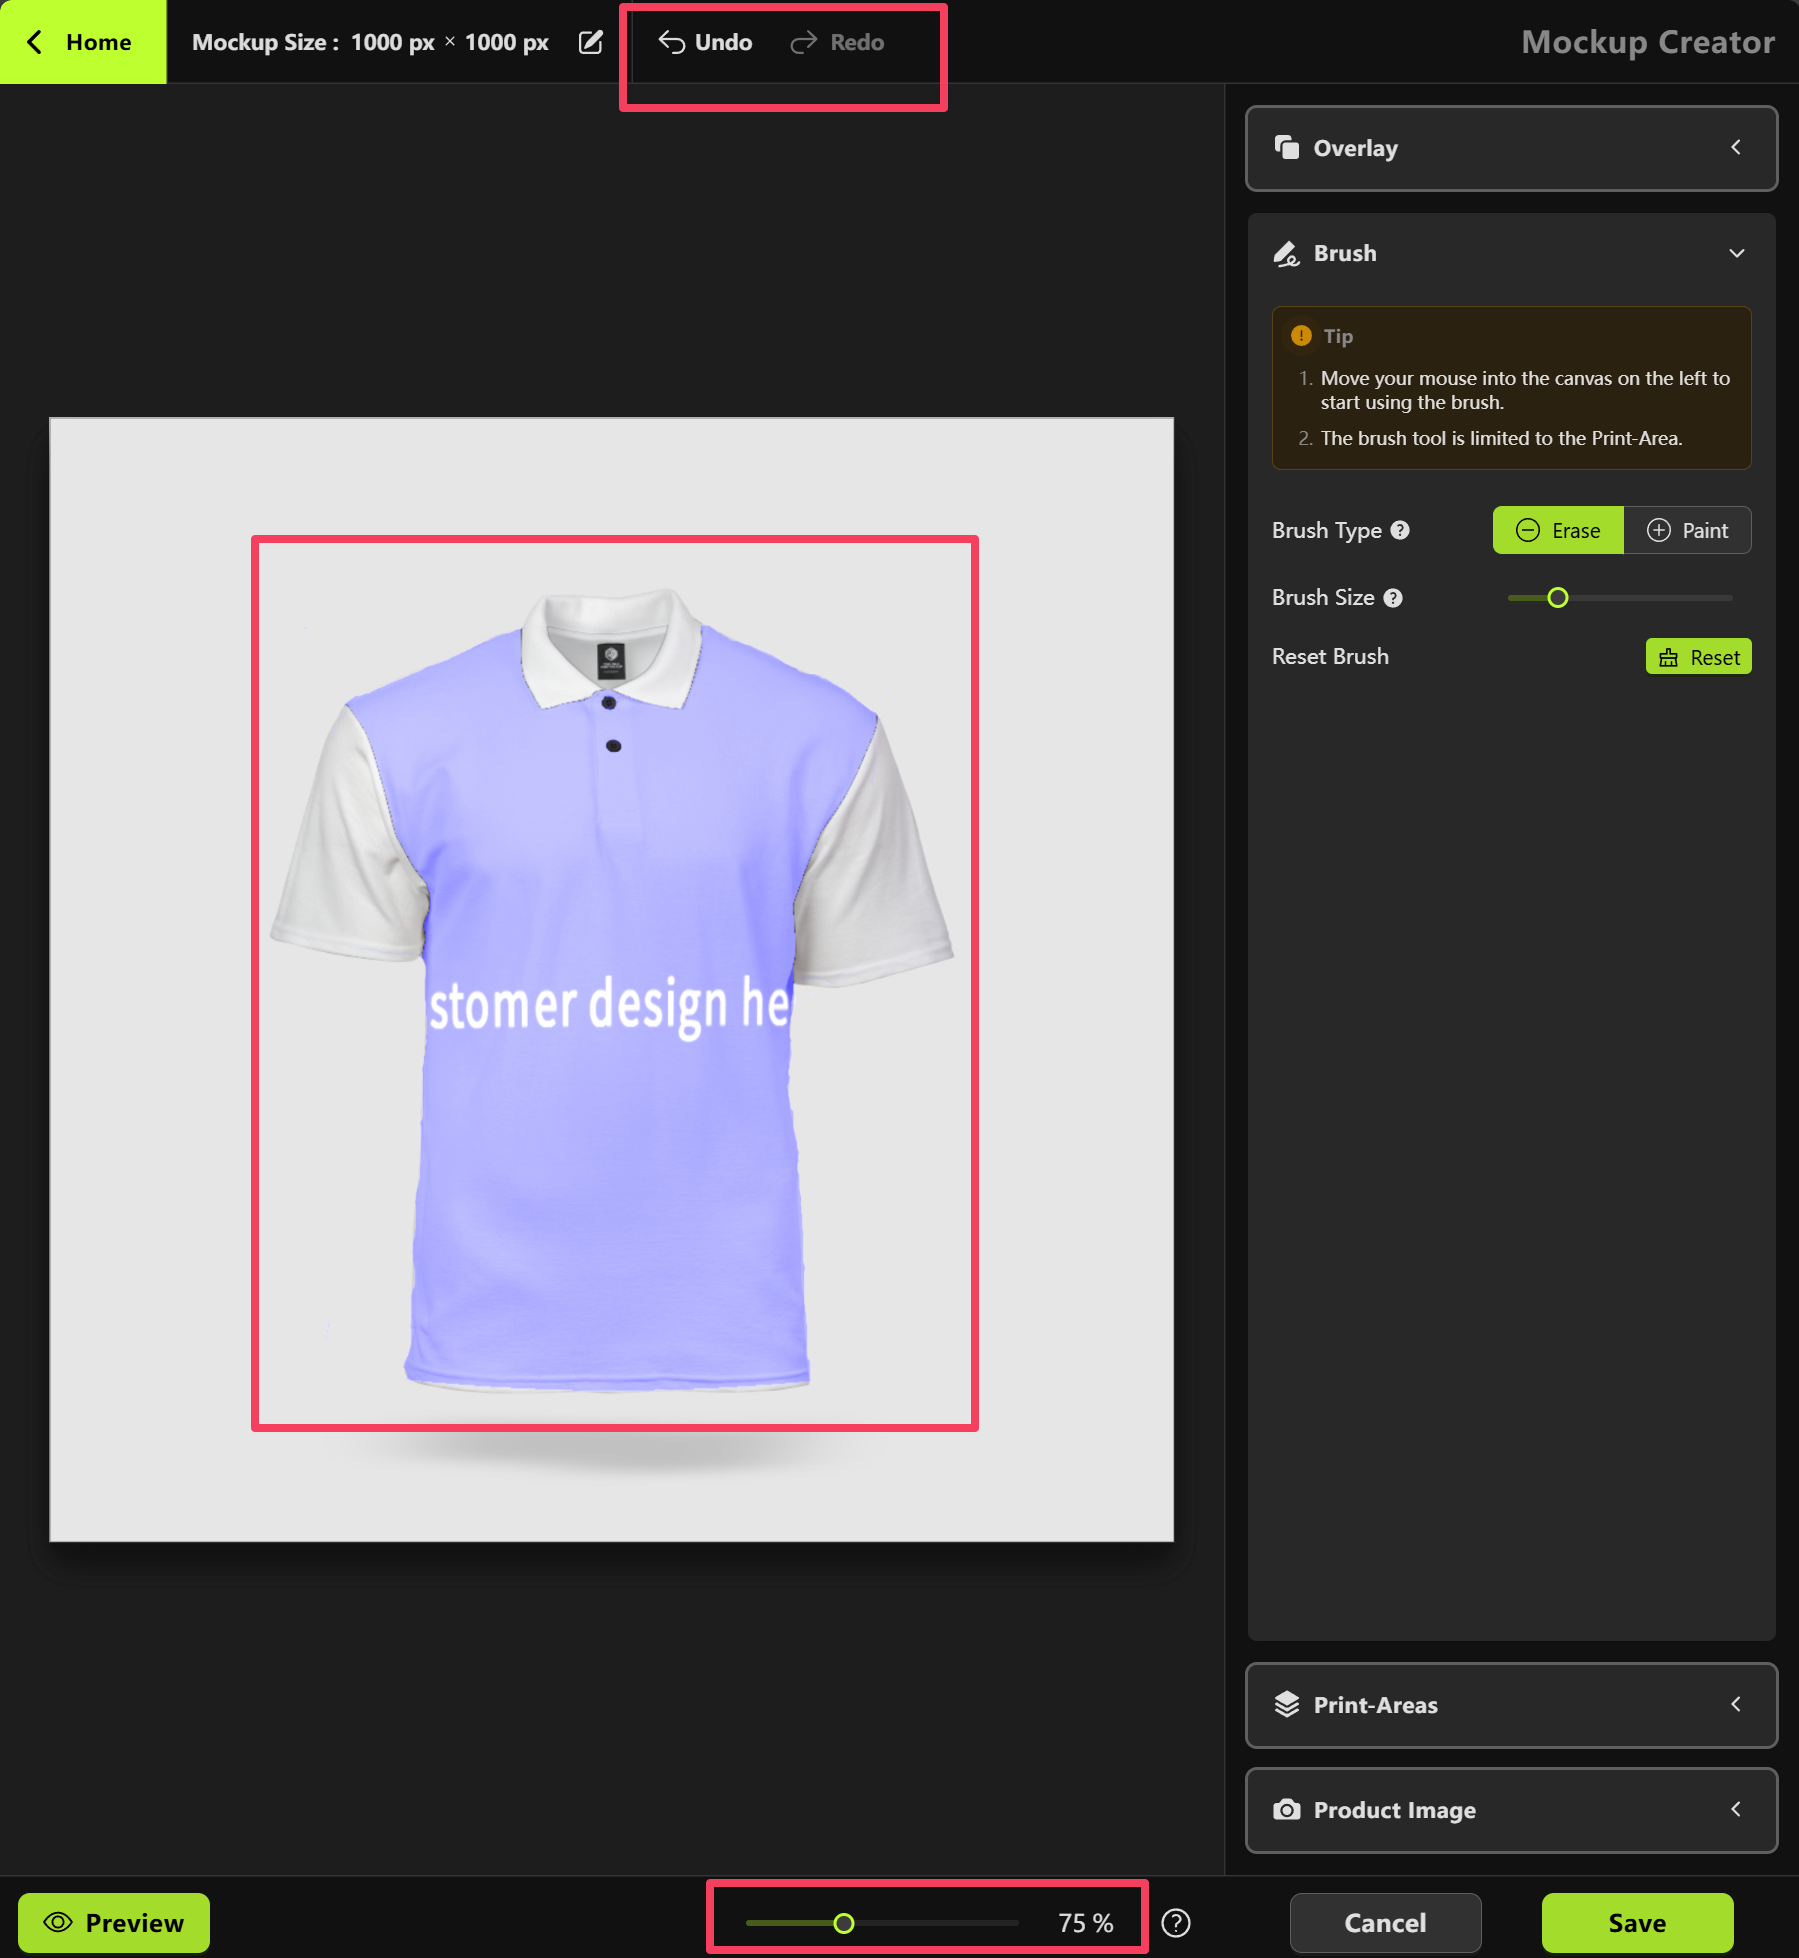
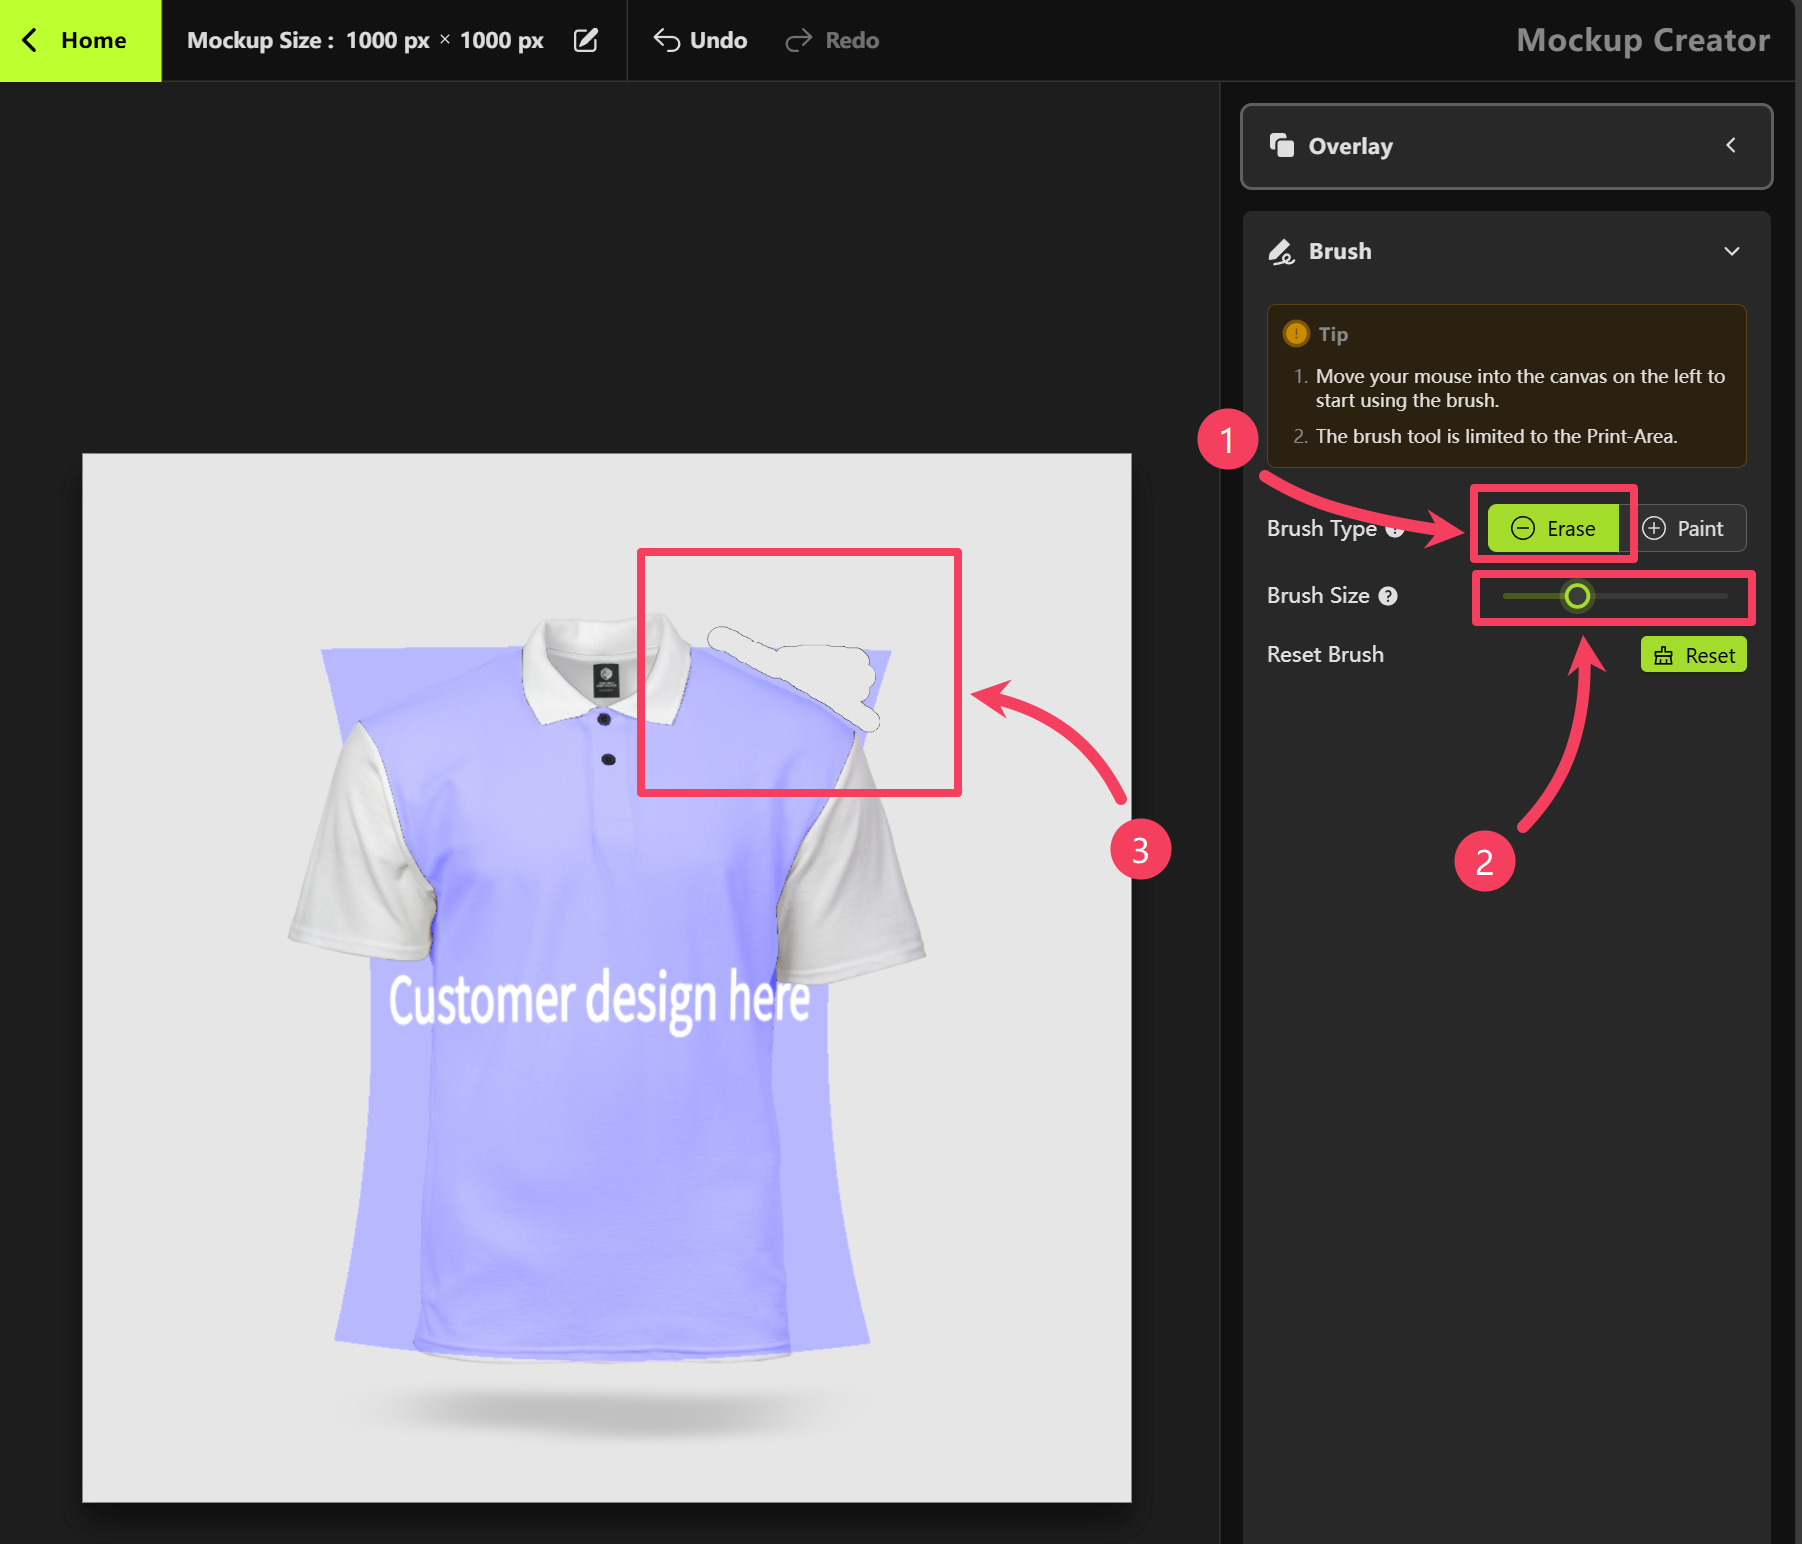 While creating your mockup, you can use the **Undo** and **Redo** options in the top toolbar of the `Mockup Creator` to easily reverse or repeat any actions.
To zoom in or out of the workspace for more precise editing, use the slider in the bottom toolbar or scroll with your mouse wheel.
With these tools and adjustments, you’ll be able to create a polished mockup that perfectly showcases the front of your product.
While creating your mockup, you can use the **Undo** and **Redo** options in the top toolbar of the `Mockup Creator` to easily reverse or repeat any actions.
To zoom in or out of the workspace for more precise editing, use the slider in the bottom toolbar or scroll with your mouse wheel.
With these tools and adjustments, you’ll be able to create a polished mockup that perfectly showcases the front of your product.
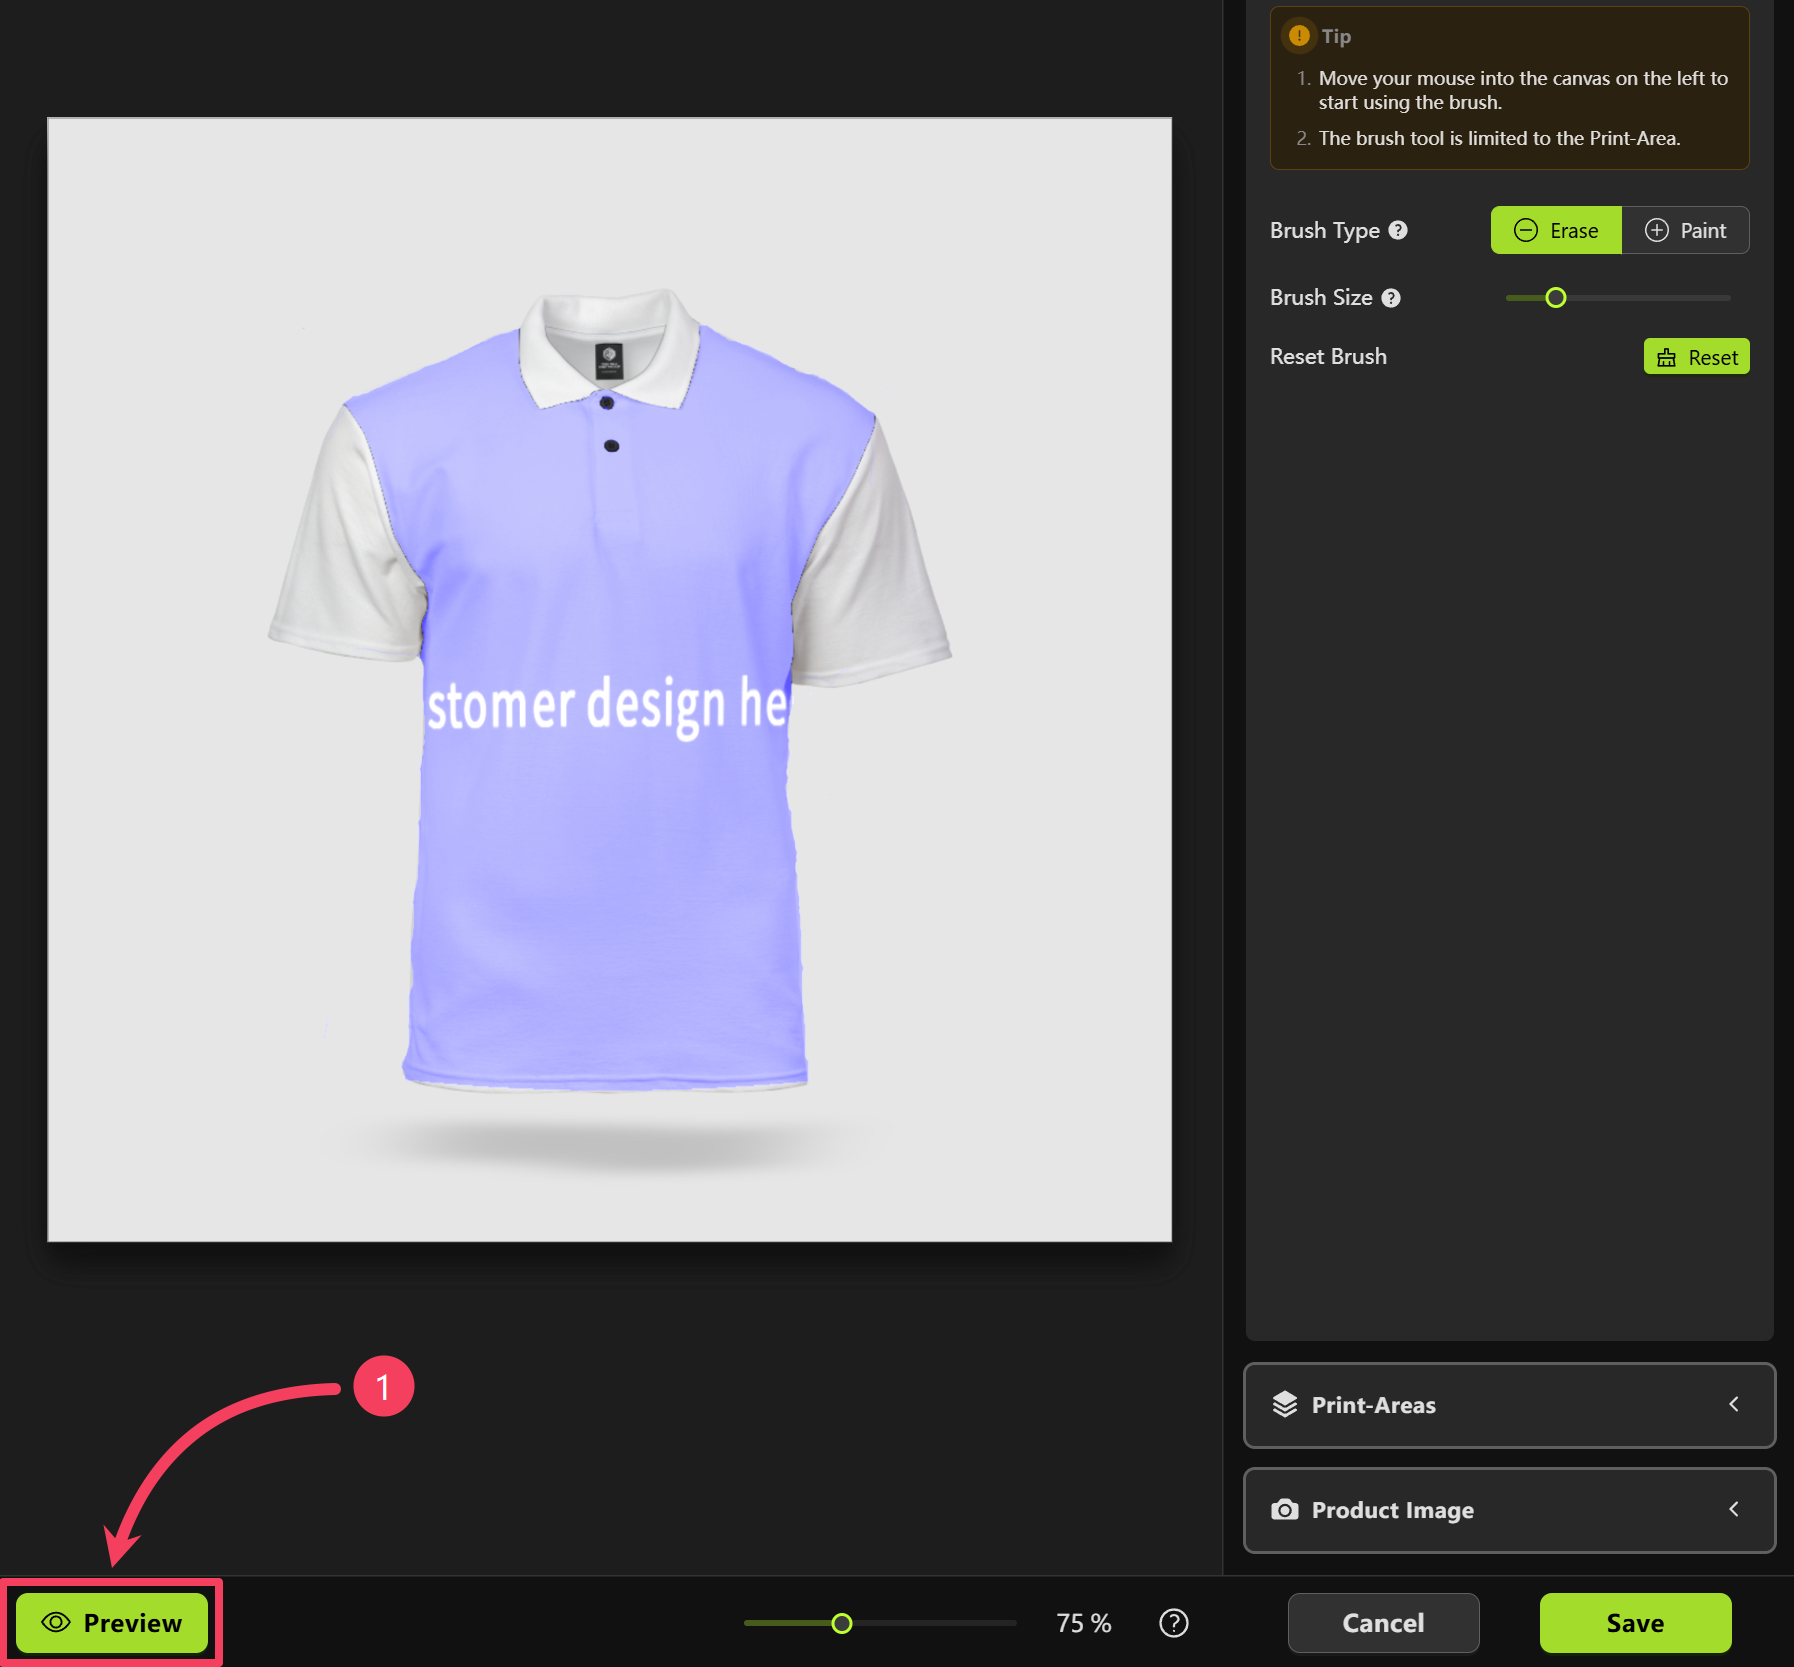
 Click the **Preview** button to open the Personalizer and preview the current mockup.
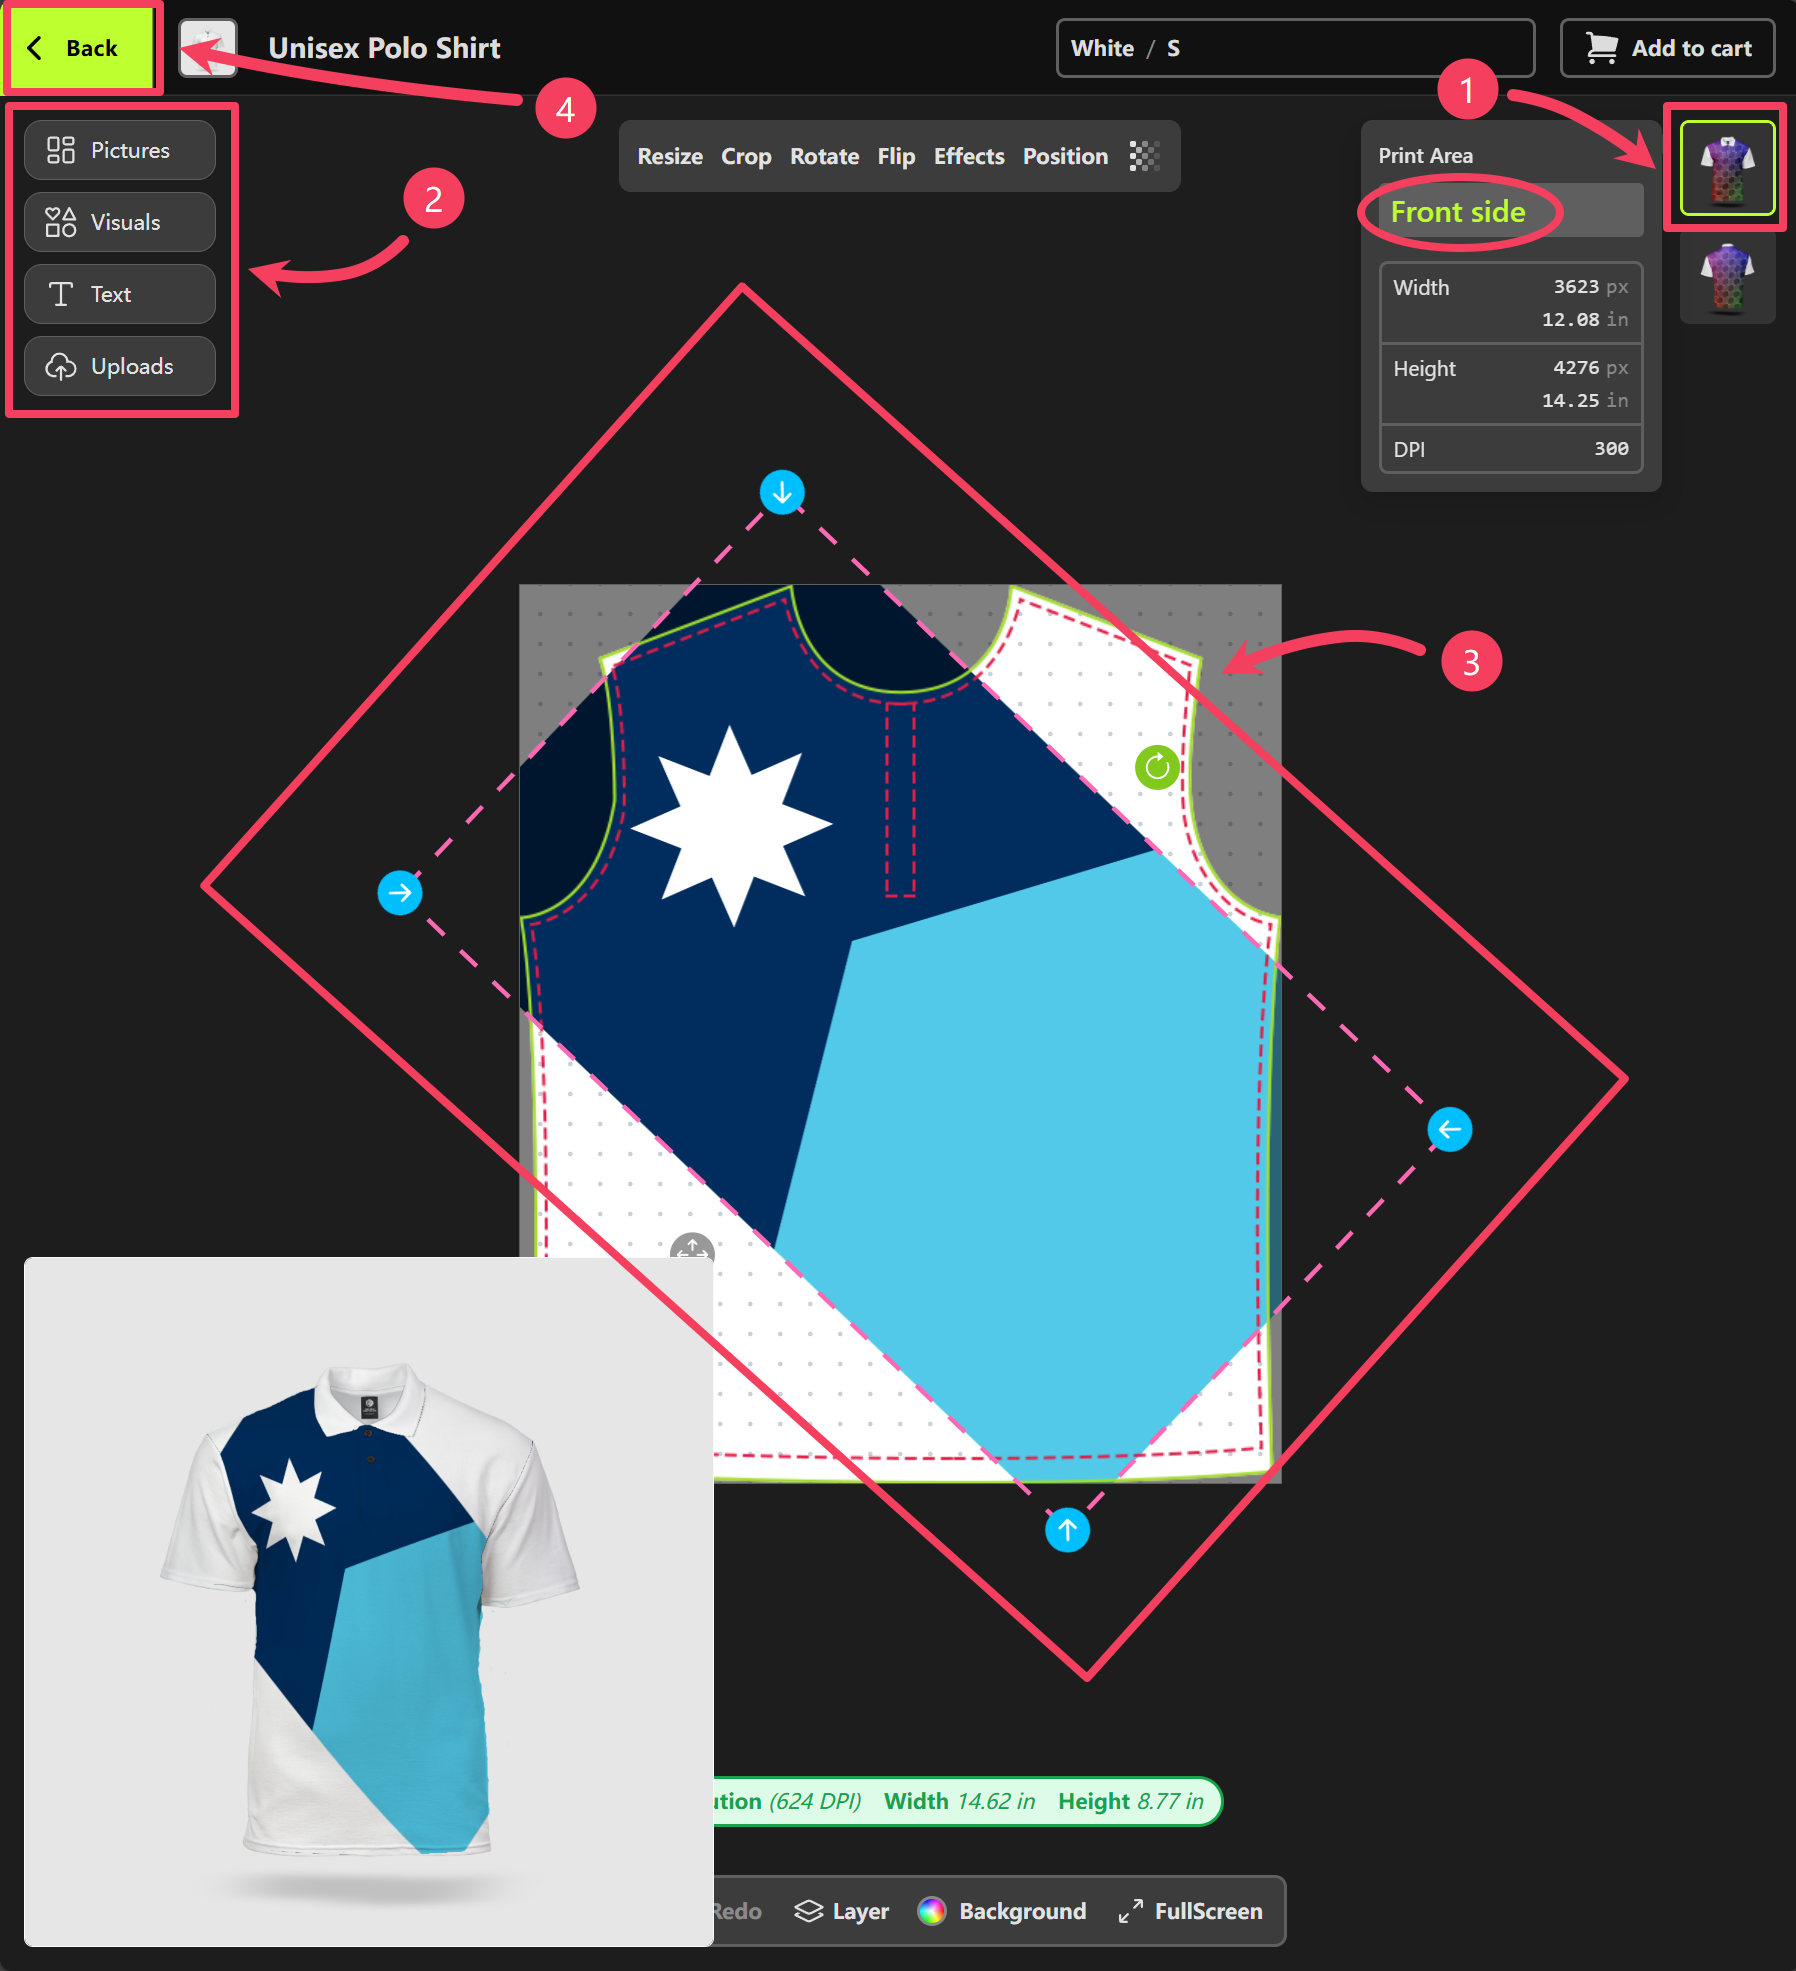
 Test your product in the `Product Personalizer`:
1. In the Print Areas panel on the right, select the print area labeled `Front side` to start designing.
2. Use the Elements panel on the left to add a design element (such as an image or text) to the canvas.
3. Adjust your design on the canvas and review the product preview in the bottom-left corner to see if it looks the way you want.
4. Click **Back** to return to the Mockup Creator.
Test your product in the `Product Personalizer`:
1. In the Print Areas panel on the right, select the print area labeled `Front side` to start designing.
2. Use the Elements panel on the left to add a design element (such as an image or text) to the canvas.
3. Adjust your design on the canvas and review the product preview in the bottom-left corner to see if it looks the way you want.
4. Click **Back** to return to the Mockup Creator.
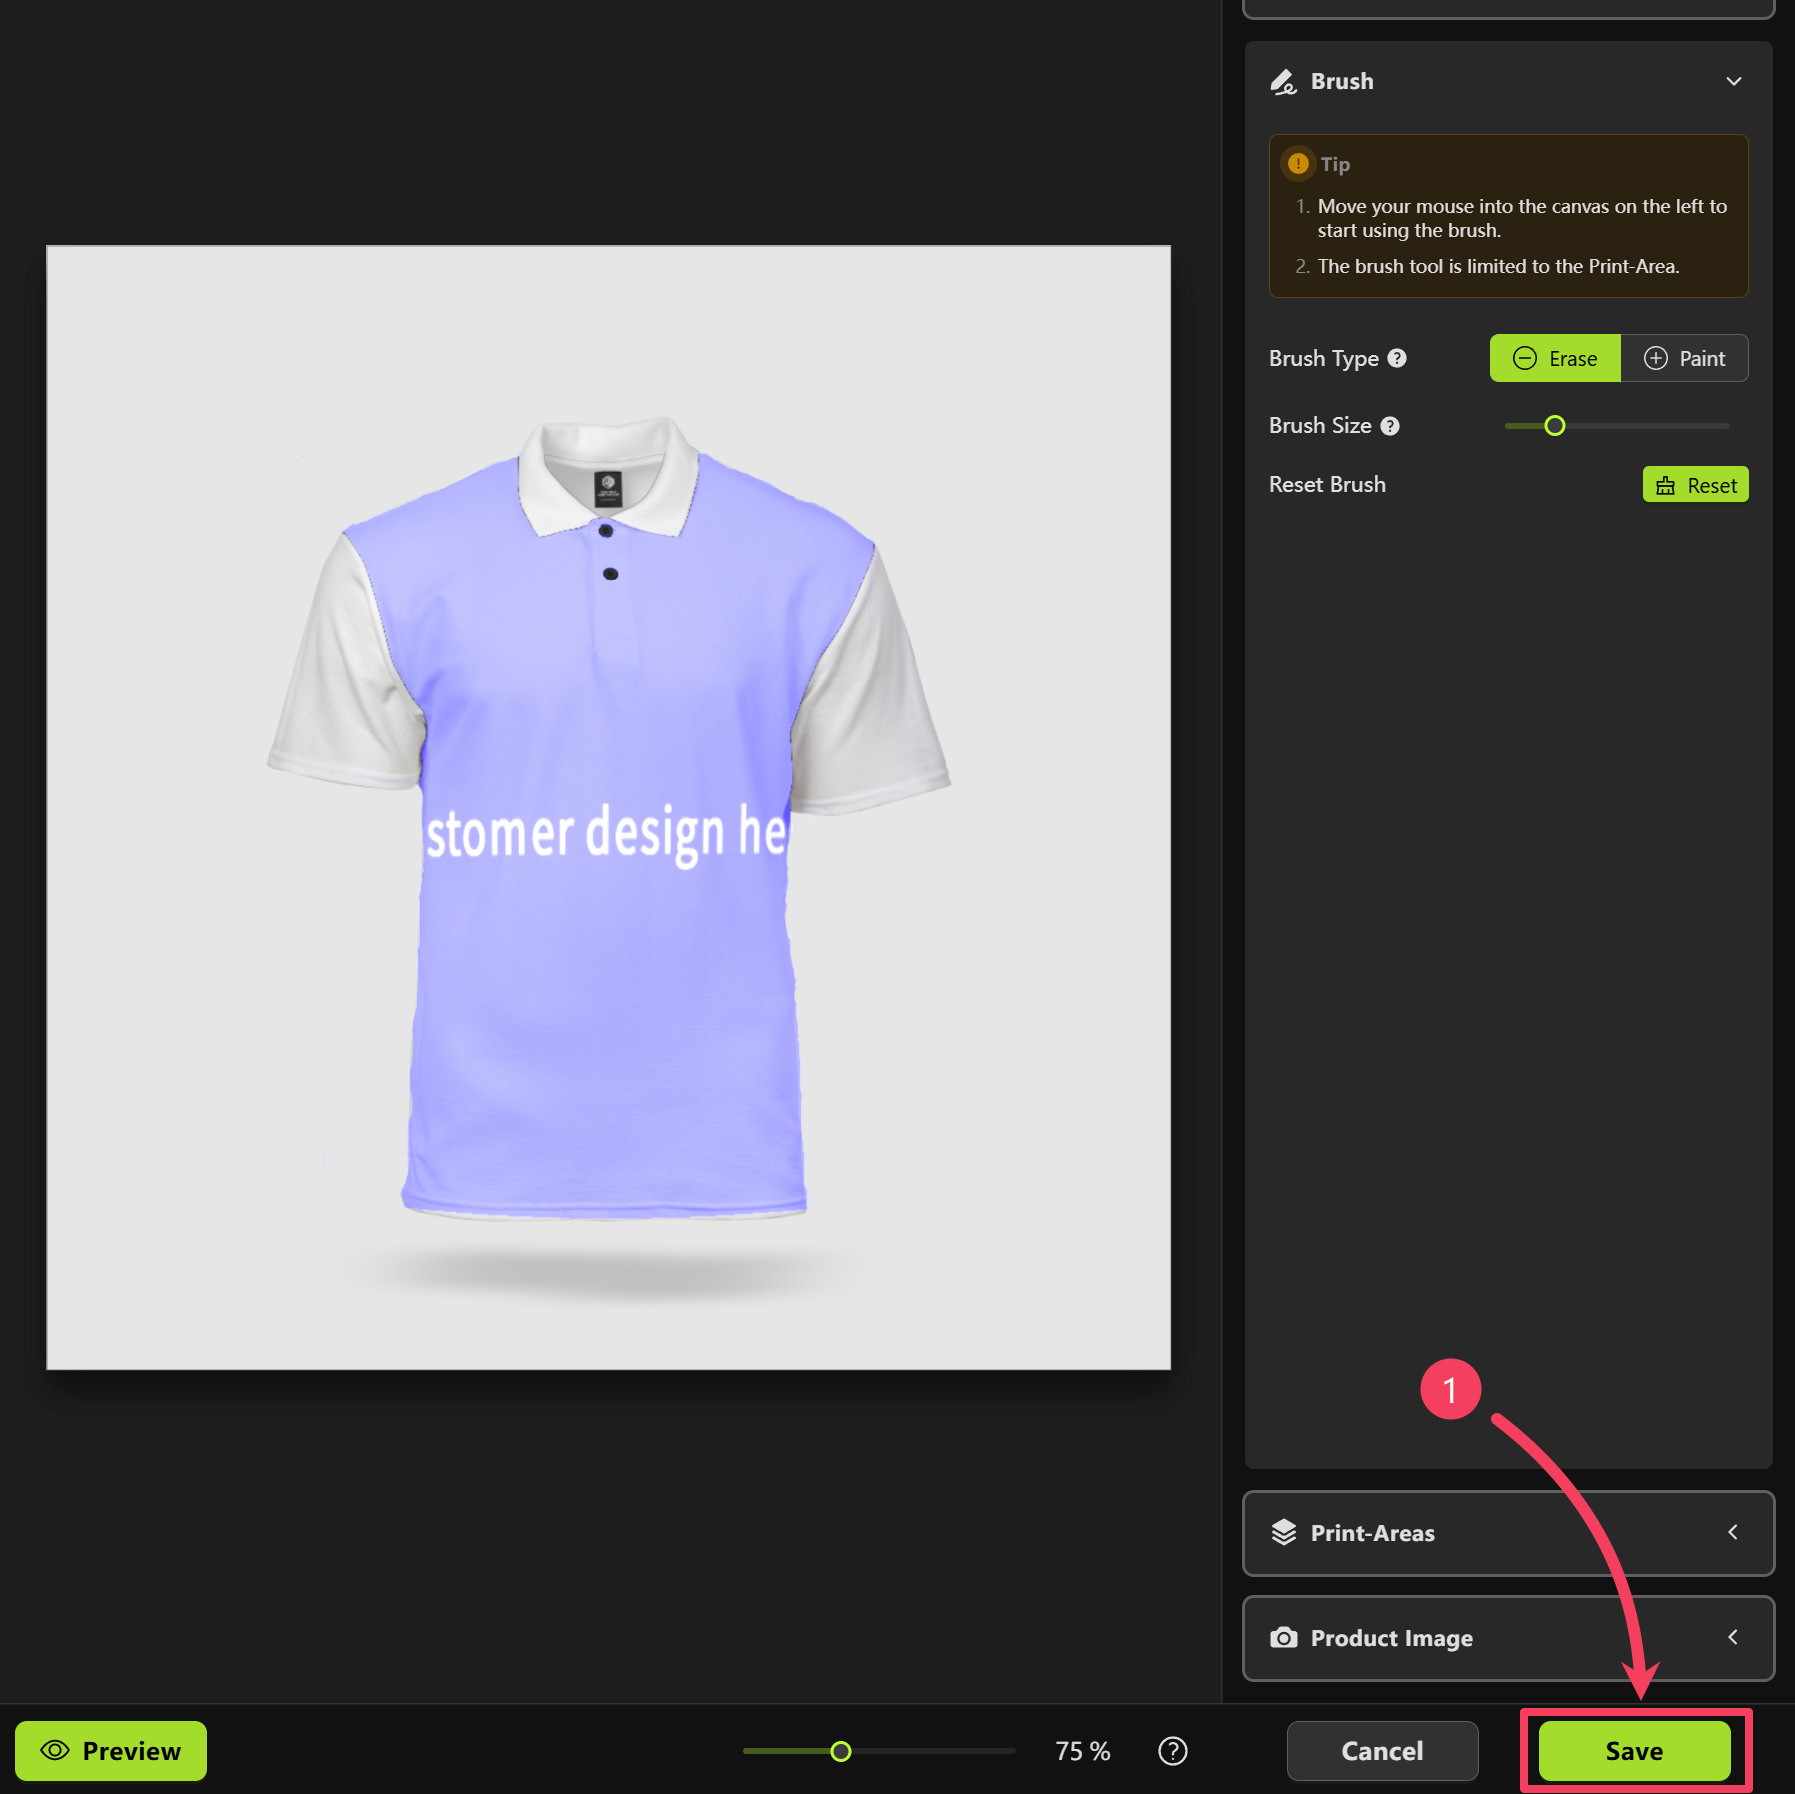
 If you’re happy with how your mockup looks, click the **Save** button to save your mockup.
 ### New Mockup: Back Side
We’ve already created a Print Area for the front of the product, now let’s set one up for the back.
### New Mockup: Back Side
We’ve already created a Print Area for the front of the product, now let’s set one up for the back.
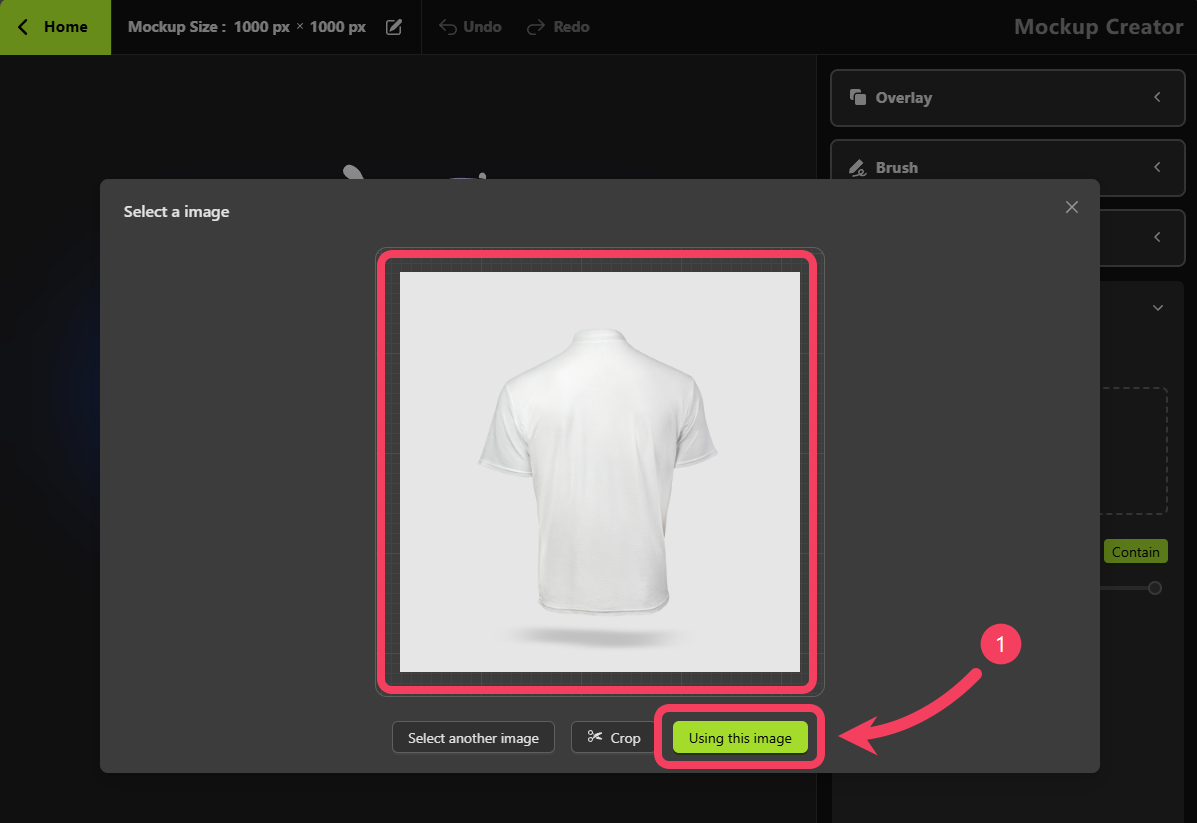
 Select or upload a back-facing image of the product.
Click the **Using this image** button.
Select or upload a back-facing image of the product.
Click the **Using this image** button.
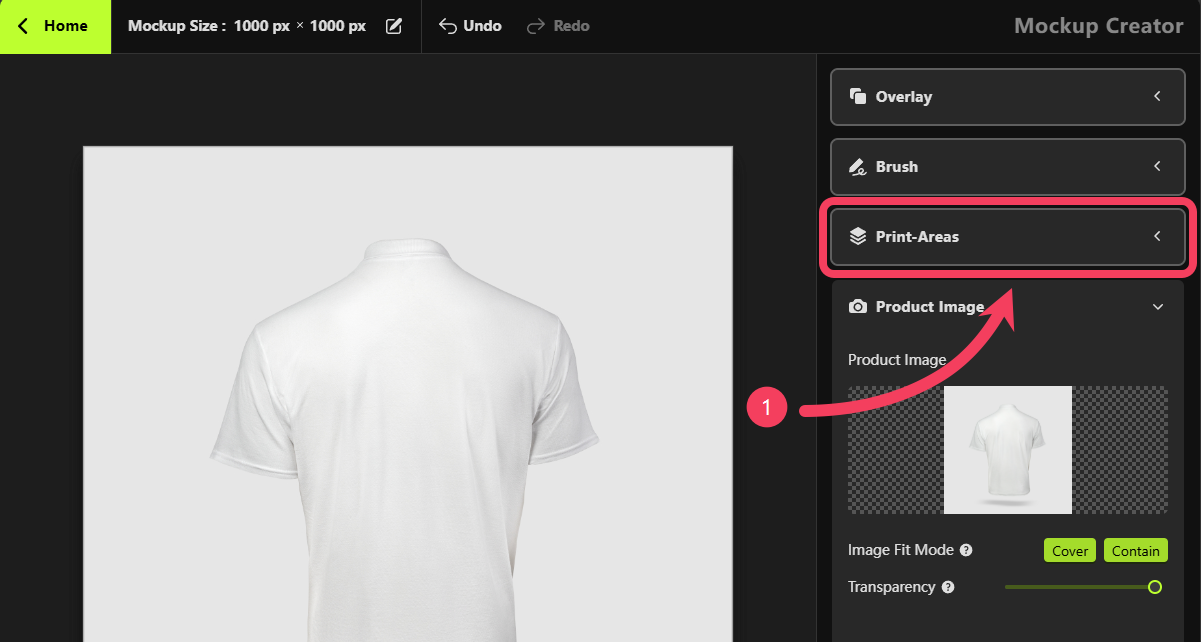
 Click on the **Print Areas** section in the right-hand panel.
Click the **Add Print-Area**.
Click on the **Print Areas** section in the right-hand panel.
Click the **Add Print-Area**.
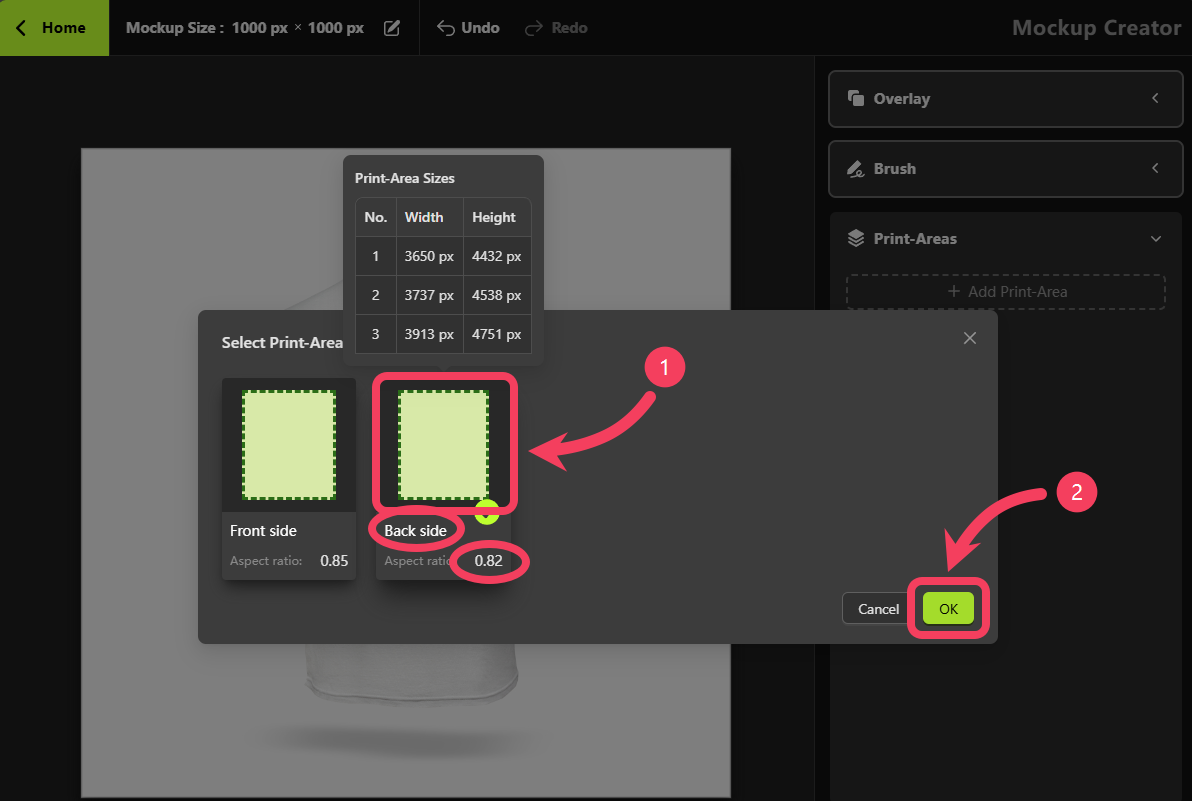
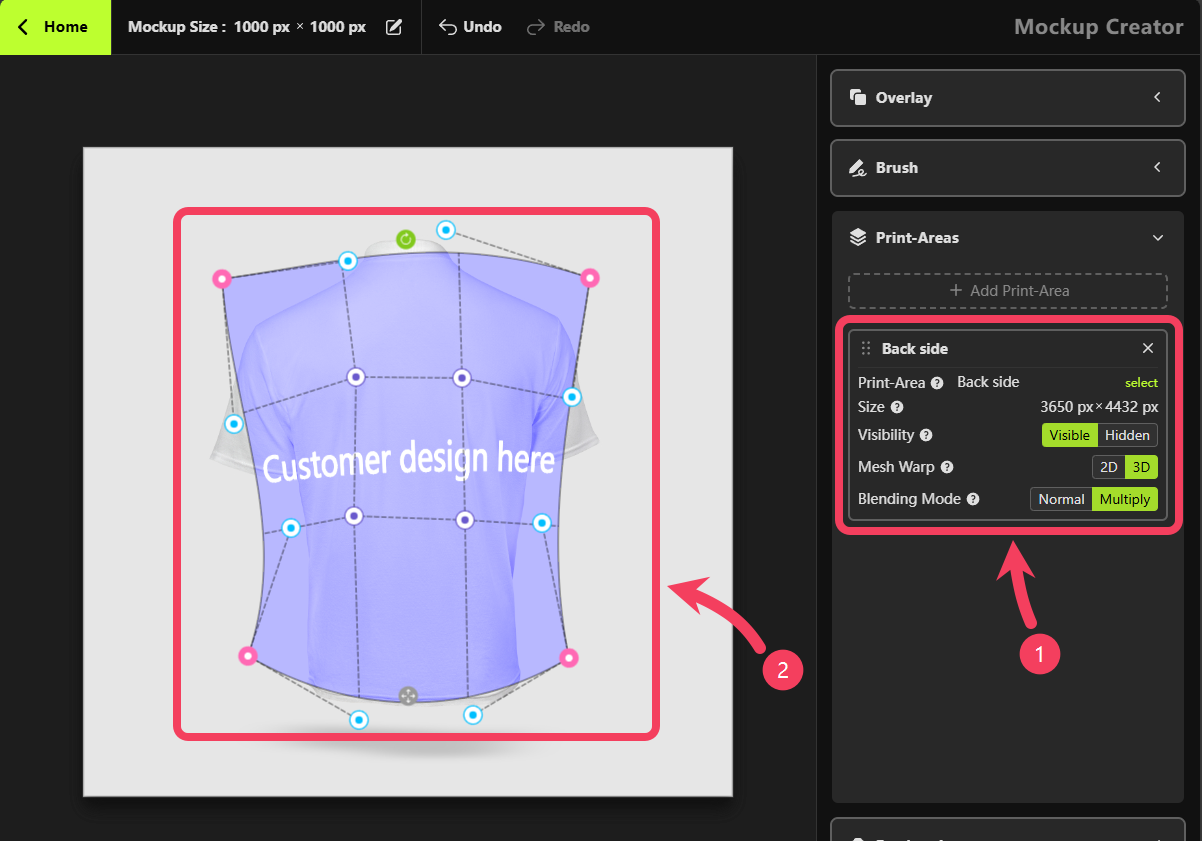
 1. Select the appropriate back-facing Print Area based on its name, and make note of its aspect ratio.
In Step 1, we created two Print-Areas: `Front side` and `Back side`. Here, we'll be using the `Back side`.
2. Click **OK** to add this Print Area to your mockup
1. Select the appropriate back-facing Print Area based on its name, and make note of its aspect ratio.
In Step 1, we created two Print-Areas: `Front side` and `Back side`. Here, we'll be using the `Back side`.
2. Click **OK** to add this Print Area to your mockup
 Using the same steps as before, create a mockup that showcases the back of the product.
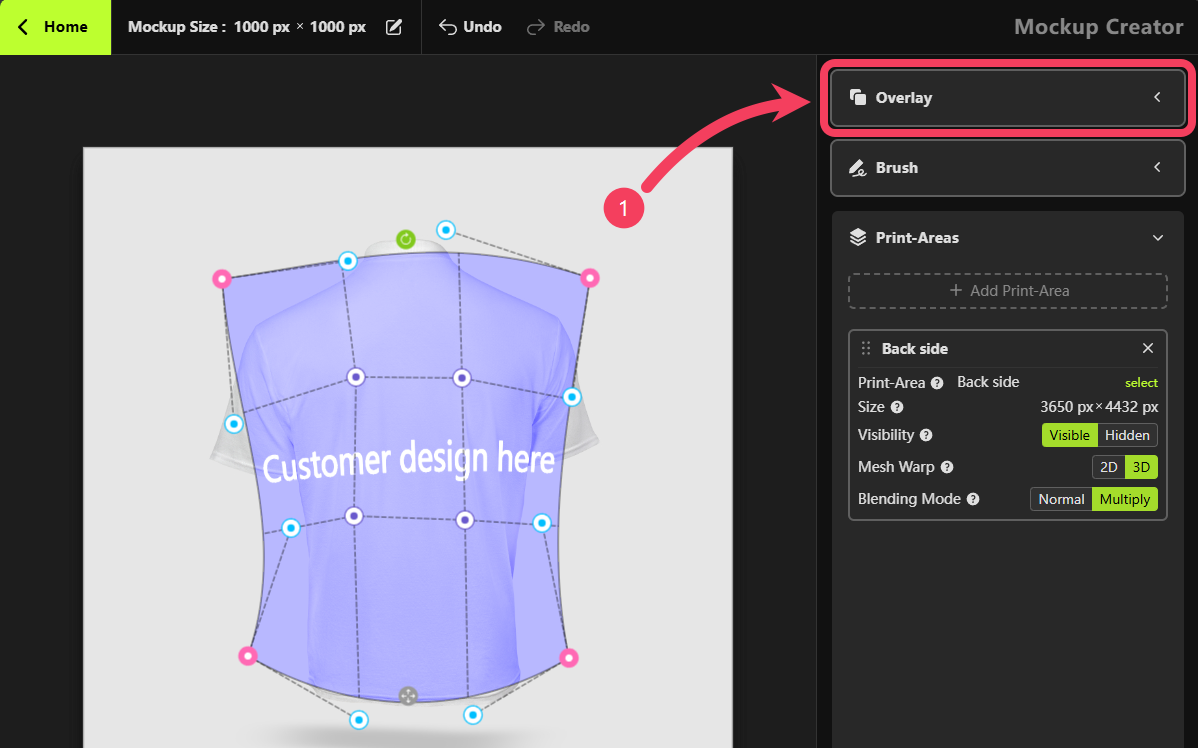
 Click on the **Overlay** section in the right-hand panel.
Click **Add Image**
Click on the **Overlay** section in the right-hand panel.
Click **Add Image**
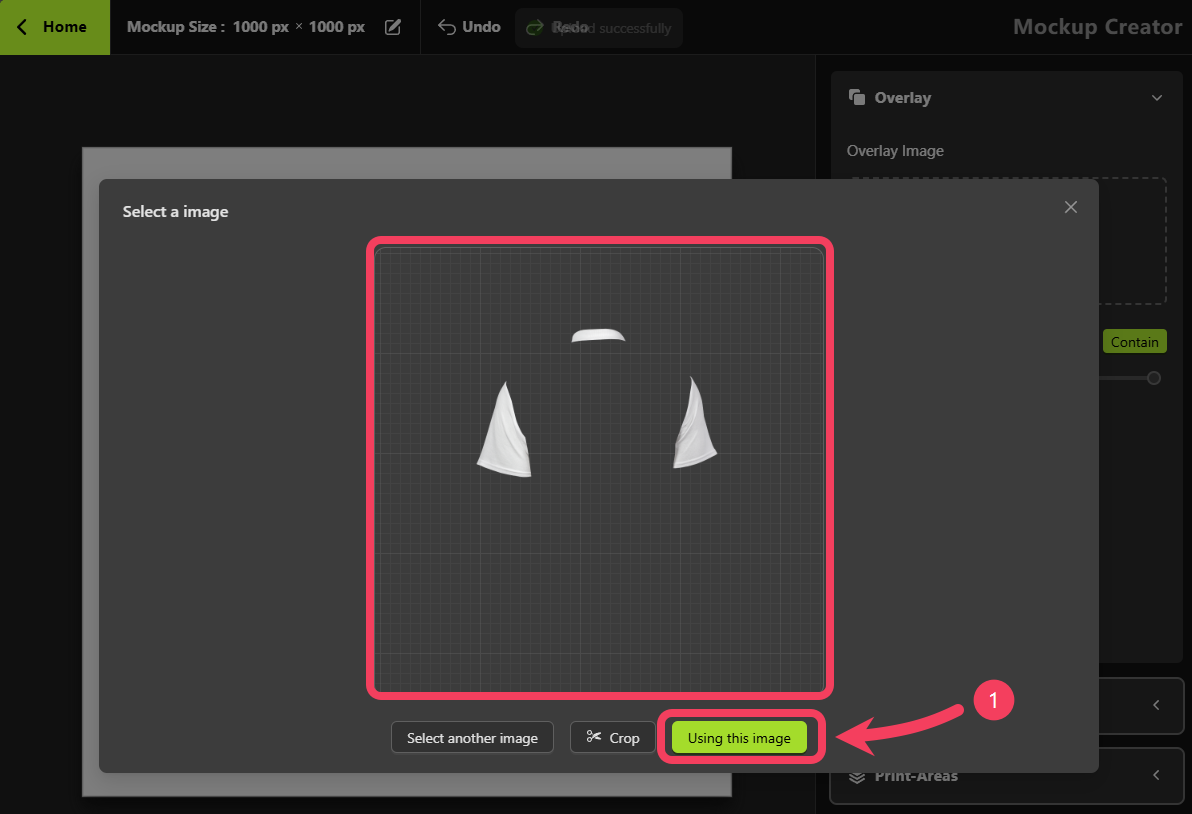
 In this tutorial, we're creating a model for a polo shirt. We'll upload an **Overlay image** that includes the shirt's collar and sleeves, and is also suitable for the back of the product.
Click **Using this image**.
In this tutorial, we're creating a model for a polo shirt. We'll upload an **Overlay image** that includes the shirt's collar and sleeves, and is also suitable for the back of the product.
Click **Using this image**.
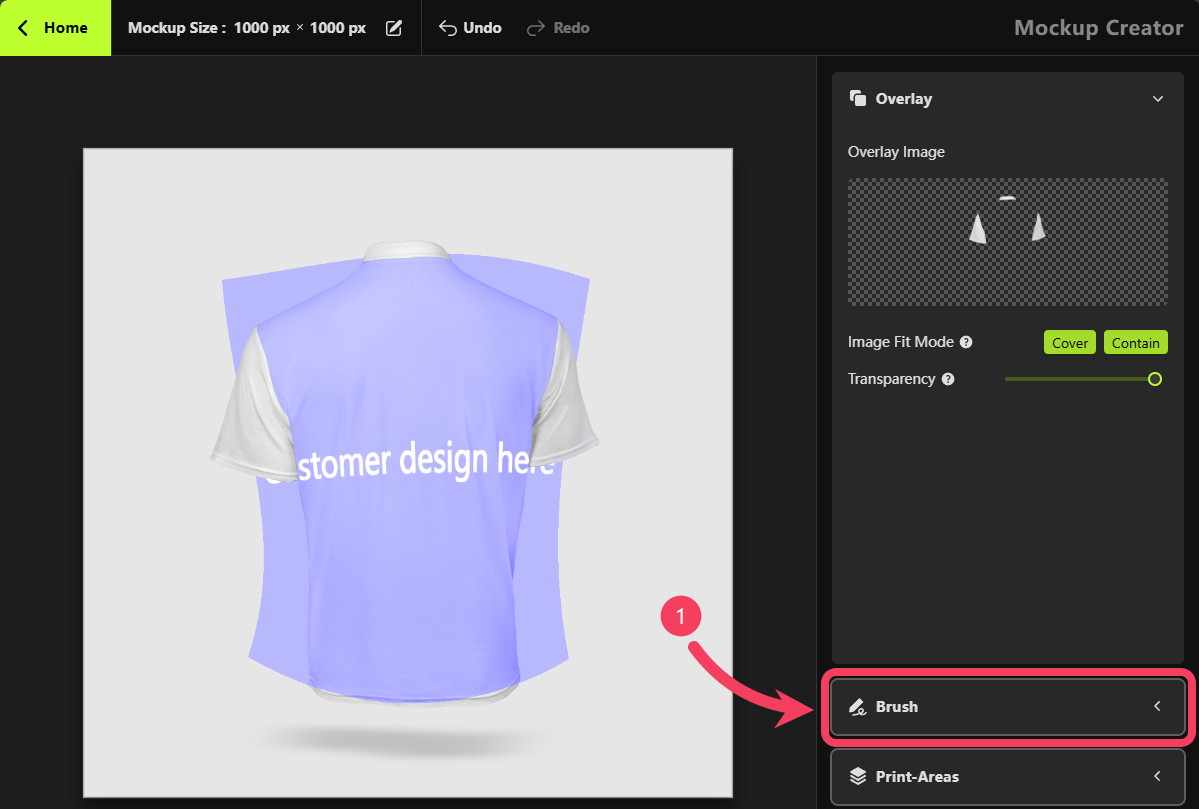
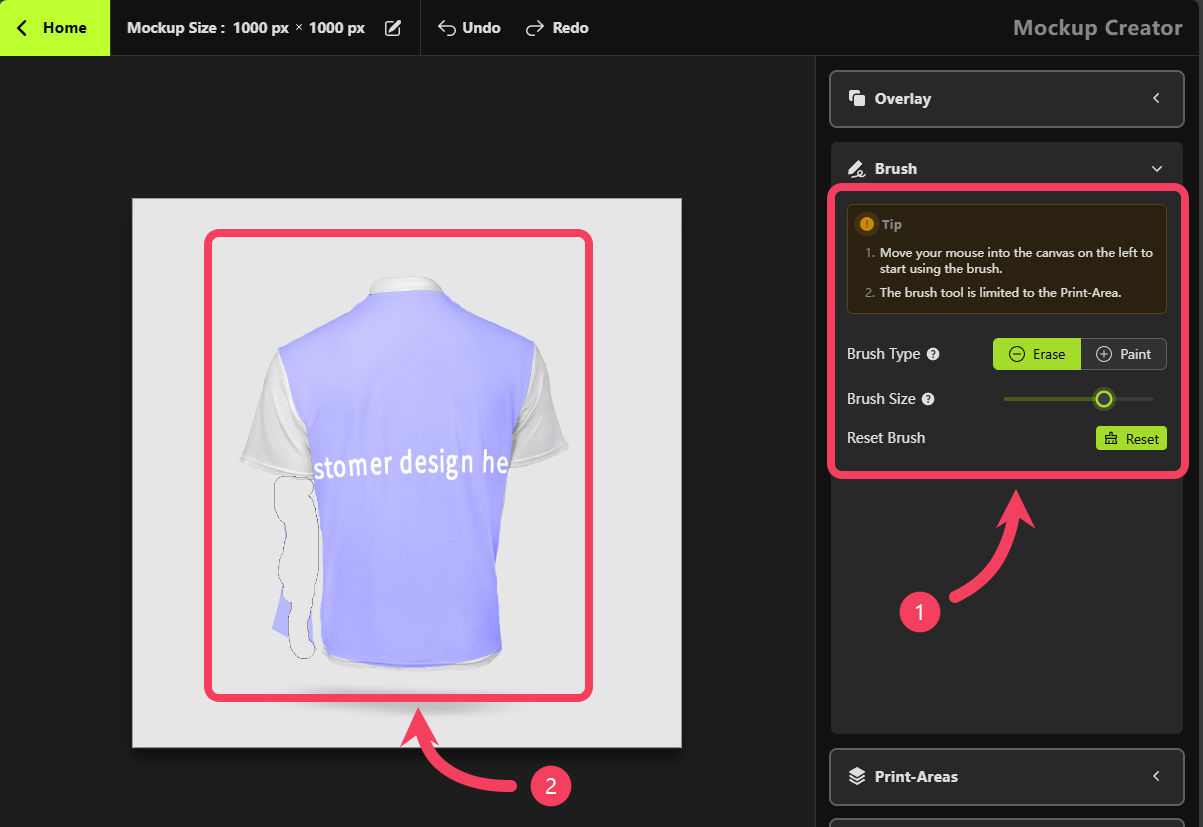
 Click on the **Brush** section in the right-hand panel.
 In the **Brush** panel:
1. Set the **Brush Type** to **Erase**
2. Adjust the **Brush Size** as needed
3. Move your mouse over to the canvas on the left and use the brush to erase any parts of the print area that you don’t want shown in the mockup.
The brush tool is limited to the Print-Area.
In the **Brush** panel:
1. Set the **Brush Type** to **Erase**
2. Adjust the **Brush Size** as needed
3. Move your mouse over to the canvas on the left and use the brush to erase any parts of the print area that you don’t want shown in the mockup.
The brush tool is limited to the Print-Area.
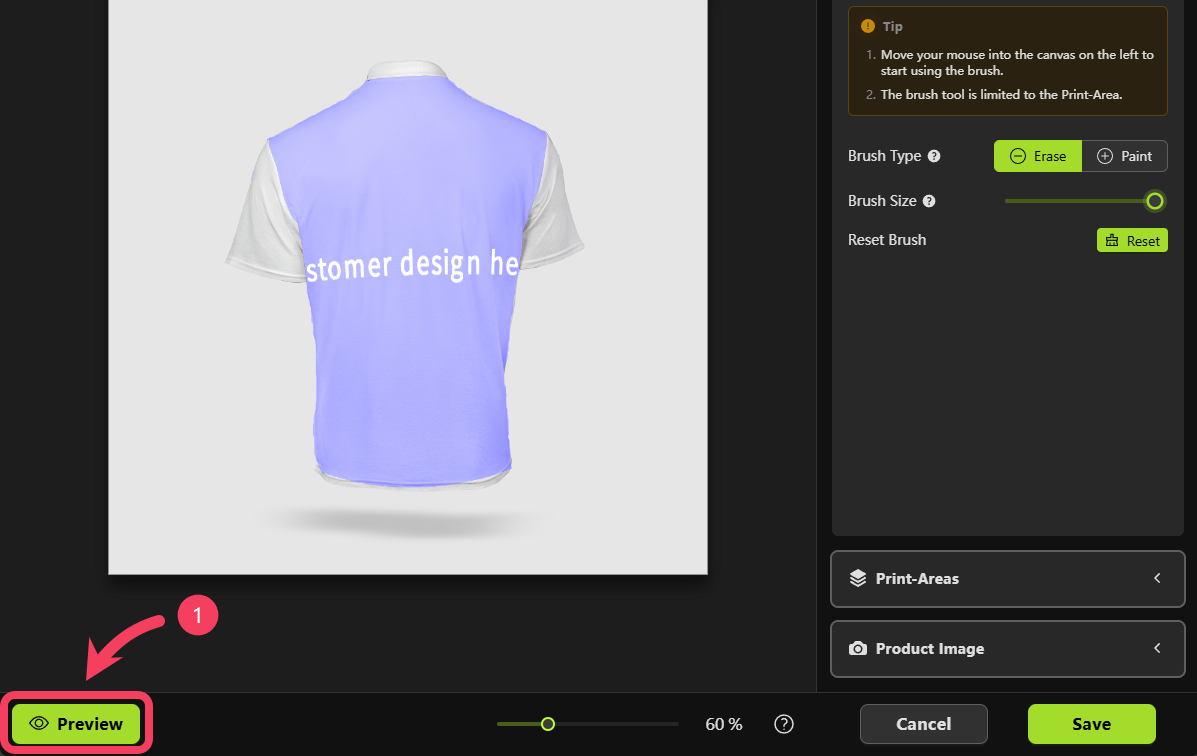
 Click the **Preview** button to open the Personalizer and preview the current mockup.
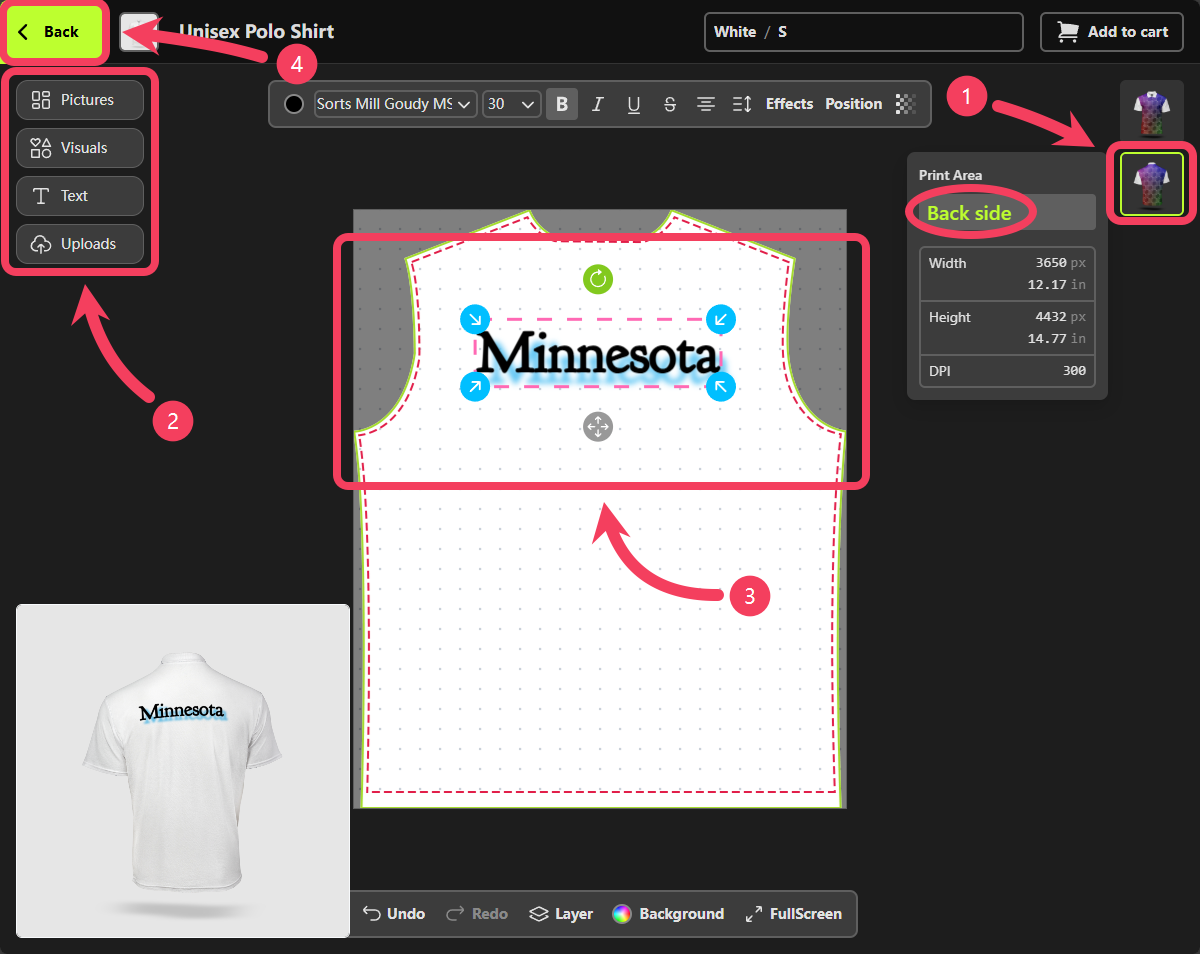
 Test your product in the Personalizer.
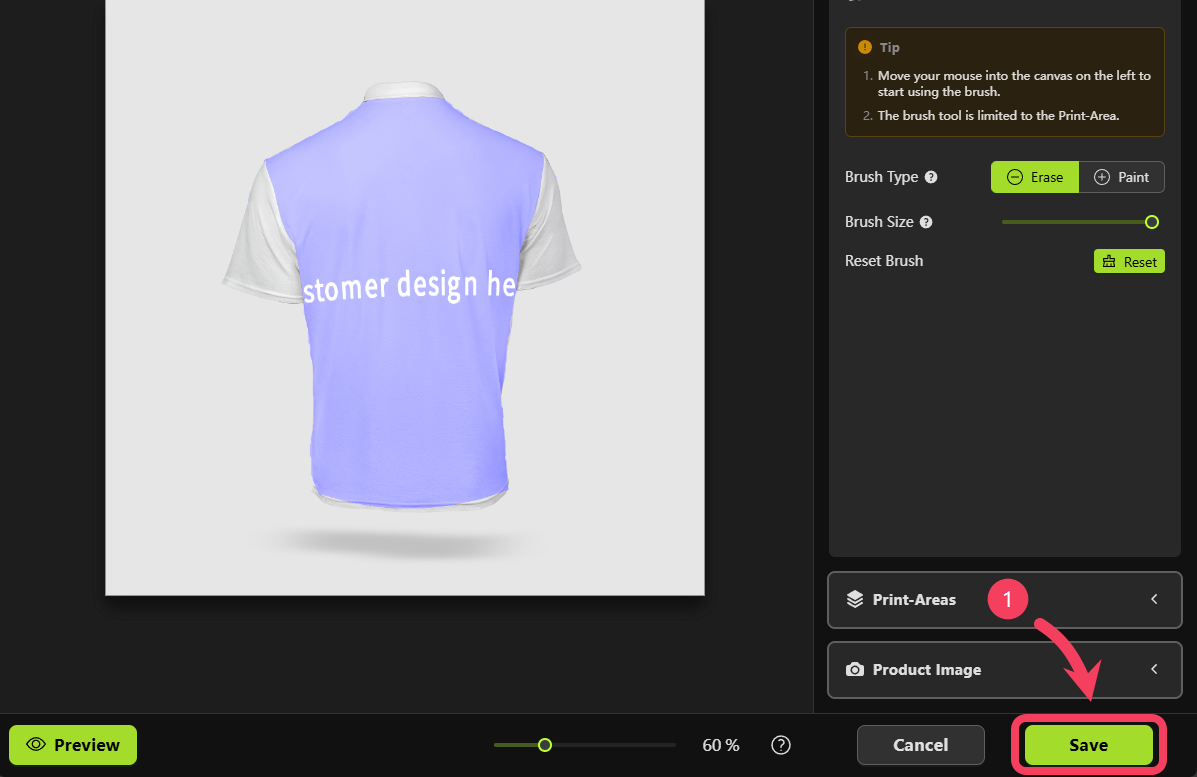
 If you’re happy with how your mockup looks, click the **Save** button to save your mockup.
 ### New Mockup Group
So far, we've created two mockups within the `default` **Mockup Group**: one showing the `front` of the product in white, and another showing the `back`. However, our product comes in more than just `White`. Next, we'll create separate **Mockup Groups** for each available color variant.
Select **New Mockup Group** to create a group for organizing the mockups of the `Grey` color variant.
### New Mockup Group
So far, we've created two mockups within the `default` **Mockup Group**: one showing the `front` of the product in white, and another showing the `back`. However, our product comes in more than just `White`. Next, we'll create separate **Mockup Groups** for each available color variant.
Select **New Mockup Group** to create a group for organizing the mockups of the `Grey` color variant.
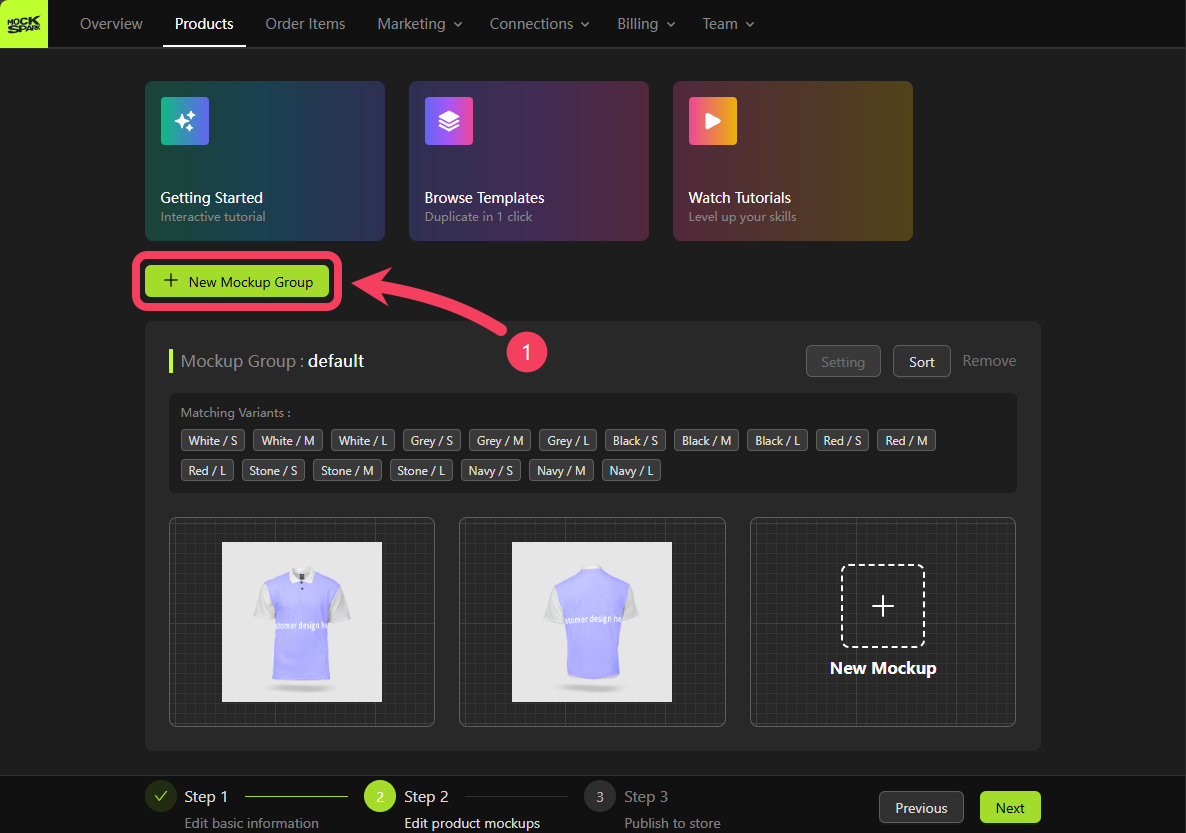 In the form dialog titled **Create Mockup Group**, follow these steps:
1. In the `Mockup Group Title` field, enter `Grey` as the group name.
2. Under `Matching Variants` field, select all variants that are in the `Grey` color.
3. Click the **>** button in the center of the dialog to move the selected variants from the `Source Box` to the `Target Box`. This assigns them to the new `Grey` Mockup Group.
4. Click **OK** to save your changes.
In the form dialog titled **Create Mockup Group**, follow these steps:
1. In the `Mockup Group Title` field, enter `Grey` as the group name.
2. Under `Matching Variants` field, select all variants that are in the `Grey` color.
3. Click the **>** button in the center of the dialog to move the selected variants from the `Source Box` to the `Target Box`. This assigns them to the new `Grey` Mockup Group.
4. Click **OK** to save your changes.
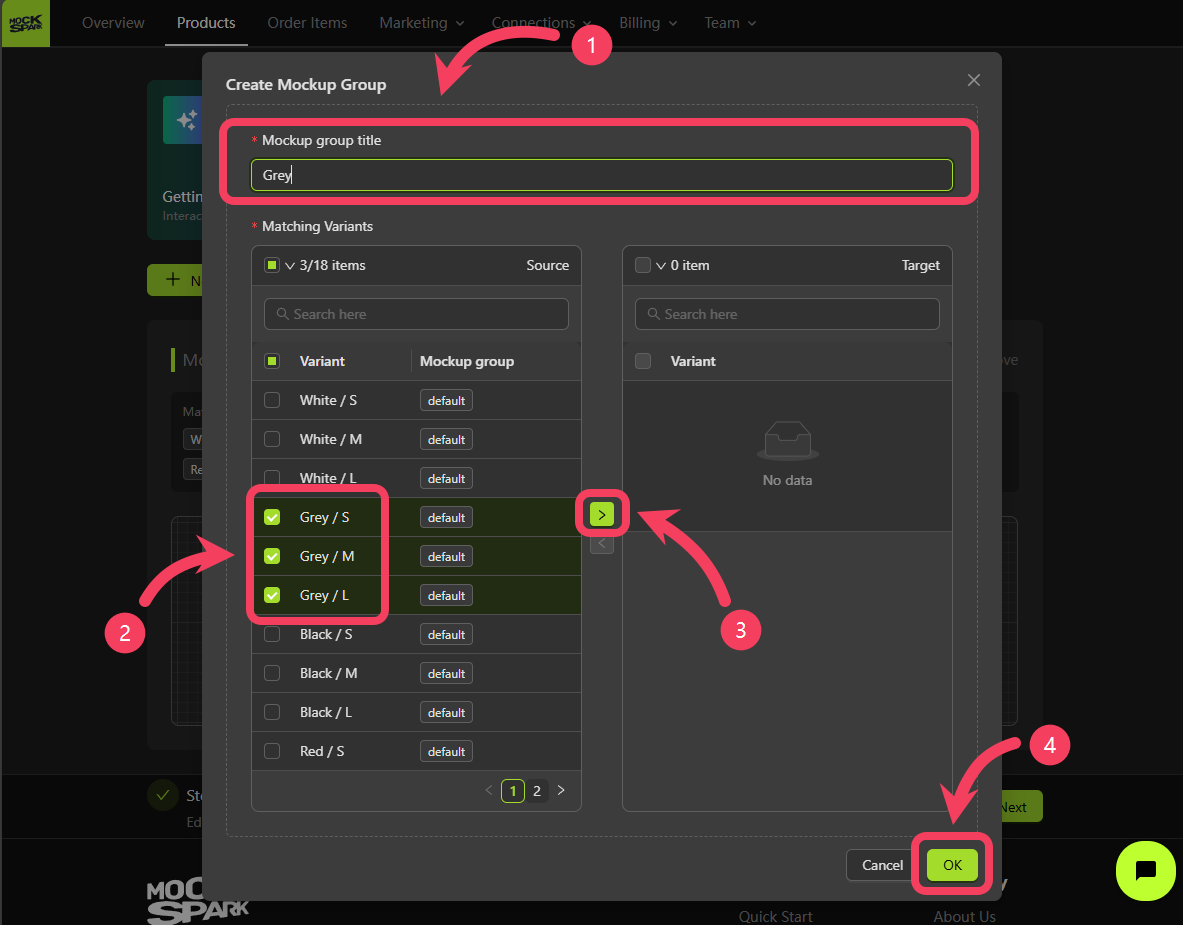 After successfully saving, you’ll see the new **Mockup Group** appear in the interface, containing all variants in the `Grey` color.
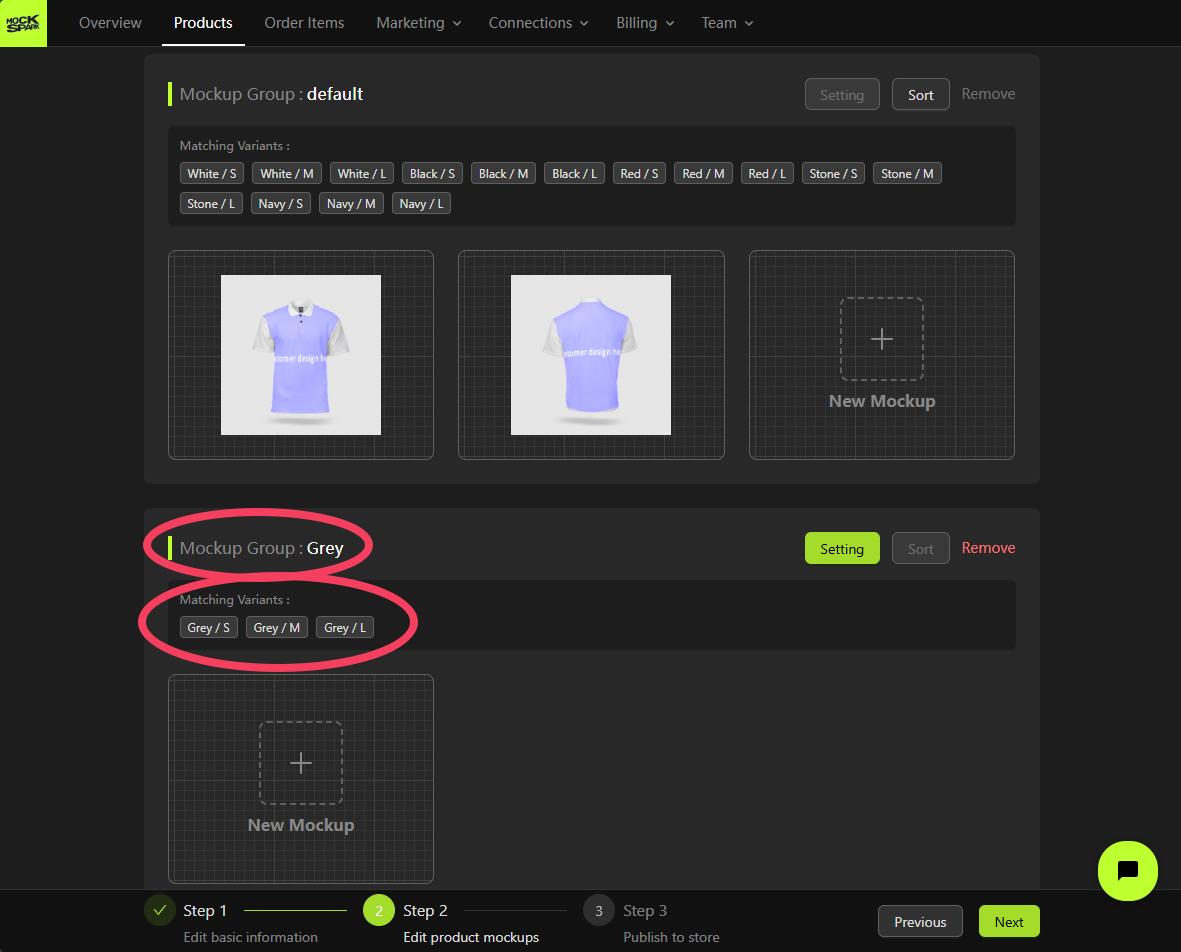 While you can click **New Mockup** to create a new mockup from scratch for the `Grey` **Mockup Group**, there's a faster way. Since we’ve already created a front-facing mockup for the `White` product earlier, you can simply reuse that one to save time.
Click **Duplicate** on the `front` mockup of the `White` product within the `default` **Mockup Group**.
While you can click **New Mockup** to create a new mockup from scratch for the `Grey` **Mockup Group**, there's a faster way. Since we’ve already created a front-facing mockup for the `White` product earlier, you can simply reuse that one to save time.
Click **Duplicate** on the `front` mockup of the `White` product within the `default` **Mockup Group**.
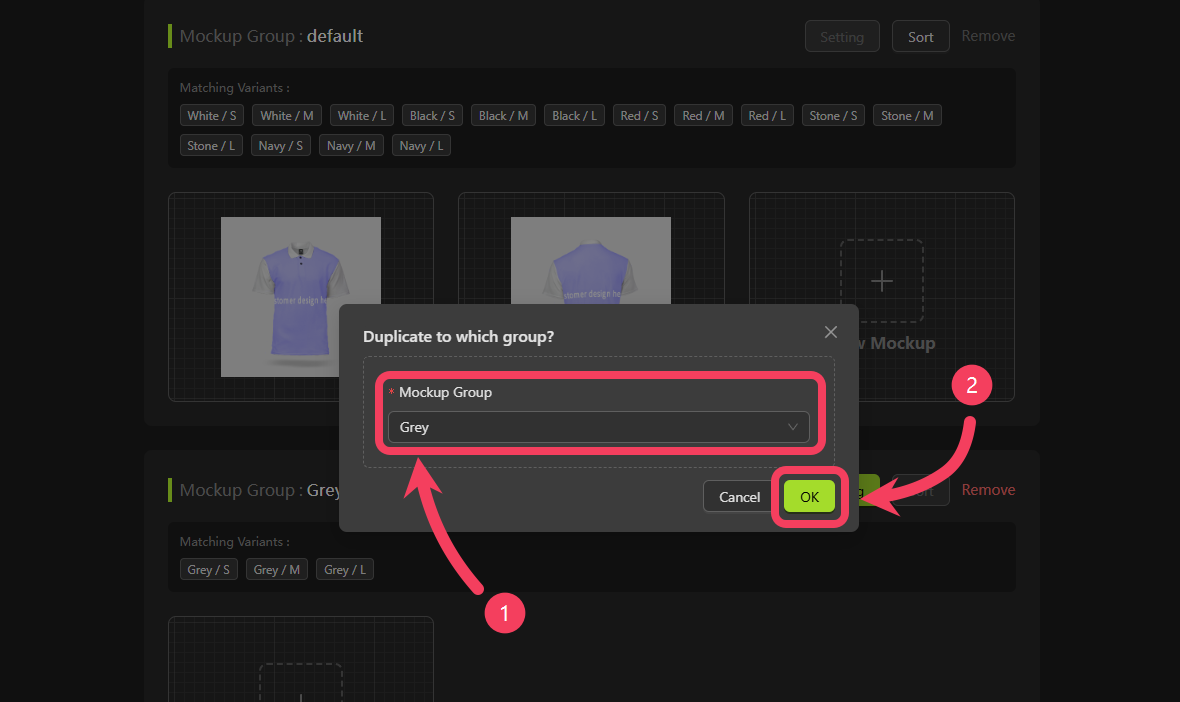
 1. In the dialog that appears, select `Grey` as the target **Mockup Group**.
2. Click **OK** to complete the duplication.
1. In the dialog that appears, select `Grey` as the target **Mockup Group**.
2. Click **OK** to complete the duplication.
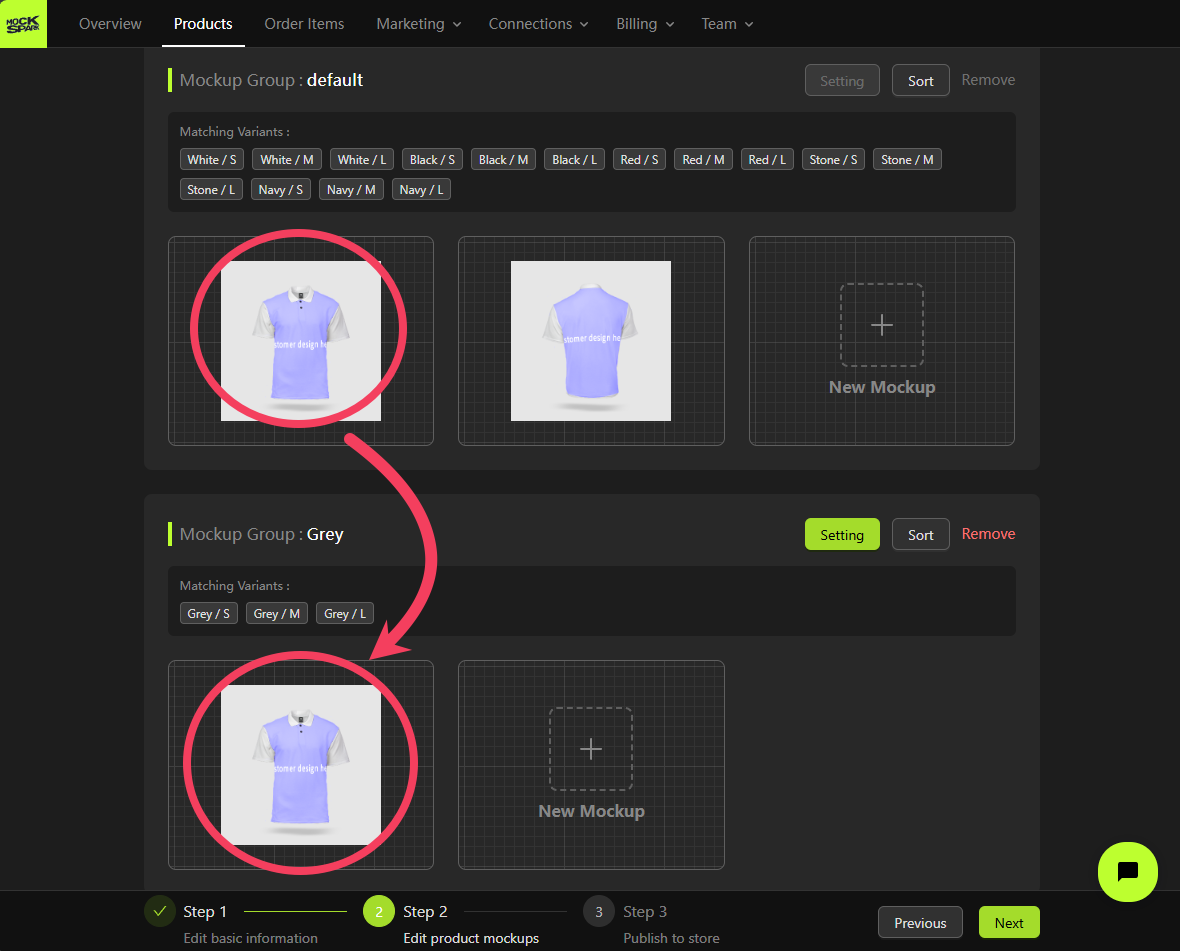
 You'll see in the interface that the `Grey` **Mockup Group** now includes a duplicate front mockup displaying the `White` product.
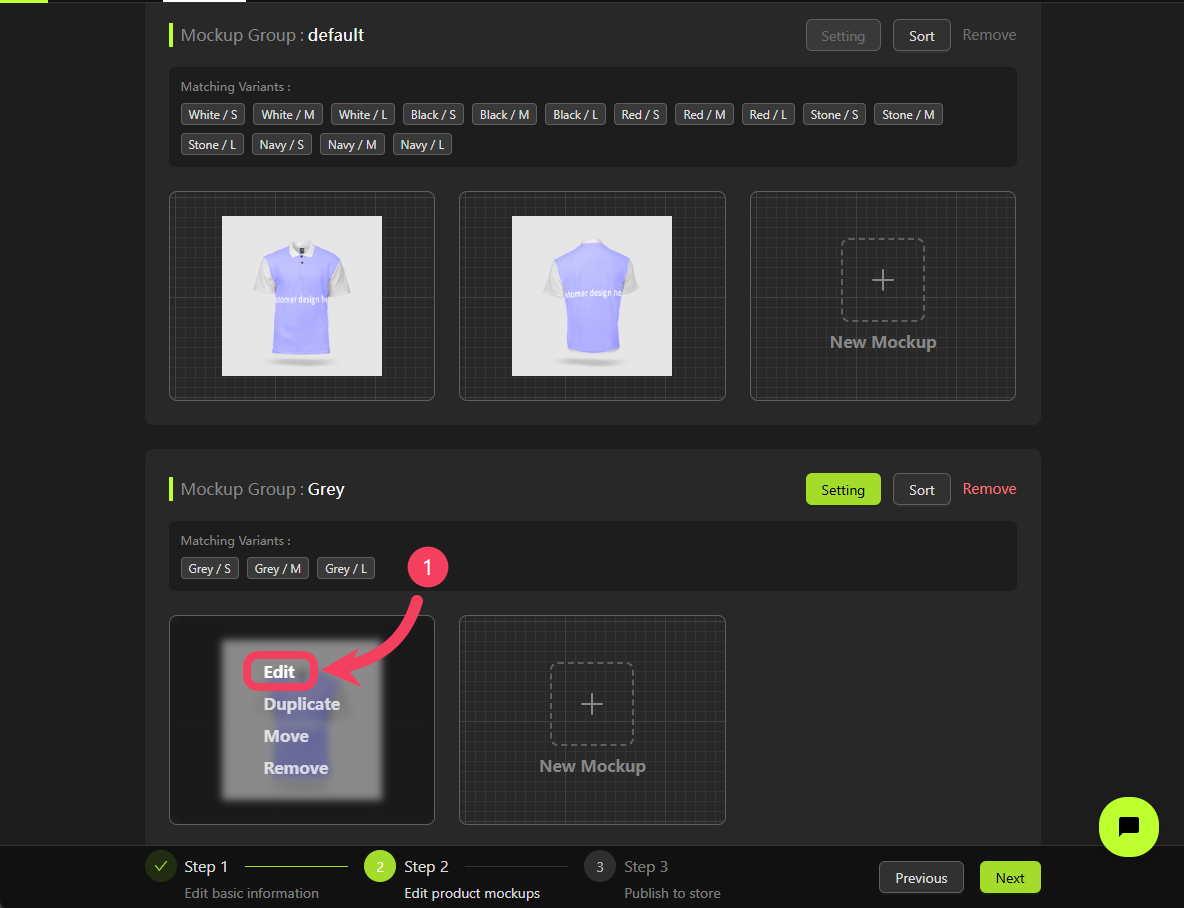
 Click the **Edit** button on the duplicated mockup. We'll update it to display the `front` view of the `Grey` product instead of the `White` one.
 In the right-hand panel of the `Mockup Creator`, select **Product Image** and click **Edit**.
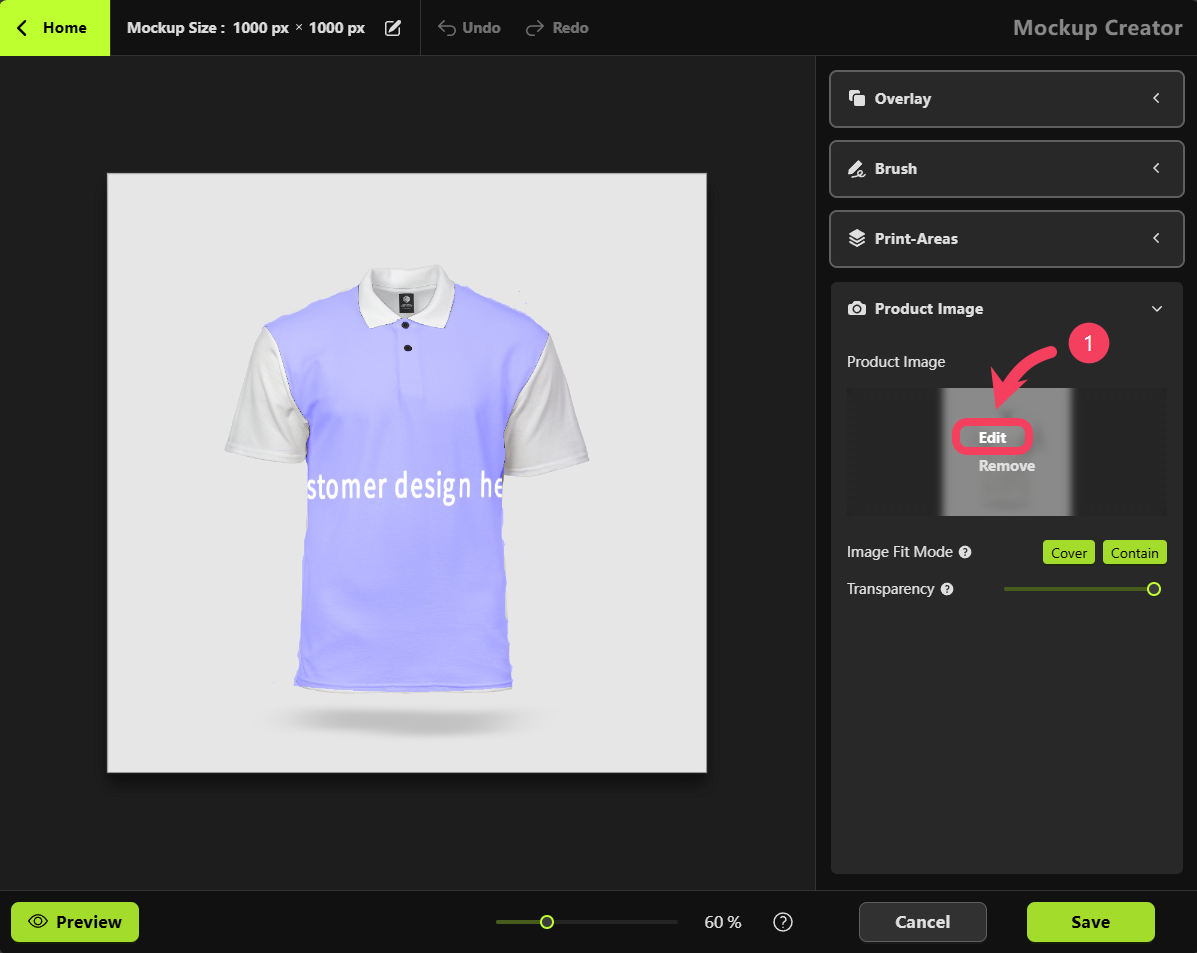 Click **Select another image**.
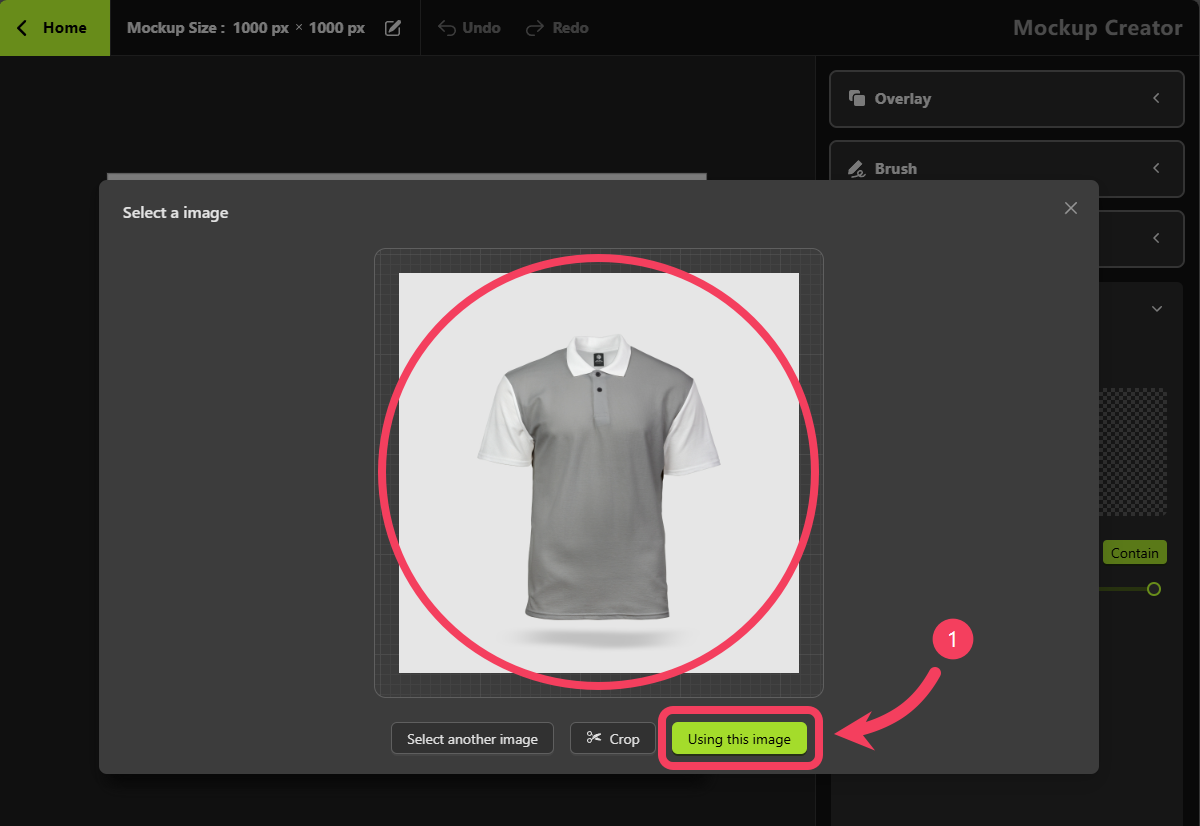
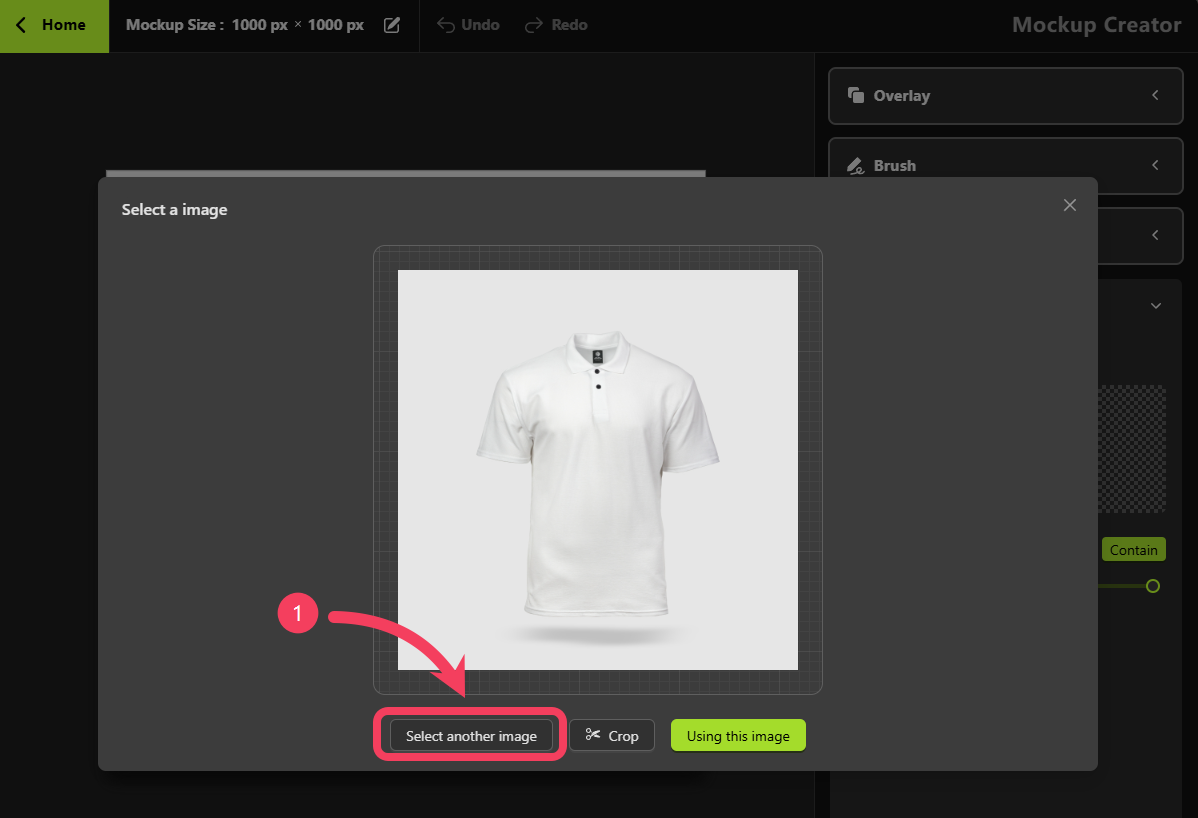 Replace the original front image of the `White` product with the front image of the `Grey` product.
Click **Using this image**.
Replace the original front image of the `White` product with the front image of the `Grey` product.
Click **Using this image**.
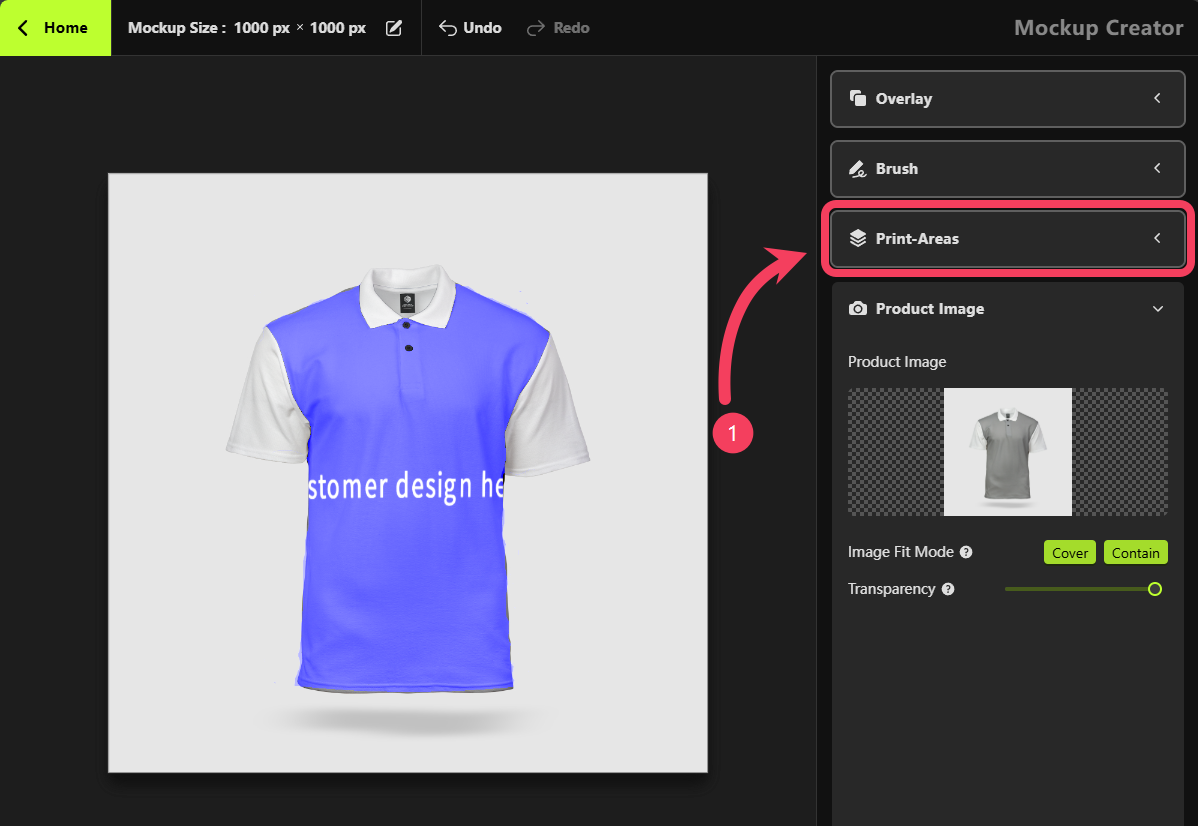
 In the right-hand panel of the `Mockup Creator`, select **Print Areas**.
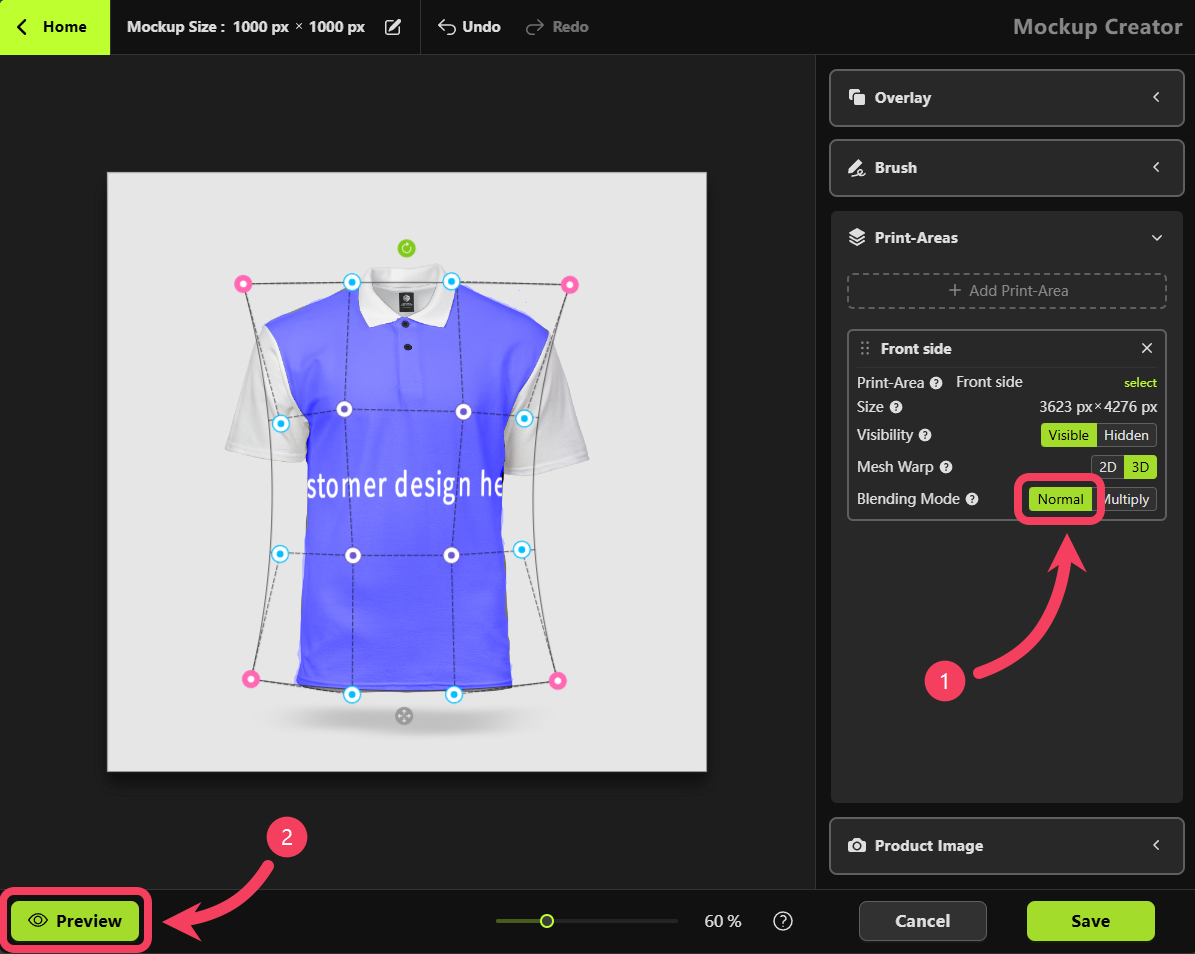
 Since the product is now `Grey` and not part of the `light color` range, using the `Multiply blend mode` is not appropriate in this case.
1. Change the **Blending Mode** from **Multiply** back to **Normal**.
2. Click the **Preview** button to open the `Product Personalizer` and preview the current mockup.
Since the product is now `Grey` and not part of the `light color` range, using the `Multiply blend mode` is not appropriate in this case.
1. Change the **Blending Mode** from **Multiply** back to **Normal**.
2. Click the **Preview** button to open the `Product Personalizer` and preview the current mockup.
 Once you've confirmed that the preview in the `Product Personalizer` has been updated to show the `Grey` product, click **Back** to return to the `Mockup Creator`.
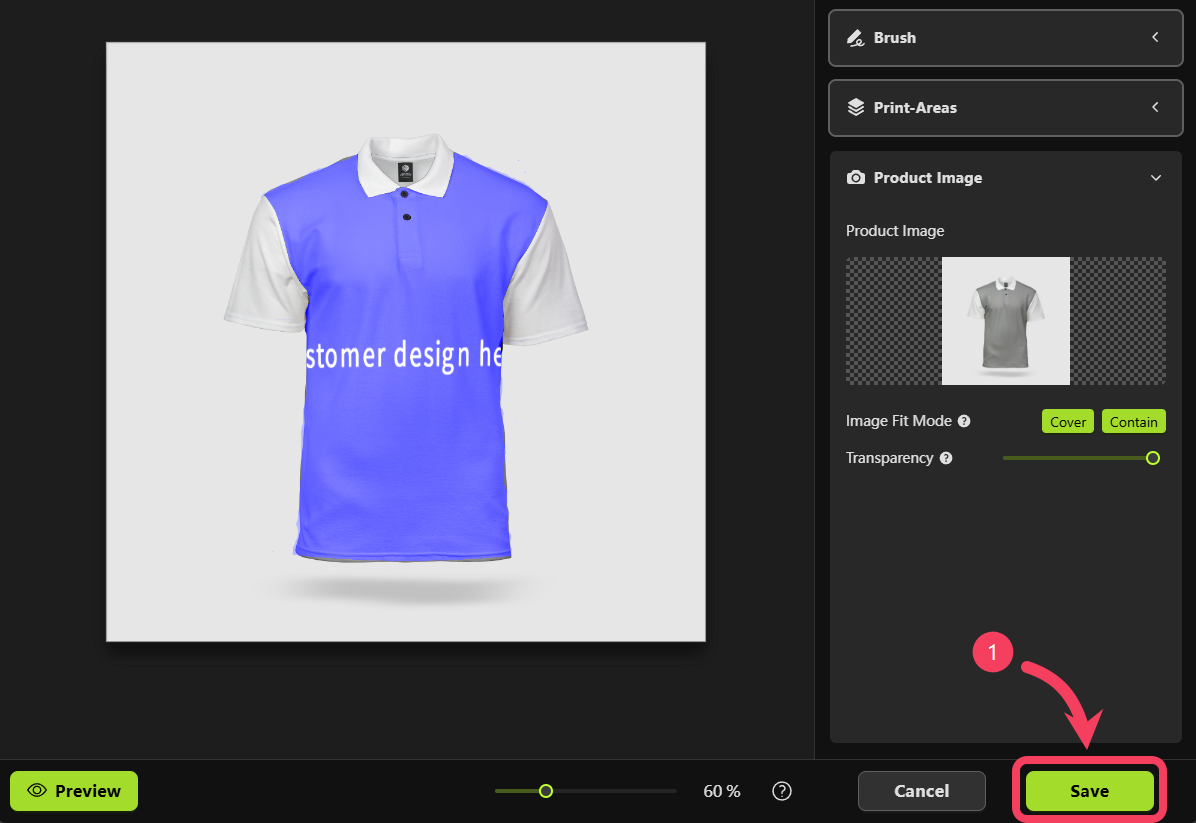
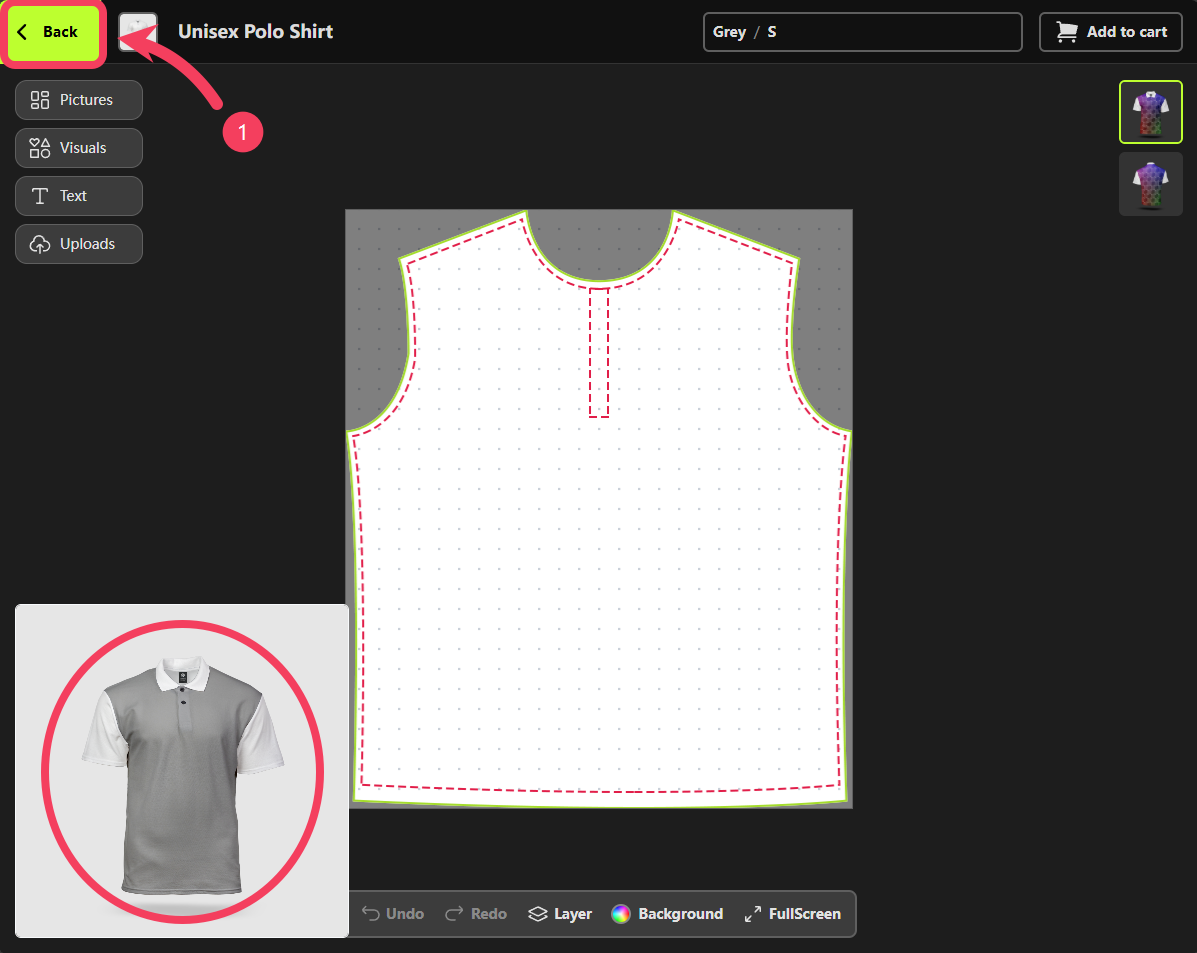 If you’re happy with how your mockup looks, click the **Save** button to save your mockup.
 After finishing the `front` mockup for the `Grey` product, use the same method to create a `back` mockup.
Click **Duplicate** on the `back` mockup of the `White` product within the `default` **Mockup Group**.
After finishing the `front` mockup for the `Grey` product, use the same method to create a `back` mockup.
Click **Duplicate** on the `back` mockup of the `White` product within the `default` **Mockup Group**.
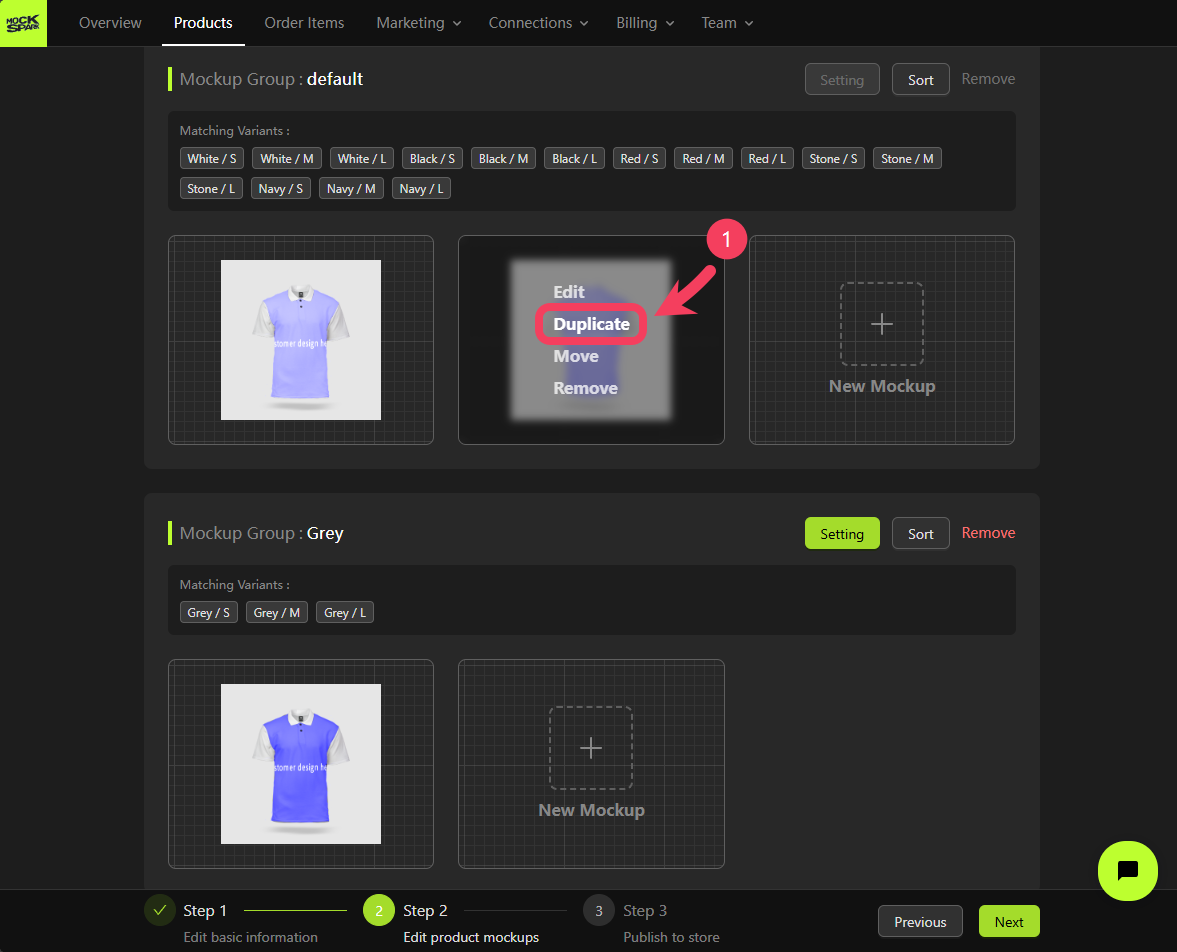 Click the **Edit** button on the duplicated mockup. We'll update it to display the `back` view of the `Grey` product instead of the `White` one.
Also, change the **Blending Mode** from **Multiply** back to **Normal**, then click the **Save** button to save your mockup.
Click the **Edit** button on the duplicated mockup. We'll update it to display the `back` view of the `Grey` product instead of the `White` one.
Also, change the **Blending Mode** from **Multiply** back to **Normal**, then click the **Save** button to save your mockup.
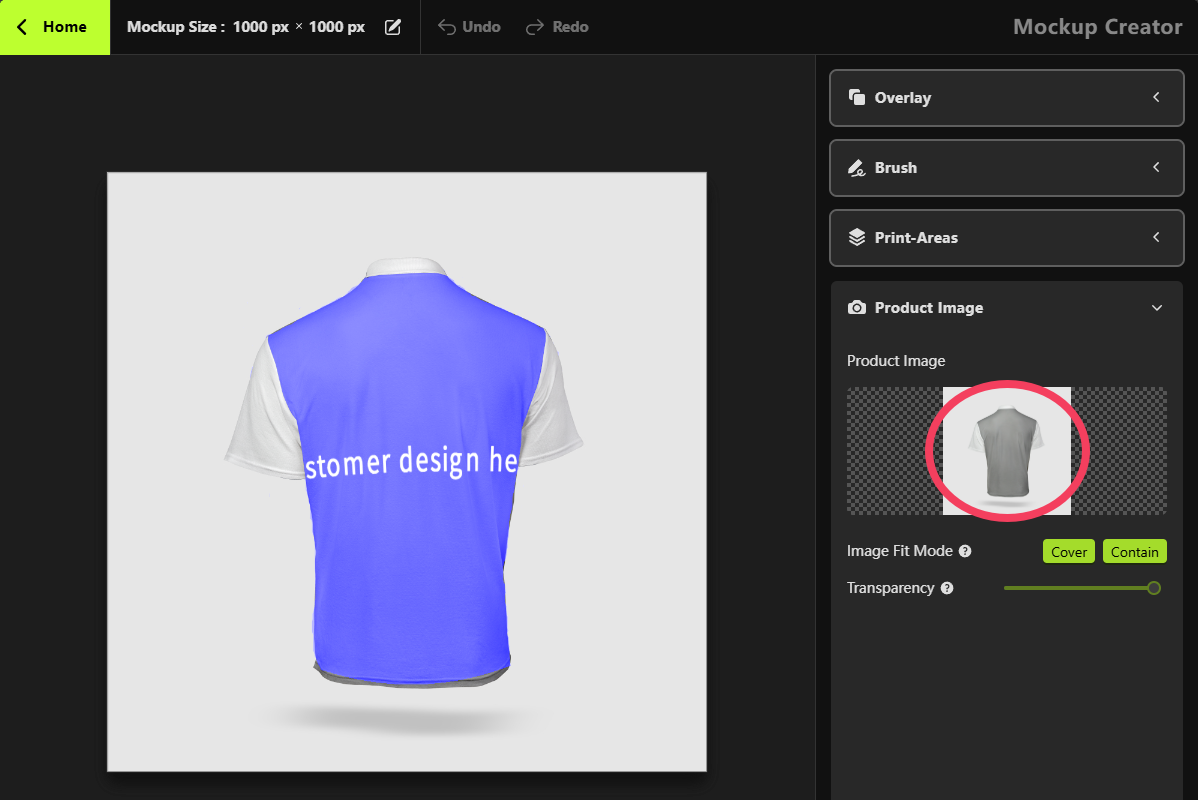 At this point, we’ve successfully created a **Mockup Group** for all `Grey` variants that includes both `front` and `back` product mockups.
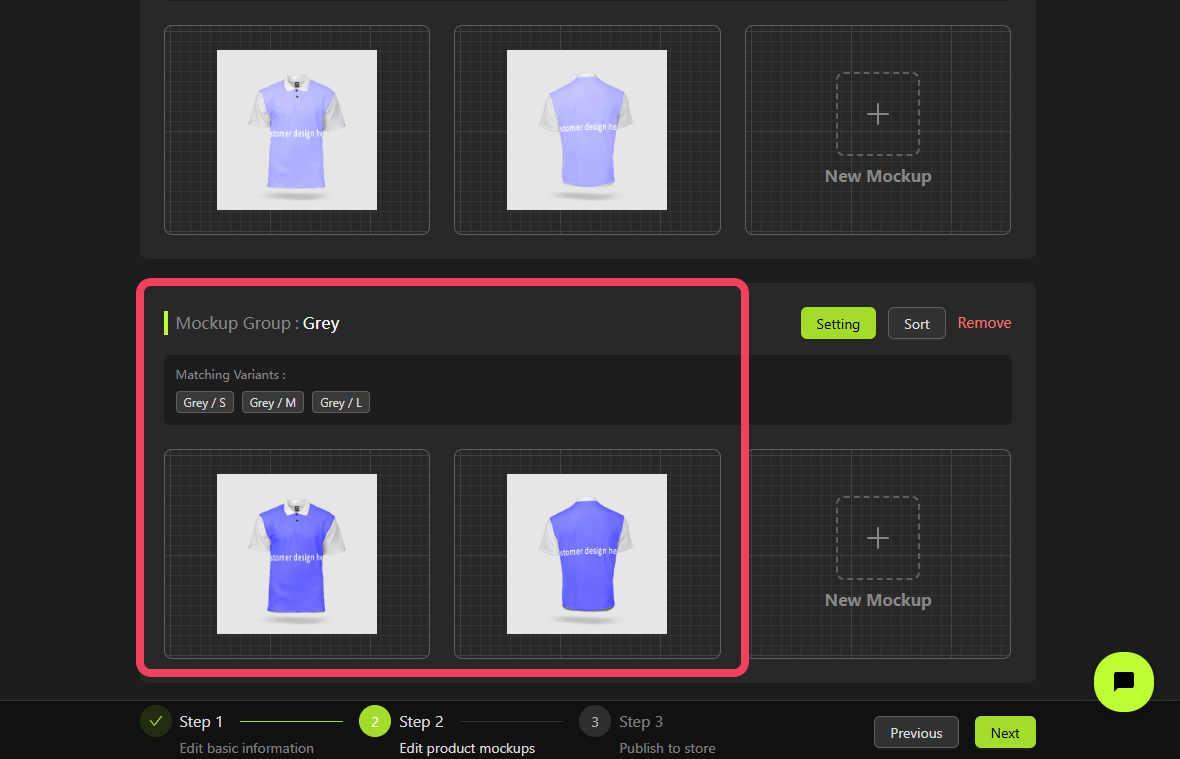 Using the same approach, you can create a **Mockup Group** that includes all `Black` variants.
Using the same approach, you can create a **Mockup Group** that includes all `Red` variants.
Using the same approach, you can create a **Mockup Group** that includes all `Black` variants.
Using the same approach, you can create a **Mockup Group** that includes all `Red` variants.
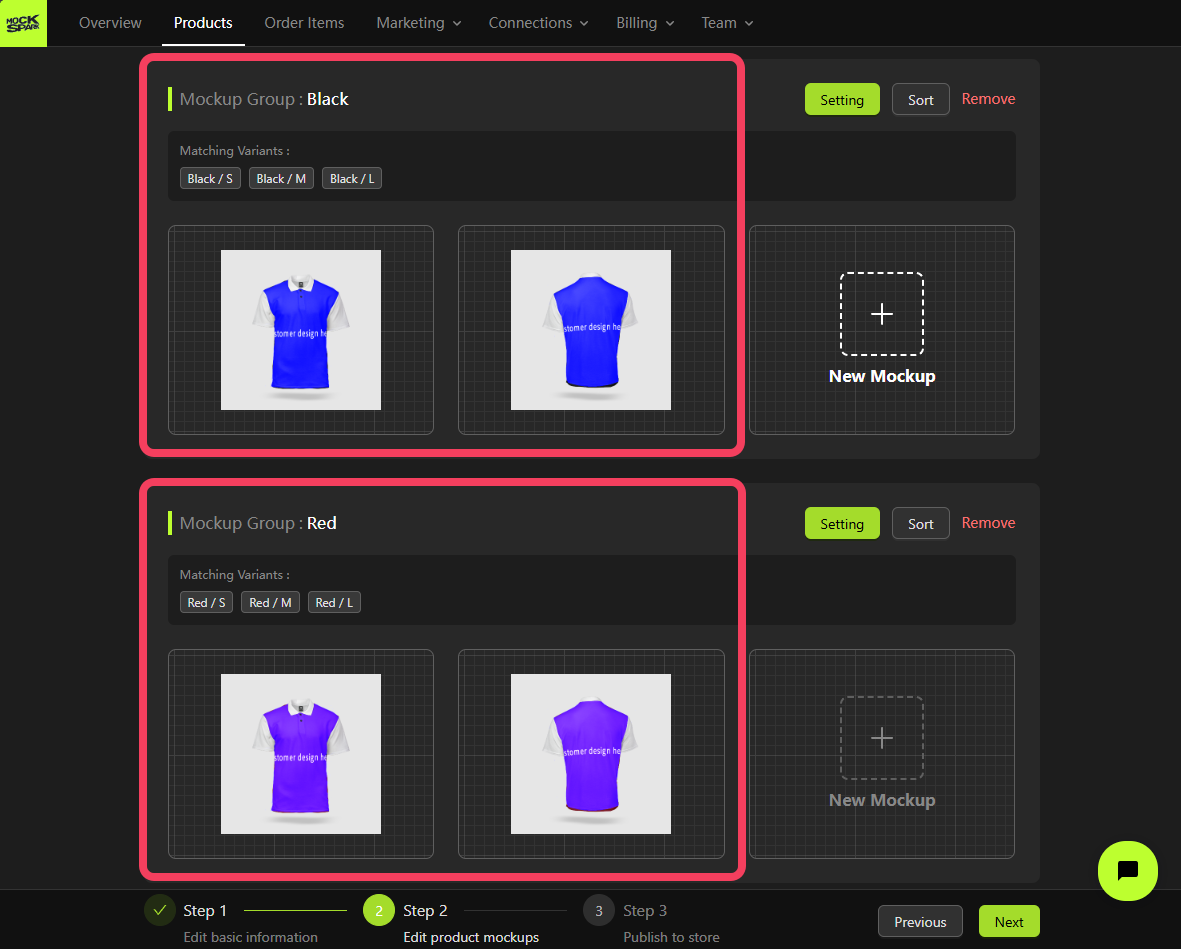 Using the same approach, you can create a **Mockup Group** that includes all `Stone` variants.
Using the same approach, you can create a **Mockup Group** that includes all `Navy` variants.
Using the same approach, you can create a **Mockup Group** that includes all `Stone` variants.
Using the same approach, you can create a **Mockup Group** that includes all `Navy` variants.
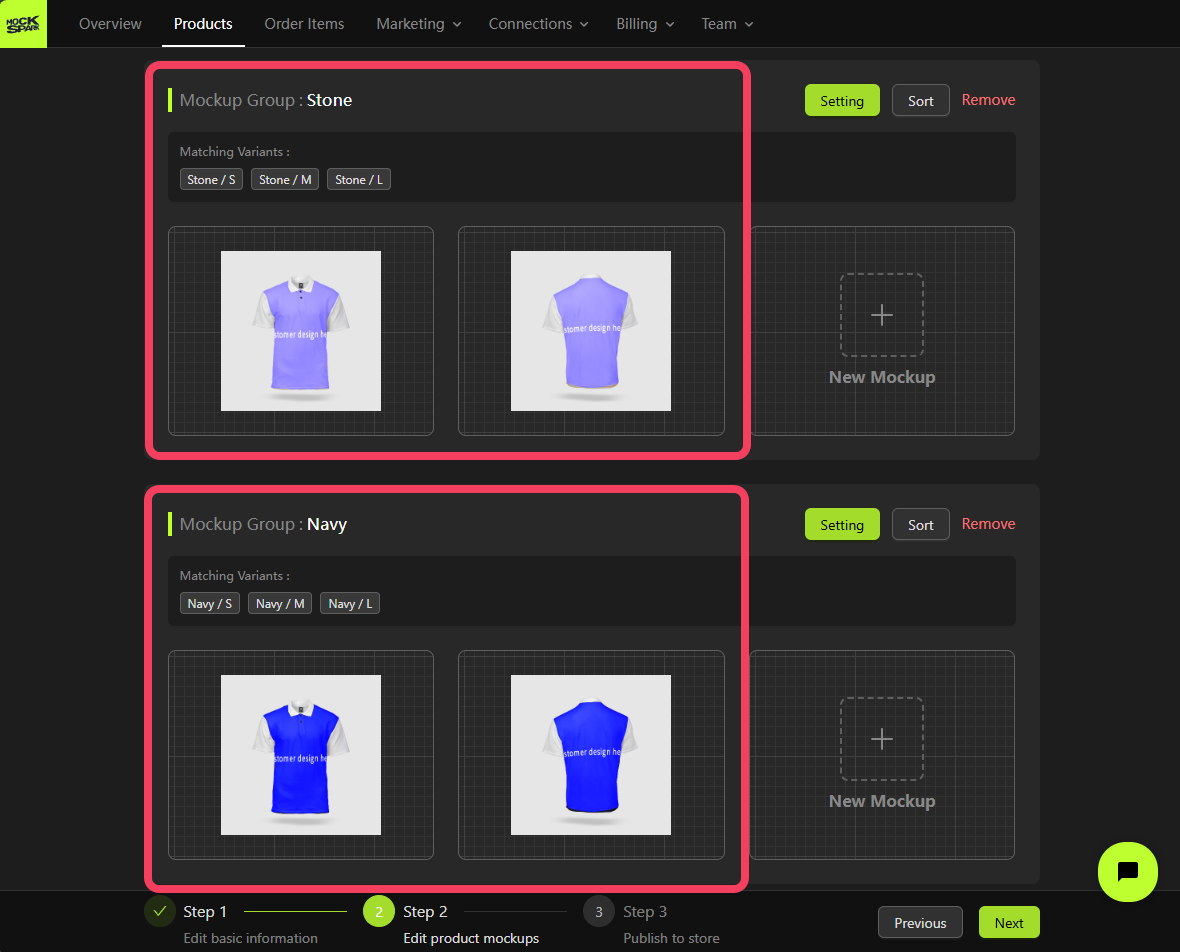 In the end, only the `White` variants remain under the **Matching Variants** section of the **Mockup Group** named `default`.
Aside from the `default` Mockup Group, you can `modify` the variants included in any other Mockup Group or `delete` the group entirely.
In the end, only the `White` variants remain under the **Matching Variants** section of the **Mockup Group** named `default`.
Aside from the `default` Mockup Group, you can `modify` the variants included in any other Mockup Group or `delete` the group entirely.
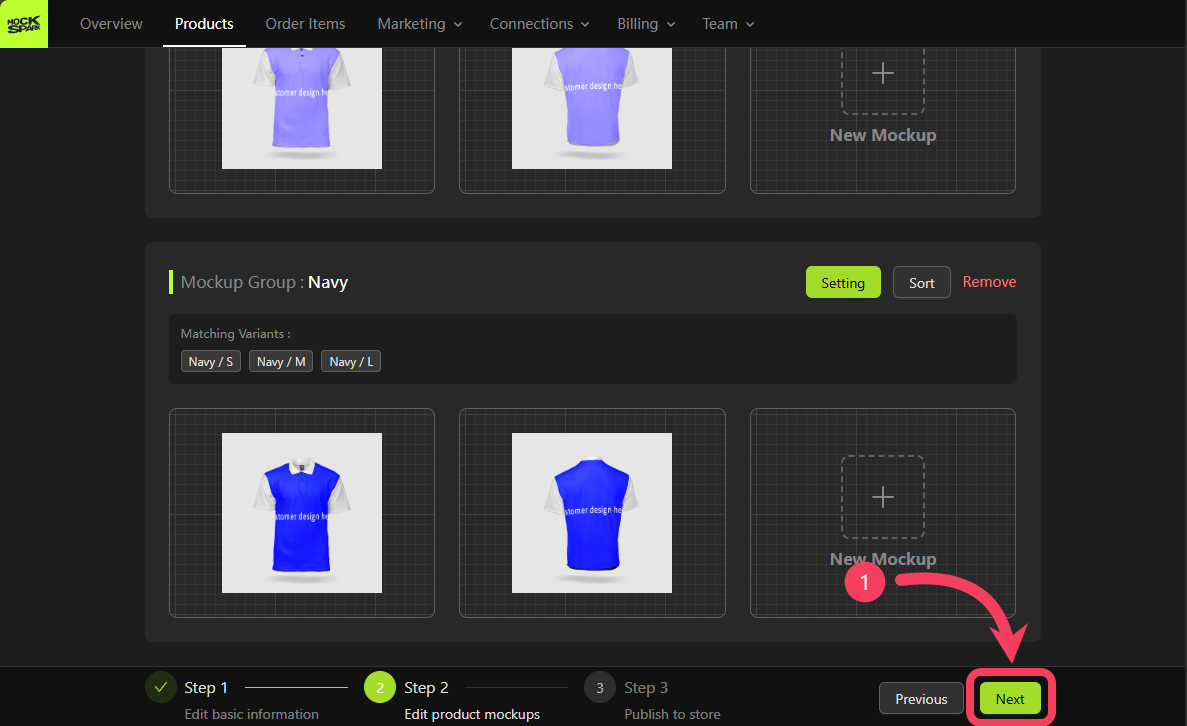
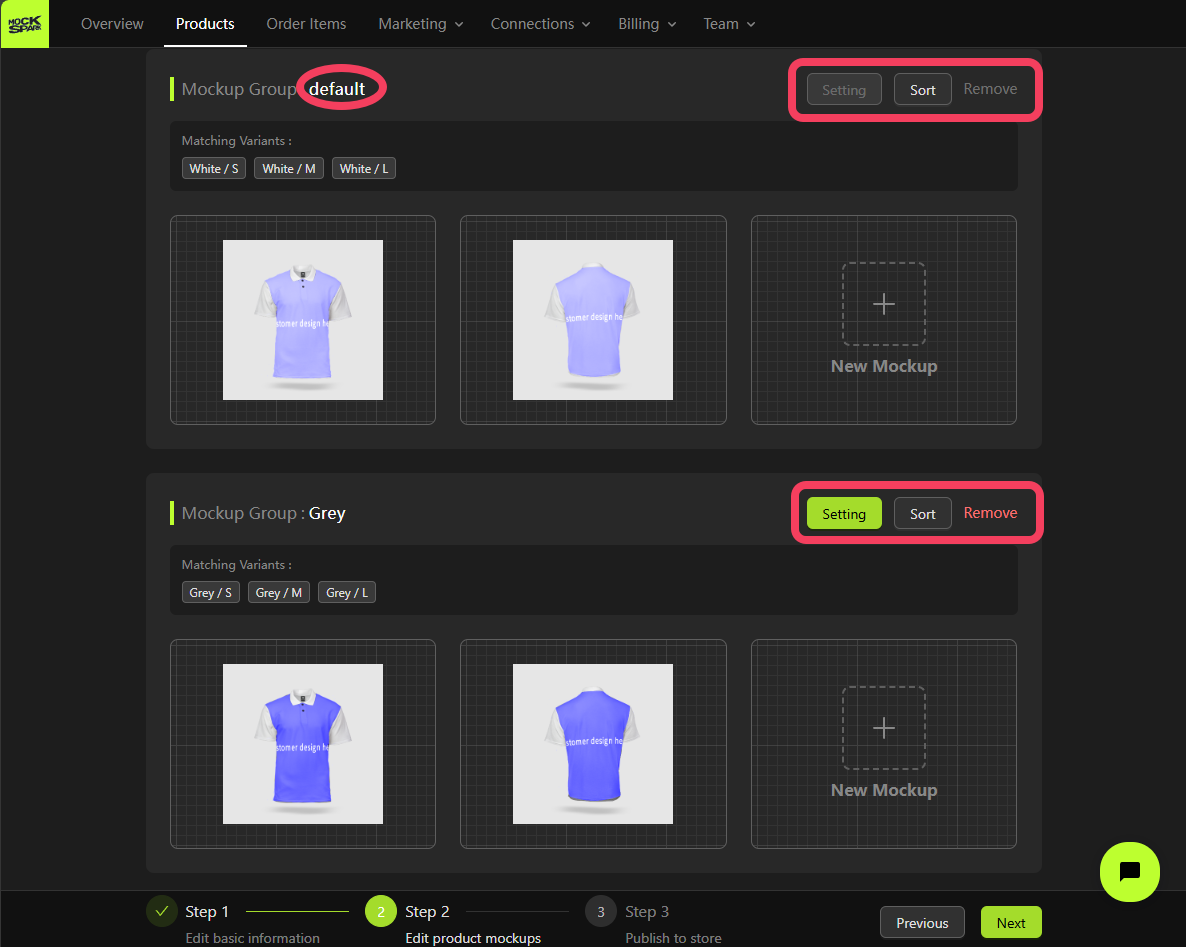 Click **Next** to save all the mockups you created in Step 2. Otherwise, any changes made on this page will not be saved.
 ## Step 3: Publish Your Product
### URL / Currency / Weight
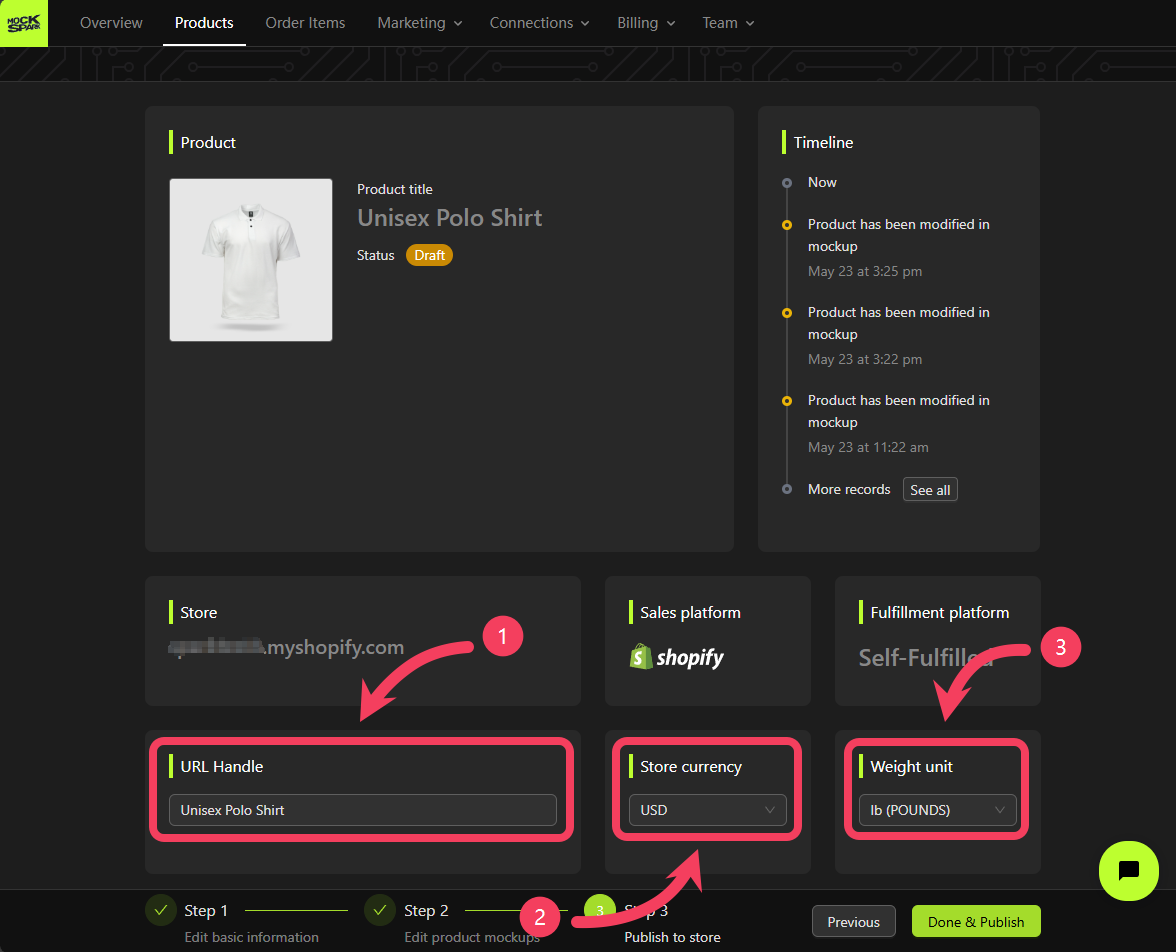
You can edit settings such as the product **URL handle**, **Store currency**, and **Weight unit**:
1. `URL Handle`: A unique, user-friendly text based on your product title. It's used to create the product’s web address in your online store.
Shopify automatically formats your URL handle into a clean, SEO-friendly string containing only letters, hyphens (-), and numbers, but no spaces or special characters.
2. `Store currency`: It's pulled directly from your Shopify store settings. To change the currency, simply update it in your Shopify Admin panel. For more details, visit: [Shopify Help Center | Changing your store currency](https://help.shopify.com/en/manual/payments/shopify-payments/store-currency/changing-your-store-currency)
3. `Weight unit`: The unit of weight used for this product.
## Step 3: Publish Your Product
### URL / Currency / Weight
You can edit settings such as the product **URL handle**, **Store currency**, and **Weight unit**:
1. `URL Handle`: A unique, user-friendly text based on your product title. It's used to create the product’s web address in your online store.
Shopify automatically formats your URL handle into a clean, SEO-friendly string containing only letters, hyphens (-), and numbers, but no spaces or special characters.
2. `Store currency`: It's pulled directly from your Shopify store settings. To change the currency, simply update it in your Shopify Admin panel. For more details, visit: [Shopify Help Center | Changing your store currency](https://help.shopify.com/en/manual/payments/shopify-payments/store-currency/changing-your-store-currency)
3. `Weight unit`: The unit of weight used for this product.
 ### Variants
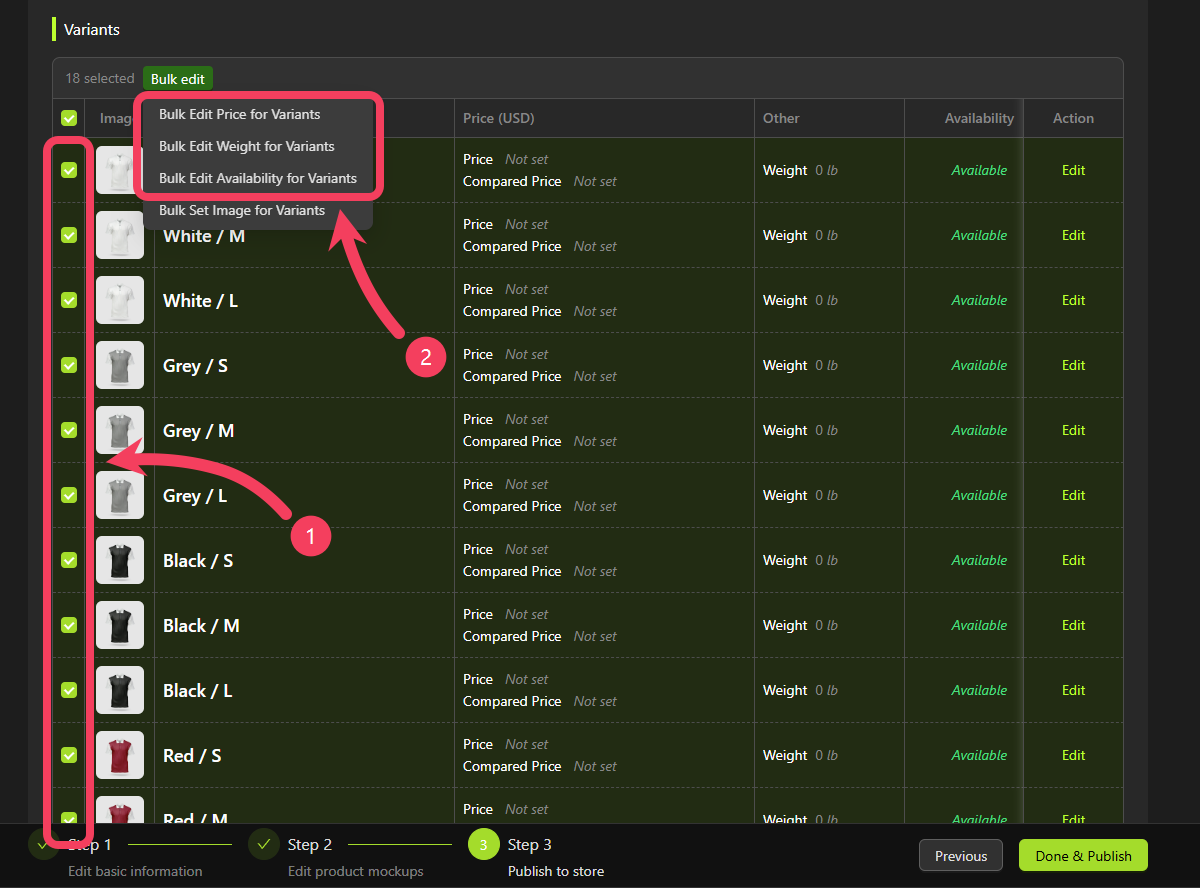
1. In the **Variants** table, check the boxes next to the variants you want to work with.
2. Click on **Bulk edit**, then choose from the available options to update properties like `Price`, `Weight`, and `Availability` for the selected variants.
### Variants
1. In the **Variants** table, check the boxes next to the variants you want to work with.
2. Click on **Bulk edit**, then choose from the available options to update properties like `Price`, `Weight`, and `Availability` for the selected variants.
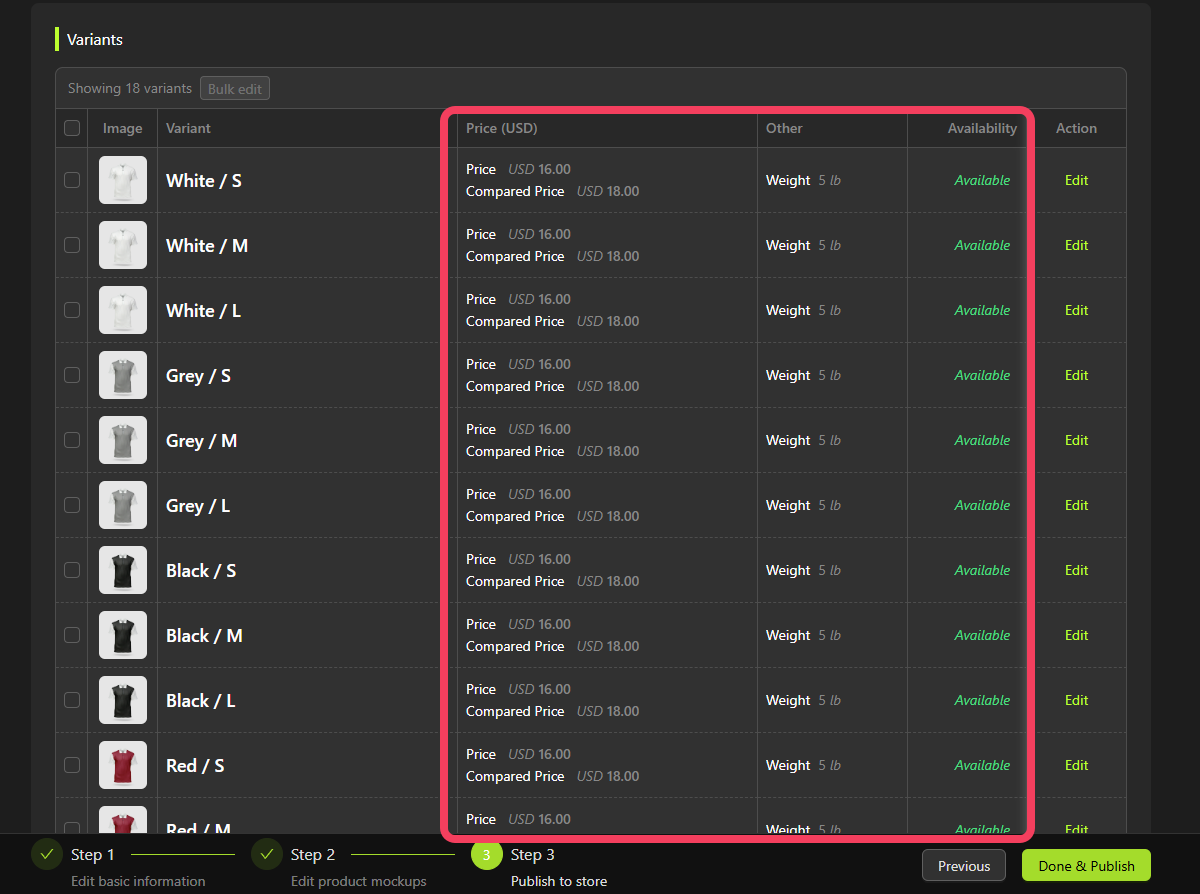
 After completing the bulk actions, you’ll see the updated values reflected in the **Variants** table.
 In addition to bulk editing multiple variants, you can also edit individual variants directly within the table.
1. On the right side of the `row` for the variant you want to edit, click **Edit**.
2. Update the information for that variant as needed.
3. Click **OK** to save your changes.
In addition to bulk editing multiple variants, you can also edit individual variants directly within the table.
1. On the right side of the `row` for the variant you want to edit, click **Edit**.
2. Update the information for that variant as needed.
3. Click **OK** to save your changes.
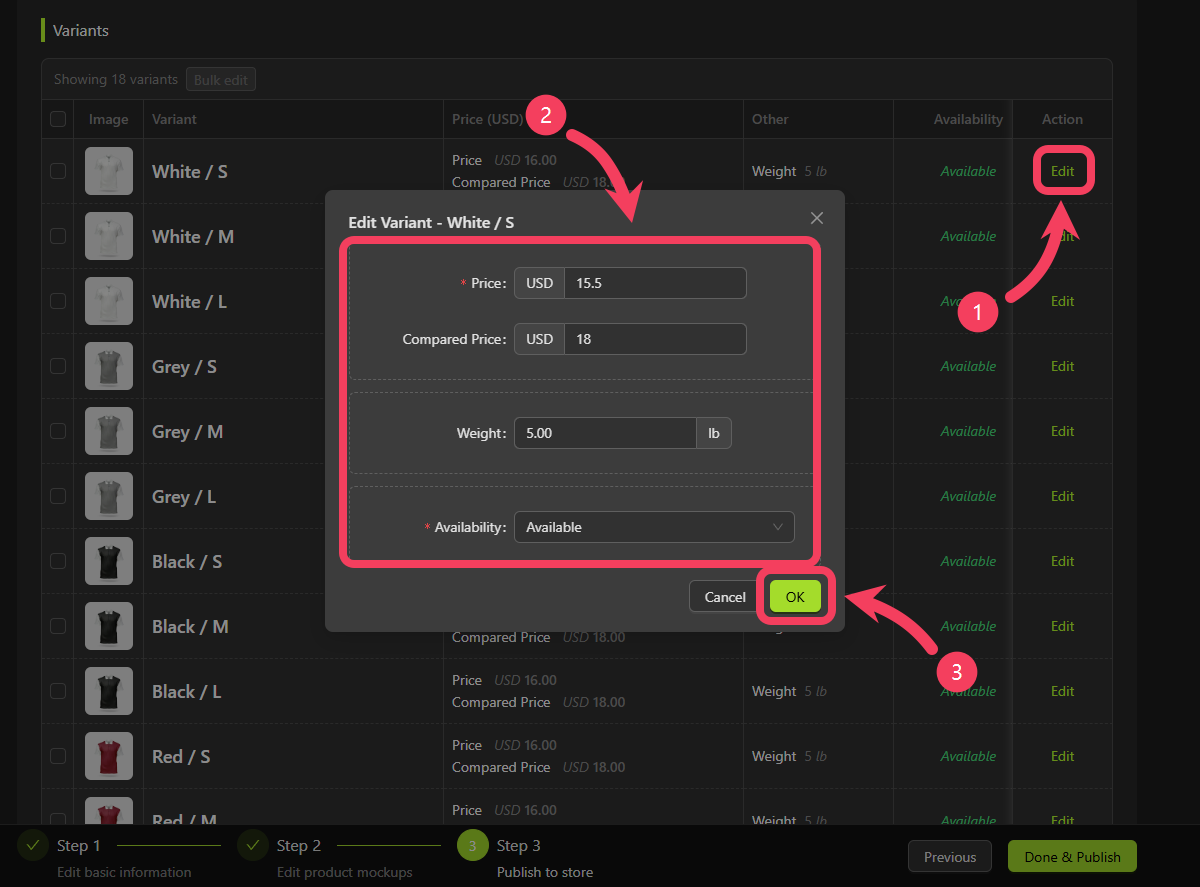 You’ll see that the variant has been updated in the **Variants** table.
After confirming that all product information in Step 3 meet your requirements, click **Done & Publish** to list the product on your Shopify store.
You’ll see that the variant has been updated in the **Variants** table.
After confirming that all product information in Step 3 meet your requirements, click **Done & Publish** to list the product on your Shopify store.
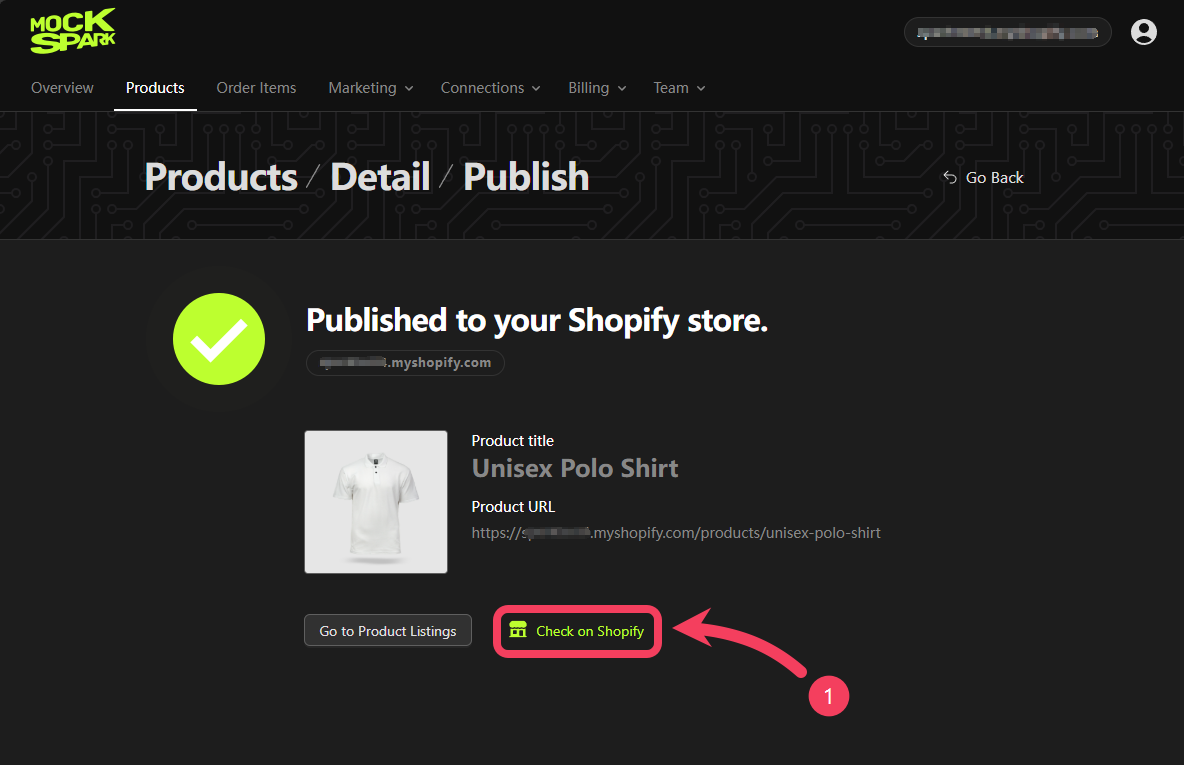
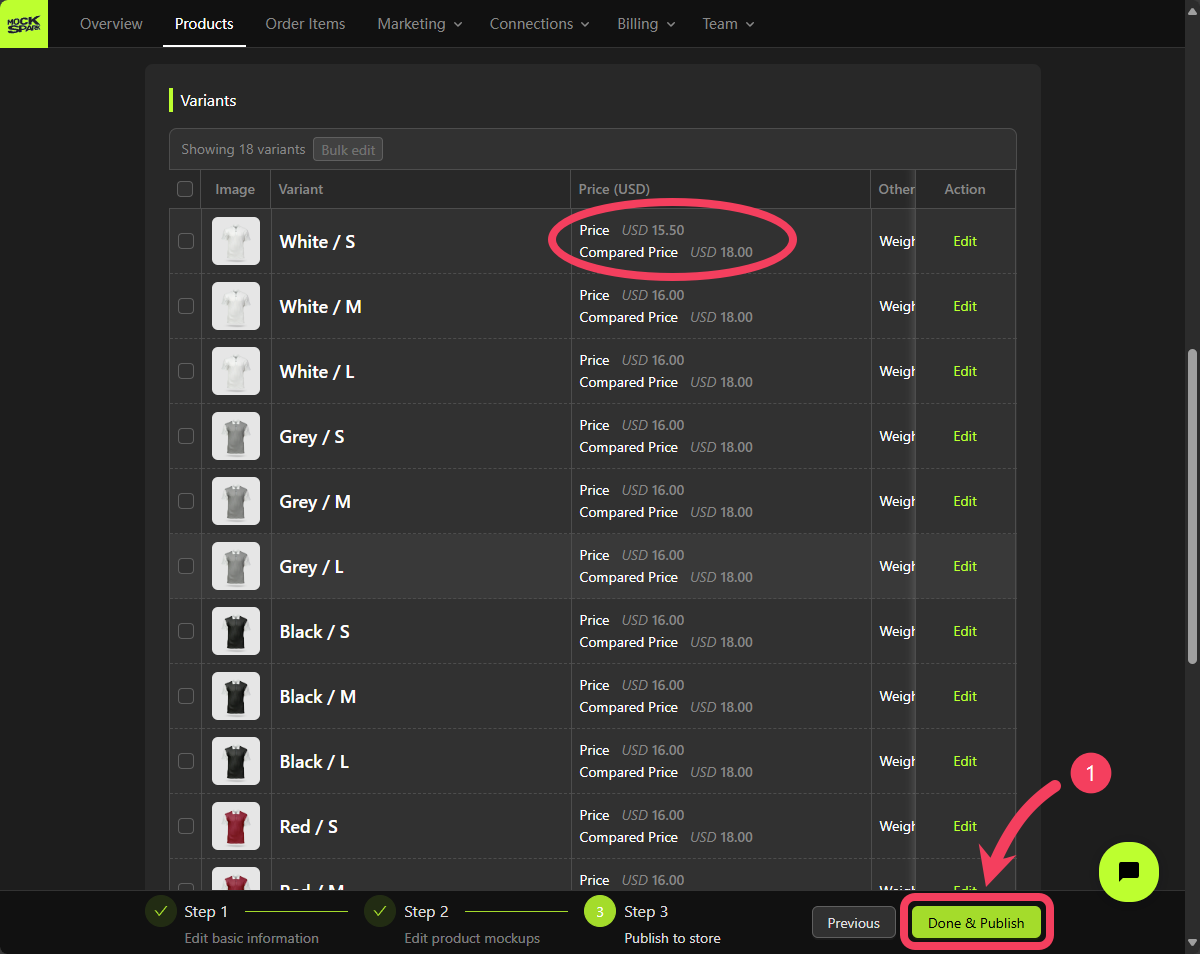 Click the **Check on Shopify** to view the published product in your Shopify store.
 ## Preview Your Product in the Store
Click the **Customize** button on the product page of your Shopify store.
## Preview Your Product in the Store
Click the **Customize** button on the product page of your Shopify store.
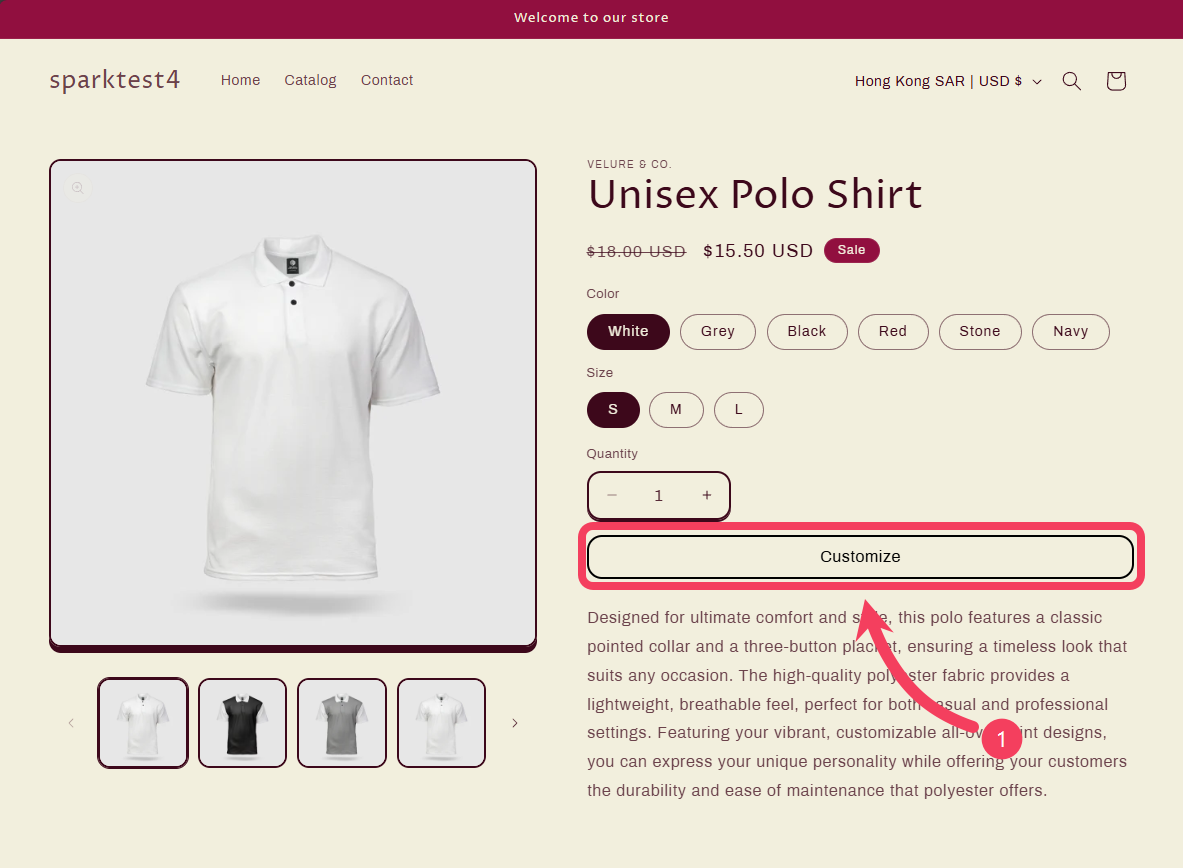 If everything is working properly, you should see the `Product Personalizer` interface as shown below.
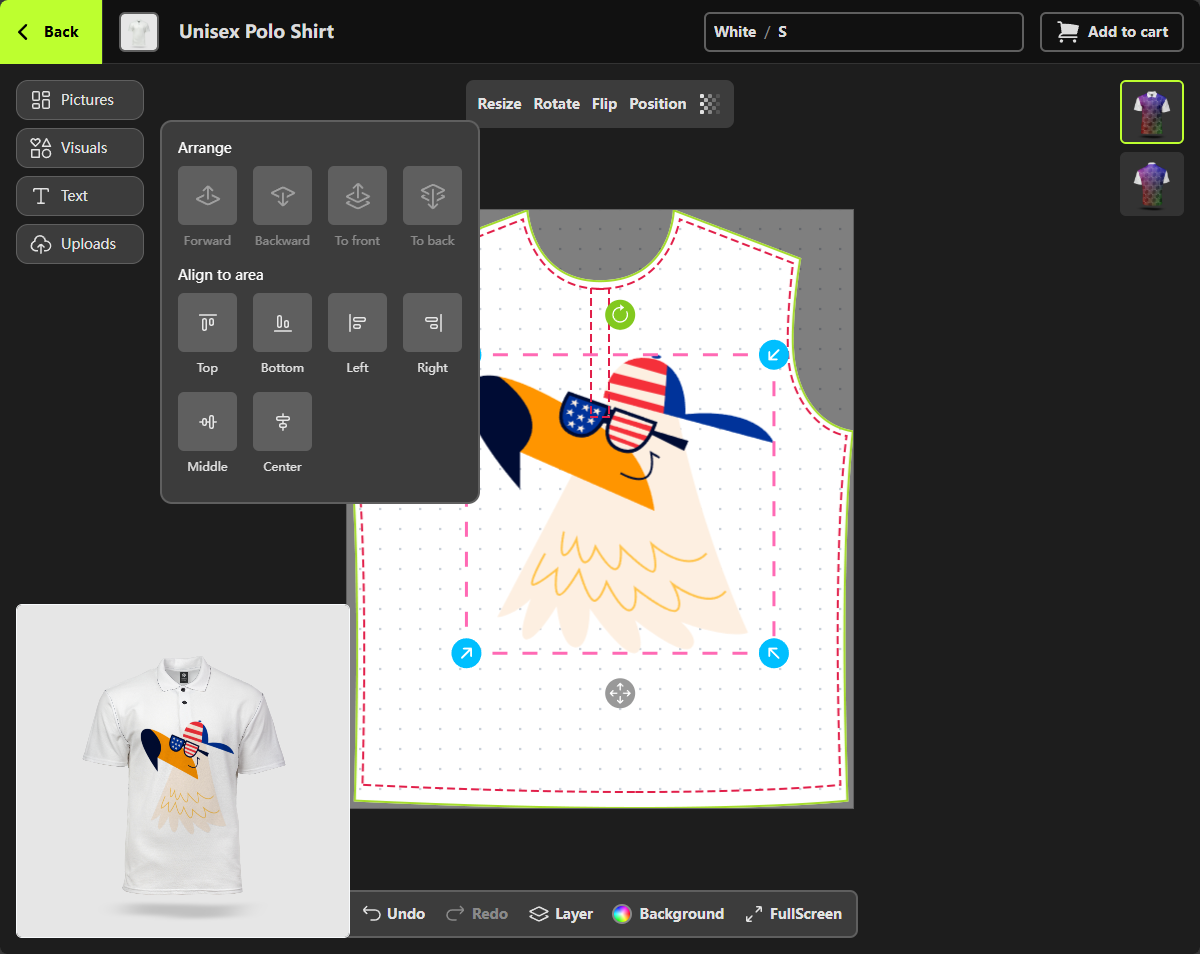 The Product Personalizer on mobile (design)
The Product Personalizer on mobile (preview)
The Product Personalizer on mobile (design)
The Product Personalizer on mobile (preview)