> ## Documentation Index
> Fetch the complete documentation index at: https://help.mockspark.com/llms.txt
> Use this file to discover all available pages before exploring further.
# Personalizer
> Unlock seamless customization for a unique shopping experience
## Introducing Product Personalizer
Welcome to the Product Personalizer!
**Product Personalizer** is a powerful and versatile tool designed to help merchants offer a personalized customization experience for their customers. By integrating this module into your store, customers can create unique products by customizing them online according to their preferences. They can add text, images, choose colors, styles, and more to craft one-of-a-kind items.
Whether your customers are browsing on a PC or mobile device, Product Personalizer ensures a seamless and consistent user experience. It includes a variety of configurable options that adapt to different product types and industry applications.
With **Product Personalizer**, you can:
* Enhance user engagement and boost conversion rates.
* Expand the scope for personalized product designs.
* Increase customer satisfaction and brand loyalty.
This guide will walk you through how to use **Product Personalizer** and get the most out of its features.
In this tutorial, **Product Personalizer** will be referred to as **Personalizer**.
## Use on Desktop Devices
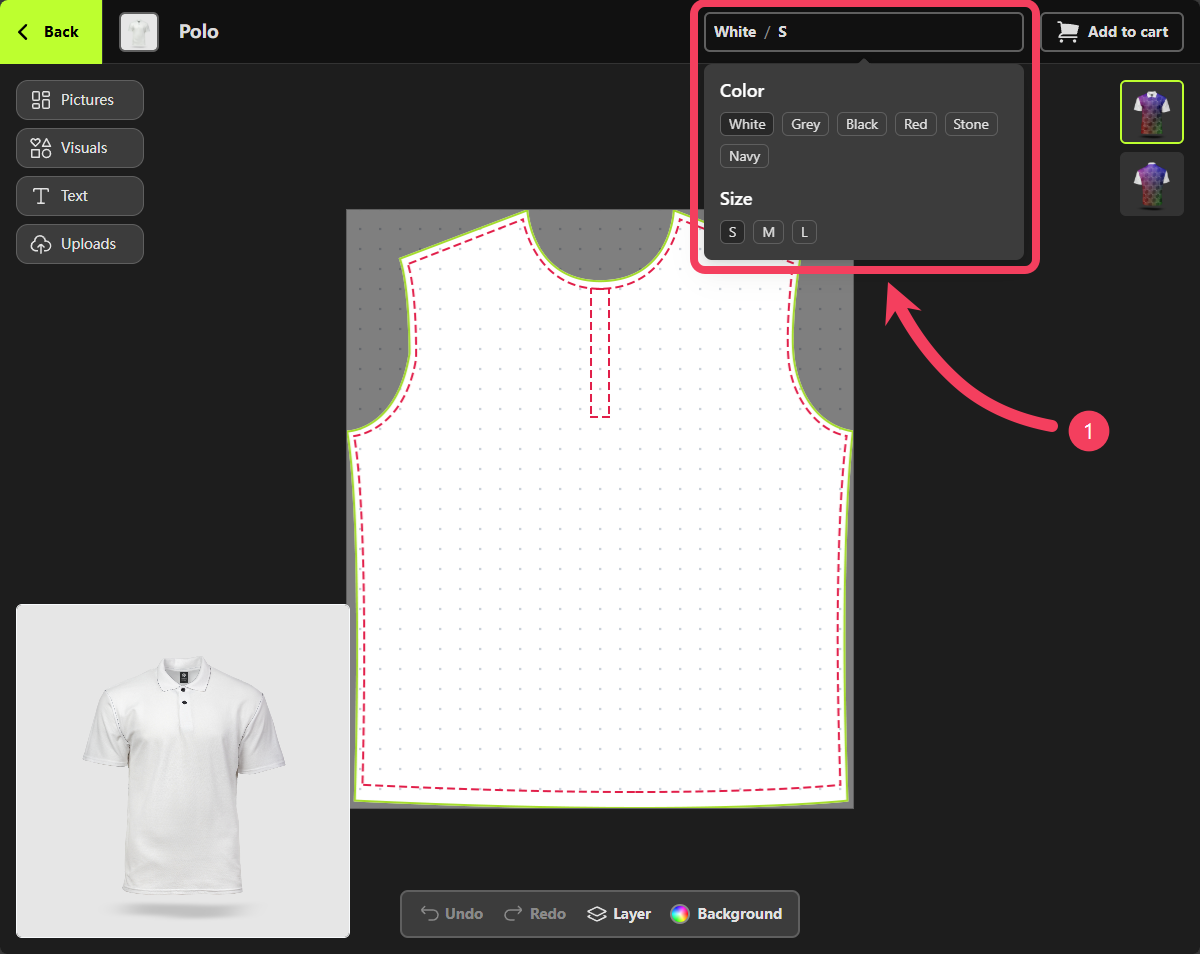
At the top right of the **Personalizer**, you can view and switch between all available product options, such as color, size, and more.
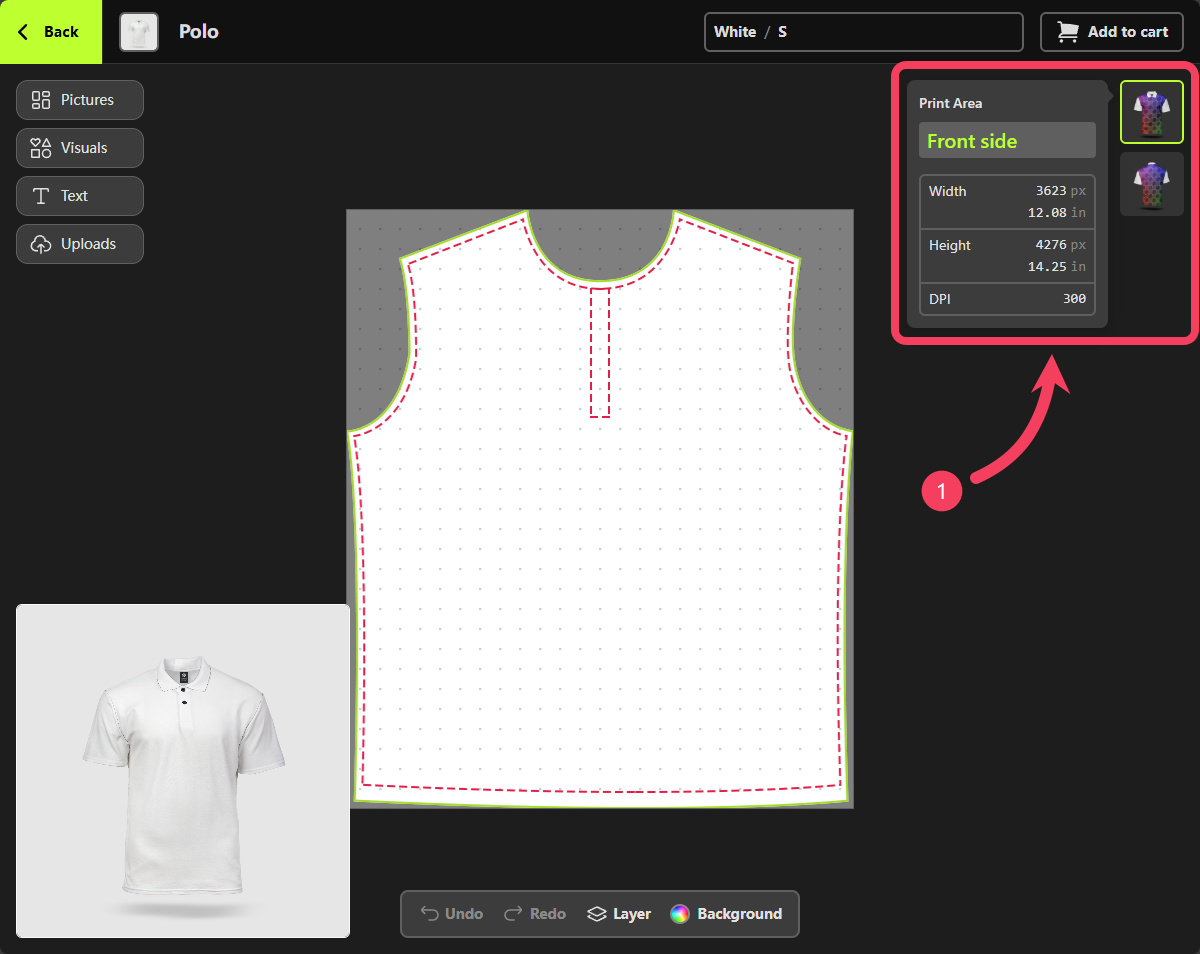
 On the right side of the **Personalizer**, you can view and switch between the Print-Areas currently being customized. A product may include one or several Print-Areas, such as the front and back of a polo shirt. To learn more about Print-Areas, please visit [Products tutorial](/docs/products/products#print-areas).
 On the left side of the **Personalizer**, you’ll find the tools for adding design elements to the canvas.
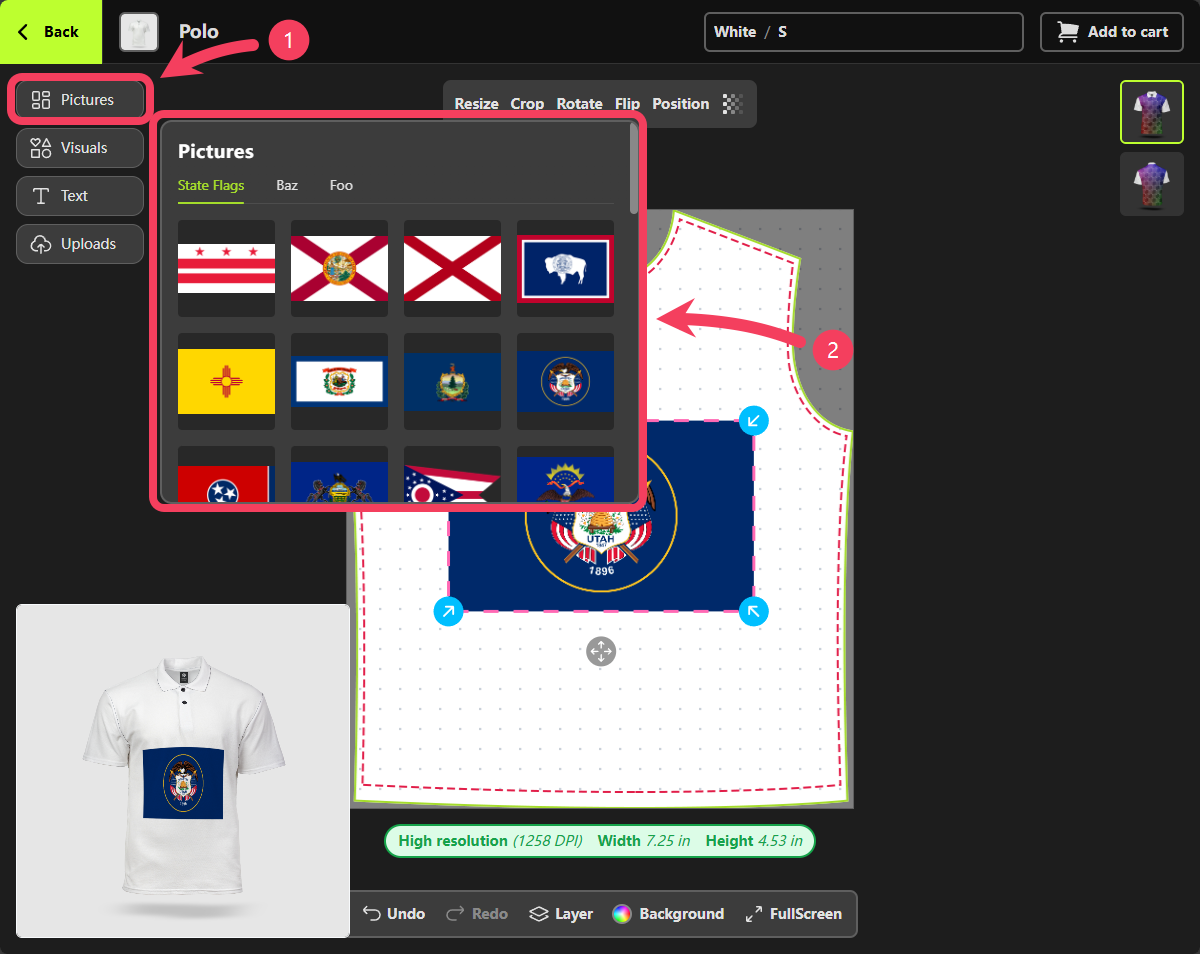
There are several ways to add design elements. First is the **Pictures** section, which offers a collection of images provided by the merchant. To learn more about the `Pictures` feature, please visit [Picture Collections tutorial](/docs/marketing/picture-collections).
1. Select **Pictures** as your method for adding design element.
2. In the **Pictures** panel that appears to the right of the button, choose your preferred image and add it to the canvas to begin designing.
On the left side of the **Personalizer**, you’ll find the tools for adding design elements to the canvas.
There are several ways to add design elements. First is the **Pictures** section, which offers a collection of images provided by the merchant. To learn more about the `Pictures` feature, please visit [Picture Collections tutorial](/docs/marketing/picture-collections).
1. Select **Pictures** as your method for adding design element.
2. In the **Pictures** panel that appears to the right of the button, choose your preferred image and add it to the canvas to begin designing.
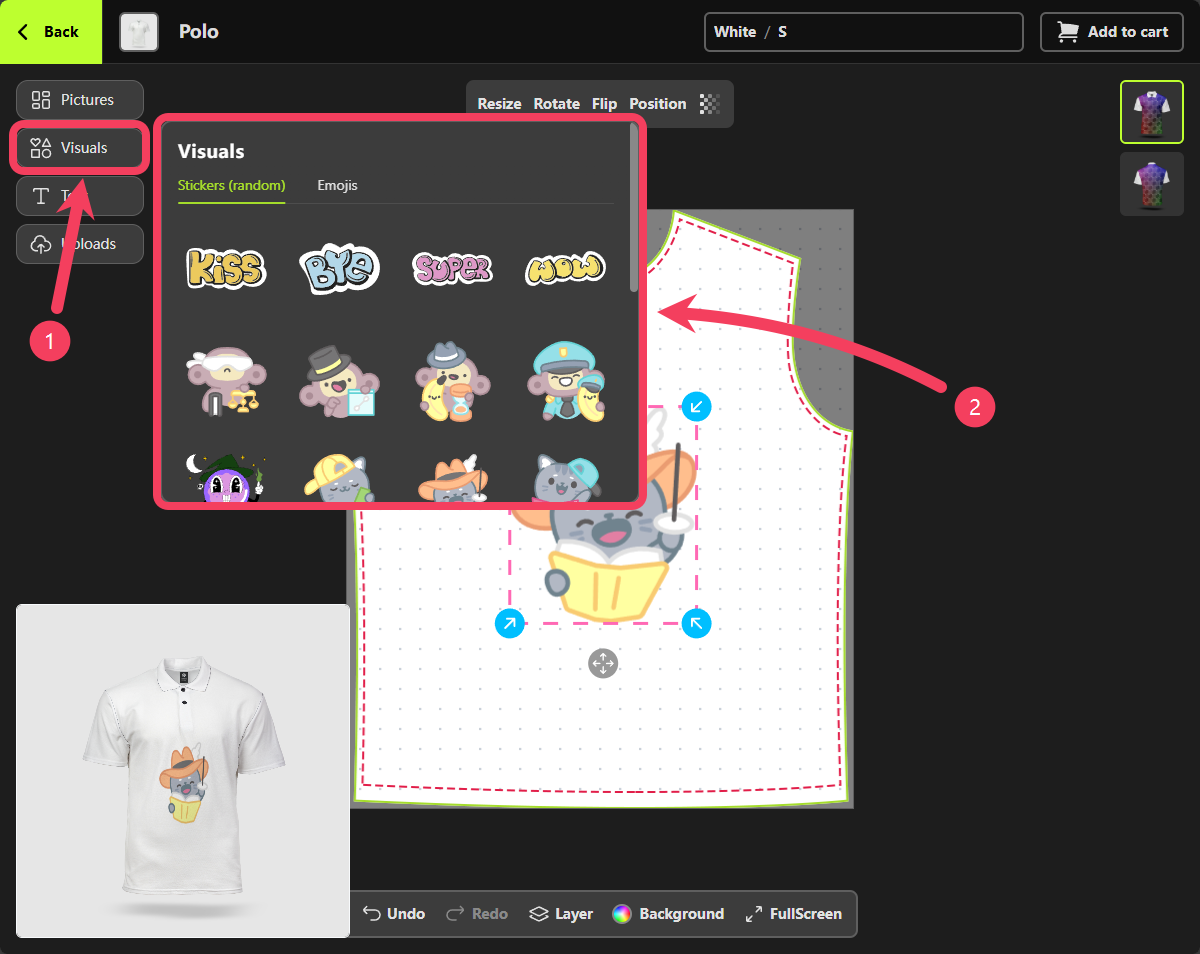
 The second way to add design elements is by using the **Visuals** section, where you can place a variety of fun vector graphics (such as stickers, emojis, and more) onto your design canvas.
**Visuals** are design assets provided by the MockSpark platform. These assets are typically vector images, which means they can be scaled without losing quality. This makes them ideal for different printing needs and helps prevent issues like blurry or low-quality prints.
Because of how Visuals work, each Print-Area can contain up to three Visuals at a time.
1. Select **Visuals** as your method for adding design element.
2. In the **Visuals** panel that appears to the right of the button, browse and select your preferred visual to add it to the canvas.
The second way to add design elements is by using the **Visuals** section, where you can place a variety of fun vector graphics (such as stickers, emojis, and more) onto your design canvas.
**Visuals** are design assets provided by the MockSpark platform. These assets are typically vector images, which means they can be scaled without losing quality. This makes them ideal for different printing needs and helps prevent issues like blurry or low-quality prints.
Because of how Visuals work, each Print-Area can contain up to three Visuals at a time.
1. Select **Visuals** as your method for adding design element.
2. In the **Visuals** panel that appears to the right of the button, browse and select your preferred visual to add it to the canvas.
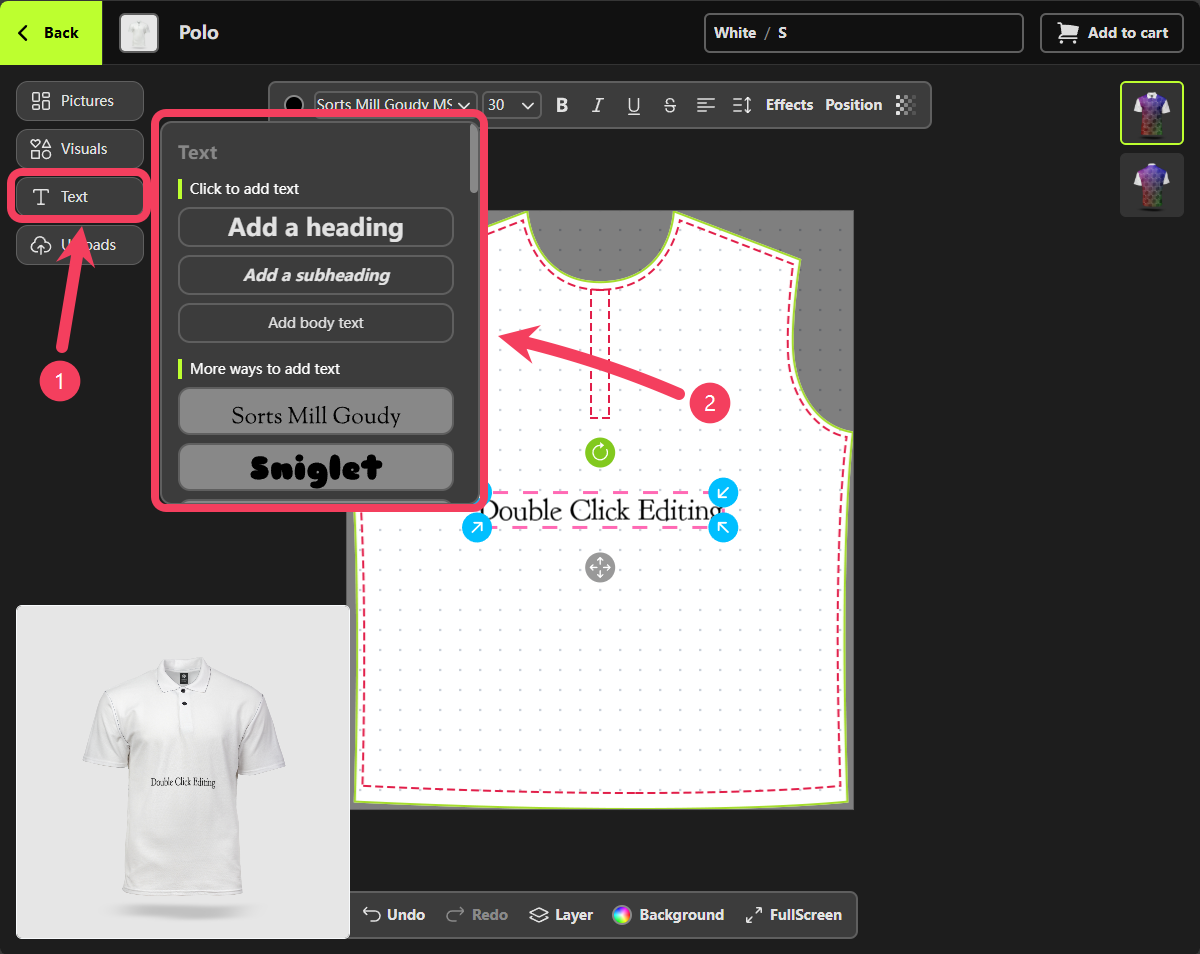
 In addition to the two methods mentioned earlier, you can also add text to your design canvas through the **Text** feature. We offer a variety of fonts for you to choose from.
1. Select **Text** as your method for adding design element.
2. In the **Text** panel that appears to the right of the button, choose your preferred font and add it to the canvas to begin designing.
In addition to the two methods mentioned earlier, you can also add text to your design canvas through the **Text** feature. We offer a variety of fonts for you to choose from.
1. Select **Text** as your method for adding design element.
2. In the **Text** panel that appears to the right of the button, choose your preferred font and add it to the canvas to begin designing.
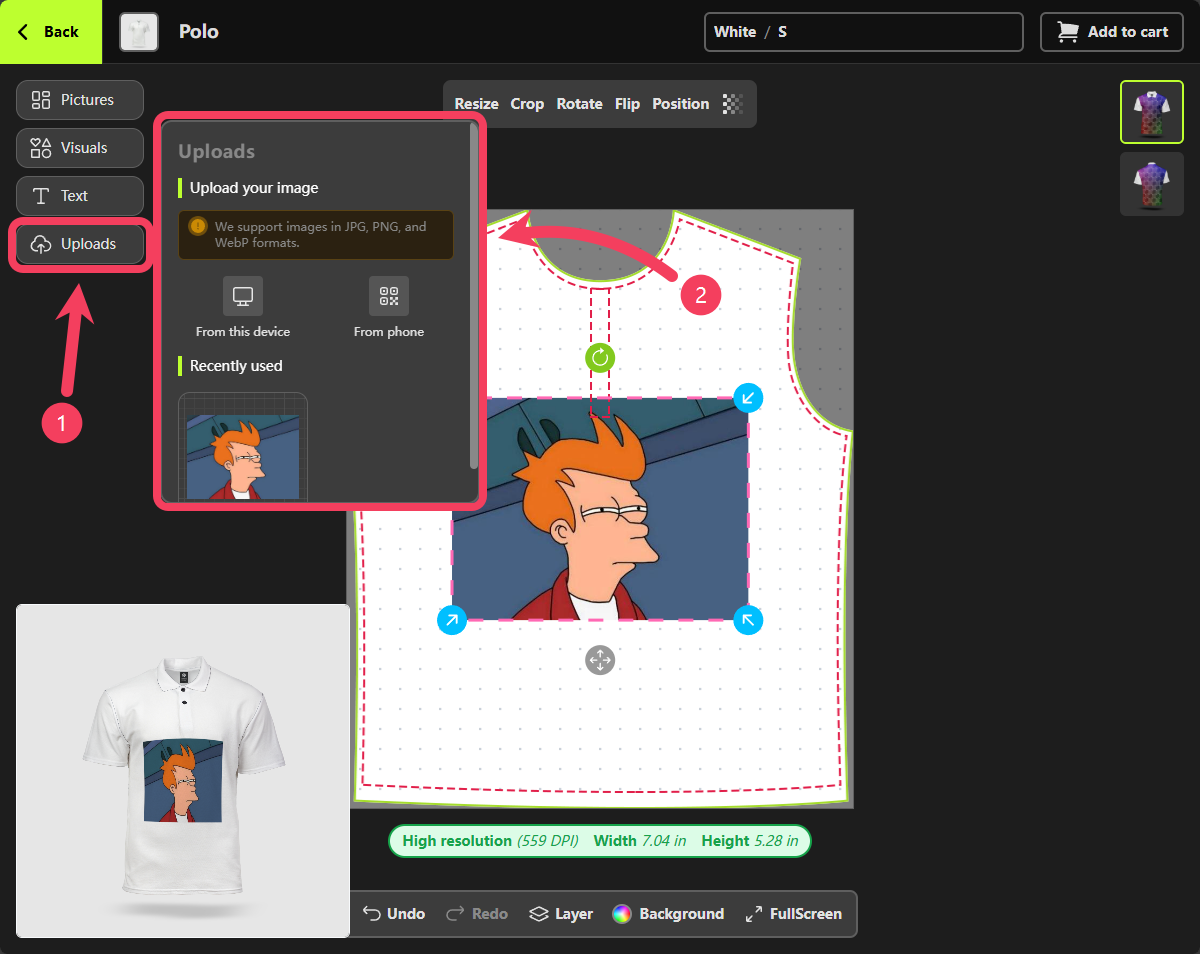
 If the previous methods for adding design elements don't suit your needs, you can use the **Uploads** feature to add your own images to the design canvas. This could be photos you've taken yourself or images generated by other AI tools.
We support images in JPG, PNG, and WebP formats.
1. Select **Uploads** as your method for adding design element.
2. In the **Uploads** panel that appears to the right of the button, you can upload images by taking or selecting them from your current device. You can also upload images by scanning a QR code with your phone.
If the previous methods for adding design elements don't suit your needs, you can use the **Uploads** feature to add your own images to the design canvas. This could be photos you've taken yourself or images generated by other AI tools.
We support images in JPG, PNG, and WebP formats.
1. Select **Uploads** as your method for adding design element.
2. In the **Uploads** panel that appears to the right of the button, you can upload images by taking or selecting them from your current device. You can also upload images by scanning a QR code with your phone.
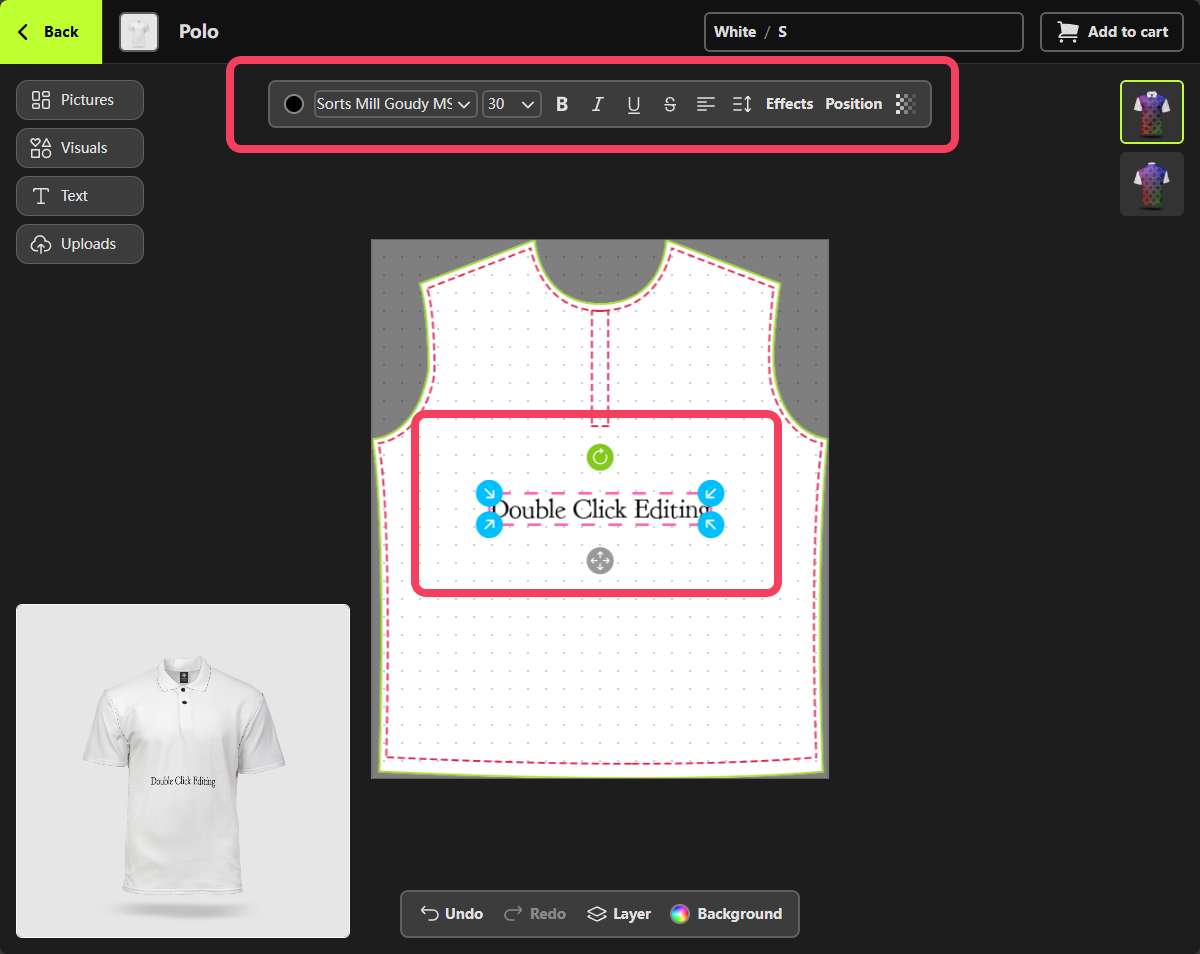
 At the center of the **Personalizer** is our design area, also known as the `canvas`. When you select a `text design element` on the canvas, a control bar for that text automatically appears above it. This control bar allows you to customize various properties of the text, such as color, font, and size.
Double-clicking the text on the canvas lets you edit its content.
At the center of the **Personalizer** is our design area, also known as the `canvas`. When you select a `text design element` on the canvas, a control bar for that text automatically appears above it. This control bar allows you to customize various properties of the text, such as color, font, and size.
Double-clicking the text on the canvas lets you edit its content.
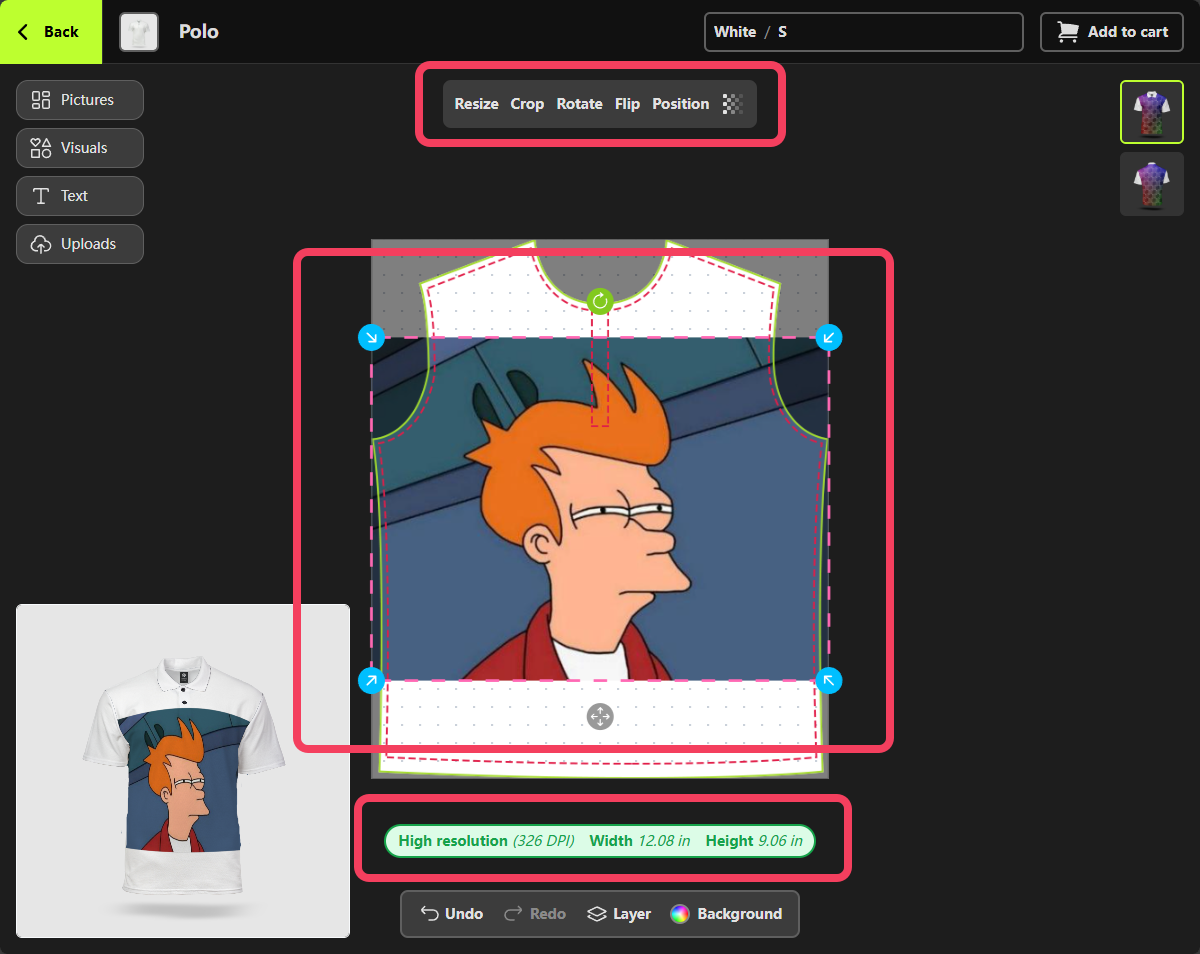
 When you select an `image design element` on the canvas (excluding Visuals), a control bar automatically appears above it. This bar allows you to crop, flip, rotate, and perform other edits on the image.
Below the canvas, you'll see an estimate of the image's print quality. If you receive a **Low resolution** warning during the design process, it means you need to adjust your design to ensure better print quality.
When you select an `image design element` on the canvas (excluding Visuals), a control bar automatically appears above it. This bar allows you to crop, flip, rotate, and perform other edits on the image.
Below the canvas, you'll see an estimate of the image's print quality. If you receive a **Low resolution** warning during the design process, it means you need to adjust your design to ensure better print quality.
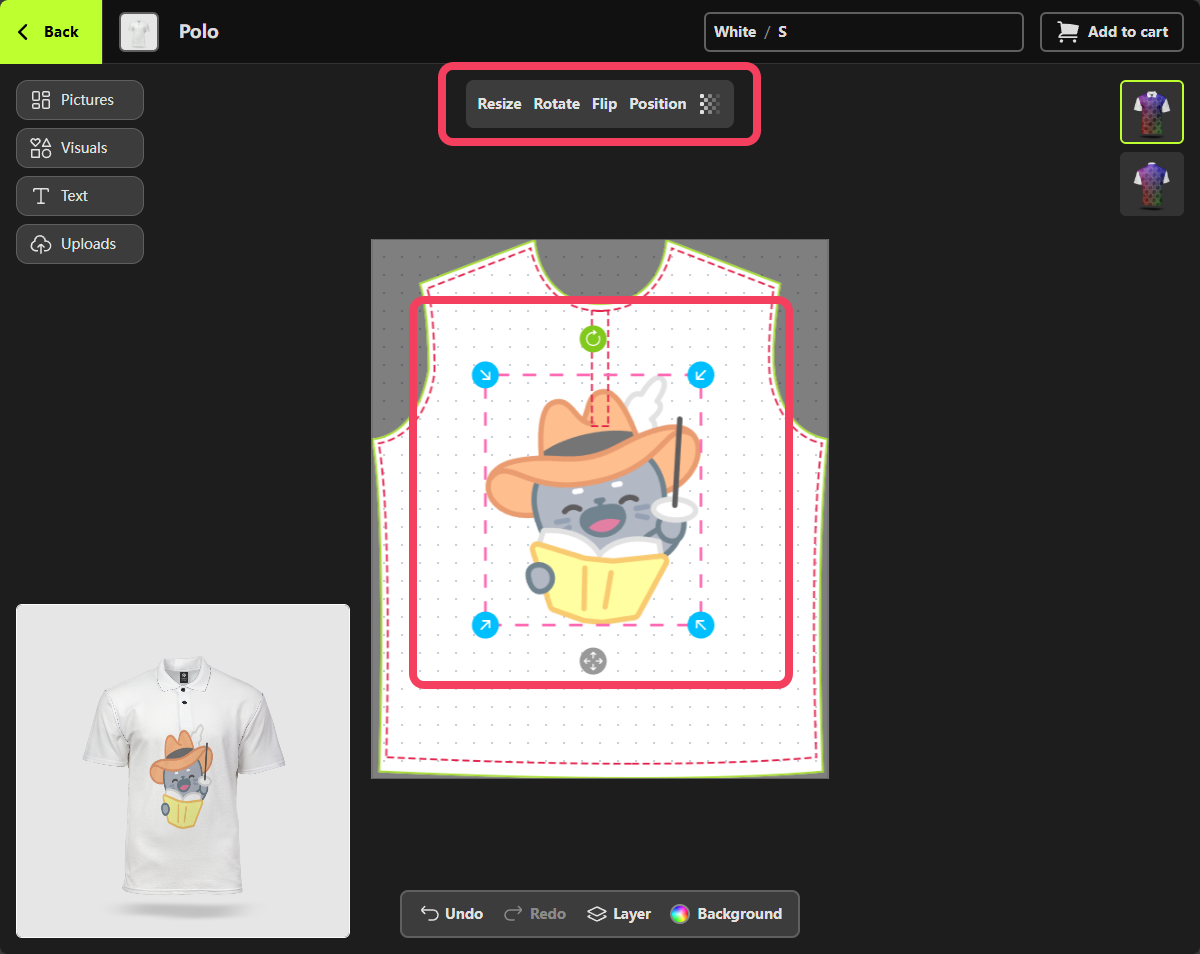
 When you select a `visual design element` on the canvas, such as a sticker or emoji, a control bar automatically appears above it. This bar allows you to flip, rotate, and make other adjustments to the visual.
Visual design elements do not show print quality warnings like image elements might.
When you select a `visual design element` on the canvas, such as a sticker or emoji, a control bar automatically appears above it. This bar allows you to flip, rotate, and make other adjustments to the visual.
Visual design elements do not show print quality warnings like image elements might.
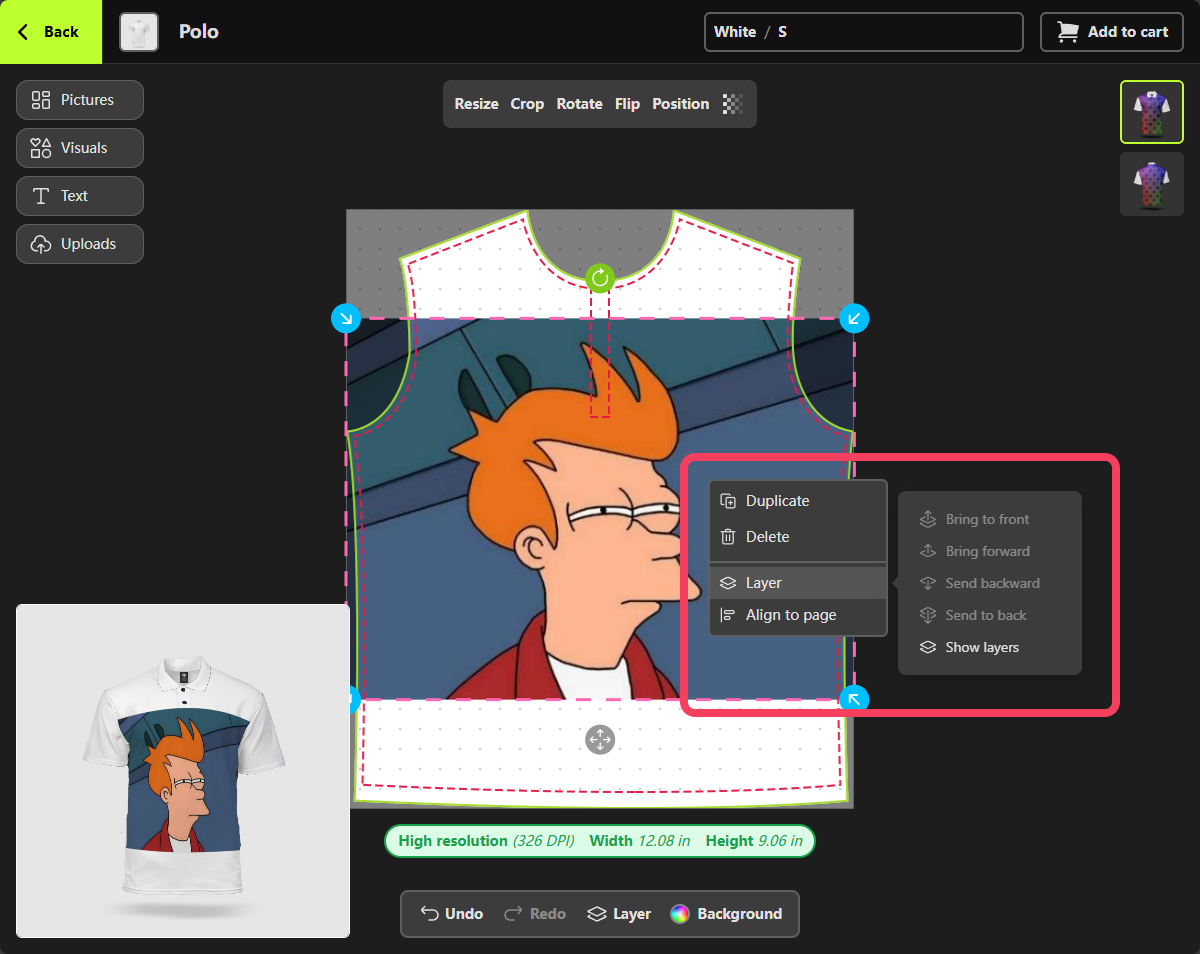
 When you right-click on a design element, you can duplicate or delete it. You also have the option to adjust its layer order within the current design or align it on the canvas.
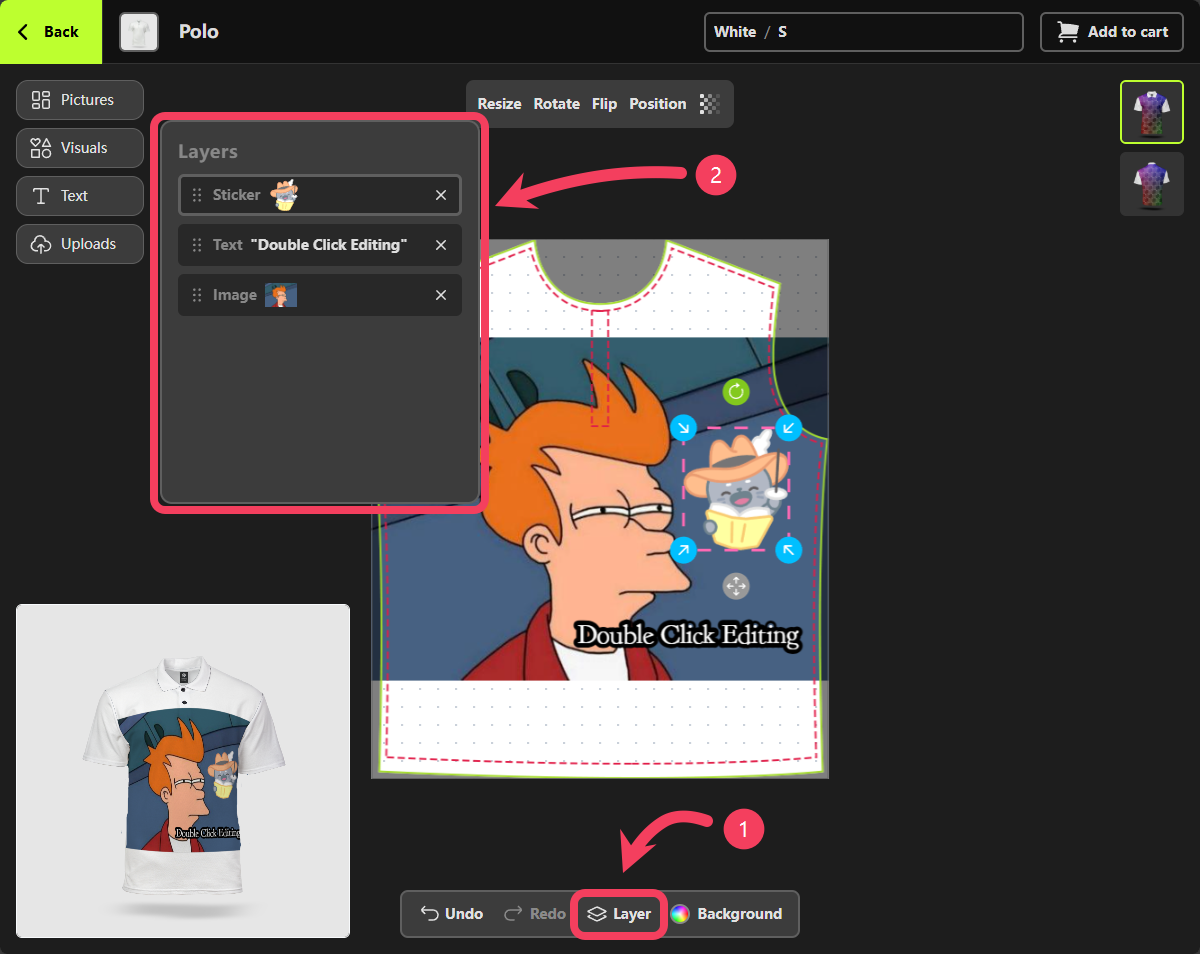
 In addition to manipulating individual design elements on the canvas, you can use the canvas control bar below the **Personalizer** to manage the entire canvas of the current Print-Area.
1. Select **Layer** from the canvas control bar at the bottom of the **Personalizer**.
2. In the **Layer** panel that appears, you can view, remove, and manually rearrange the order of the design elements by dragging them.
In addition to manipulating individual design elements on the canvas, you can use the canvas control bar below the **Personalizer** to manage the entire canvas of the current Print-Area.
1. Select **Layer** from the canvas control bar at the bottom of the **Personalizer**.
2. In the **Layer** panel that appears, you can view, remove, and manually rearrange the order of the design elements by dragging them.
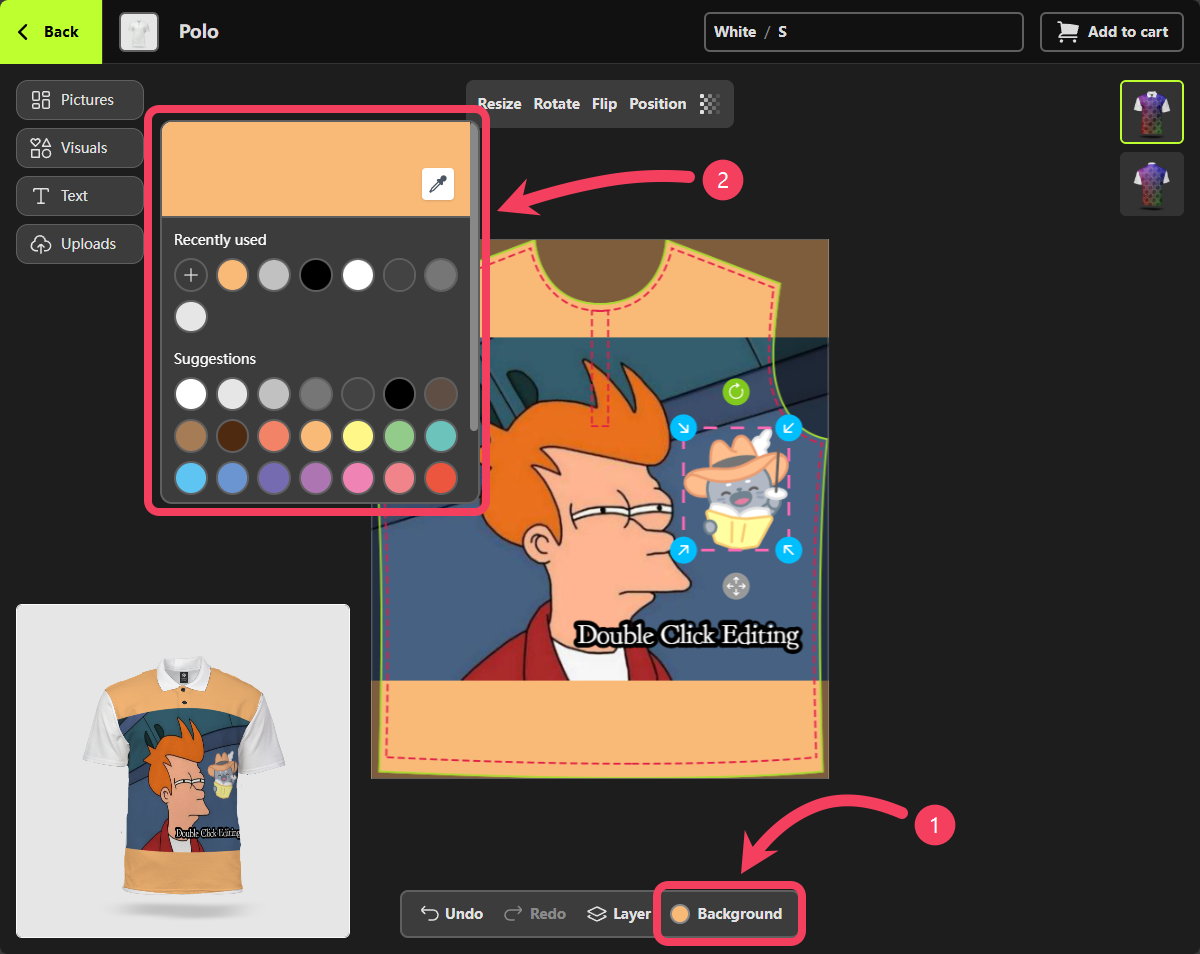
 Steps to change the background color of the current canvas:
1. Select **Background** from the canvas control bar at the bottom of the **Personalizer**.
2. In the **Background** panel that appears, choose the color you want to apply.
Steps to change the background color of the current canvas:
1. Select **Background** from the canvas control bar at the bottom of the **Personalizer**.
2. In the **Background** panel that appears, choose the color you want to apply.
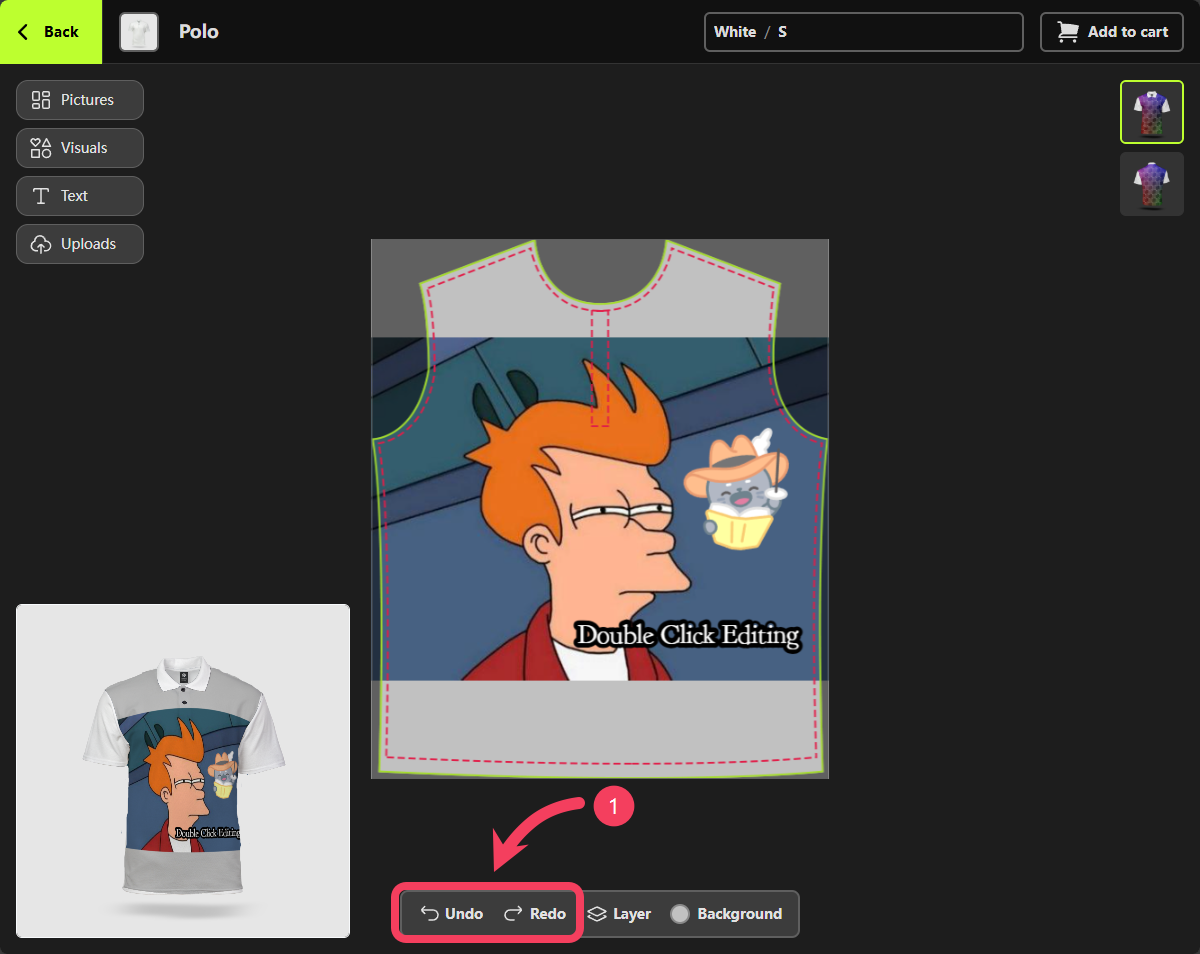
 If you want to **Undo** or **Redo** your actions, the canvas control bar at the bottom of the **Personalizer** offers these functions.
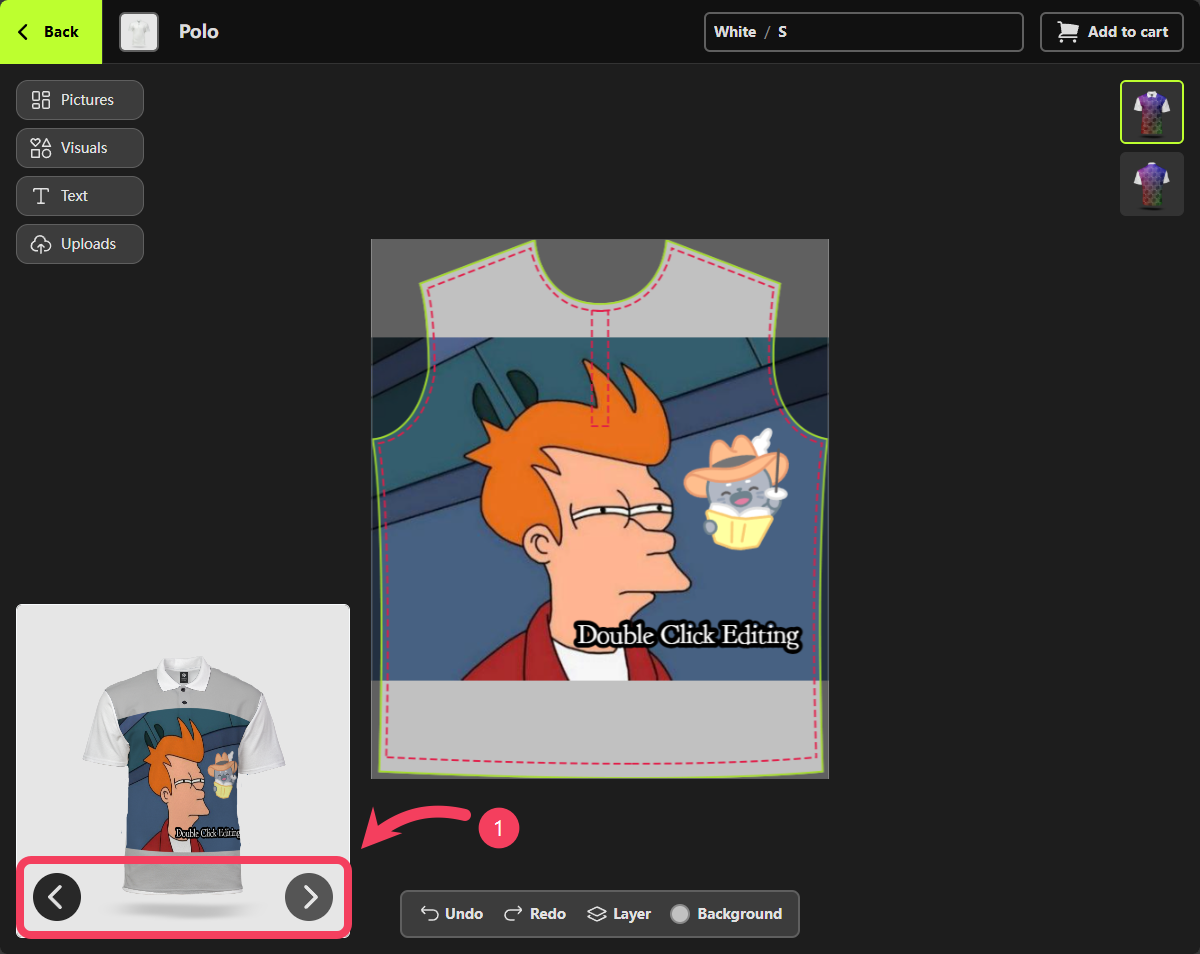
 At the bottom left of the **Personalizer** is the preview window that displays the current design effect. When you move your mouse over this window, buttons for switching between preview images will appear.
The design preview images in the Personalizer are essentially product mockups created by the merchant. If the merchant has made only one mockup for this particular product specification, there will be just one preview image available here.
At the bottom left of the **Personalizer** is the preview window that displays the current design effect. When you move your mouse over this window, buttons for switching between preview images will appear.
The design preview images in the Personalizer are essentially product mockups created by the merchant. If the merchant has made only one mockup for this particular product specification, there will be just one preview image available here.
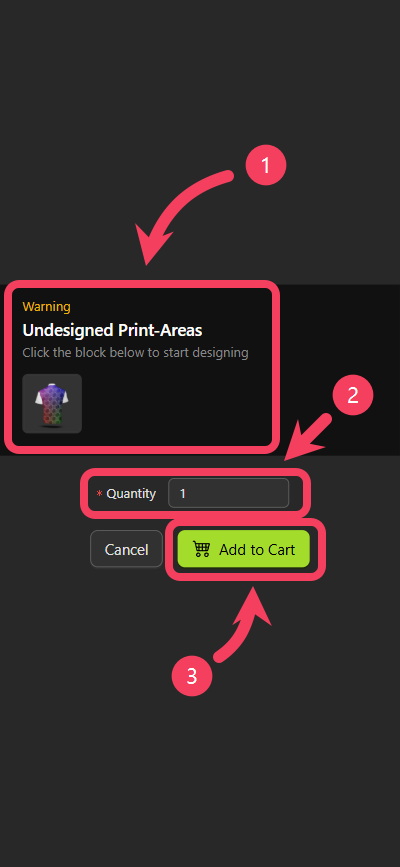
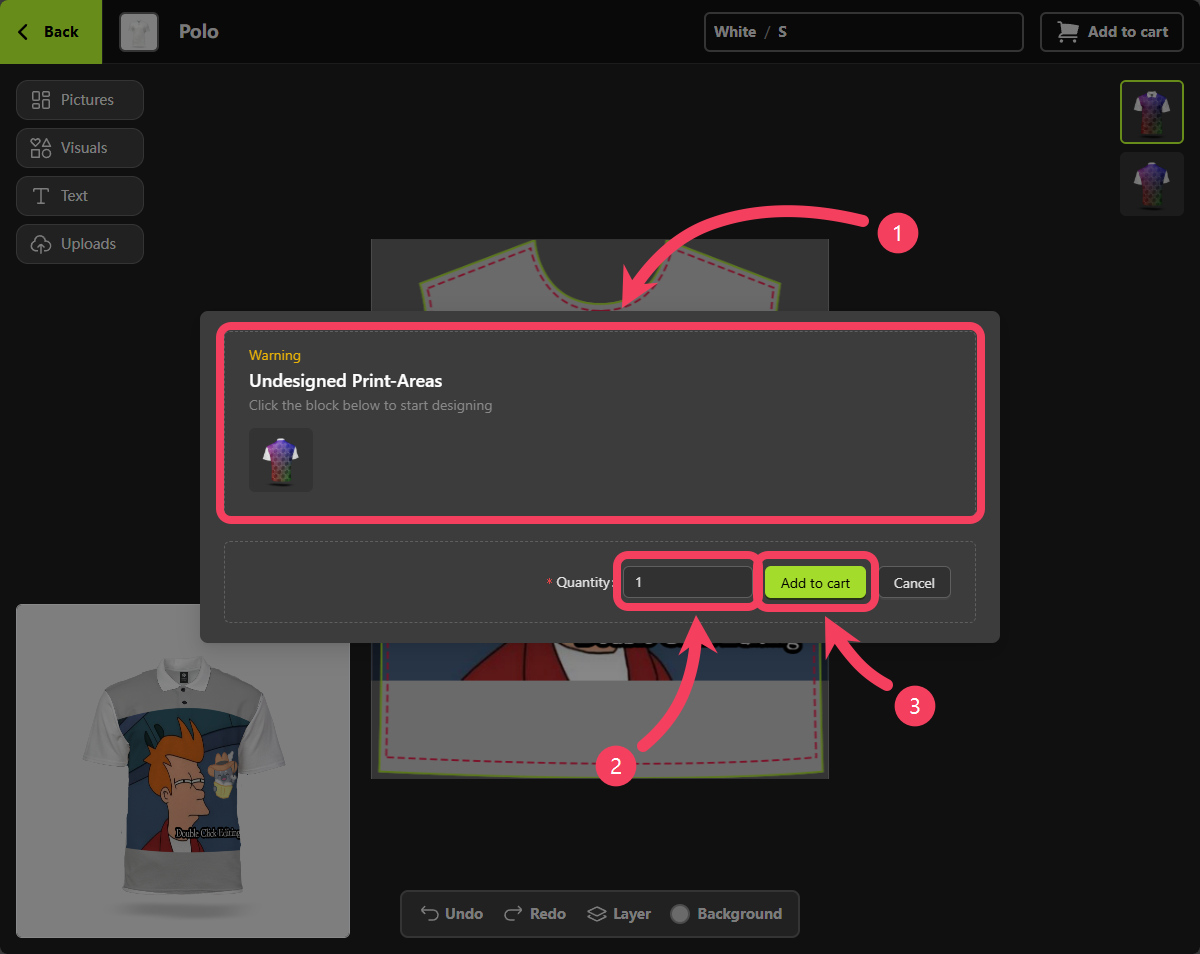
 Once you've finished your design, click the **Add to cart** button at the top right corner of the **Personalizer**. A dialog box will appear, allowing you to enter the `quantity` of the customized product you wish to purchase.
Additionally, if there are any issues such as `undesigned` Print-Areas or images with `poor print quality`, the dialog box will alert you. It's recommended that you make adjustments to your design based on these alerts to ensure better print results.
Once you've finished your design, click the **Add to cart** button at the top right corner of the **Personalizer**. A dialog box will appear, allowing you to enter the `quantity` of the customized product you wish to purchase.
Additionally, if there are any issues such as `undesigned` Print-Areas or images with `poor print quality`, the dialog box will alert you. It's recommended that you make adjustments to your design based on these alerts to ensure better print results.
 ## Use on Mobile Devices
`Personalizer` is available for use on both desktop and mobile devices.
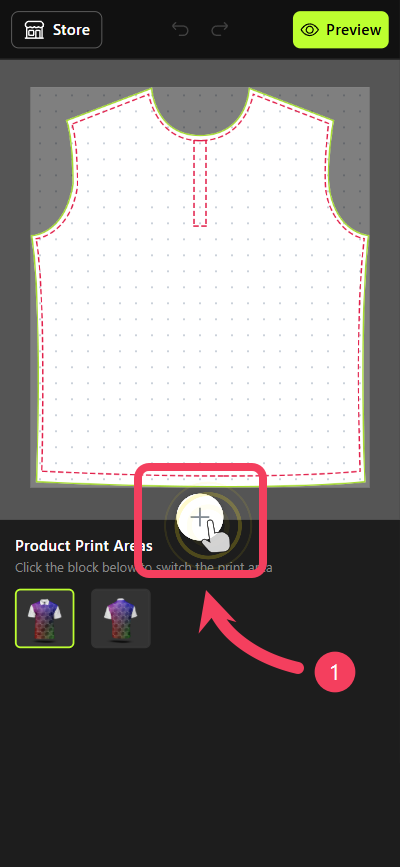
When you access `Personalizer` on a mobile device, you'll find a button in the center of the interface. Tap this button to add design elements to your canvas.
## Use on Mobile Devices
`Personalizer` is available for use on both desktop and mobile devices.
When you access `Personalizer` on a mobile device, you'll find a button in the center of the interface. Tap this button to add design elements to your canvas.
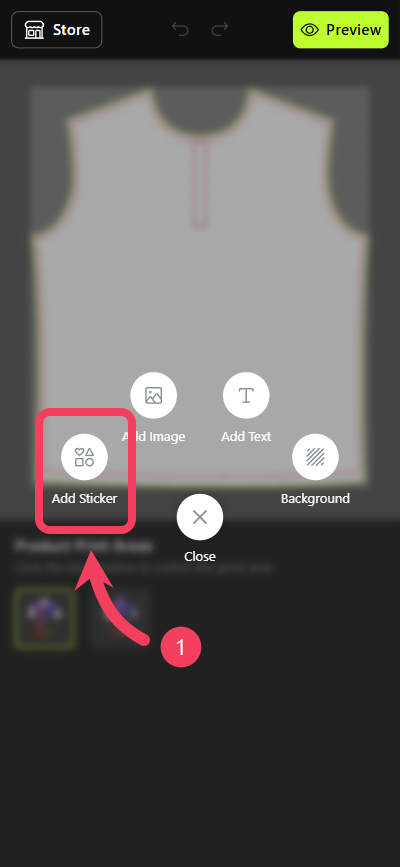
 In the interface, tap **Add Sticker** to add `visual design elements` to your canvas.
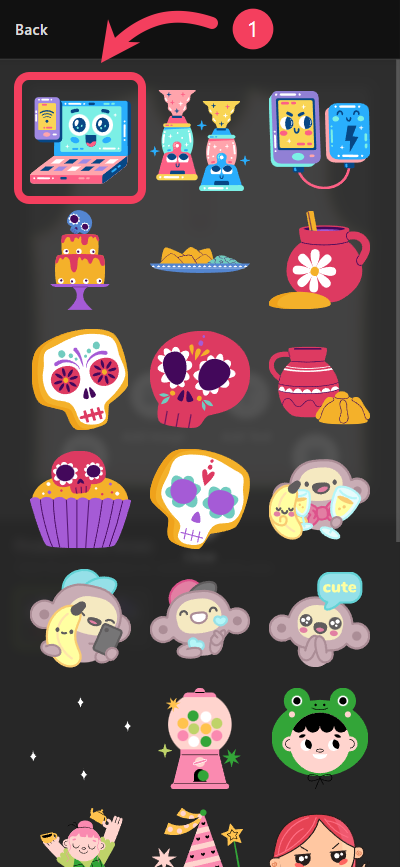
 Select a `sticker` that you like, then tap it to add it to your canvas.
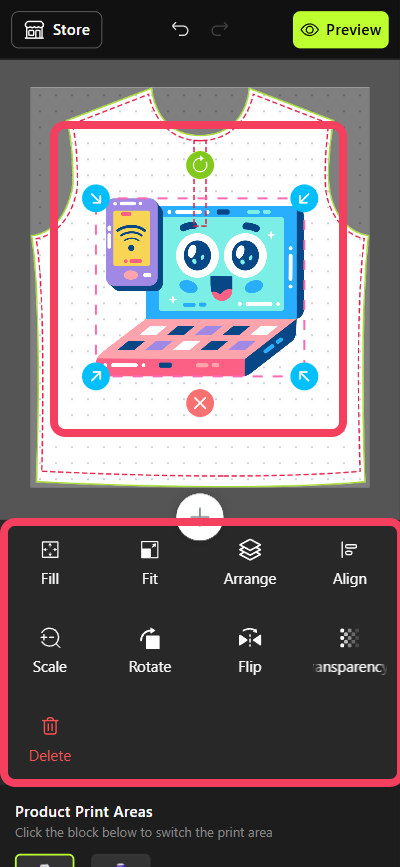
 Once you've added the `sticker` to your canvas, you'll see it highlighted as the selected item.
Additionally, a control panel will appear at the bottom of the canvas, allowing you to perform various actions on the `sticker`.
Once you've added the `sticker` to your canvas, you'll see it highlighted as the selected item.
Additionally, a control panel will appear at the bottom of the canvas, allowing you to perform various actions on the `sticker`.
 Tap the button in the center of the interface, then select **Add Image** to either add `picture design elements` to your canvas or `upload` your own image.
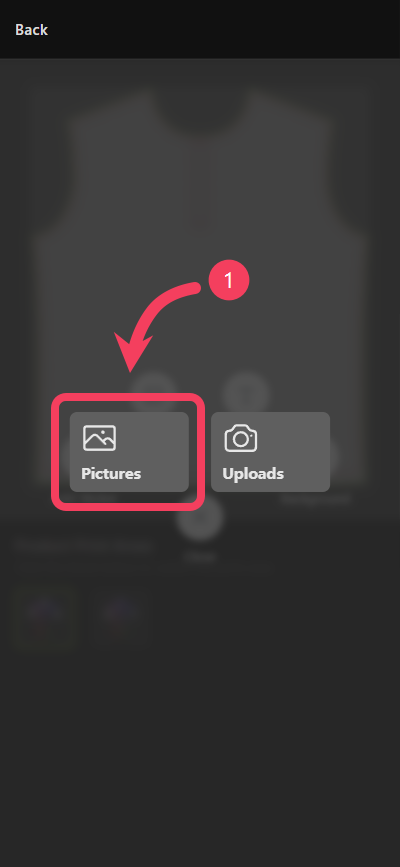
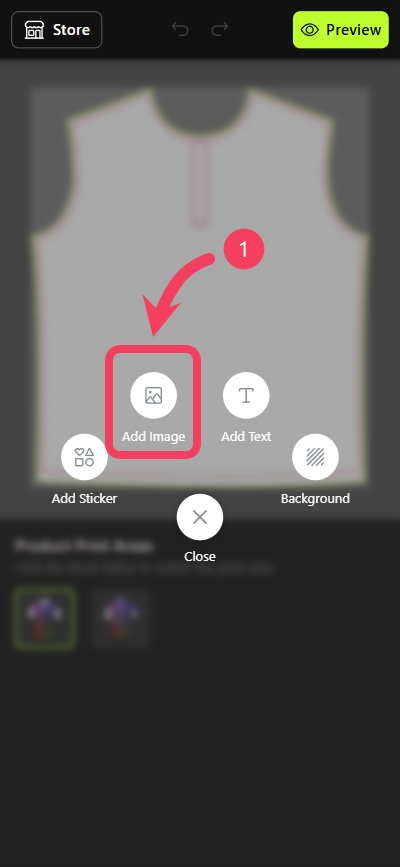 Add images provided by the vendor, known as **Pictures**. To learn more about the `Pictures` feature, please visit [Picture Collections tutorial](/docs/marketing/picture-collections).
Tap **Pictures** in the interface.
Add images provided by the vendor, known as **Pictures**. To learn more about the `Pictures` feature, please visit [Picture Collections tutorial](/docs/marketing/picture-collections).
Tap **Pictures** in the interface.
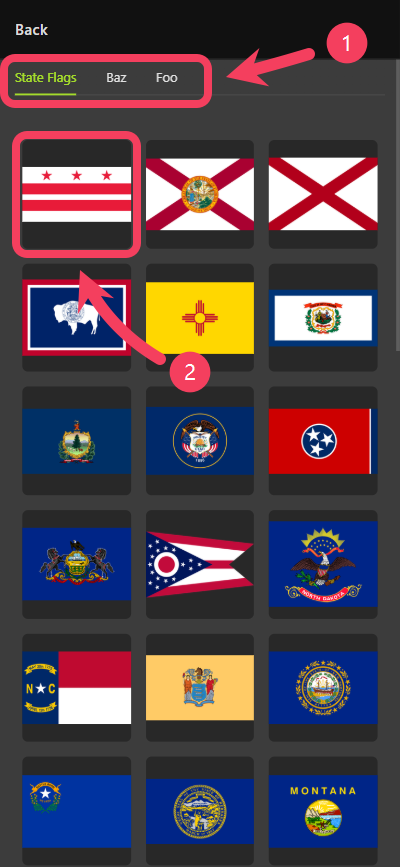
 1. Choose a `picture collection` that you prefer.
2. Select a `picture` you like, then tap it to add it to your canvas.
1. Choose a `picture collection` that you prefer.
2. Select a `picture` you like, then tap it to add it to your canvas.
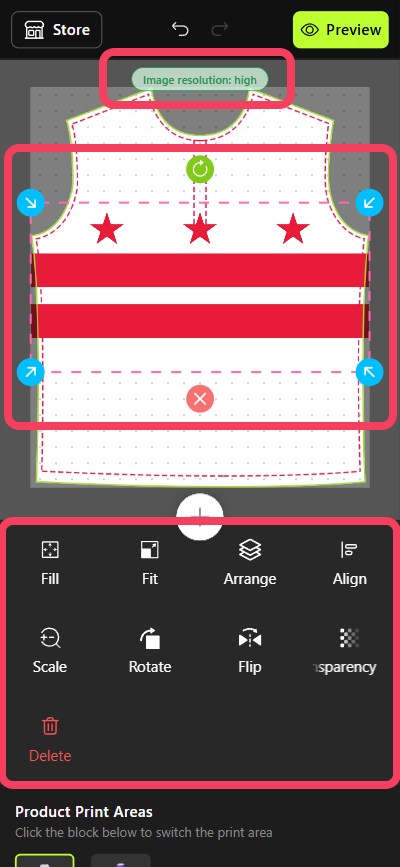
 Once you’ve added the `picture` to your canvas, you’ll see it highlighted as the selected item.
Additionally, a control panel will appear at the bottom of the canvas, allowing you to perform various actions on the `picture`.
Above the canvas, you'll see an estimate of the image's print quality. If you receive a **Low resolution** warning during the design process, it means you need to adjust your design to ensure better print quality.
Once you’ve added the `picture` to your canvas, you’ll see it highlighted as the selected item.
Additionally, a control panel will appear at the bottom of the canvas, allowing you to perform various actions on the `picture`.
Above the canvas, you'll see an estimate of the image's print quality. If you receive a **Low resolution** warning during the design process, it means you need to adjust your design to ensure better print quality.
 In addition to using vendor-provided **Pictures**, you can also **Upload** images from the photo gallery on your mobile device.
We support images in JPG, PNG, and WebP formats.
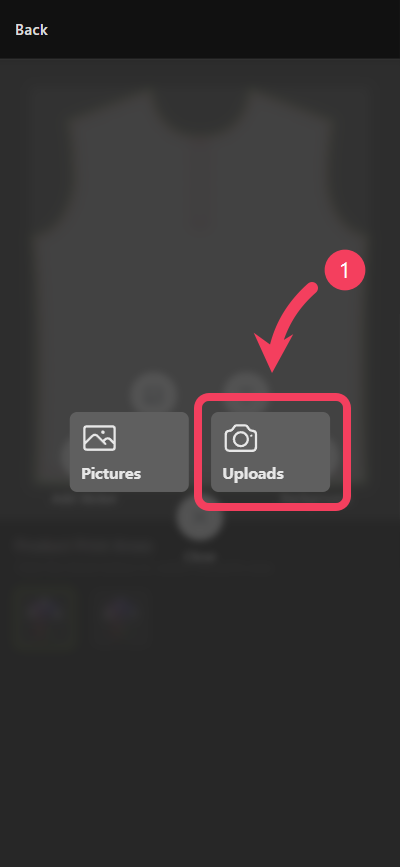
Tap **Uploads** in the interface.
In addition to using vendor-provided **Pictures**, you can also **Upload** images from the photo gallery on your mobile device.
We support images in JPG, PNG, and WebP formats.
Tap **Uploads** in the interface.
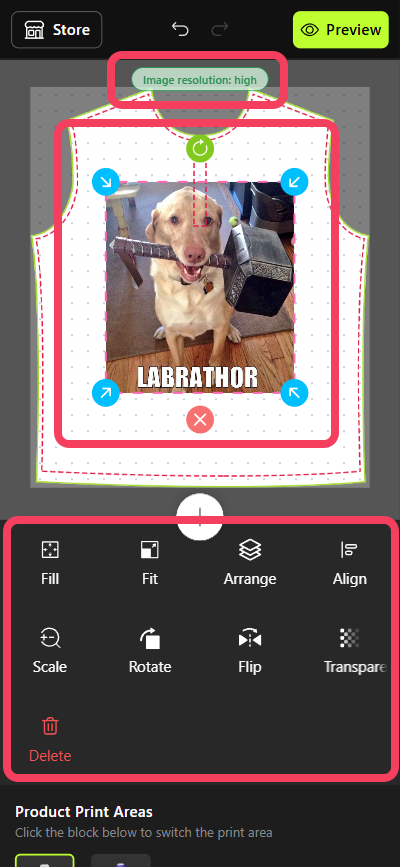
 Once you upload an `image` to your canvas, you’ll see it highlighted as the selected item.
Additionally, a control panel will appear at the bottom of the canvas, allowing you to perform various actions on the `image`.
Above the canvas, you'll see an estimate of the image's print quality. If you receive a **Low resolution** warning during the design process, it means you need to adjust your design to ensure better print quality.
Once you upload an `image` to your canvas, you’ll see it highlighted as the selected item.
Additionally, a control panel will appear at the bottom of the canvas, allowing you to perform various actions on the `image`.
Above the canvas, you'll see an estimate of the image's print quality. If you receive a **Low resolution** warning during the design process, it means you need to adjust your design to ensure better print quality.
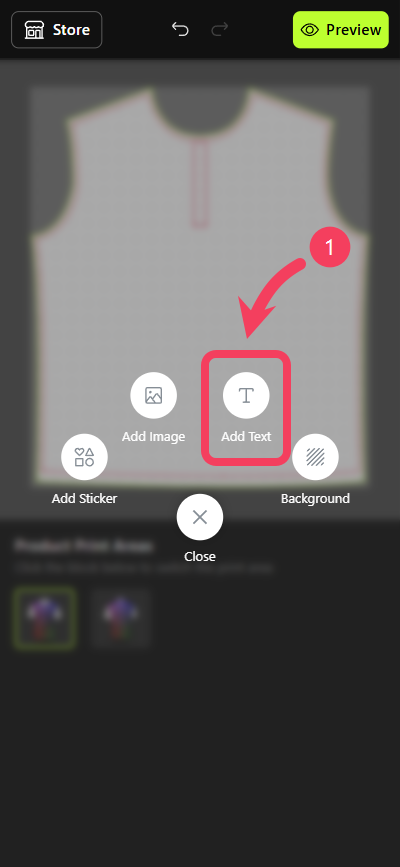
 Tap the button in the center of the interface, then select **Add Text** to include text on your canvas.
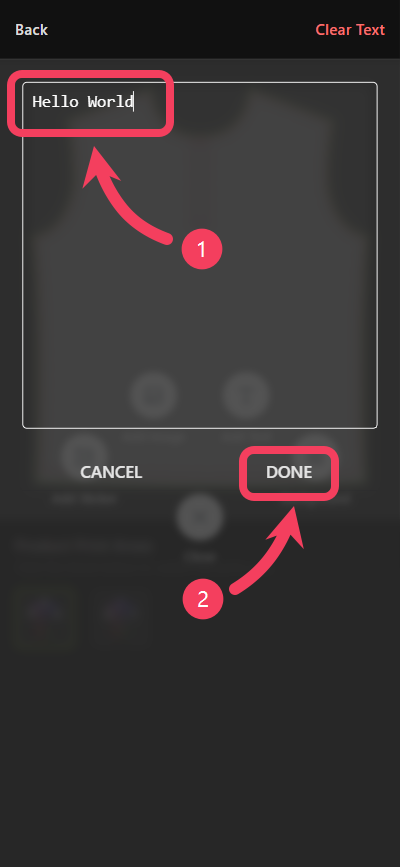
 1. Enter the `text` you want to display in the multiline text box.
2. Tap **DONE** to add the text to your canvas.
Please refrain from using emoji in your text, as this may lead to printing inconsistencies in actual production.
1. Enter the `text` you want to display in the multiline text box.
2. Tap **DONE** to add the text to your canvas.
Please refrain from using emoji in your text, as this may lead to printing inconsistencies in actual production.
 Once you’ve added the `text` to your canvas, you’ll see it highlighted as the selected item.
Additionally, a control panel will appear at the bottom of the canvas, allowing you to perform various actions on the `text`.
Once you’ve added the `text` to your canvas, you’ll see it highlighted as the selected item.
Additionally, a control panel will appear at the bottom of the canvas, allowing you to perform various actions on the `text`.
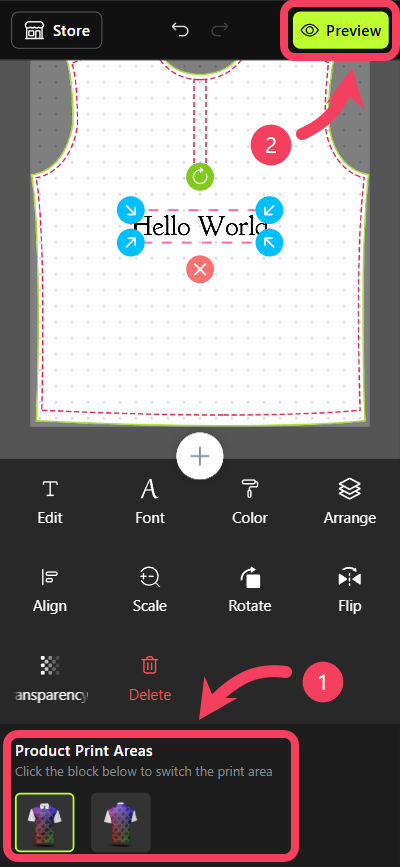
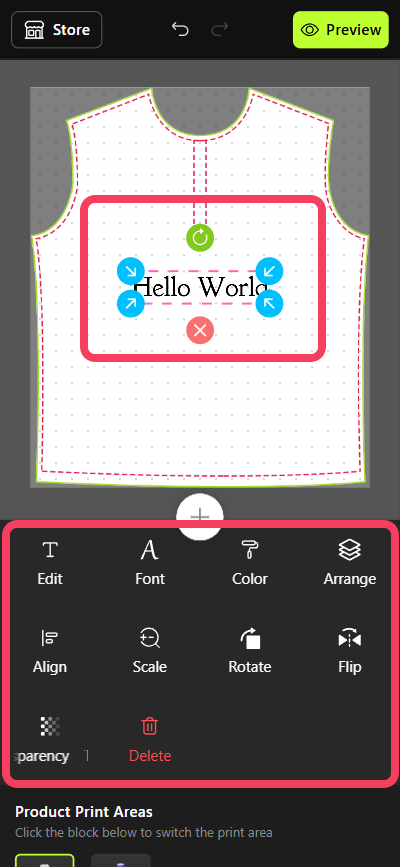 At the bottom of **Personalizer**, you can view and switch between the Print-Areas currently being customized. A product may include one or several Print-Areas, such as the front and back of a polo shirt. To learn more about Print-Areas, please visit [Products tutorial](/docs/products/products#print-areas).
1. After finishing the design for the current `Print-Area`, you can switch to other Print-Area of the product to continue designing.
2. Once your design is complete, tap the **Preview** button located on the right side of the top bar in **Personalizer** to preview the final look of your design.
At the bottom of **Personalizer**, you can view and switch between the Print-Areas currently being customized. A product may include one or several Print-Areas, such as the front and back of a polo shirt. To learn more about Print-Areas, please visit [Products tutorial](/docs/products/products#print-areas).
1. After finishing the design for the current `Print-Area`, you can switch to other Print-Area of the product to continue designing.
2. Once your design is complete, tap the **Preview** button located on the right side of the top bar in **Personalizer** to preview the final look of your design.
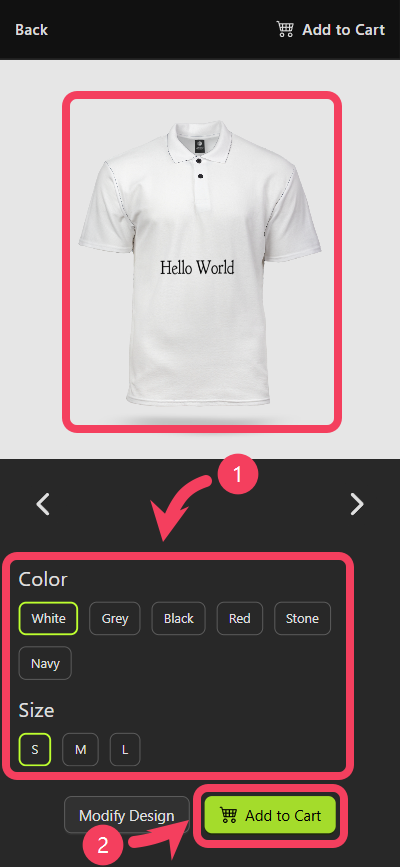
 In the `Preview` interface, you can not only see your design but also view and switch between all available product `options`, such as color and size.
Once everything is confirmed and looks good, tap the **Add to Cart** button at the bottom of the `Preview` interface to proceed.
In the `Preview` interface, you can not only see your design but also view and switch between all available product `options`, such as color and size.
Once everything is confirmed and looks good, tap the **Add to Cart** button at the bottom of the `Preview` interface to proceed.
 After tapping the **Add to Cart** button, a dialog box will appear where you can enter the `quantity` of the customized product you wish to purchase.
Additionally, if there are any issues such as `undesigned` Print-Areas or images with `poor print quality`, the dialog box will alert you. It's recommended that you make adjustments to your design based on these alerts to ensure better print results.
After tapping the **Add to Cart** button, a dialog box will appear where you can enter the `quantity` of the customized product you wish to purchase.
Additionally, if there are any issues such as `undesigned` Print-Areas or images with `poor print quality`, the dialog box will alert you. It's recommended that you make adjustments to your design based on these alerts to ensure better print results.