> ## Documentation Index
> Fetch the complete documentation index at: https://help.mockspark.com/llms.txt
> Use this file to discover all available pages before exploring further.
# Quick Start Guide
> Start selling your customizable products in minutes
This quickstart guide will walk you through the process of creating and publishing a customizable product to your Shopify store in just a few minutes.
By the end of this guide, you will have a shop that can meet customers' customization needs.
**Prerequisites** : Before you begin, make sure to [install the Shopify App](/docs/get-started/installation-guide#install-the-shopify-app) and [enable the App on your Theme](/docs/get-started/installation-guide#enable-the-app-on-your-theme).
## Log In to the MockSpark Dashboard
Please visit and log in to our dashboard at [app.mockspark.com](https://app.mockspark.com/)
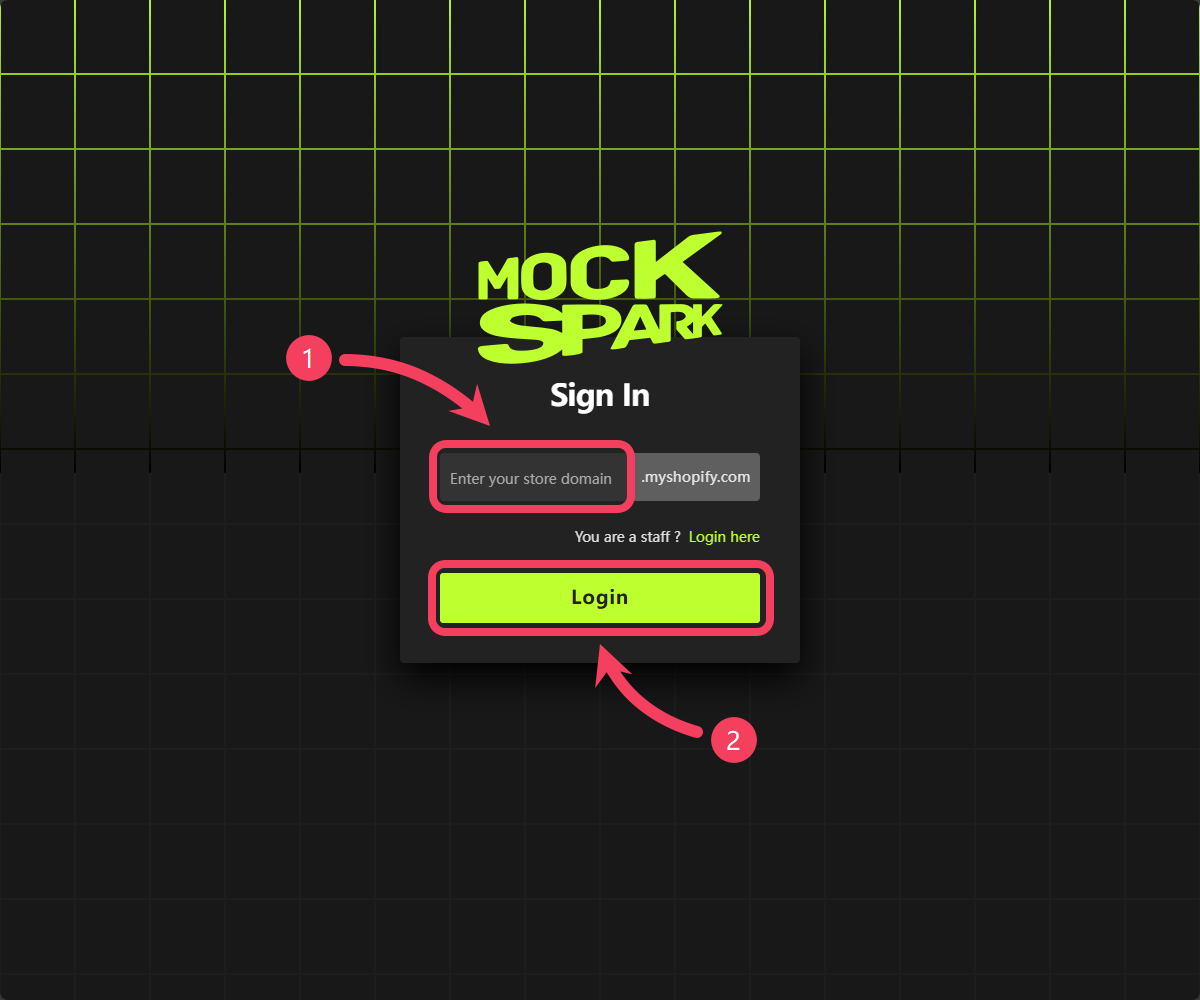
1. Log in using your Shopify store domain.
2. Click **Login** to sign in. Once you're logged in successfully, you'll be redirected to the dashboard's overview page.
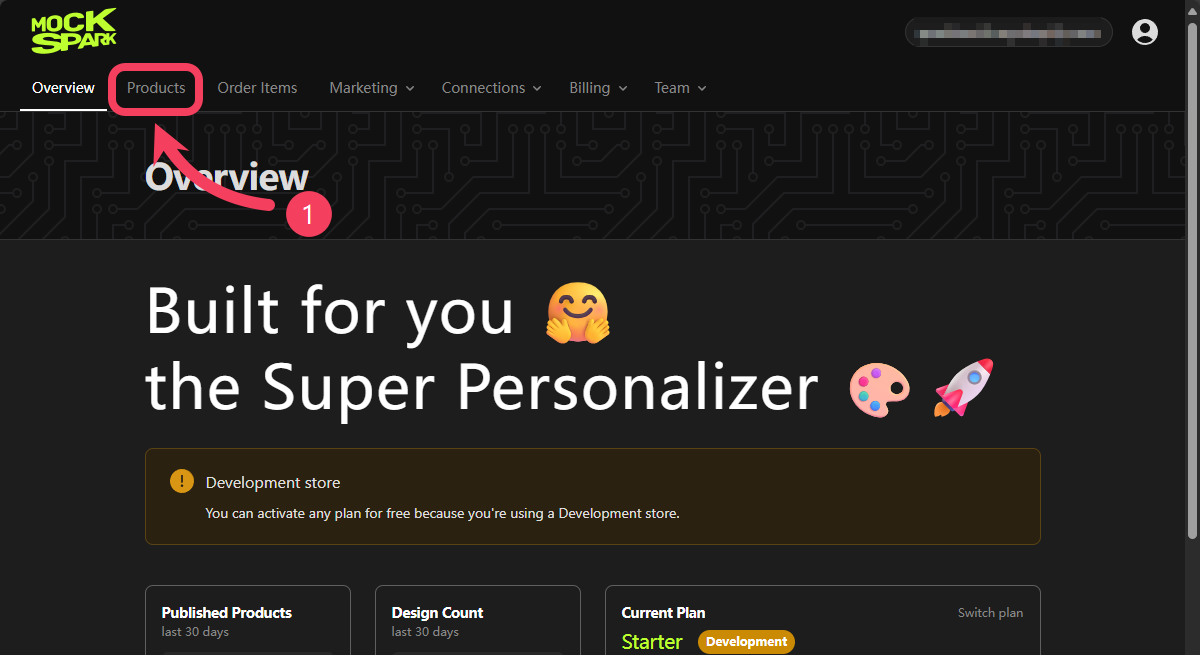
 Go to the **Products** section from the top navigation bar.
 ## Create a Customizable Product
In MockSpark, there are two ways to create customizable products:
1. Import a **Third-Party Fulfilled Product**.
2. Create a **Seller-Fulfilled Product**.
This Quickstart tutorial walks you through the first method: import a **Third-Party Fulfilled Product**.
To explore more about customizable product, visit [Products tutorial](/docs/products/products).
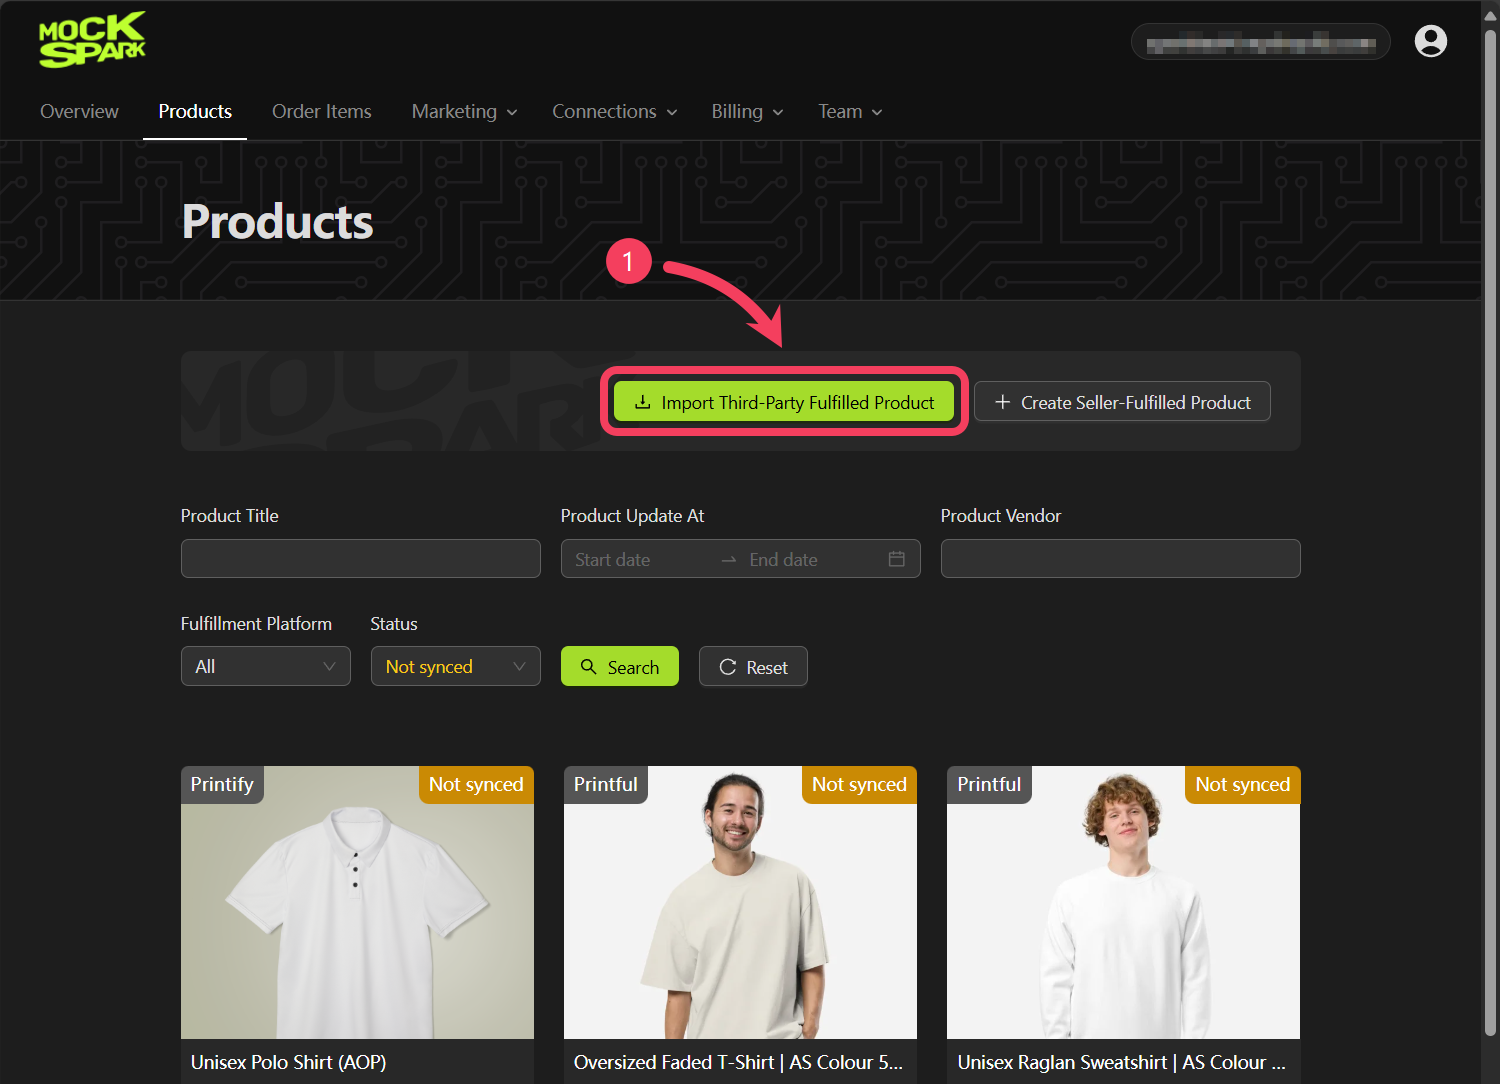
Click the **Import Product** button.
## Create a Customizable Product
In MockSpark, there are two ways to create customizable products:
1. Import a **Third-Party Fulfilled Product**.
2. Create a **Seller-Fulfilled Product**.
This Quickstart tutorial walks you through the first method: import a **Third-Party Fulfilled Product**.
To explore more about customizable product, visit [Products tutorial](/docs/products/products).
Click the **Import Product** button.
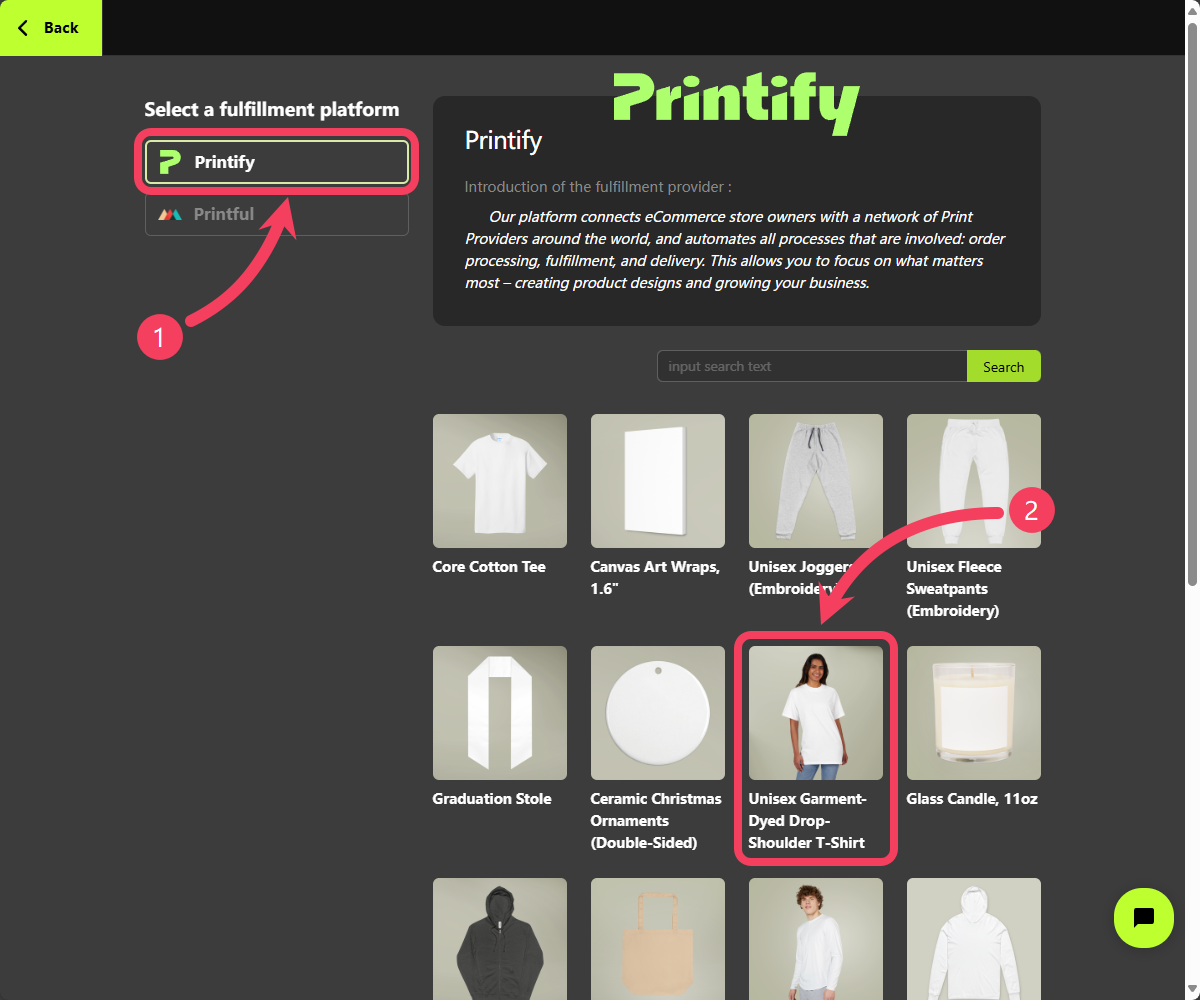
 1. Choose a fulfillment platform you'd like to use, such as `Printify`.
2. Choose a product you want to sell, such as `T-shirt`.
1. Choose a fulfillment platform you'd like to use, such as `Printify`.
2. Choose a product you want to sell, such as `T-shirt`.
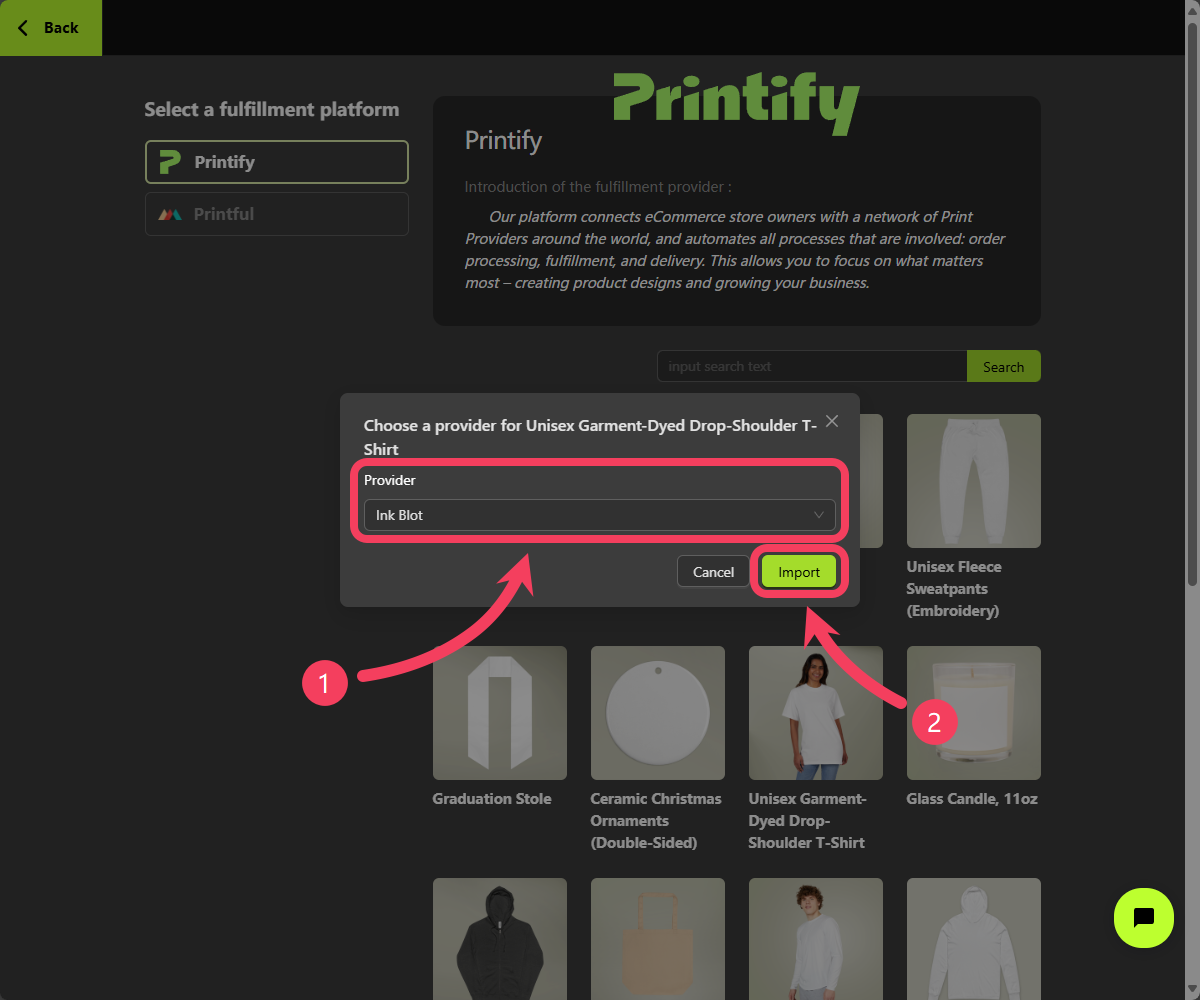
 1. Choose a provider for this product or simply go with the default option if you prefer.
2. Click **Import** to add the product to your product library.
1. Choose a provider for this product or simply go with the default option if you prefer.
2. Click **Import** to add the product to your product library.
 ### Step 1: Edit Basic Details
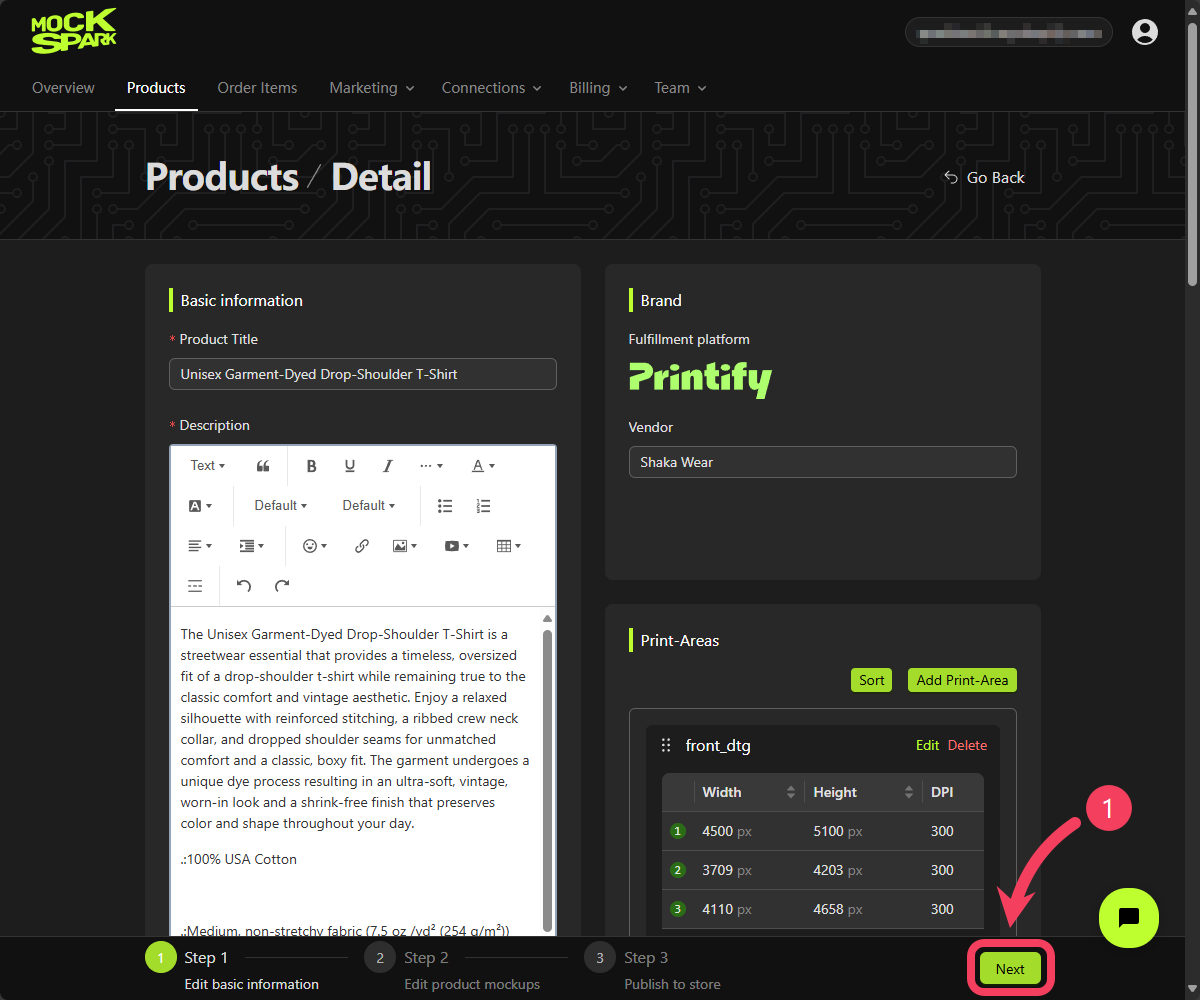
After the product is successfully imported, you'll be automatically redirected to its edit page. Here, you can customize the basic product details such as the title, description, and variants. However, for the Quickstart tutorial, we recommend keeping the default information provided by the fulfillment platform for now.
Click **Next** to proceed to the next step.
### Step 1: Edit Basic Details
After the product is successfully imported, you'll be automatically redirected to its edit page. Here, you can customize the basic product details such as the title, description, and variants. However, for the Quickstart tutorial, we recommend keeping the default information provided by the fulfillment platform for now.
Click **Next** to proceed to the next step.
 ### Step 2: Create Mockups
In Mockspark, the **Mockup** is a core concept at the heart of our customization features. Every design function for customizable products is built around mockups.
A customizable product lets you group different variants into separate mockup groups. This is an advanced feature that’s especially helpful when you want to display each color or style with its own specific mockup. But to keep things simple in this quickstart guide, we'll apply all variants to a single mockup group for now.
To explore more about mockups, visit [Products tutorial](/docs/products/products).
In this guide, we’ll walk you through creating two mockups (one for the front and one for the back of your product) within the default mockup group.
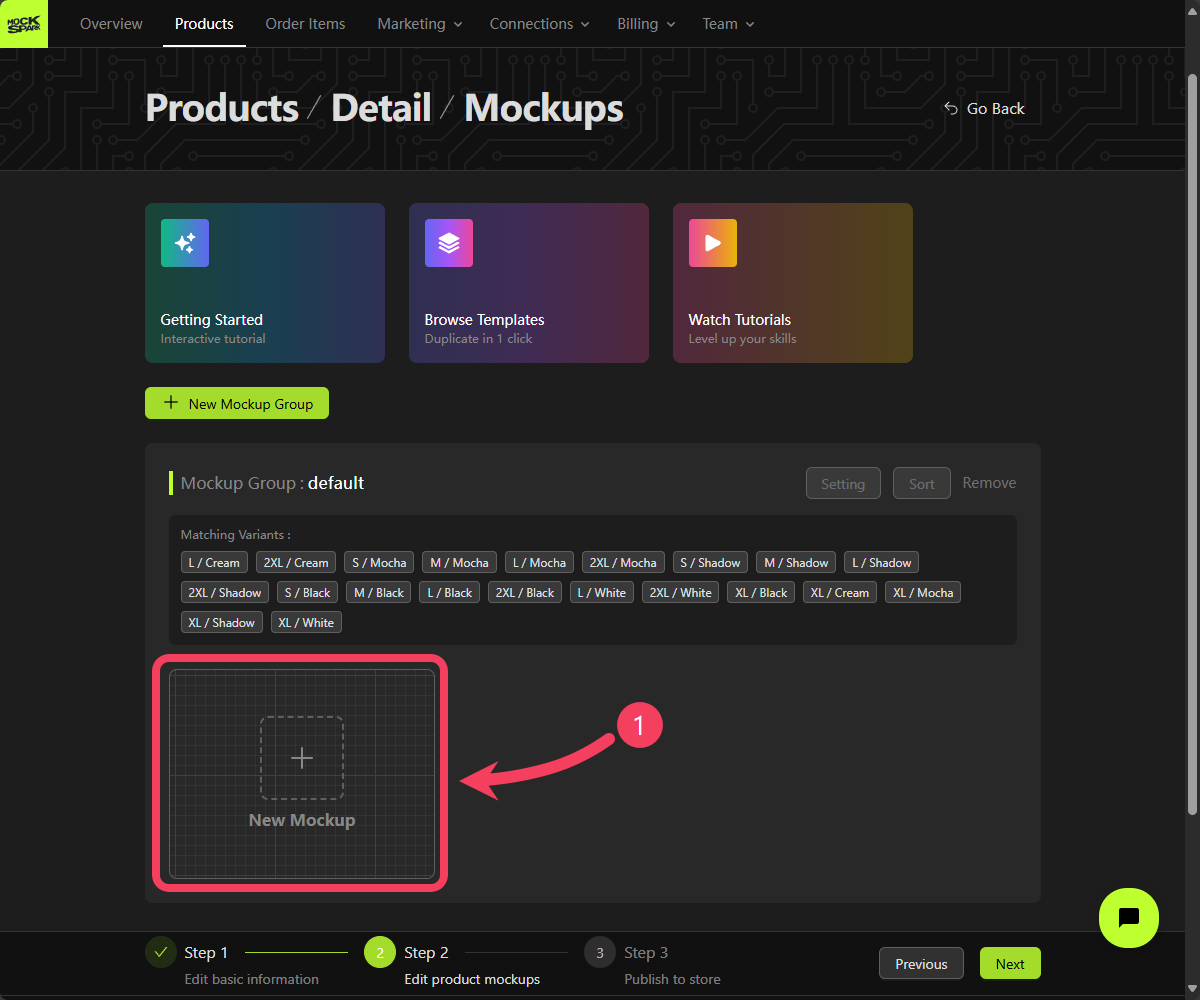
Click **New Mockup** to open the Mockup Creator and build a mockup for your product.
### Step 2: Create Mockups
In Mockspark, the **Mockup** is a core concept at the heart of our customization features. Every design function for customizable products is built around mockups.
A customizable product lets you group different variants into separate mockup groups. This is an advanced feature that’s especially helpful when you want to display each color or style with its own specific mockup. But to keep things simple in this quickstart guide, we'll apply all variants to a single mockup group for now.
To explore more about mockups, visit [Products tutorial](/docs/products/products).
In this guide, we’ll walk you through creating two mockups (one for the front and one for the back of your product) within the default mockup group.
Click **New Mockup** to open the Mockup Creator and build a mockup for your product.
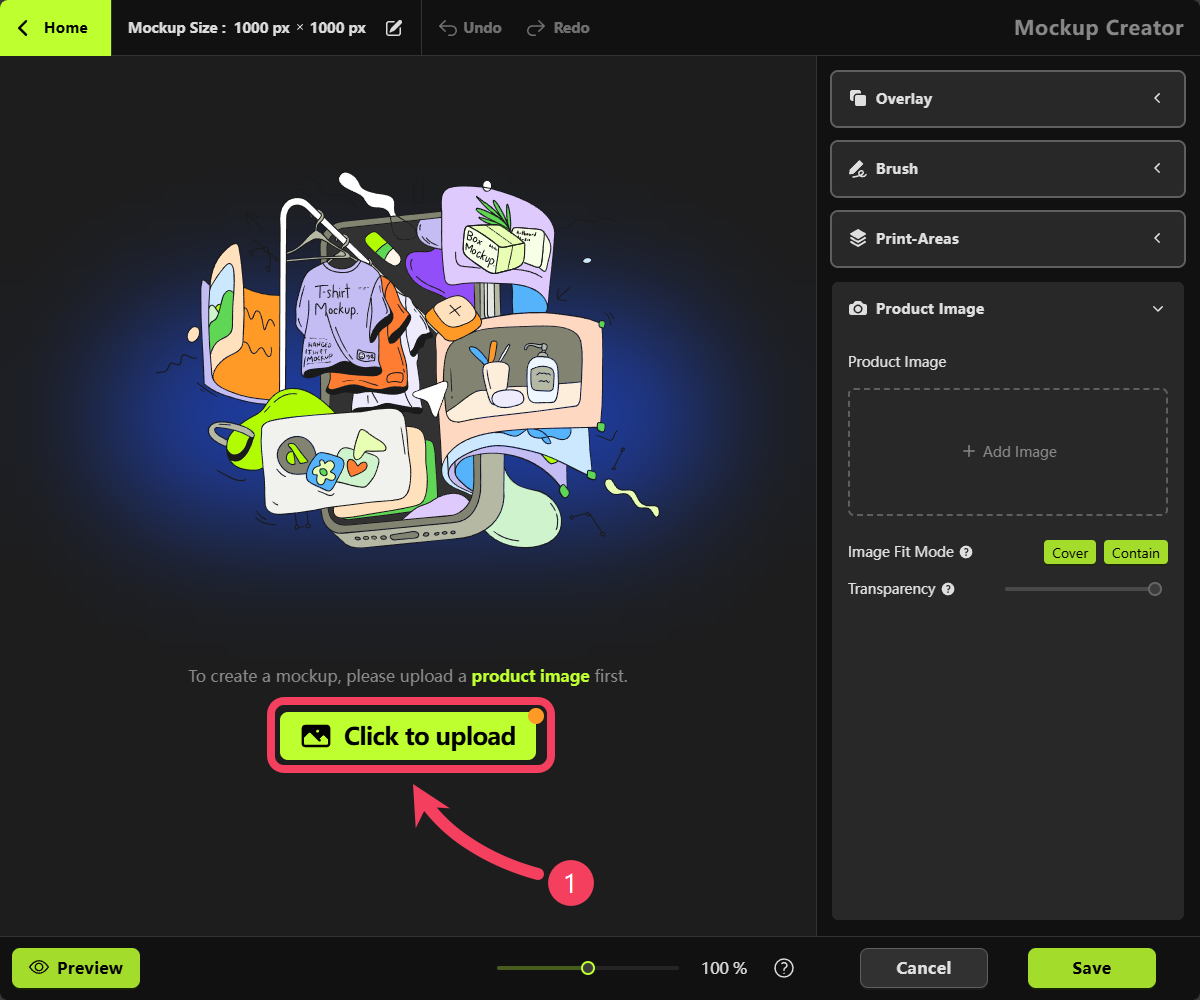
 To create a mockup, begin by clicking the button shown in the image below to upload a product photo.
 Select or upload a front-facing image of the product.
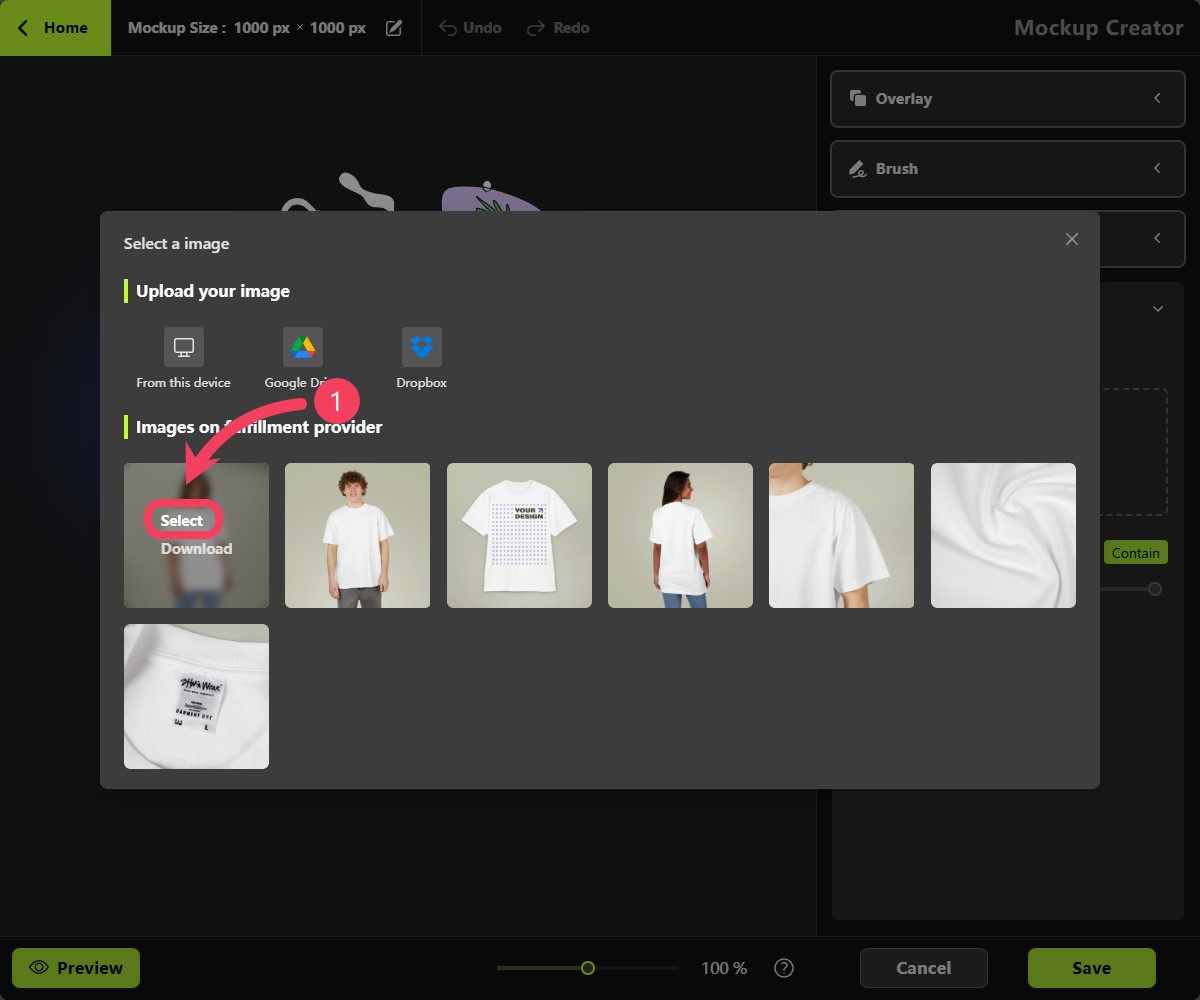 In addition to using product images provided by your fulfillment platform, you also have the option to upload your own product photos. However, for this Quickstart guide, we’ll begin by using the default images from the fulfillment platform.
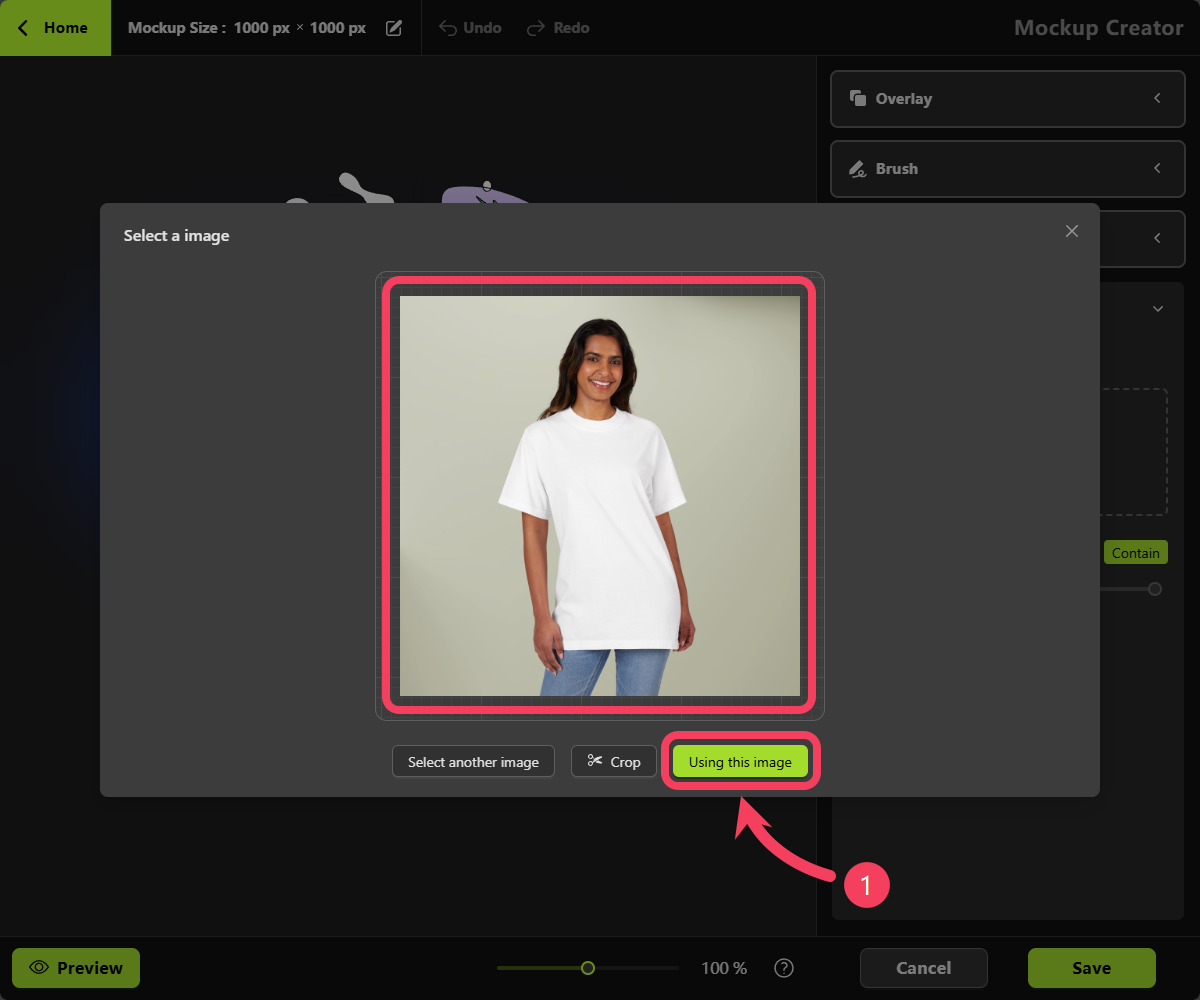
Click the **Using this image** button.
In addition to using product images provided by your fulfillment platform, you also have the option to upload your own product photos. However, for this Quickstart guide, we’ll begin by using the default images from the fulfillment platform.
Click the **Using this image** button.
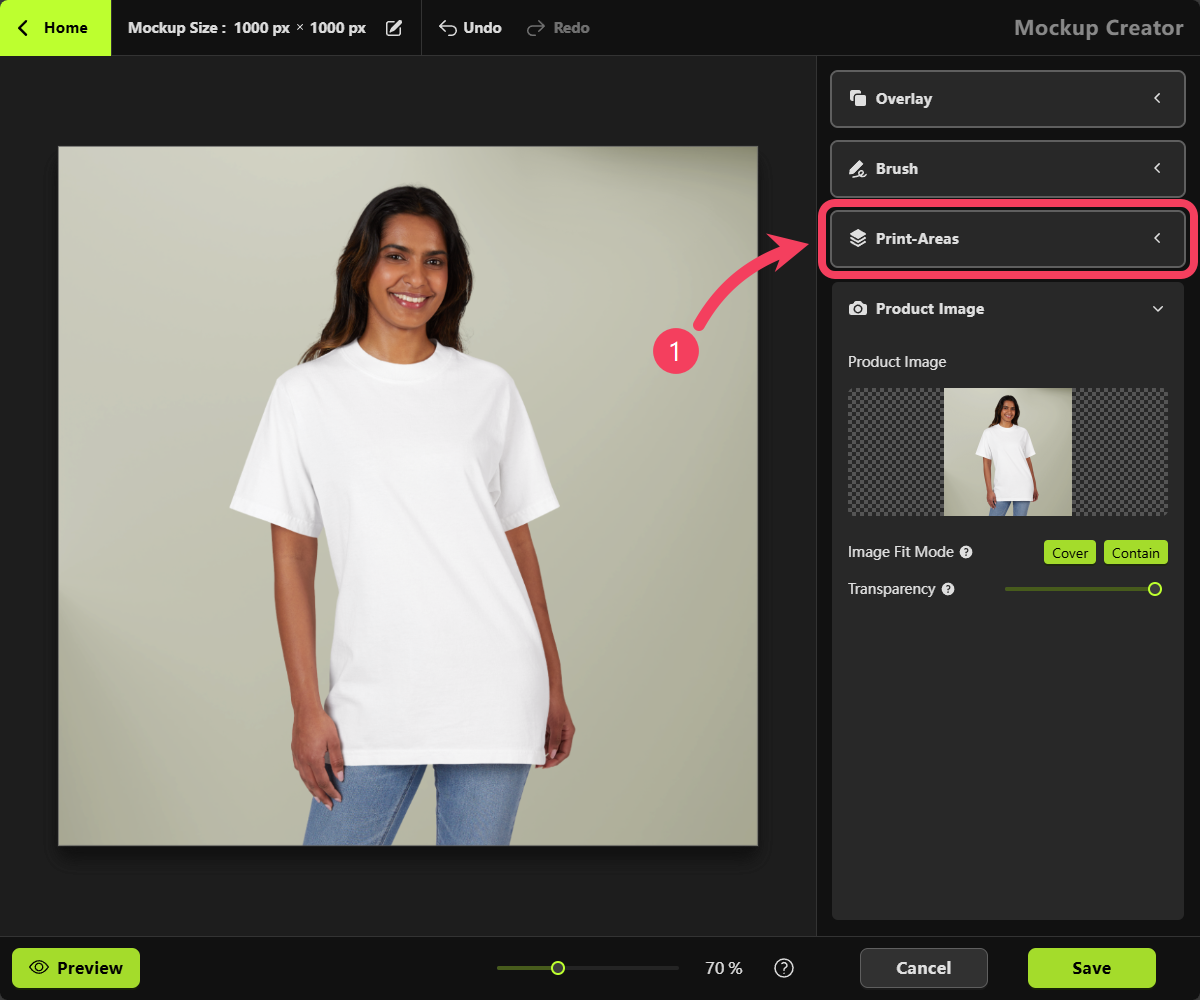
 Click on the **Print Areas** section in the right-hand panel.
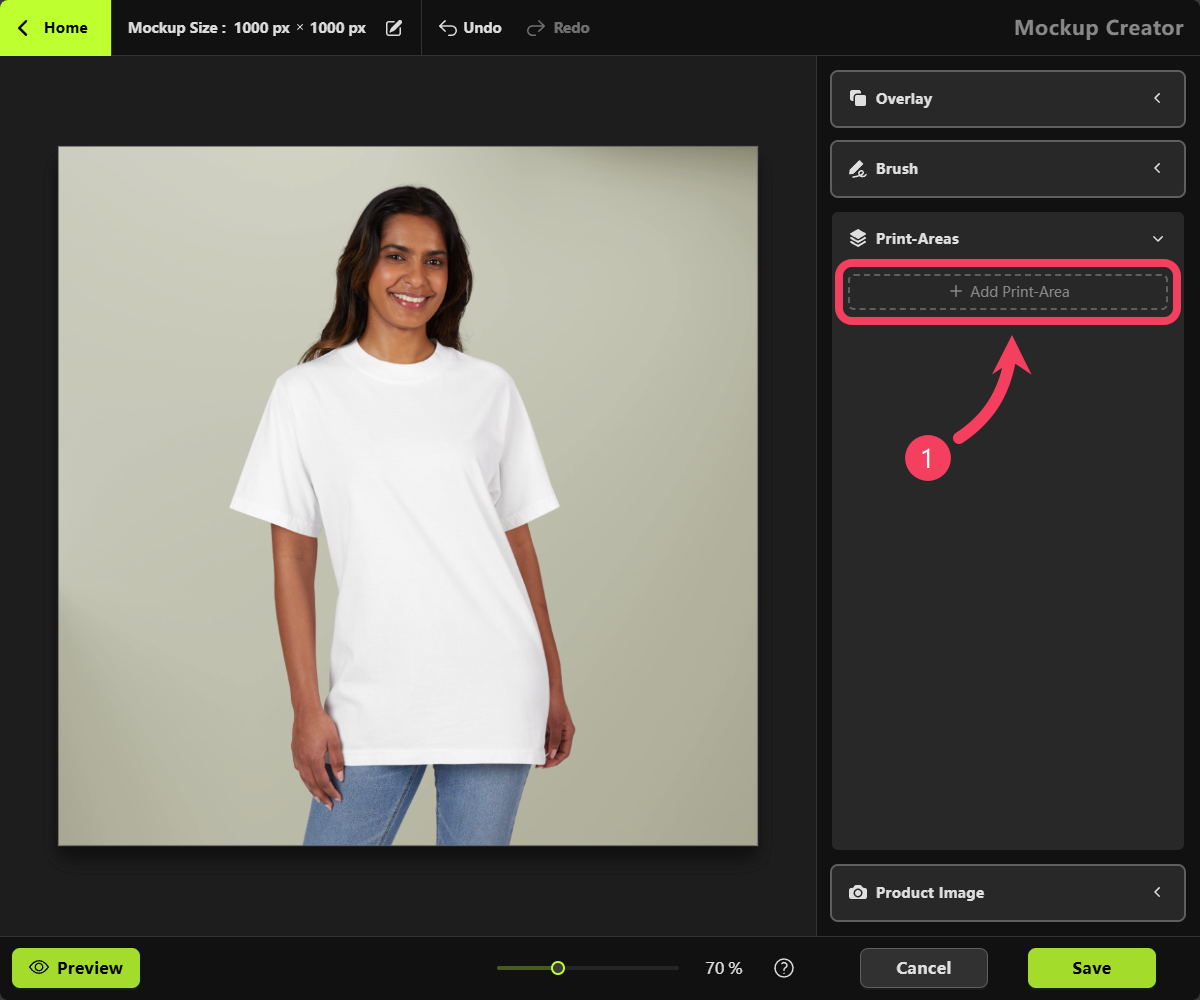
 Click the **Add Print-Area**.
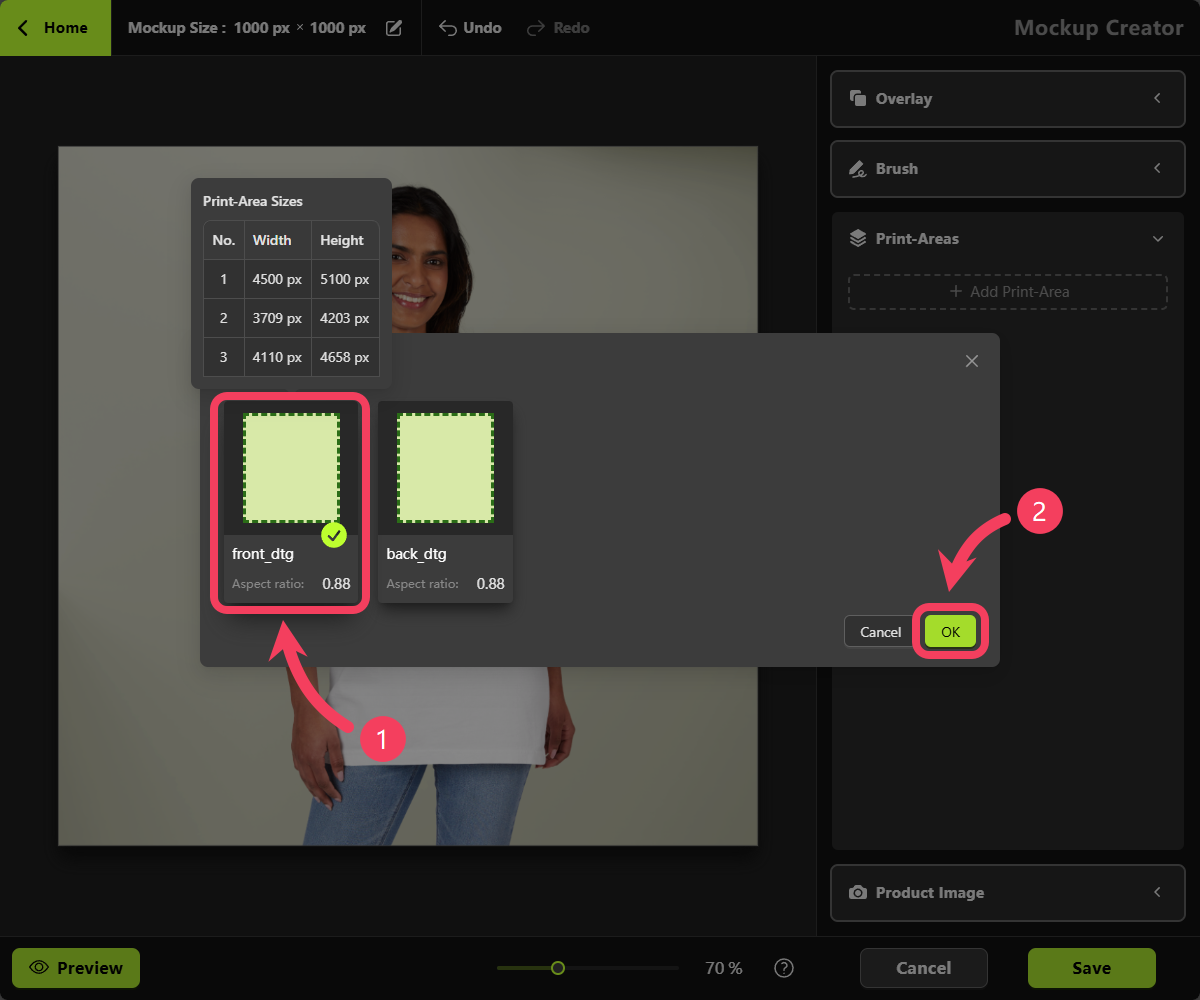
 1. Select the appropriate front-facing Print Area based on its name, and make note of its aspect ratio.
2. Click **OK** to add this Print Area to your mockup.
1. Select the appropriate front-facing Print Area based on its name, and make note of its aspect ratio.
2. Click **OK** to add this Print Area to your mockup.
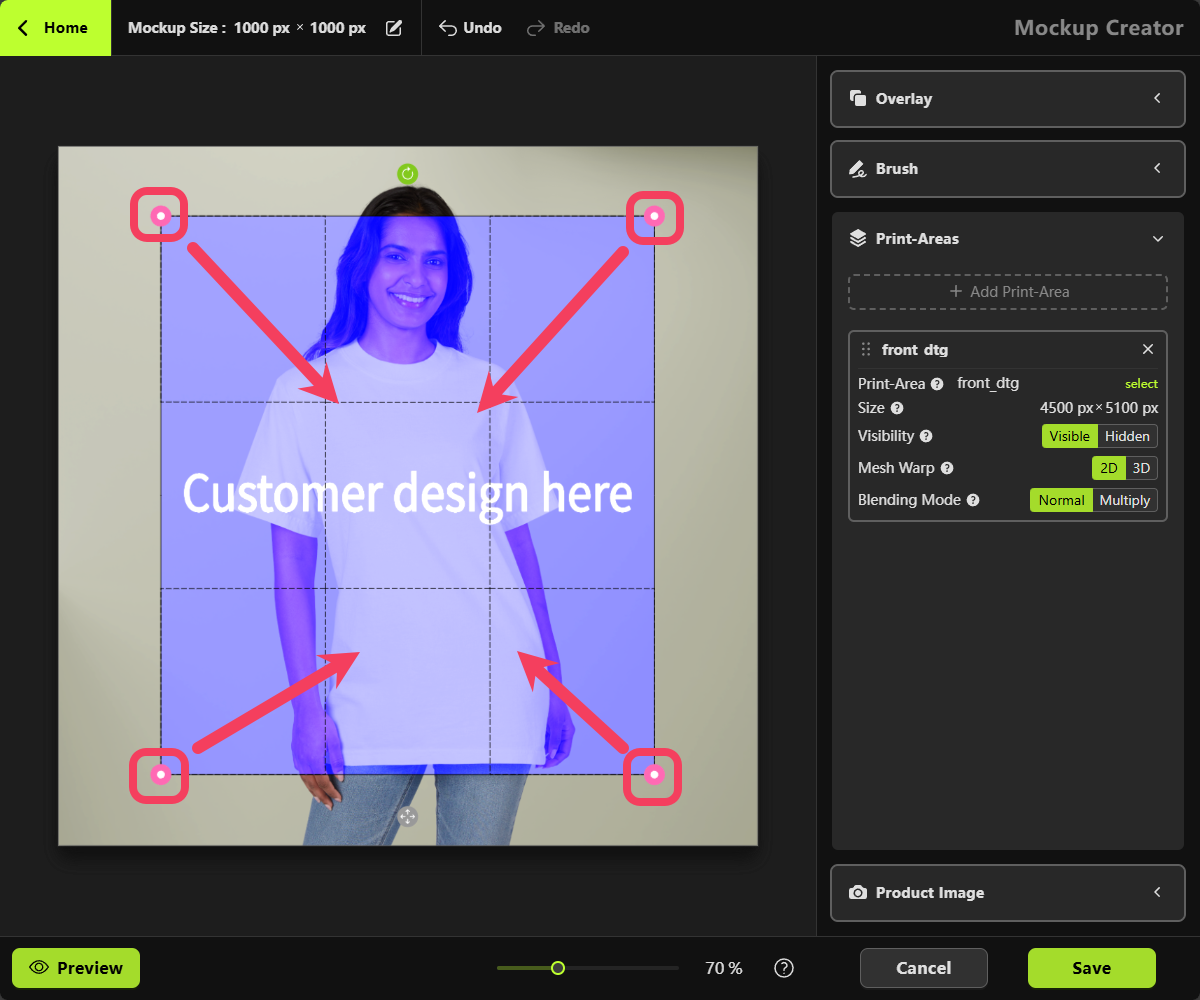
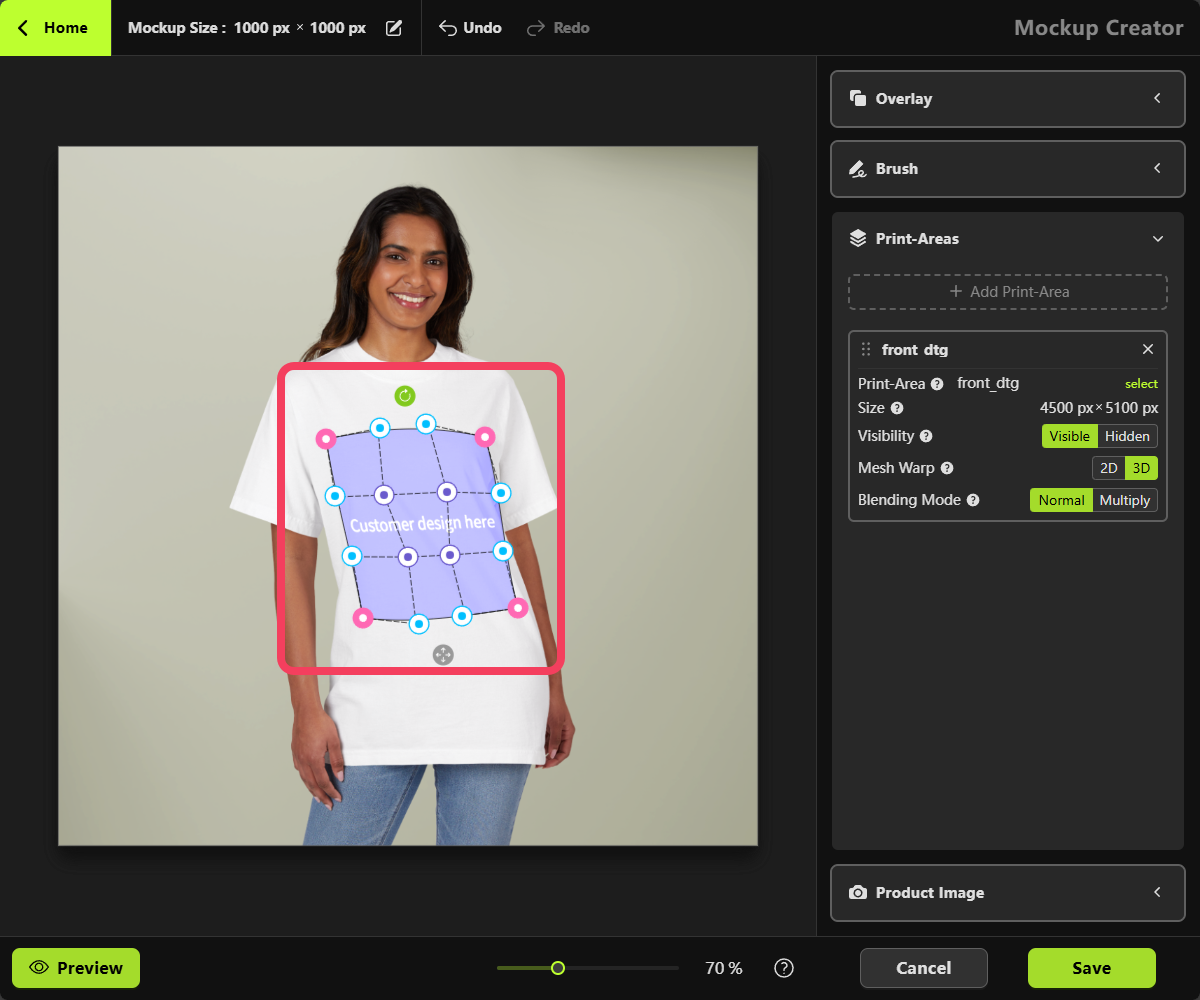
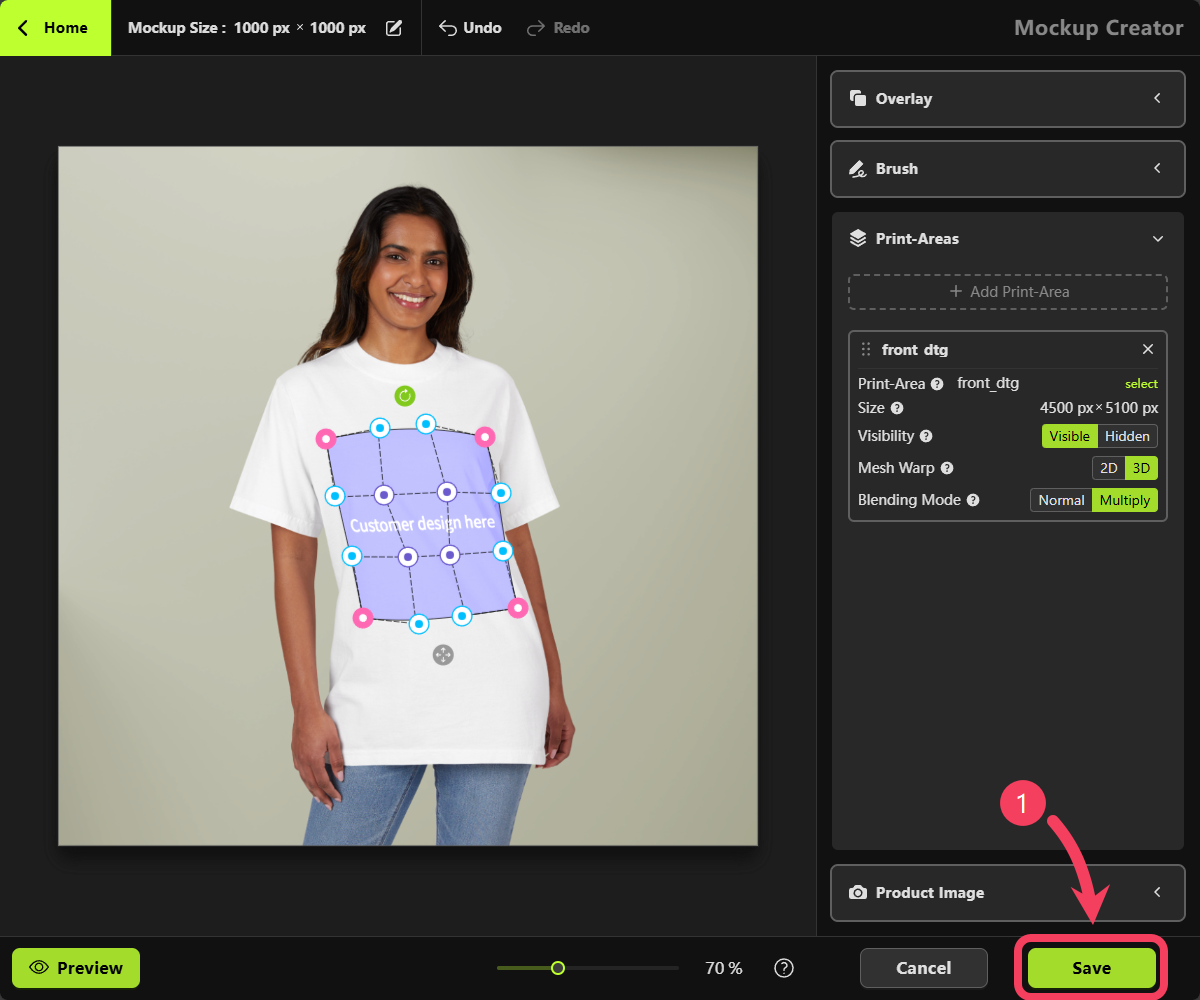
 Drag each of the 4 corners of the Print Area to the appropriate position on the product image.
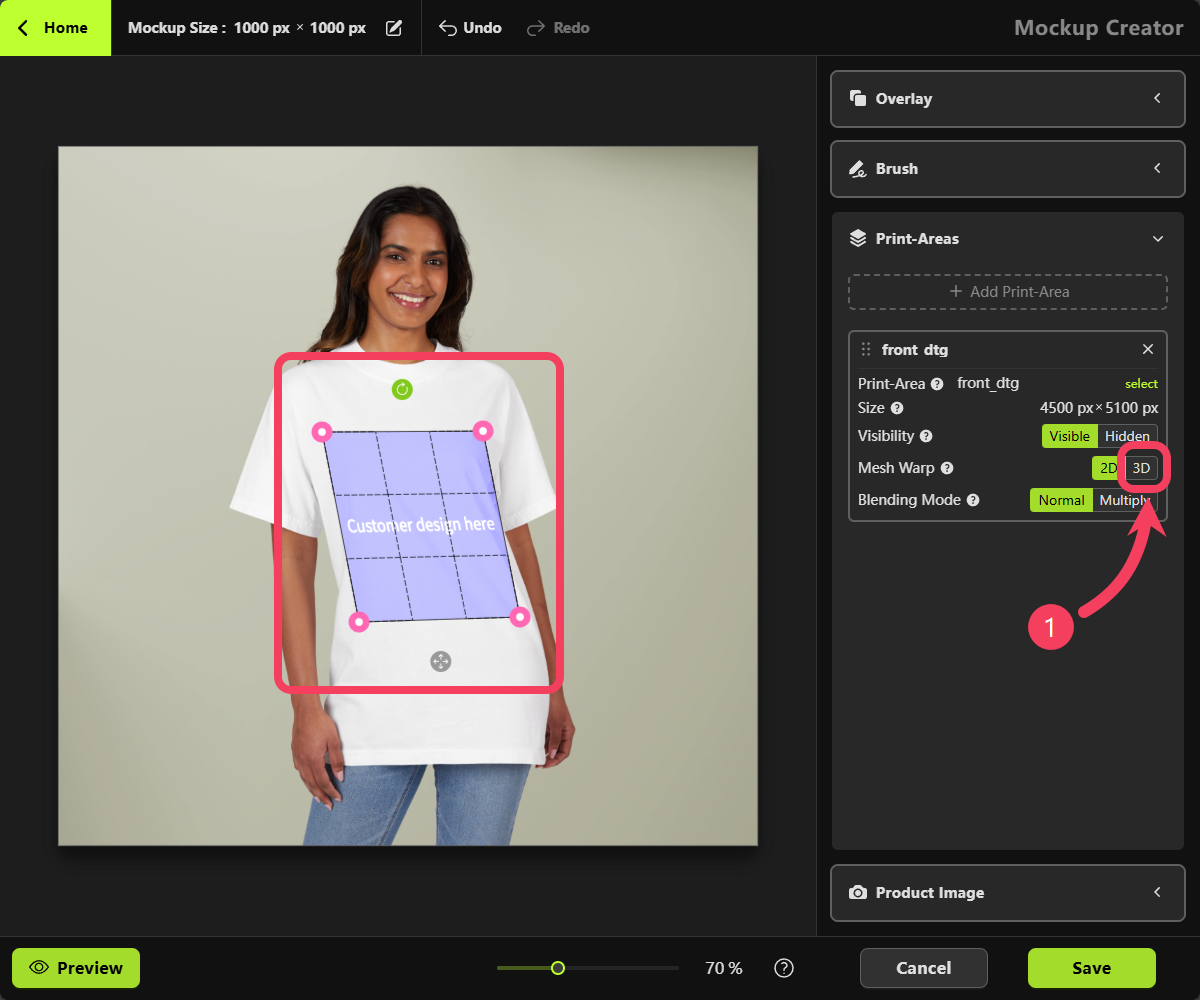
 In the Print Areas section of the right-hand panel, change **Mesh Warp** from **2D** to **3D**.
 In `3D Mesh Warp` mode, the Print Area’s 4 corner points will be replaced with a 4x4 grid, giving you 16 adjustable control points.
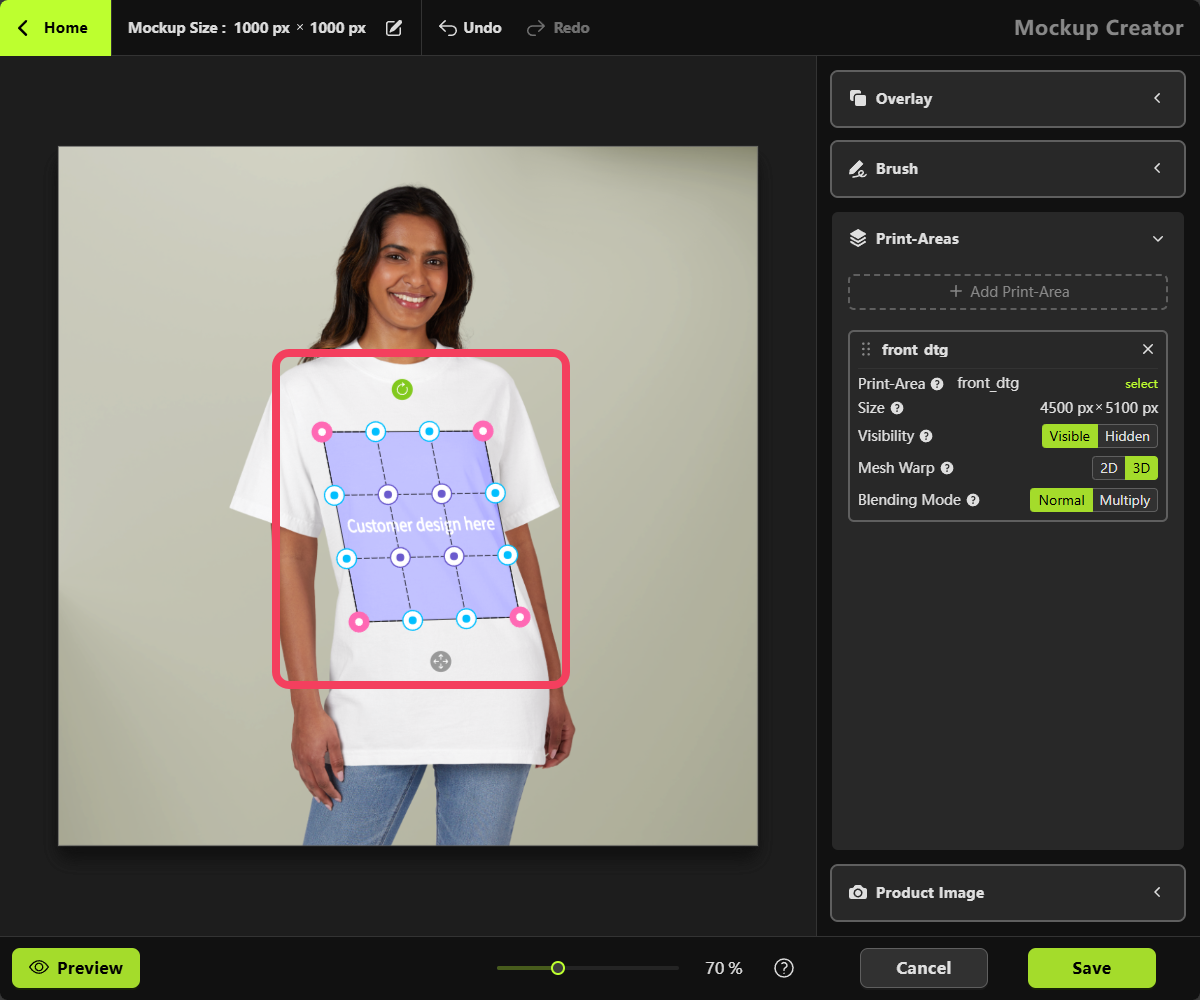 Using the Print Area’s aspect ratio as a guide, adjust the control points to reshape the Print Area. This helps create a more realistic and natural-looking product mockup.
 If your product is `White`, we recommend changing the **Blending Mode** from **Normal** to **Multiply** in the Print Areas section on the right-hand panel. This will help enhance the mockup’s visual appearance for a more realistic effect.
For the best results, we recommend setting the Print-Area's `Blending Mode` to `Multiply` only on **light-colored products**.
If your product is `White`, we recommend changing the **Blending Mode** from **Normal** to **Multiply** in the Print Areas section on the right-hand panel. This will help enhance the mockup’s visual appearance for a more realistic effect.
For the best results, we recommend setting the Print-Area's `Blending Mode` to `Multiply` only on **light-colored products**.
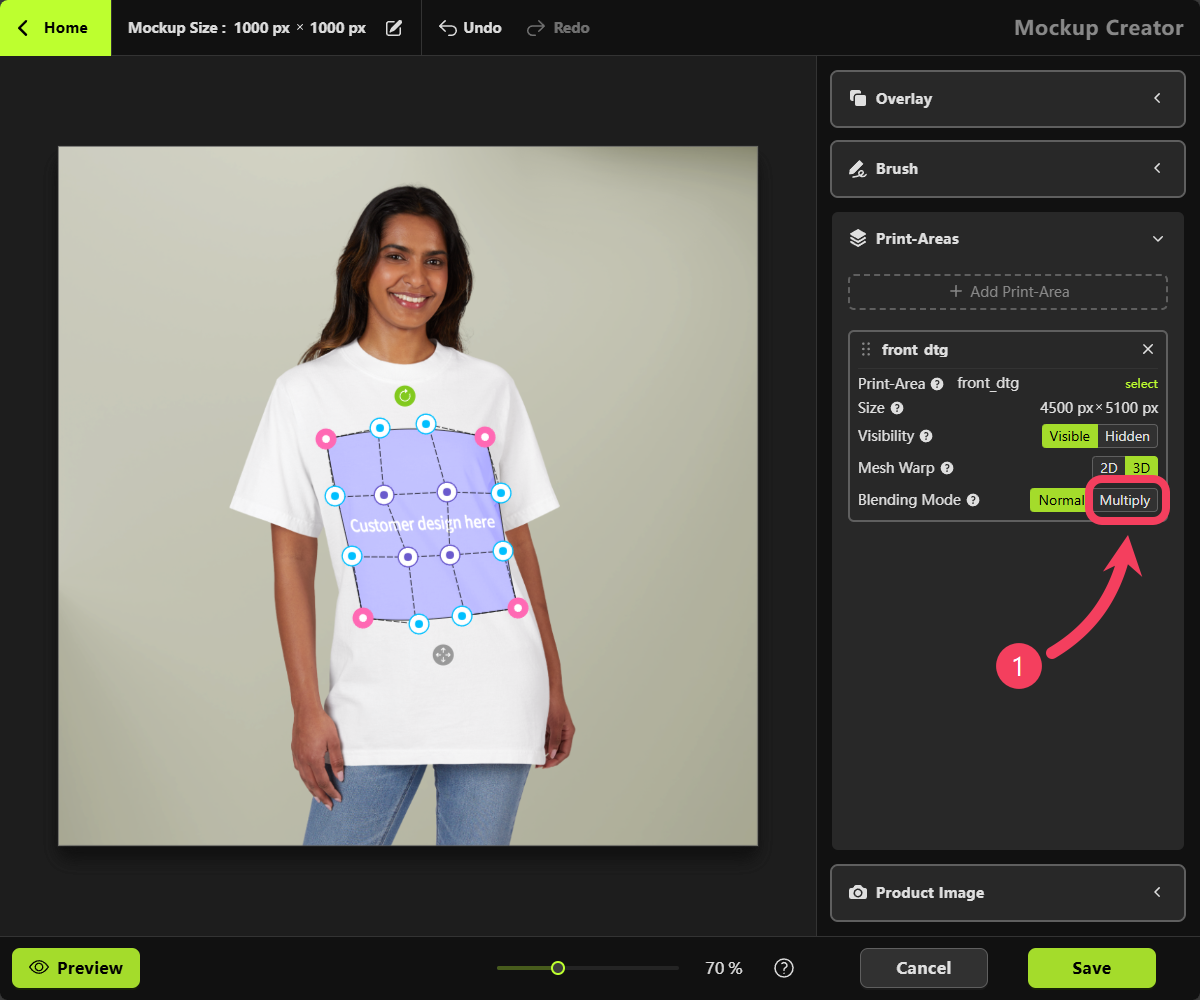 The `Multiply blend mode` creates darker colors by multiplying the base color with the blend color. In this mode, white areas in the blend layer become completely transparent and don’t affect the layers beneath, while black areas remain fully visible. It always darkens the image and never makes it lighter.
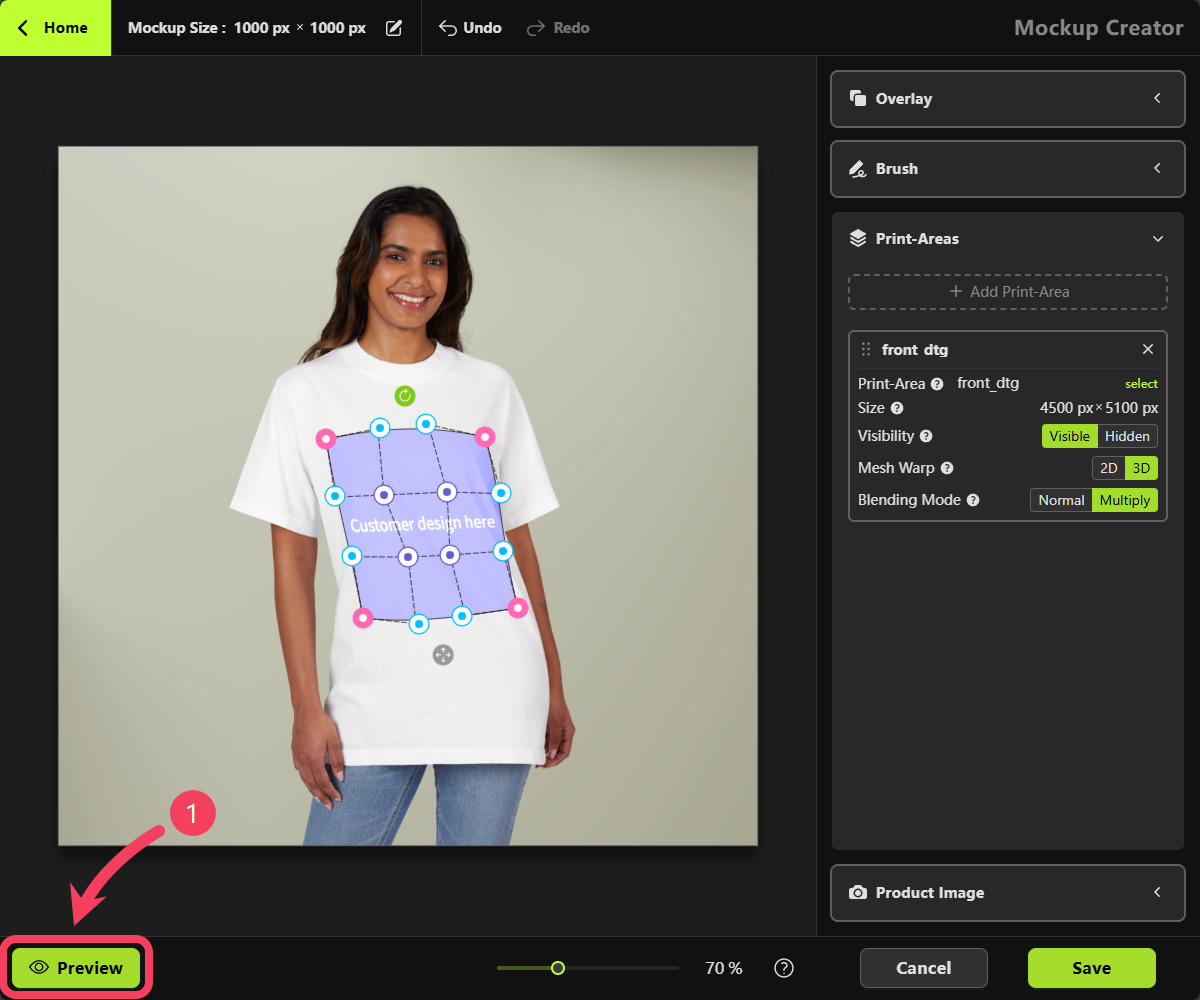
Click the **Preview** button to open the Personalizer and preview the current mockup.
The `Multiply blend mode` creates darker colors by multiplying the base color with the blend color. In this mode, white areas in the blend layer become completely transparent and don’t affect the layers beneath, while black areas remain fully visible. It always darkens the image and never makes it lighter.
Click the **Preview** button to open the Personalizer and preview the current mockup.
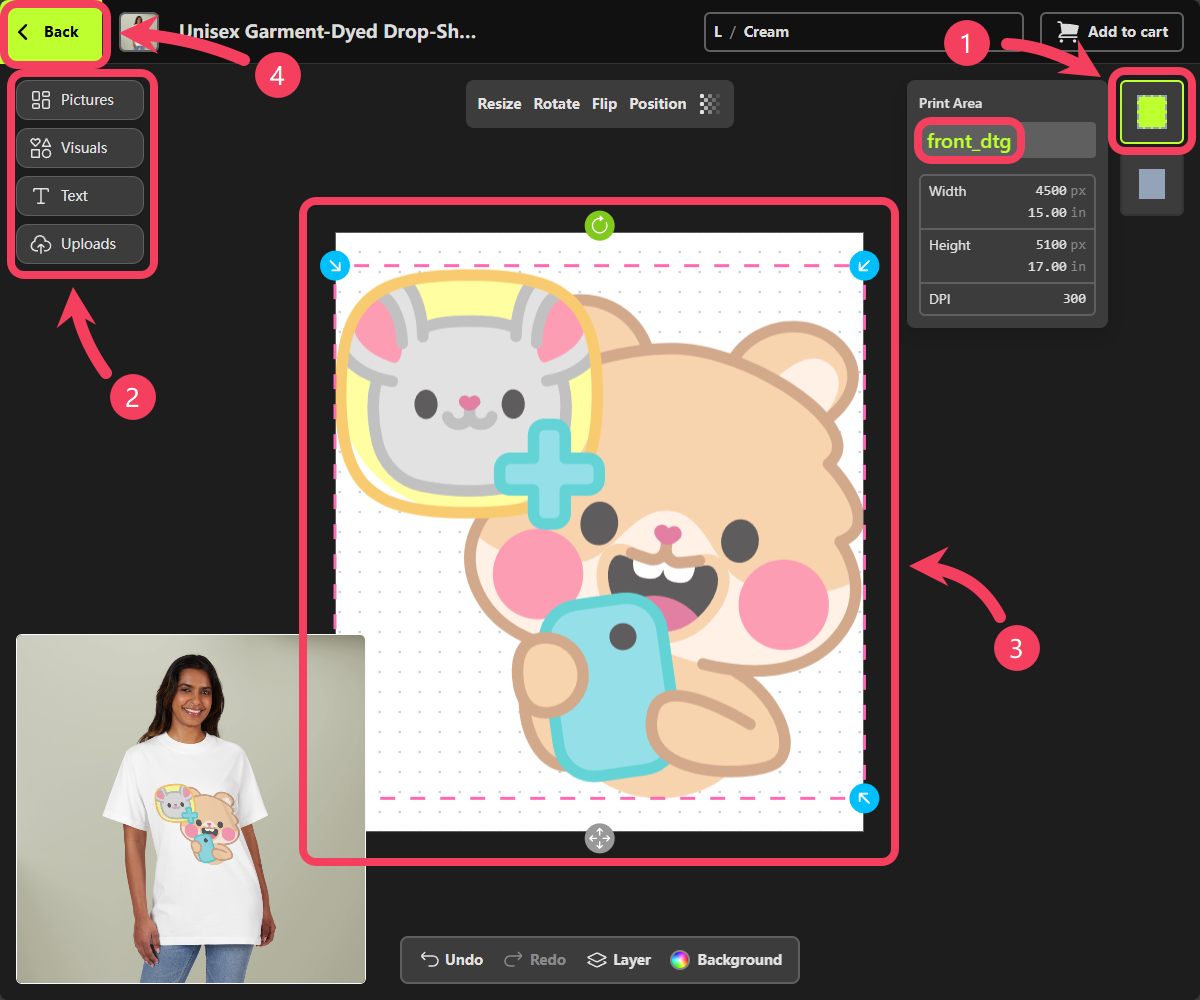
 Test your product in the Personalizer:
1. In the Print Areas panel on the right, select the print area labeled `front_dtg` to start designing.
2. Use the Elements panel on the left to add a design element (such as an image or text) to the canvas.
3. Adjust your design on the canvas and review the product preview in the bottom-left corner to see if it looks the way you want.
4. Click **Back** to return to the Mockup Creator.
Test your product in the Personalizer:
1. In the Print Areas panel on the right, select the print area labeled `front_dtg` to start designing.
2. Use the Elements panel on the left to add a design element (such as an image or text) to the canvas.
3. Adjust your design on the canvas and review the product preview in the bottom-left corner to see if it looks the way you want.
4. Click **Back** to return to the Mockup Creator.
 If you’re happy with how your mockup looks, click the **Save** button to save your mockup.
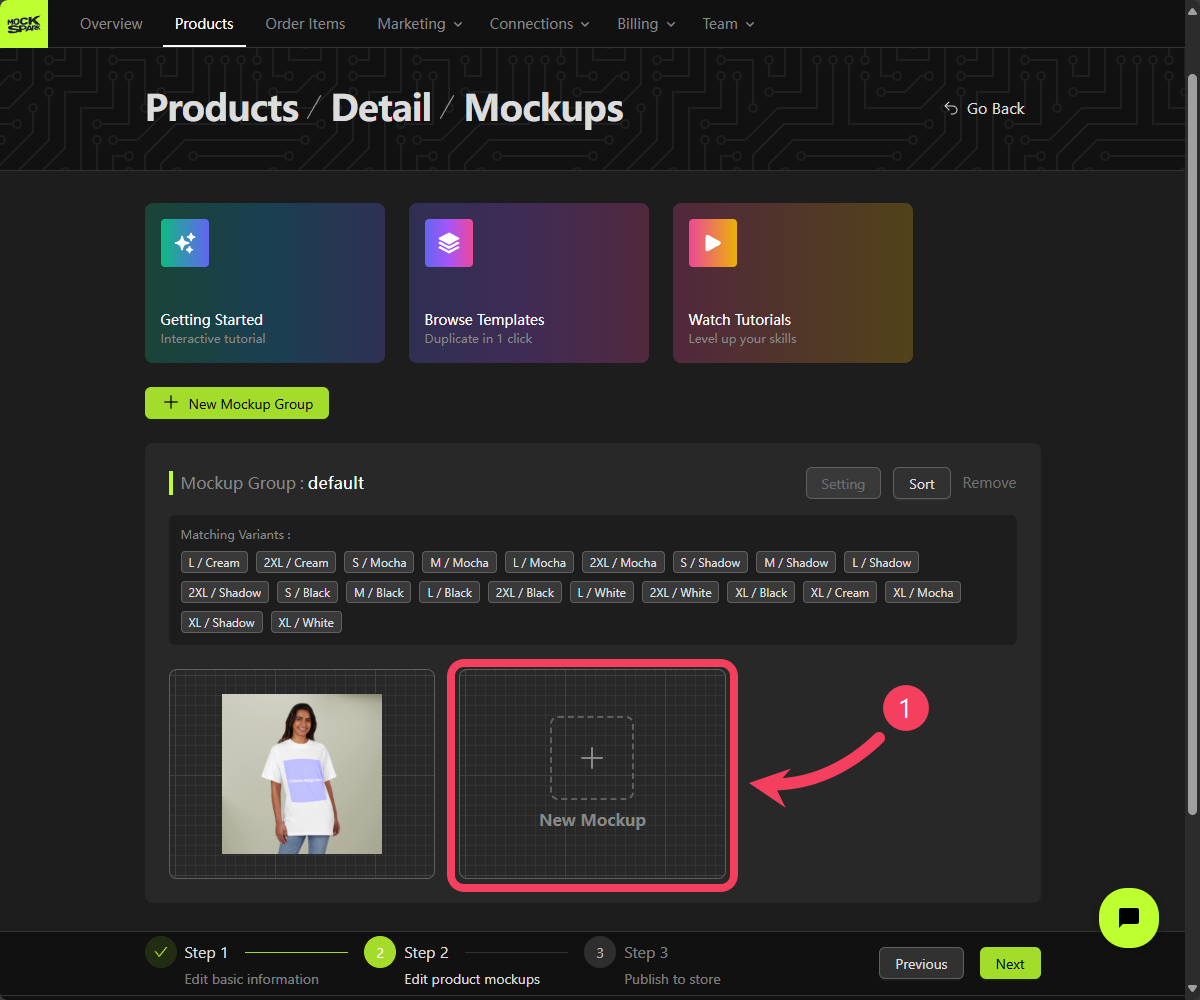
 We’ve already created a Print Area for the front of the product, now let’s set one up for the back.
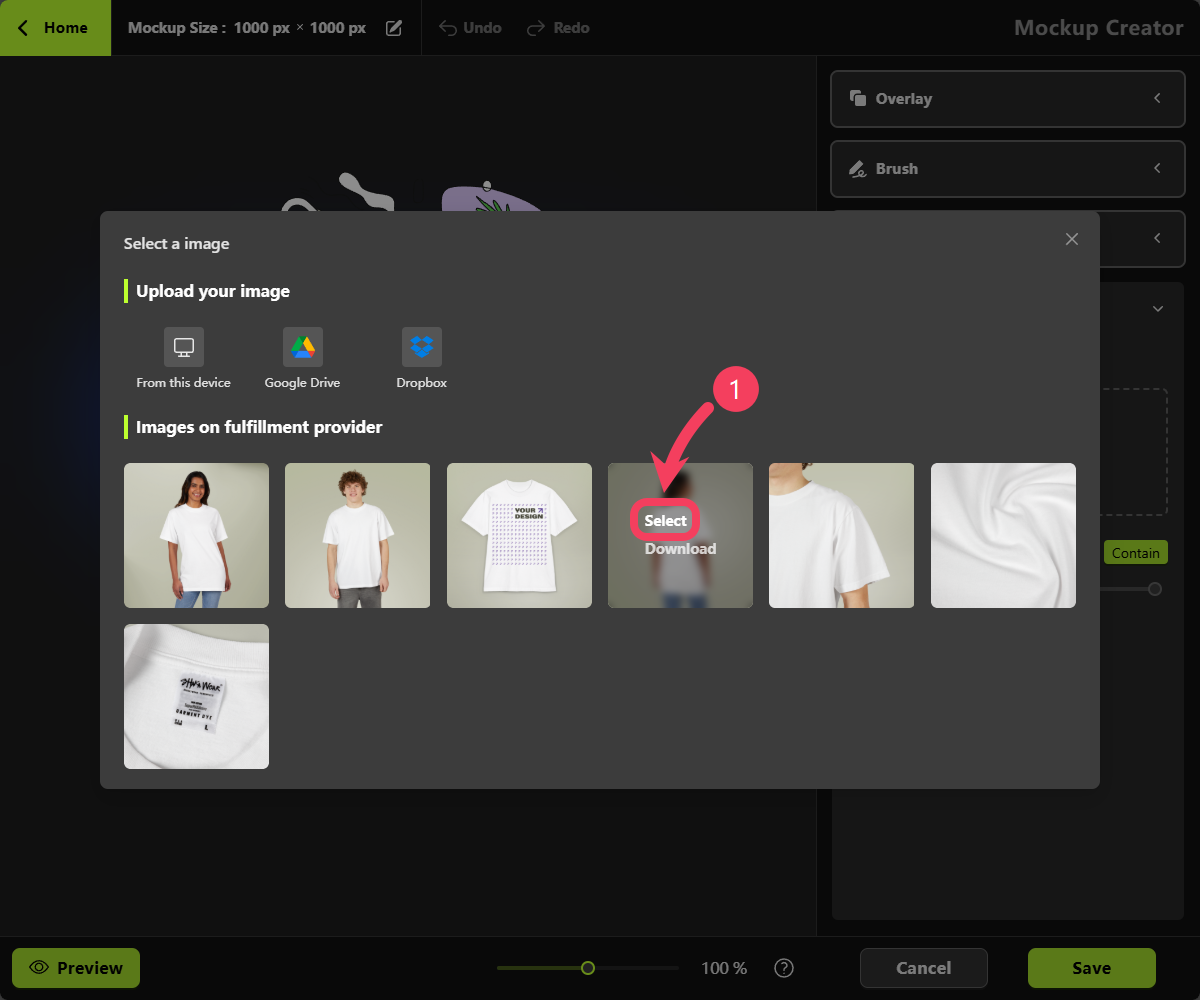
 Select or upload a back-facing image of the product.
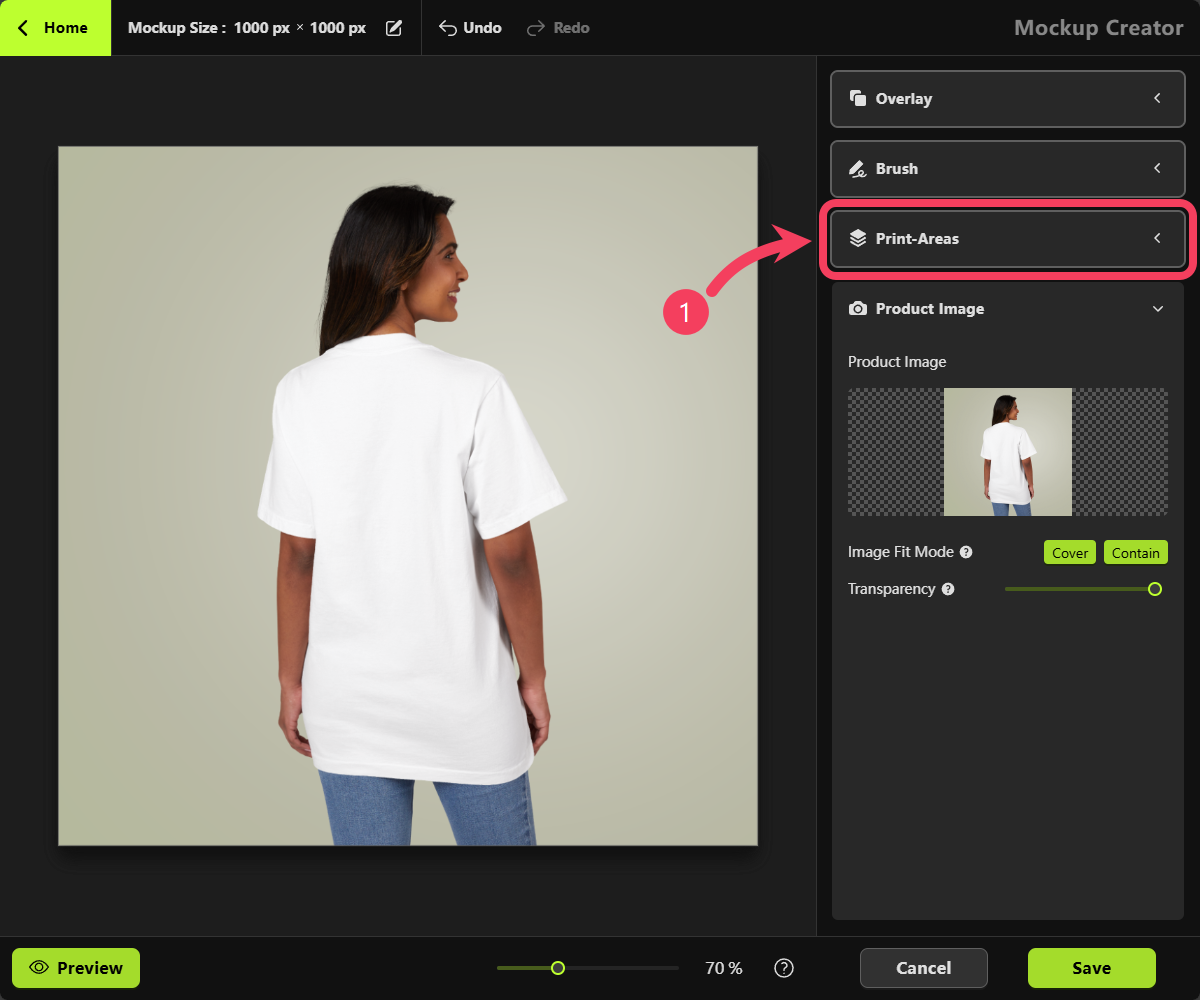
 Click the **Add Print-Area**
 1. Select the appropriate back-facing Print Area based on its name, and take note of its aspect ratio.
2. Click **OK** to add this Print Area to your mockup.
1. Select the appropriate back-facing Print Area based on its name, and take note of its aspect ratio.
2. Click **OK** to add this Print Area to your mockup.
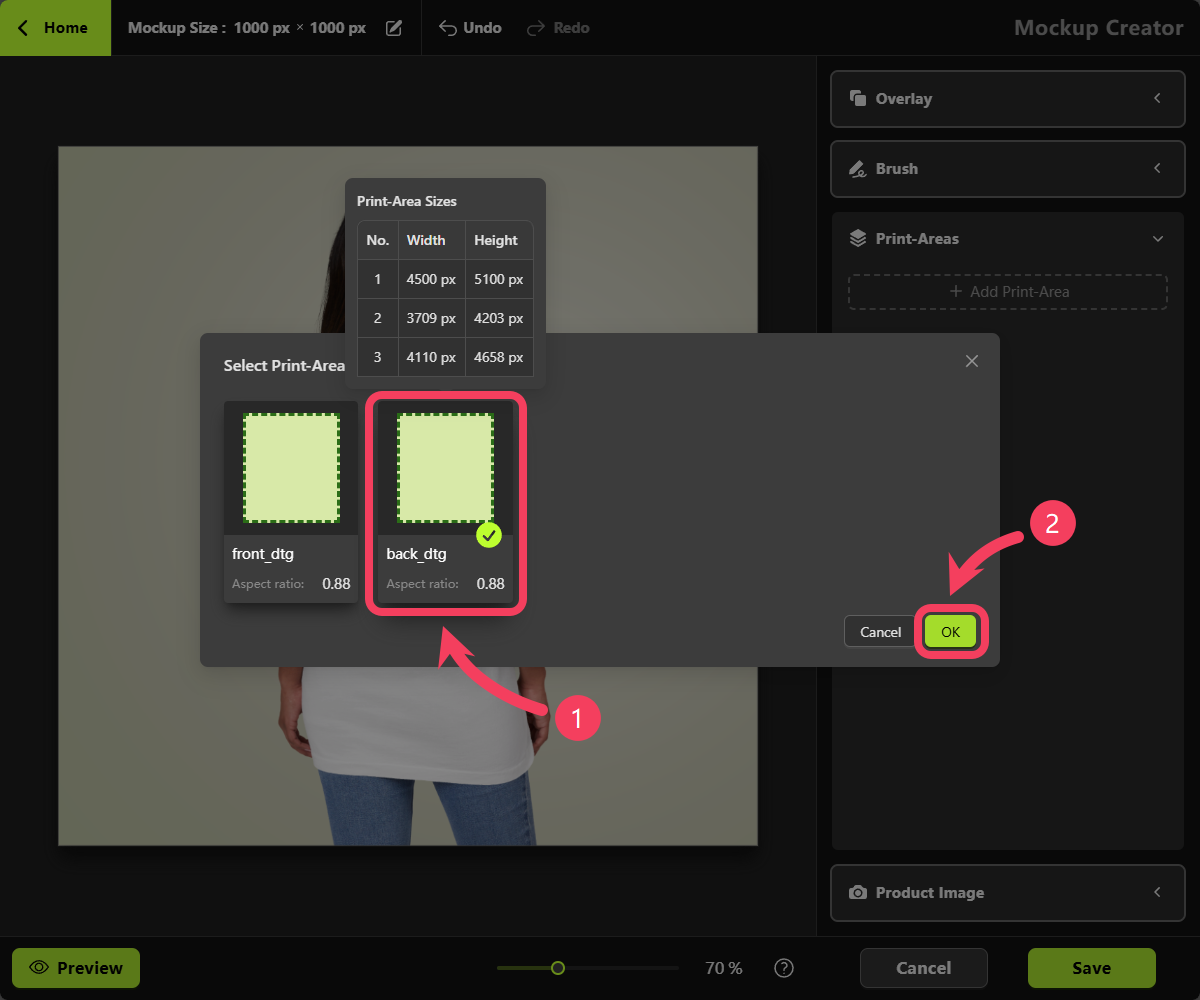 Using the same steps as before, create a mockup that showcases the back of the product.
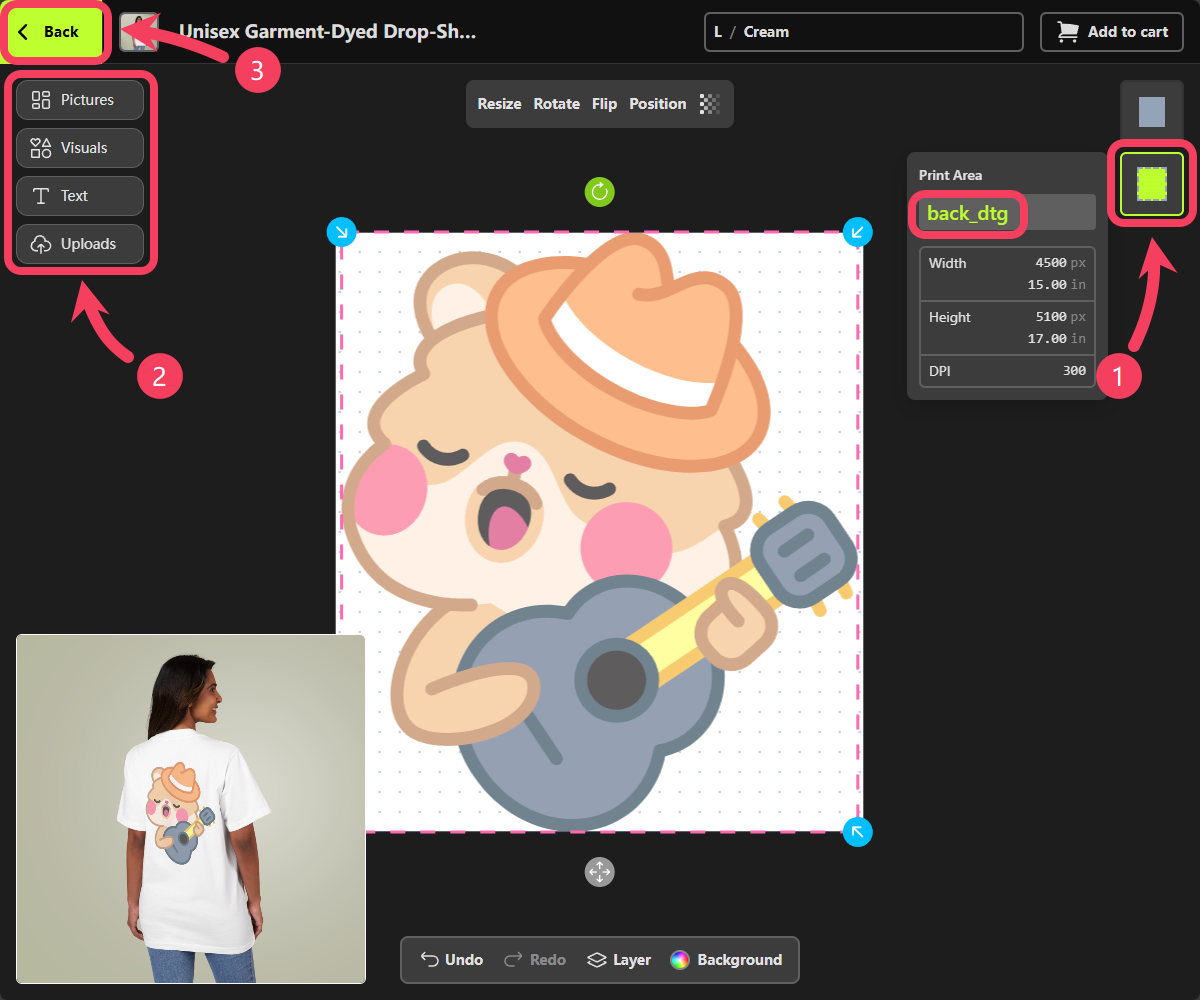
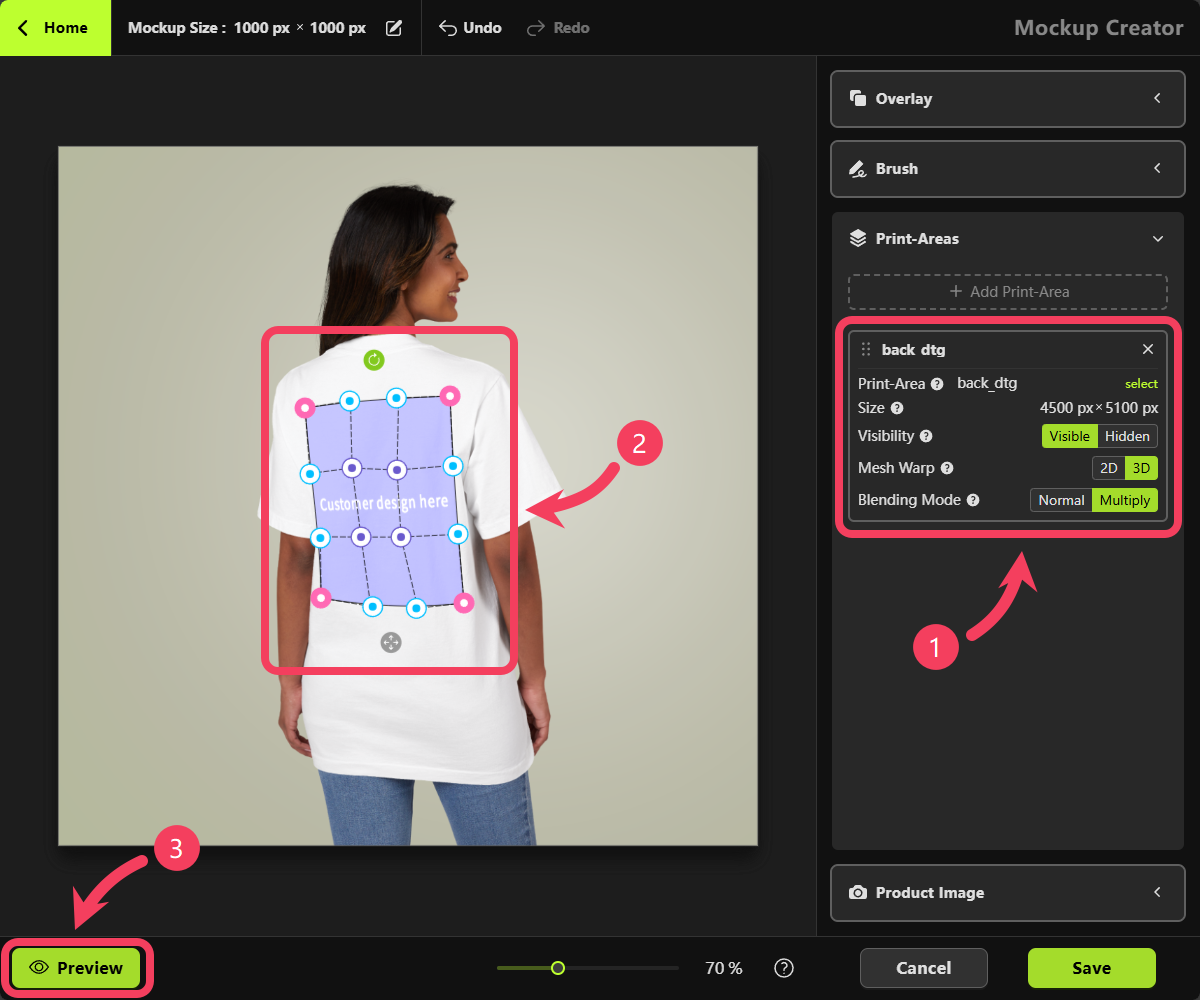 Test your product in the Personalizer.
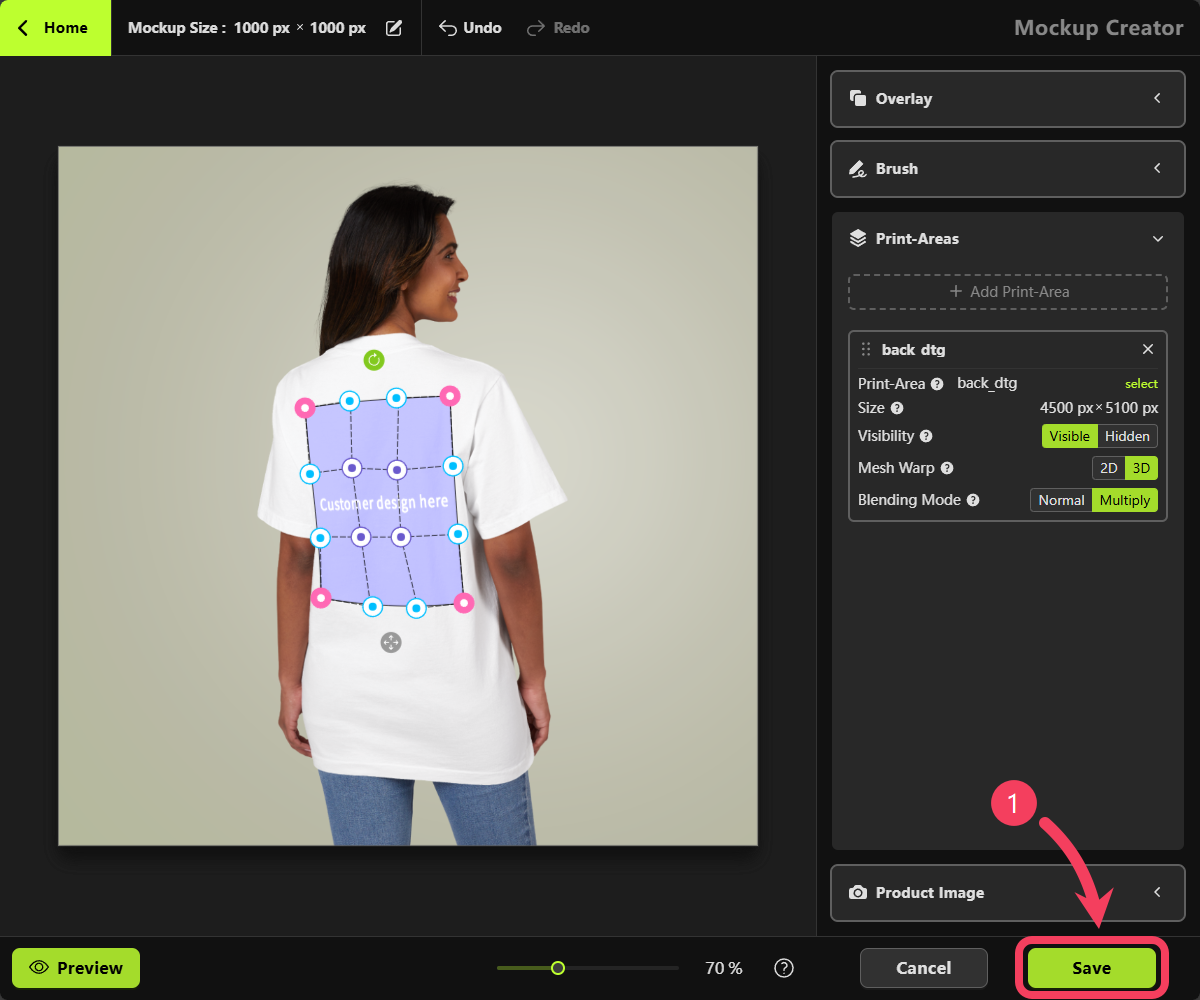
 If you’re happy with how your mockup looks, click the **Save** button to save your mockup.
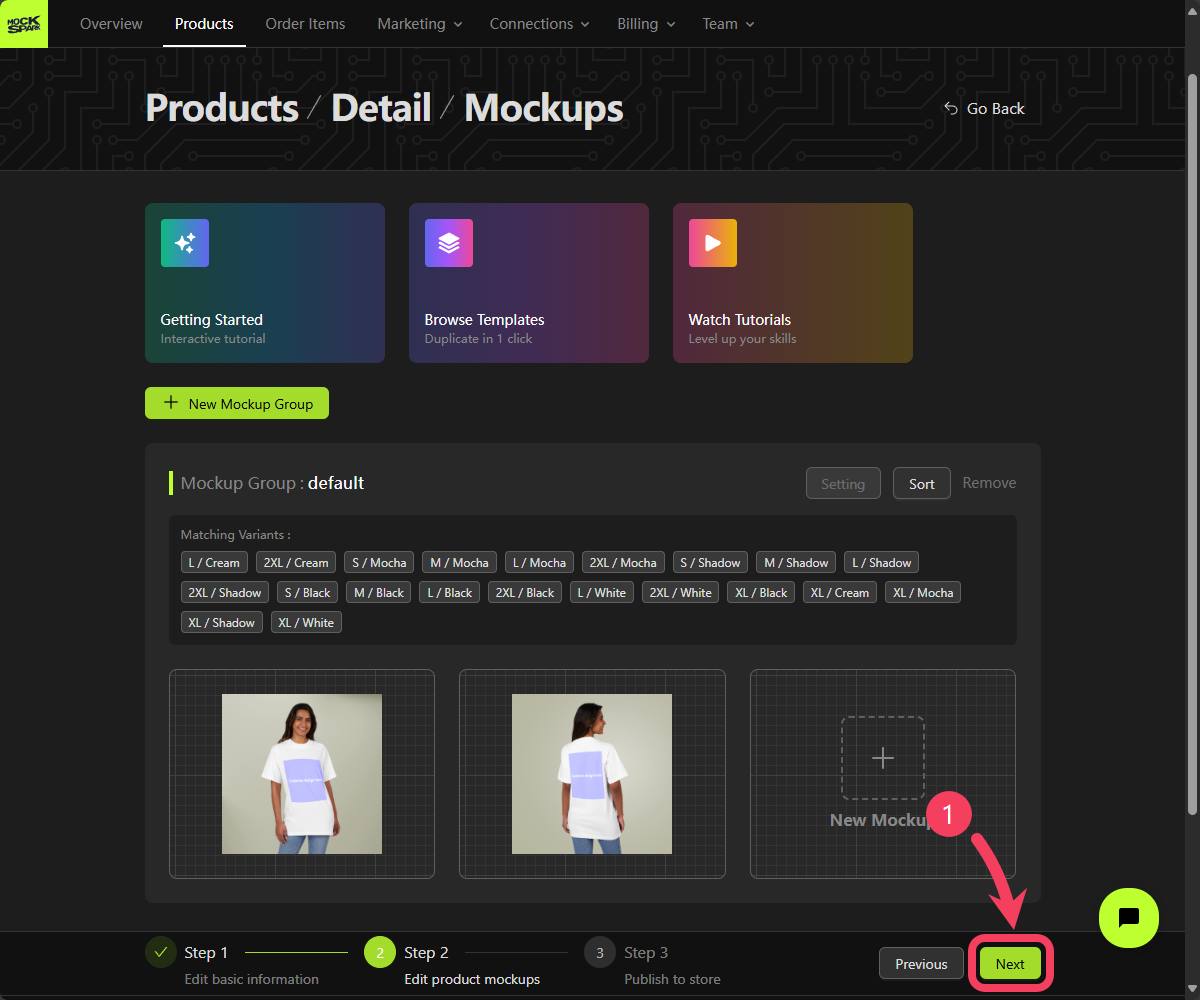
 After creating mockups for your product, click the **Next** button to save your work and continue.
 ### Step 3: Publish Your Product
You can edit settings such as the product **URL handle**, **Store currency**, and **Weight unit**:
1. `URL Handle`: A unique, user-friendly text based on your product title. It's used to create the product’s web address in your online store.
2. `Store currency`: It's pulled directly from your Shopify store settings. To change the currency, simply update it in your Shopify Admin panel. For more details, visit: [Shopify Help Center | Changing your store currency](https://help.shopify.com/en/manual/payments/shopify-payments/store-currency/changing-your-store-currency)
3. `Weight unit`: The unit of weight used for this product.
### Step 3: Publish Your Product
You can edit settings such as the product **URL handle**, **Store currency**, and **Weight unit**:
1. `URL Handle`: A unique, user-friendly text based on your product title. It's used to create the product’s web address in your online store.
2. `Store currency`: It's pulled directly from your Shopify store settings. To change the currency, simply update it in your Shopify Admin panel. For more details, visit: [Shopify Help Center | Changing your store currency](https://help.shopify.com/en/manual/payments/shopify-payments/store-currency/changing-your-store-currency)
3. `Weight unit`: The unit of weight used for this product.
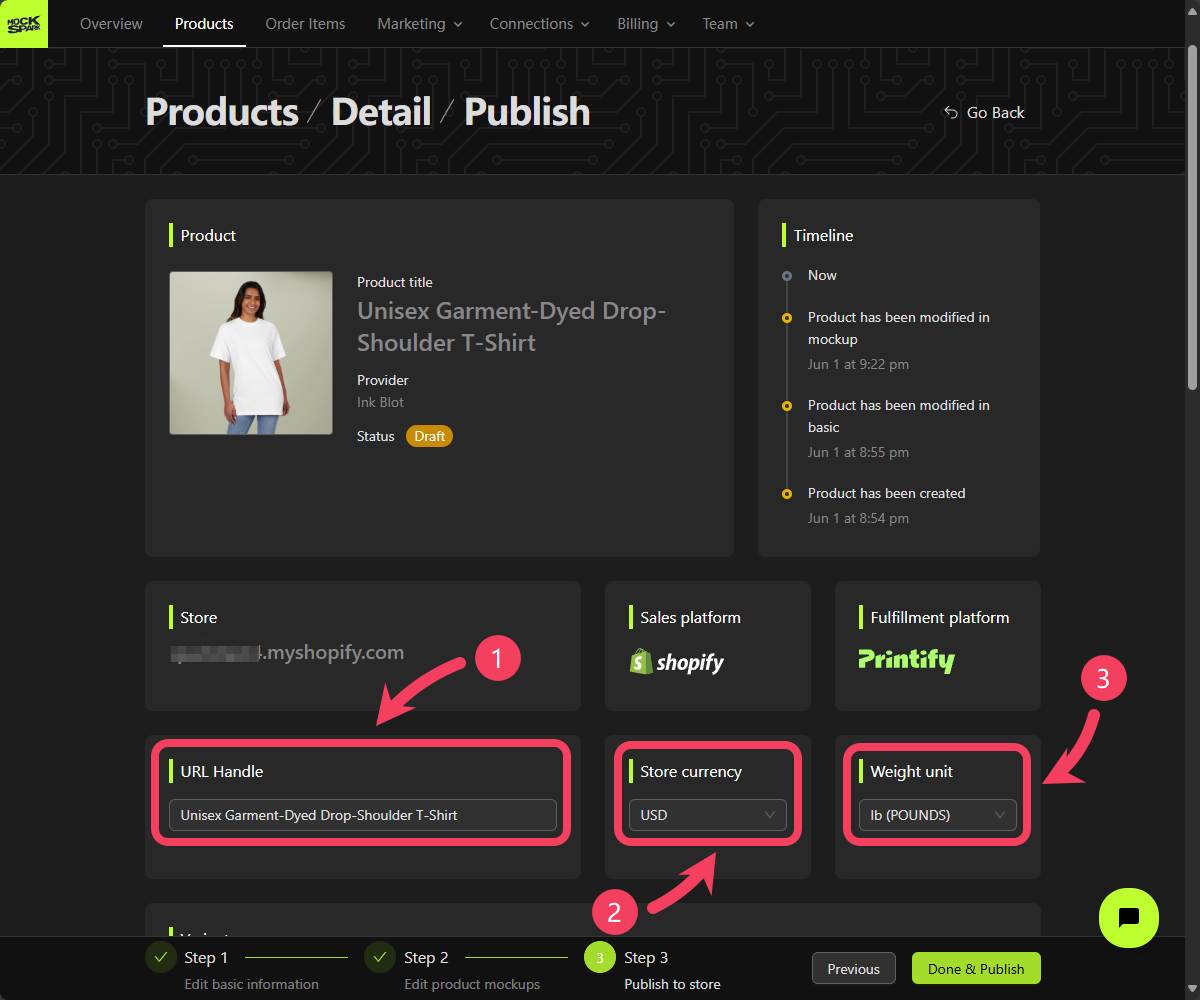 Shopify automatically formats your URL handle into a clean, SEO-friendly string containing only letters, hyphens (-), and numbers, but no spaces or special characters.
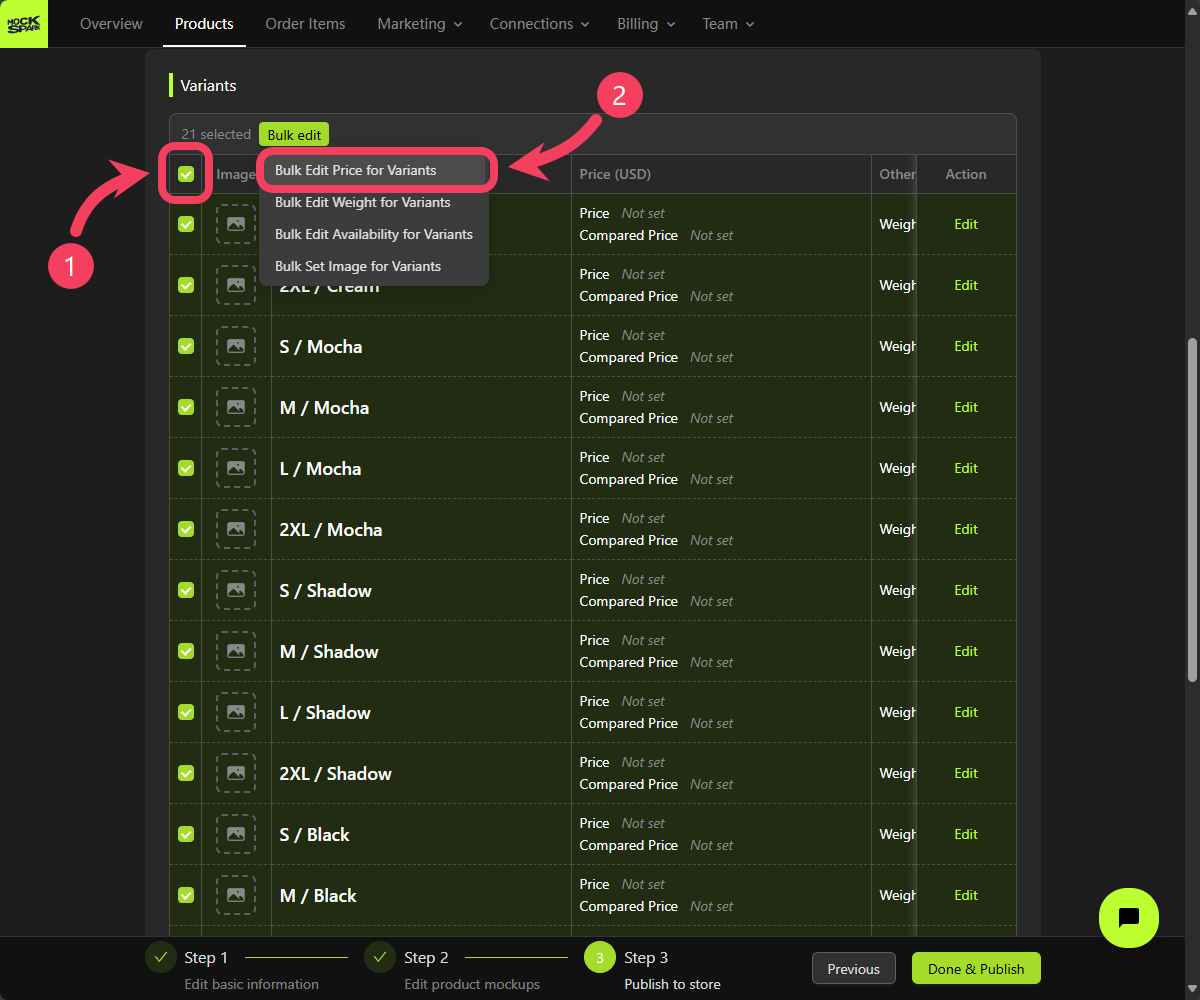
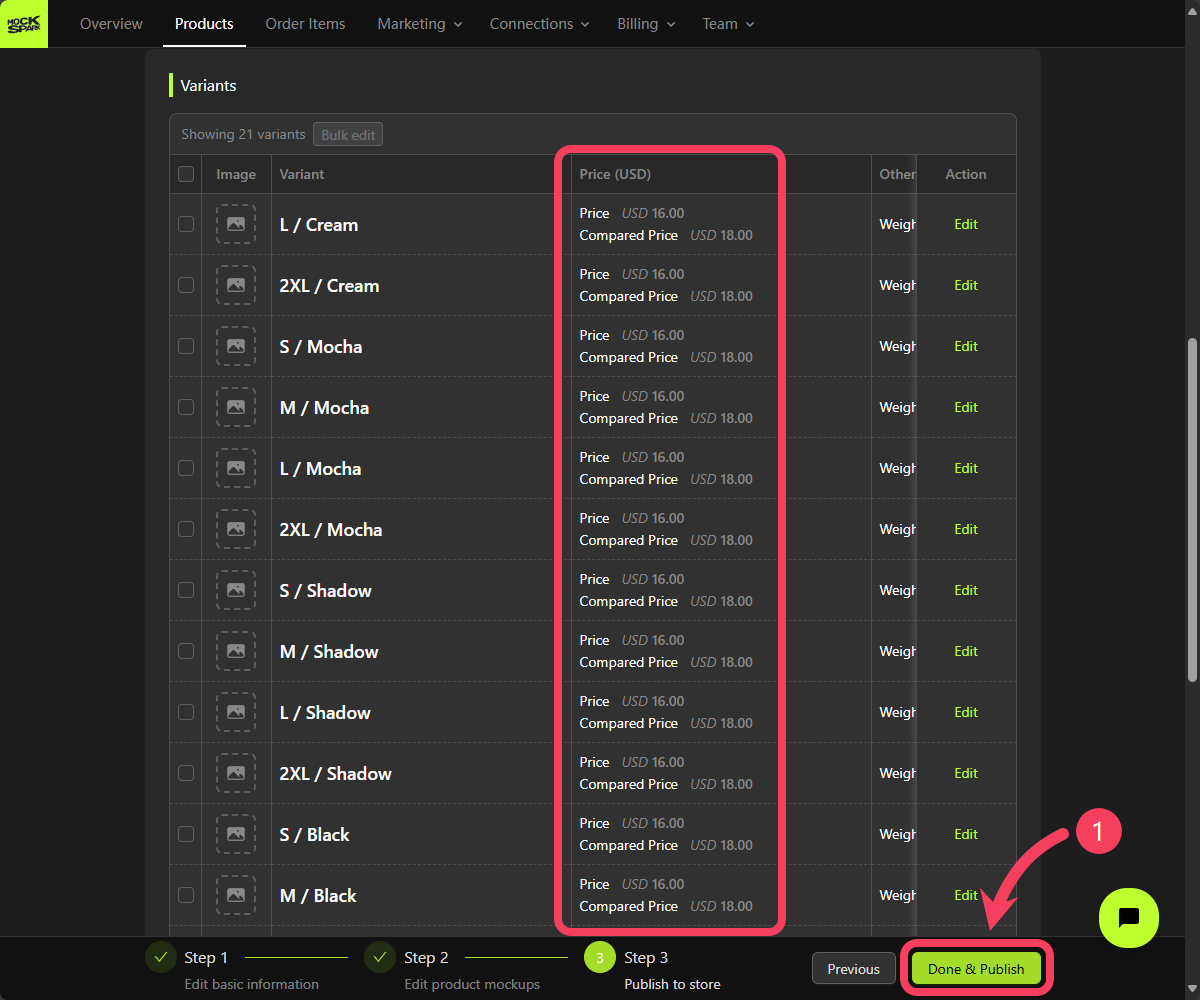
1. In the variants table, select all variants by checking the boxes.
2. Hover over the **Bulk edit** button and select **Bulk Edit Price for Variants** from the dropdown menu.
Shopify automatically formats your URL handle into a clean, SEO-friendly string containing only letters, hyphens (-), and numbers, but no spaces or special characters.
1. In the variants table, select all variants by checking the boxes.
2. Hover over the **Bulk edit** button and select **Bulk Edit Price for Variants** from the dropdown menu.
 Easily update prices for all variants in bulk.
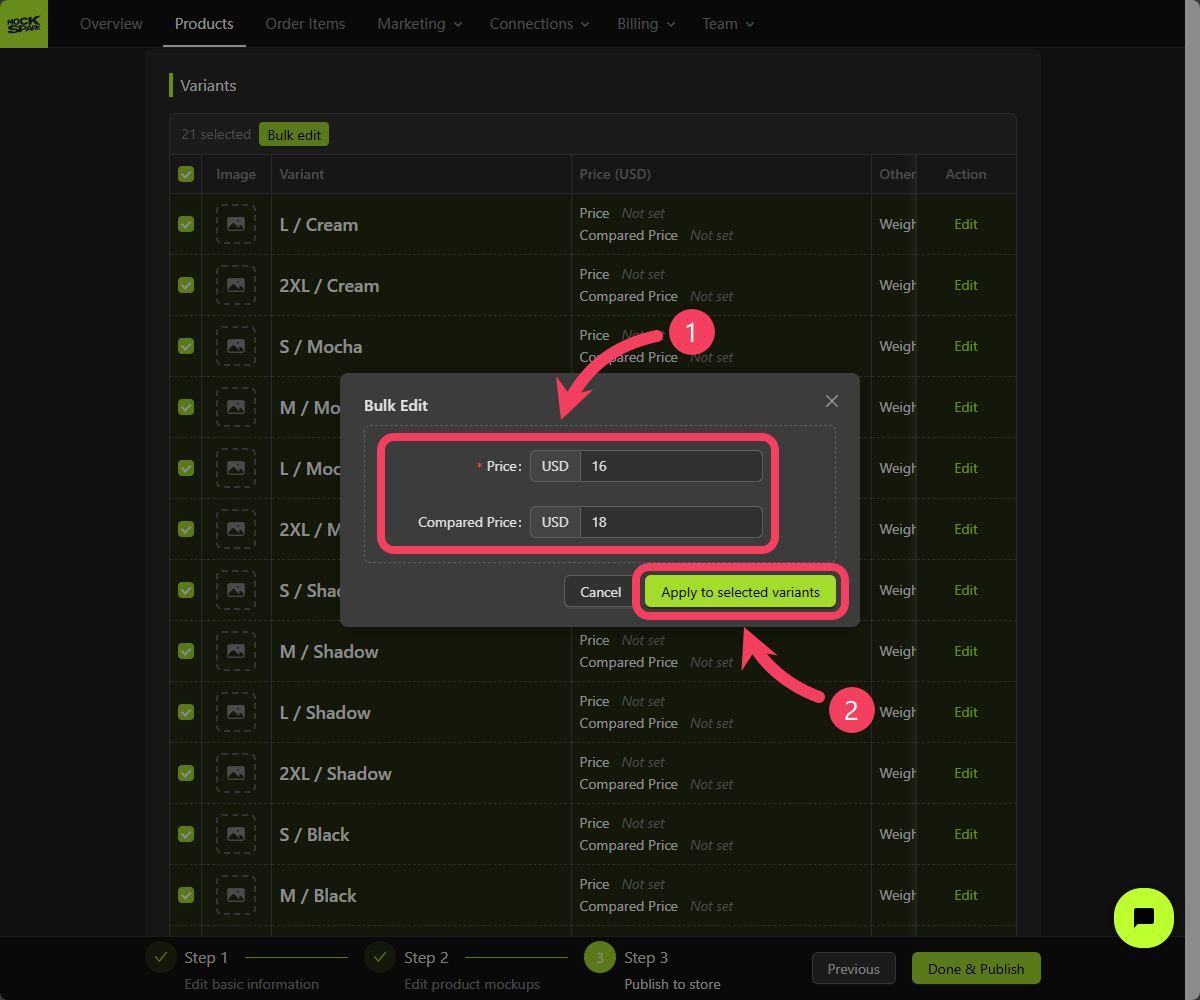 Once you've set the prices for all variants, click **Done & Publish** to list the product on your Shopify store.
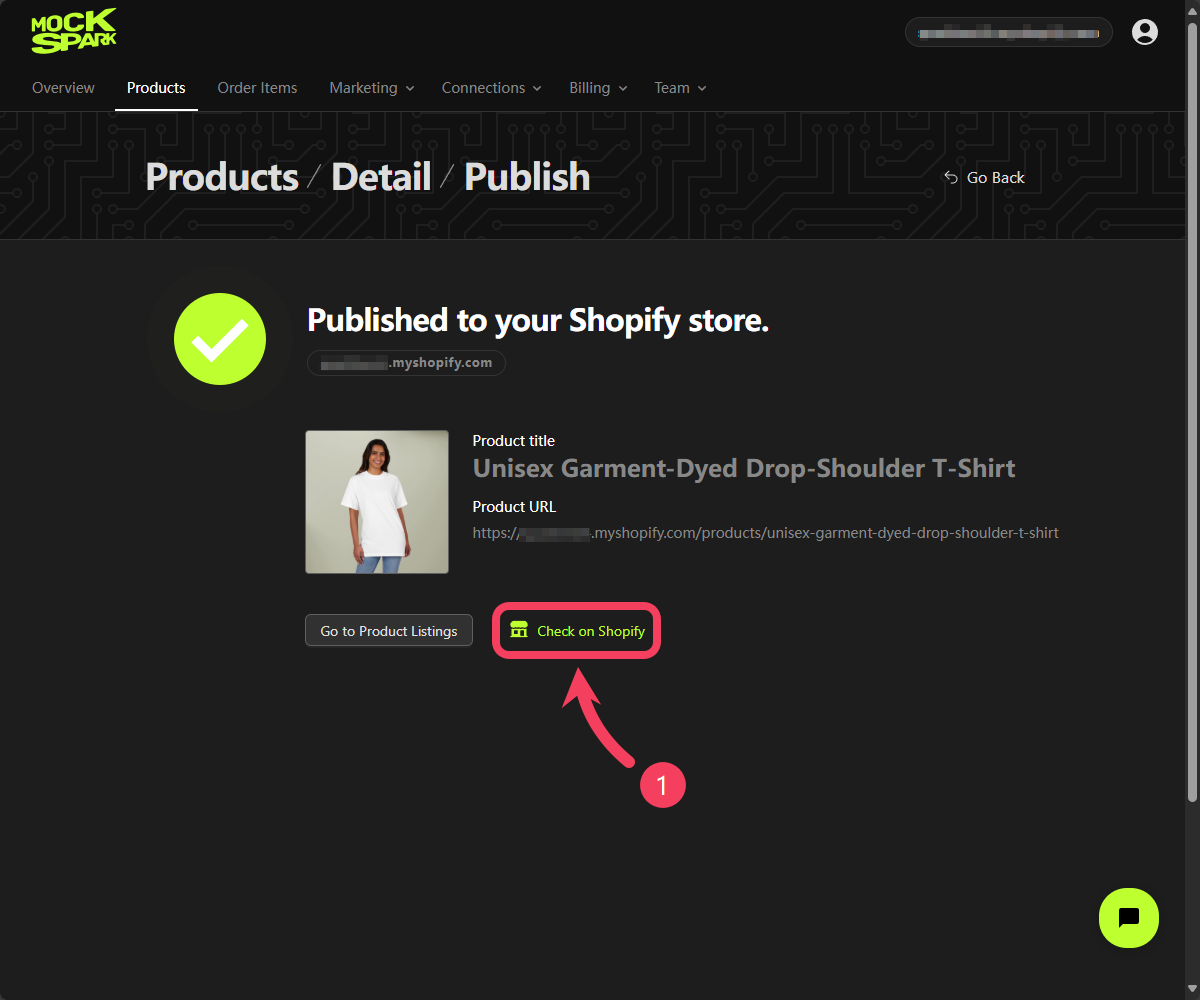
 Click the **Check on Shopify** to view the published product in your Shopify store.
 ## Preview Your Product in the Store
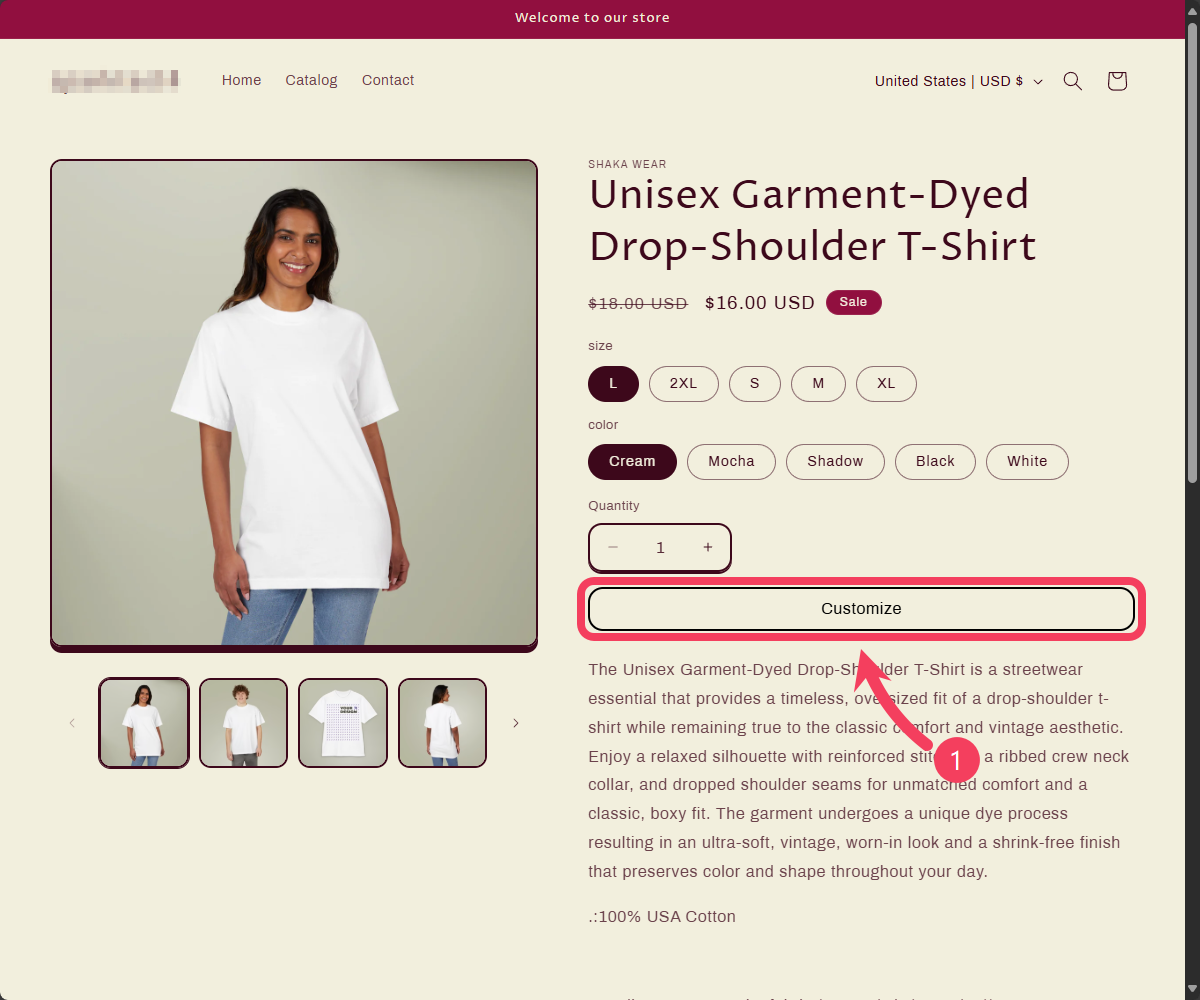
Click the **Customize** button on the product page of your Shopify store.
If a product is not a customizable item listed through MockSpark, the design button will not appear on its product detail page.
## Preview Your Product in the Store
Click the **Customize** button on the product page of your Shopify store.
If a product is not a customizable item listed through MockSpark, the design button will not appear on its product detail page.
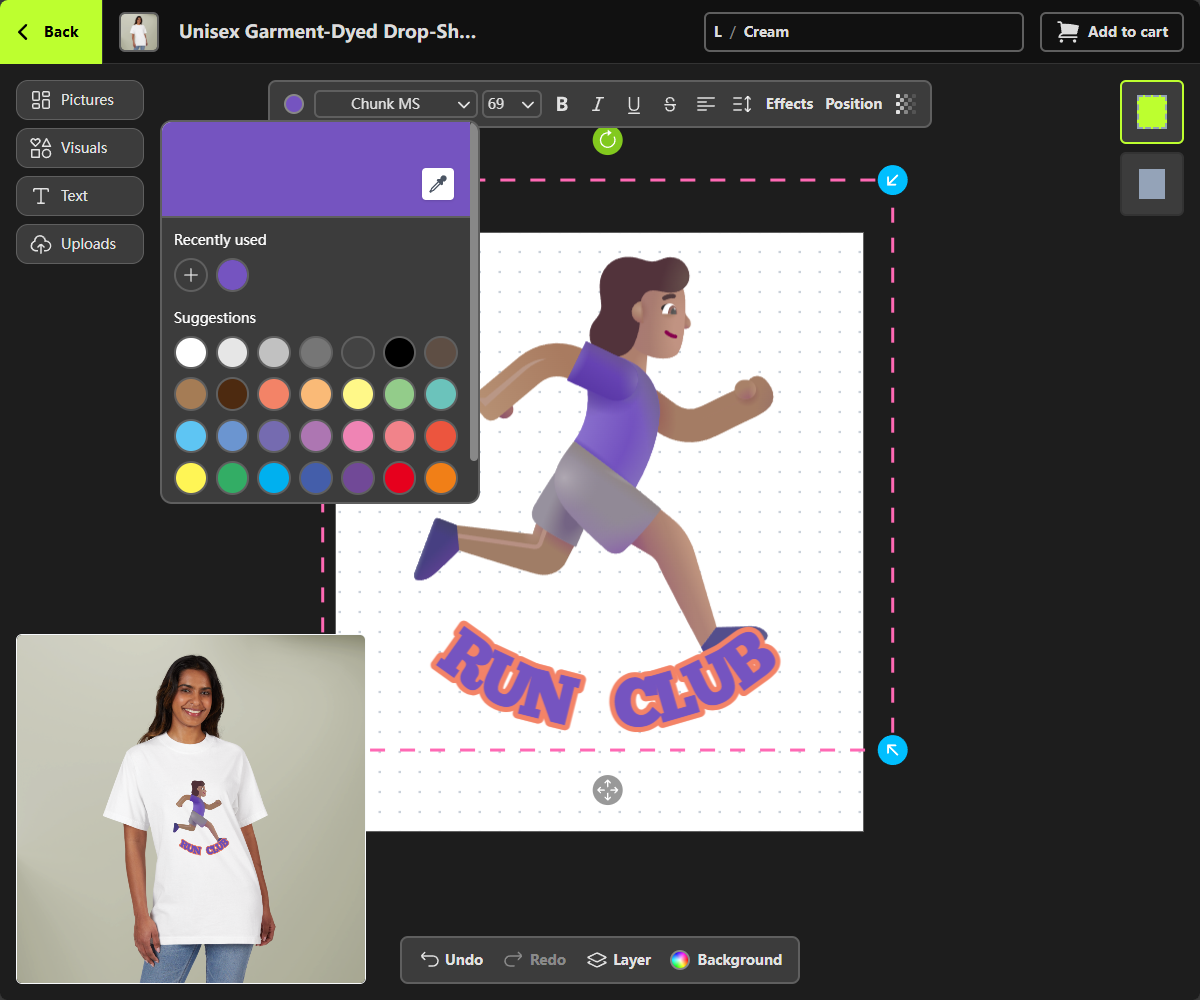
 If everything is working properly, you should see the **Product Personalizer** interface as shown below.
You can rest assured that the **Mockspark Product Personalizer** will always appear under your store’s domain. Your customers will stay on your site and won’t be redirected to an external page.
If everything is working properly, you should see the **Product Personalizer** interface as shown below.
You can rest assured that the **Mockspark Product Personalizer** will always appear under your store’s domain. Your customers will stay on your site and won’t be redirected to an external page.
 The Product Personalizer on mobile (design)
The Product Personalizer on mobile (preview)
## Learn More
Congratulations! You've successfully created and published your first customizable product with MockSpark.
Here are some suggested next steps to enhance your customizable products:
A step-by-step guide to creating fully customizable products.
Unlock seamless customization for a unique shopping experience.
Fun images to boost your sales.
Manage your customizable product orders more efficiently.
The Product Personalizer on mobile (design)
The Product Personalizer on mobile (preview)
## Learn More
Congratulations! You've successfully created and published your first customizable product with MockSpark.
Here are some suggested next steps to enhance your customizable products:
A step-by-step guide to creating fully customizable products.
Unlock seamless customization for a unique shopping experience.
Fun images to boost your sales.
Manage your customizable product orders more efficiently.